
Installing and Flashing Windows – Your DIY Guide
Updated: Oct. 31, 2023Properly installed sills and flashing will withstand the weather forever
Overview
Any carpenter who has done remodeling work has suffered through this scenario: You pull out an old flanged window for replacement and recognize the telltale signs of a leaky window: rotted framing and sheathing, even soaked insulation infested with mold. That’s when a simple window swap-out turns into a headache project, complete with a customer who’s grouchy over a larger-than-expected bill.
Until recently, many flanged windows were installed by simply cutting X’s in the house wrap and popping them in. But that led to a lot of leaks—and a whole lot of unhappy customers. Now, new materials and techniques make it possible to install windows without any worry of callbacks. For only an extra 15 minutes of effort and a few dollars worth of materials, you can make any window installation watertight and lawsuit-proof.
It starts with the rough opening
The most important part of the process is the “sill flashing” (Figure A and Photo 3). It’s a piece of preformed plastic flashing or a site-built system (see “Site-Built Sill Flashing,” below) that slopes away from the opening, so any water that gets behind the siding won’t collect under the window and cause problems. But rough openings provided by manufacturers don’t generally allow for the thickness of sill flashing.
If you’re going with pre-made plastic sill pans, add an extra 1/4 in. of height to the R.O. If you’re building your own sill pan, add the thickness of the siding plus 1/8 in. And if you’re dealing with an existing R.O., you can try to dry-fit the window and see if there’s enough space left over for shimming and insulation. Otherwise, it’s a good idea to tear out the 2-by sill framing and replace it with 3/4-in. plywood, and then shim as needed.
Figure A: Prep the Opening
The most important part of weatherproofing begins before the window goes in. After the house wrap is cut, tuck the bottom flap into the house and install sill flashing. Then fold in the sides of the house wrap, but leave the top flap alone.
Cut the house wrap with care


Don’t start hacking away at the house wrap, especially if you’re new to window flashing. You’re bound to miscut something because it’s tough to see the actual opening. Instead, feel the window opening through the house wrap and mark the cuts first. Then slit the house wrap and tack the top and side flaps out of the way with a staple or two (Photo 2). Drape the bottom flap into the opening and staple it to the sill.
Keep in mind that the house wrap is your last line of defense against any water that finds its way past the siding. So if you do blow any cuts, make sure you patch them with house wrap tape.
Install the window flashing

Some window manufacturers offer sill flashing as options when you buy the window. But if not, there are plenty of aftermarket suppliers. Plan on using sill flashing. The window flashing we’re using comes in three parts: two preformed corners and a center section that you cut to length to fit.
Start by nailing the corners in place under the house wrap at the sides and over the house wrap below (Photo 4). Then cut the center section to fit. The flashing is easy to cut with tin snips. Pay attention to the raised ribs, which provide a flat surface where the window frame rests. You have to cut the middle section so that it overlaps the corners 1/2 in. Think it through before you cut to make sure the ribs don’t overlap.
Add caulk at the laps and nail the flashing into place with roofing nails. Then use your thumb to caulk the nail heads.
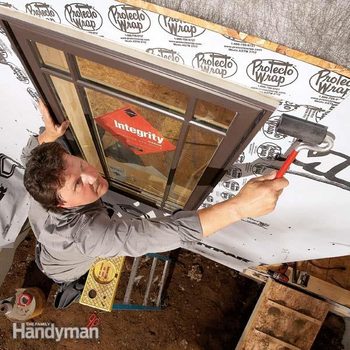
Time to slip the window in


Fold the house wrap sides in, staple them to the room side of the trimmers and king studs, then slice off the excess on the inside of the house. Leave the top flap alone for now, but seal the overlap at the bottom corners with house wrap tape. Then go ahead with a normal installation. If you’re new to the game, just follow the window installation instructions. Don’t skip the corner gaskets if the window comes with them (Figure B). They keep out water, and leaving them off can void the window warranty.
Figure B: Window Seal Replacement Around the Window
Seal around the window with flashing tape, lapping the top piece over the sides. Then fold down the house wrap at the top, and cover the diagonal slits at the top with house wrap tape.
Flashing tape is the first line of defense
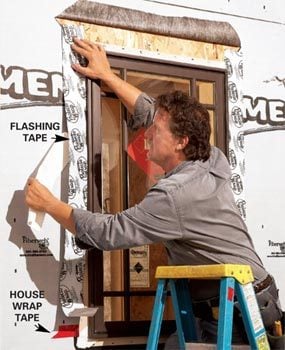

Flashing tape (Photo 6) is a thick, pliable, waterproof tape that goes under or over nailing window flanges, sill and top flashing, and house wrap. Available wherever you buy your windows, it’s usually sold in a 50-ft. roll of 4-in.-wide material. Use 4-in. if you’re siding right against the window. But if you plan to surround the window with trim, choose 9-in.-wide flashing to protect behind the seam between the trim and the siding.
Cut the tape to length with a utility knife and peel a little bit of the backing free and stick it to the top of the window. Then lay it alongside the window and peel away the rest of the backing as you smooth it into place. Embed it with a laminate roller for a good seal. For the best adhesion in cold weather, hit the tape with a heat gun while you roll.
Site-Built Sill Flashing
Twenty bucks doesn’t seem like much for one window’s worth of plastic sill flashing, but if you’re outfitting a new house with 30 windows, 600 bucks can be sobering. Especially if your competitor isn’t flashing at all! But there is an alternative. For years, carpenters have built their own sill flashing from thin-beveled cedar siding and flexible flashing tape. Rip the siding to the same width as the sill and stretch the tape at the corners to eliminate wrinkles.
Here’s some advice. Get your bid for your next new window installation in first and tell the customer about your waterproofing system right up front. It’ll come in handy when she asks XYZ Construction if that’s part of his bid. His deer-in-the-headlights look and/ or stammering about how it “isn’t important” will give you a leg up when it’s time to decide—you vs. XYZ Construction. Who would you choose?
Replacing an Existing Window
The system we’re showing is for new window installation. Ideally, when you replace an existing window with a new one, it should be weatherproofed using this same system. Chances are, though, that the existing windows are missing proper flashing, house wrap or even felt. The extent of weatherproofing you should consider depends on the new window’s exposure to weather. If the window’s deep in an entryway and has zero exposure, you can skip the weatherproofing and just caulk around it. If the top of the window is near an eave but the bottom is exposed to the elements, strip off the siding and focus on flashing the bottom half of the window, but ignore the top. If the window’s out in the open, unprotected by overhangs, strip off as much siding as needed to expose the opening and perform the steps just as we show.
Required Tools for this Project
Have the necessary tools for this DIY project lined up before you start—you’ll save time and frustration.
- Caulk gun
- Hammer
- Level
- Stapler
- Tape measure
- Taping knife
- Utility knife
Required Materials for this Project
Avoid last-minute shopping trips by having all your materials ready ahead of time. Here’s a list.
- Caulk
- Flashing tape
- House wrap
- House wrap tape
- Roofing nails
- Sill flashing
