How to Make Your Own Built In Shelves
Updated: Nov. 23, 2020
Discover hidden storage space in your walls with these two built-in shelf projects.
Multiple Days
Intermediate
Varies
Introduction
Unlock hidden storage space anywhere in your house with this project for recessed, built-in shelves. Install a single, open box of shelves, or two boxes and add a set of glass doors.Tools Required
- Clamps
- Combination square
- Drill bit set
- Drill/driver - cordless
- Drywall saw
- Forstner drill bits
- Framing square
- Glue
- Hearing protection
- Level
- Miter saw
- Orbital sander
- Pocket hole jig
- Router
- Safety glasses
- Sawhorses
- Screw gun
- Stud finder
- Table saw
- Tape measure
Materials Required
- 1/16-in.-thick washers
- Silicone caulk
In almost every room of your house, you can find tons of storage space hidden between the two sheets of drywall. Simple recessed, stud-space cabinets like the two we show here are great for capturing some of this wasted space, and they’re some of our favorite built-in shelving ideas. We’ll show you a couple of different ways to build them.

The first version on the left is a basic built-in shelf project built using common carpentry tools and a drill. We used a pocket hole jig, but this is optional. You can get excellent results by simply nailing the parts together. Even if you’ve never built a cabinet, you’ll be able to finish the basic shelf project in a weekend.
The second project, a glass door cabinet, is a bit more challenging and requires a few more tools. You’ll need a table saw and a miter saw to make the precise cuts required. You’ll also need a pocket hole kit to assemble the doors and a router with a 3/8-in. rabbeting bit to cut the recess for the glass. If you use concealed hinges like we did, you’ll need a 35-mm Forstner bit to drill the hinge recess holes. The video below will help with rabbeting.
Video: How to Cut a Rabbet Joint with a Table Saw
Project step-by-step (22)
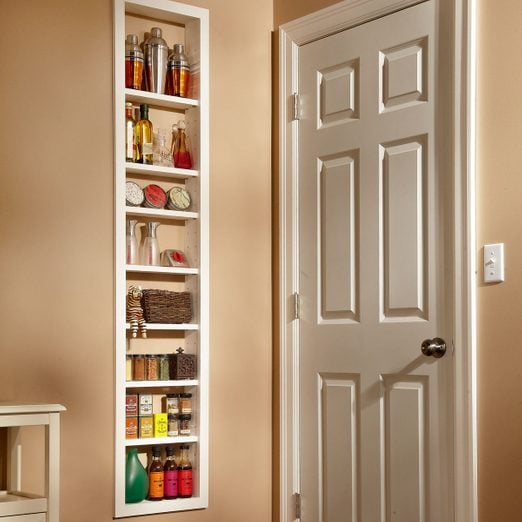
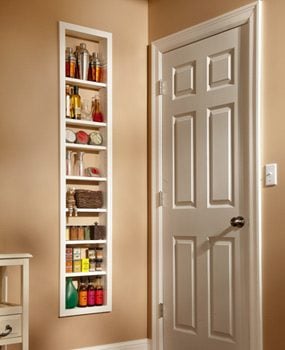
Open Box of Shelves With a Face Frame
This basic version of built-in shelves (perfect for recessed bathroom shelves) is easy to build and install. It will hold all of your bathroom or kitchen necessities and can be fitted to suit your needs.
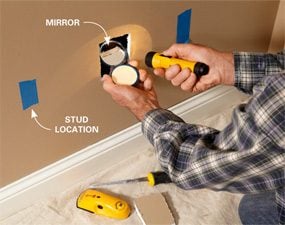
Cut an Inspection Hole
- When you find a spot you like for the shelves, use a stud finder to make sure the studs are at least 14-1/2 inches apart.
- Before you cut the big hole, cut a small inspection hole.
- Use a compact mirror and flashlight to peek inside the wall.
- Look for pipes, wires or other obstructions.
- Note: If there are obstructions, at least you’ll only have a small patch to make. Learn how to patch drywall holes here.
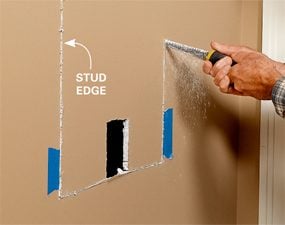
Cut the Big Hole
- Draw level lines between the studs.
- Use a drywall keyhole saw to cut to the edges of the studs.
- Saw along the studs and remove the drywall.
Measure and Cut for the Shelves
- Measure the distance between studs and subtract 1/2 inch to determine the width of the cabinet.
- Measure from the surface of the wall covering—drywall or plaster—to the back of the opening and subtract 1/4 inch to determine the depth of your cabinet.
- Note: If you have 2×4 walls with 1/2-inch drywall, you can build the cabinet box using standard 1×4 boards.
- Cut the sides, top and bottom from 1×4 boards, or from whatever width boards you need.
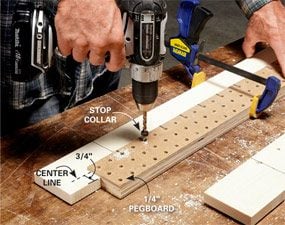
Drill Shelf Support Holes
- Construct a simple hole-boring template from a strip of pegboard with 1/4-inch holes.
- Center one of the pegboard holes on the line and clamp the template.
- Tighten a stop collar onto a 1/4-inch drill bit.
- Drill holes for the shelf support pins.
- Note: We chose to drill holes every 2 inches.
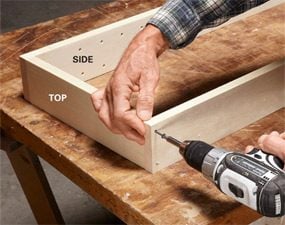
Assemble the Cabinet
- Drill clearance holes in the sides.
- Screw the sides to the top and bottom.
- Cut the plywood back to fit and nail it to the back of the box.
- Pro tip: Nail one side, then measure diagonally, or use a framing square to make sure the cabinet is square before you nail the remaining ends and side.
- Cut the shelves to length after you’ve assembled the cabinet.
- Pro tip: Measure the distance between the sides and subtract 1/8 inch to determine the shelf length.
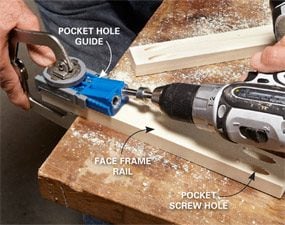
Drill the Pocket Holes
- Clamp the pocket hole guide to the end of the face frame rail.
- Drill holes with the special stepped drill bit.
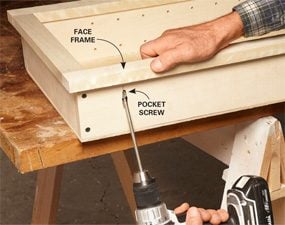
Assemble the Face Frame
- Cut the face frame parts,.
- Note: We built the face frame so that it overlaps the inside edge of the cabinet by 1/8 inch on all sides.
- Drill pocket holes in the cabinet sides and attach the face frame with pocket screws.
- Pro tip: If you don’t own a pocket hole kit, simply nail the face frame parts to the cabinet with finish nails and fill the holes before you paint.
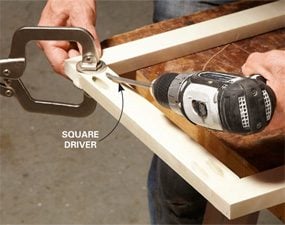
Attach the Face Frame to the Box
- Drill pocket holes on the outsides of the cabinet box.
- Align the face frame and clamp it.
- Attach the face frame with pocket screws.
Exploded View of Basic Built-In Shelf Assembly
Use this exploded diagram to see how the cabinet is constructed. See Additional Information below for the Materials List and the Cutting List.
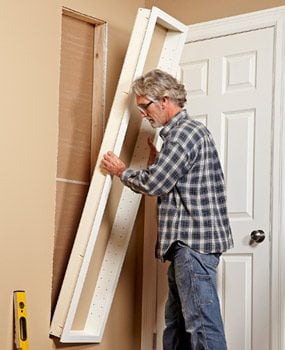
Install the Cabinet
- Slide the cabinet into the opening.
- Level the cabinet and mount it by driving screws into the shelf support holes.
- Drive a pair of screws at the top and a pair at the bottom.
- Check for level.
- Adjust by tightening or loosening opposing screws.
- Drive screws through the cabinet sides, or simply drive nails through the face frame to secure the cabinet.
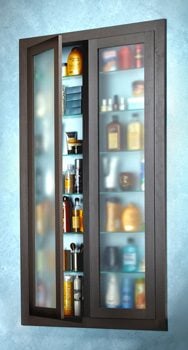
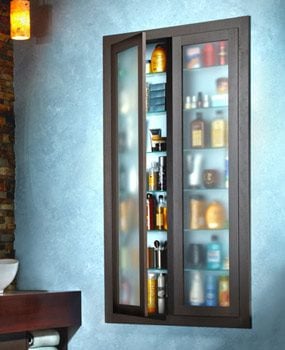
Add Glass Doors to Your Built-In Shelves
The doors on this cabinet are inset into the face frame and require a precise fit, making this project more challenging than the basic cabinet. You should have some woodworking experience to tackle this project. But because the doors are assembled with simple pocket screw joints and the hinges are fully adjustable, you don’t have to be a cabinetmaker. You just have to measure and cut accurately.
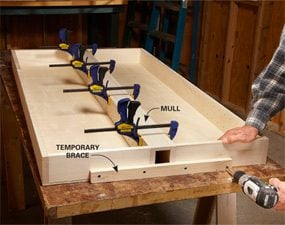
This cabinet spans one wall stud to fill two stud spaces. To allow this, we joined two basic cabinets with a mull that’s 2 inches wide by 1/2 inch thick. You have to remove the strip of drywall covering the center stud for this cabinet to fit.
Join the Cabinet Boxes
- Follow the instructions for the basic shelf unit for cutting the holes in the drywall and building the two cabinet boxes.
- Glue and clamp the 1/2-inch-thick mull between them.
- Screw temporary braces to the top and bottom to hold the cabinet steady until the face frame is installed.
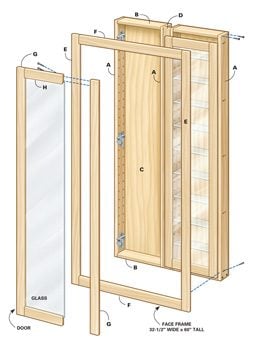
Exploded View of Glass Door Cabinet Assembly
Use this diagram to see how the cabinet is constructed. See Additional Information below for the Materials List and the Cutting List.
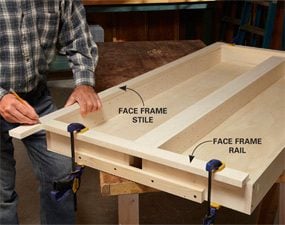
Fit the Face Frame Parts to the Cabinet
-
- Note: Unlike the basic cabinet above, the face frame for this cabinet must fit flush to the cabinet sides to accommodate the concealed hinges we’re using.
- Cut the top and bottom rails to fit between the cabinet sides.
- Align them with the inside edge of the box and clamp them in place temporarily.
- Measure and cut the face frame stiles to fit.
- Remove the face frame parts.
- Drill pocket holes
- Assemble the face frame with pocket screws.
- Pro tip: Keep the inside pocket holes at least 1/2 inch from the edge to avoid hitting them with the rabbeting bit when you rout the recess for the glass.
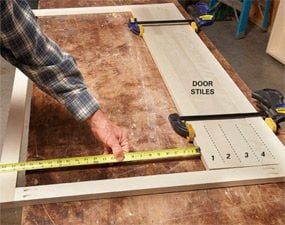
Measure for the Door Rails
- Cut the four door stiles and stack them inside the face frame.
- Measure the remaining space and subtract 3/8 inch to determine the length of the door rails.
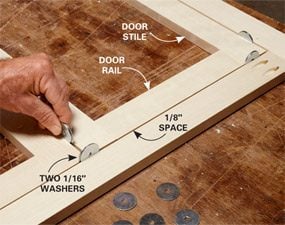
Check the Fit Before You Assemble the Doors
- Arrange the door parts inside the face frame and wedge them with pairs of 1/16-inch-thick washers.
- Adjust the lengths if needed.
- Once the fit is good, remove the parts and assemble the doors with pocket screws.
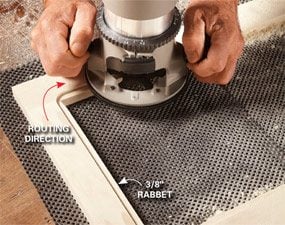
Rout the Glass Recess
- Mount a 3/8-inch rabbeting bit in a router.
- Make two or three passes in a clockwise direction, increasing the depth gradually, to create a 1/4-inch-deep rabbet.
- Adjust the router to increase the cutting depth an additional 1/16 inch and make the final pass.
- Finish the rabbet by squaring off the corners with a sharp chisel.
Inset doors are difficult because they have to be exactly the right size and perfectly flat. The trick to flat doors is to build them with straight and flat boards. Sight down the boards when you choose them at the lumberyard or home center to make sure they’re flat and straight. Also, find lumber with straight grain if possible. The fewer knots and curvy grain patterns in the wood, the better it will be for doors.
The Materials List in Additional Information (below) lists 1x6s. Cut 2-in.-wide strips from these on a table saw for the door parts. We cut our boards 1/16 in. oversize, stacked them alongside each other and ran them through our portable planer to remove the saw marks. If you don’t have a planer or jointer to dress the edges of the boards, just make sure to use a sharp saw blade when you rip the parts, and then sand off any saw marks after you assemble the doors.
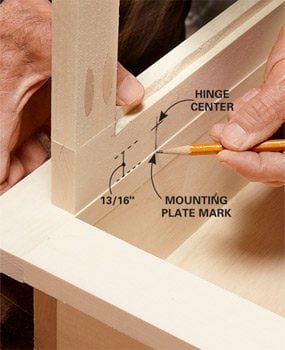
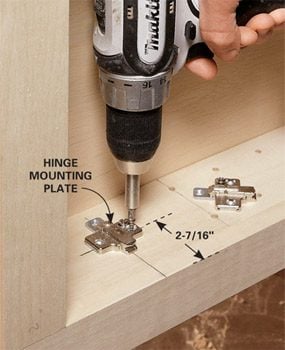
Mark for the Hinge Mounting Plates
- Rest the edge of the door on the cabinet and center it.
- Transfer the hinge center marks to the cabinet sides to indicate the center of the mounting plates.
Attach the Mounting Plates
- Draw a line 2-7/16 inches from the face of the cabinet to locate the hinge plate screws.
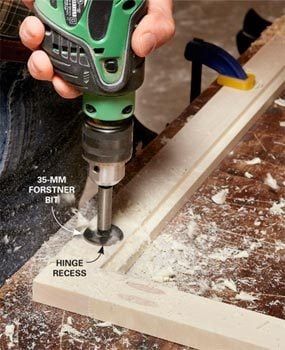
- Drill 35-mm x 1/2-inch-deep recesses in the doors with the Forstner bit at each hinge location.
- Pro tip: Practice on a scrap of wood first to gauge how deep to drill.
- Check the fit of the hinges and doors by clipping the hinges to the mounting plates.
Drill Concealed-Hinge Mounting Holes
- Mark the hinge hole locations.
- Use an awl or nail to make a starting point for the Forstner bit.
- Drill recesses for the hinges in both doors.
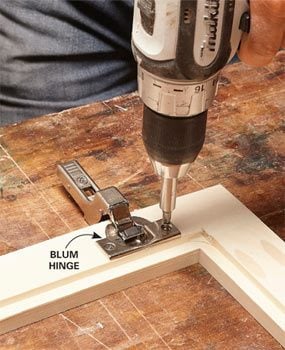
Mount the Hinges on the Doors
- Press the hinges into the 35-mm recesses.
- Line them up so that the screw holes are parallel to the edge of the door.
- Attach the hinges with the screws provided.
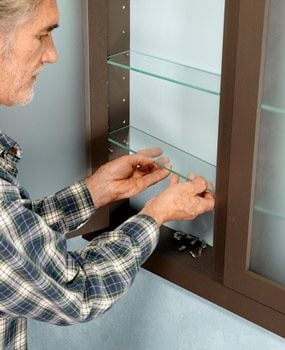
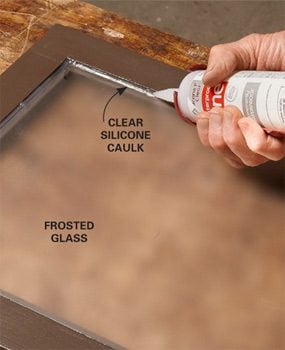
Install the Glass
-
- Note: If you’re planning to paint the cabinets, do so before you install the glass.
- Set the glass panels in the rabbet.
- Apply a small, neat bead of clear silicone caulk around the perimeter.
- Let the silicone cure overnight before mounting the doors.
Install the Cabinet and Add a Shelf or Two
- Set the cabinet in the wall and level it.
- Attach it with screws driven into the shelf support holes.
- Finish the project by clipping the doors to the hinge plates and installing the glass shelves.
- Pro tip: Use the hinge adjusting screws to adjust the doors until the space between them and the cabinet is even.