A Full Guide to Maintenance-Free Aluminum Soffit Installation
Updated: Feb. 10, 2023
You'll never have to paint the roof overhangs again!
Multiple Days
Intermediate
$501-1000
Introduction
Wrap the soffits and fascias on your home with prefinished aluminum and you'll never have to scrape, prime or paint those roof edges again. New aluminum soffits (the underside of eaves) and fascias (the vertical trim at the roof edge) won't peel or rot, so they'll last for decades with no maintenance.Tools Required
- 12-in trim nail punch
- 4-in-1 screwdriver
- Chalk line
- Circular saw
- Combination square
- Fascia folding tool
- Framing square
- Hammer
- Jigsaw
- plywood-cutting circular saw blade
- Pry bar
- Safety glasses
- Sawhorses
- Tape measure
- Tin snips
- Utility knife
Materials Required
- 1-1/2-in. trim nails
- Drip edge
- Fascia
- J-channel
- Soffit panels
How to Install Aluminum Soffits: Overview and Materials
Aluminum is a good solution for wood soffits and fascias in awful shape. It’ll take less time to bury them behind aluminum trim than to repair, scrape and repaint the old wood. This article will tell you everything you need to know to do it yourself, including how to make an inexpensive soffit-cutting table that works every bit as well as the pricey units the pros use.
Save Money by Doing it Yourself
If you’re not afraid of heights and you have basic hand tool know-how, you’re perfectly capable of cladding the fascias and soffits on your home. As you’ll see, the thin, light aluminum trim is easy to bend and cut with inexpensive tools. Other special pre-bent parts make installation a snap. Working alone, you can clad the soffits and fascias on a 1,200-sq.-ft. house in about five days. Get a volunteer to cut and hand you up materials and you’ll really move along. The materials are expensive, but you’ll save a lot more than that by doing it yourself rather than hiring a pro.
Fix the Roof First
If you hide problems, they’ll only get worse! Chances are, if your soffits or roof framing is water damaged, you have serious roof problems that you must solve before starting this project. Even though water won’t damage the new aluminum, you may actually accelerate underlying wood decay by burying evidence of leaks. Common problems are ice dams, shingle edges that are broken off or that don’t project far enough, and even sagging shingles that form a trough just behind the fascia. You may even need a new roof. If you’re not sure, have a pro make the call before you start.
Know the Materials
Just figuring out what everything is called is half the battle! Soffit panels are available in 12-foot lengths, 12- or 16-inch widths, and vented or unvented. Vented soffit has thousands of perforations that allow air to flow through but keep insects out. Solid (unvented) soffit has no perforations. Most installers use only vented material, even in areas that don’t need venting, such as gable ends (the peaks at the ends of roofs). Make your life easy—stick with 16-inch wide ventilated panels to simplify ordering and to cover large areas faster.
To calculate quantity, multiply width by length (in feet) of each soffit surface, add them all up to get total square footage and divide by 16 (the square footage of one 16-inch panel). Add five percent extra for waste and overlaps.
Fascia
Aluminum fascia goes directly over the wood fascia and has a lip at the bottom that laps over the outer edge of the installed aluminum soffit. It comes in two standard widths: 6-and 8-inch. Measure the width of your wood fascia to determine which width to buy. Measure the entire length of the existing fascia in linear feet, and divide by 12 to establish the quantity of 12-foot fascia and J-channel sections needed. Then add five percent.
J-Channel
J-channel is a (surprise!) J-shaped length of aluminum that the soffit fits into against the house. Use it to anchor any edges of soffit not covered by aluminum fascia.
Drip Edge
Metal drip edge may already be on your home. It projects from under the shingles and directs water away from the surface of the fascia. You can reuse existing drip edge if it’s in good shape and you’re happy with the color.
To calculate the number of pieces of drip edge, divide the total linear footage of the outer perimeter of the roof edge by 10. Then add five percent.
Easy does it. Don’t bother climbing around on ladders to measure your soffits and fascia (you’ll get enough of that later). Measure the walls and “guesstimate” overhang lengths to get an approximate total. On gable ends, hold a tape measure at the approximate roof angle, at the halfway point of the wall (directly under the peak), to get lengths for gable trim.
Figure A: Aluminum Soffit and Fascia Parts
Shop for these standard parts. Other special parts are also available.
Note: You can download and print Figure A from the Additional Information section below.
Project step-by-step (19)
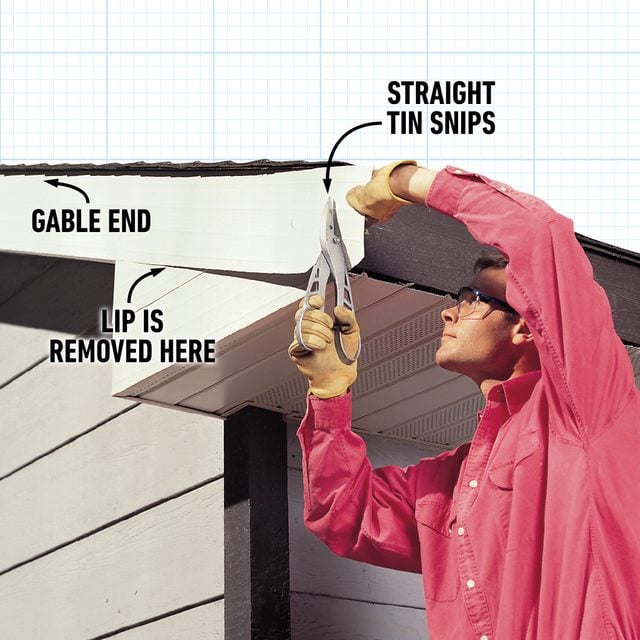
Prep the Edges of the Old Roof
Prep the Soffit and Vent
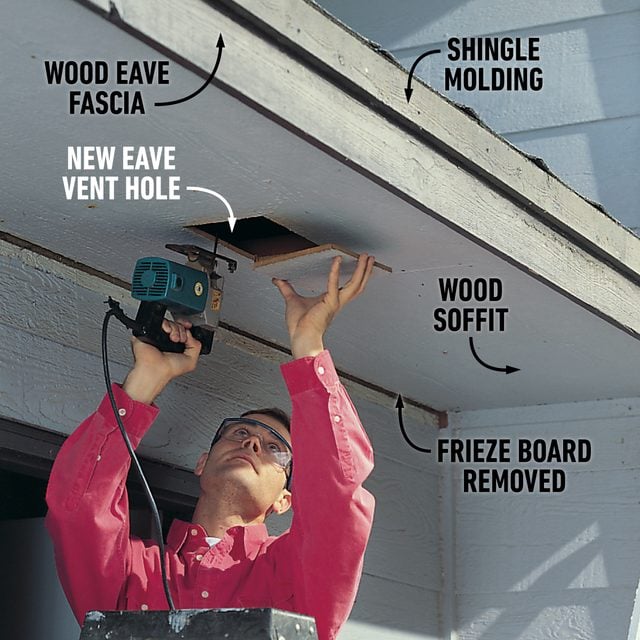
Remove existing shingle molding and frieze boards and replace any rotten fascia. Cut in additional soffit venting where necessary and remove existing soffit grilles to improve airflow.
Begin the job by pulling off the gutters. Removing gutters can be a real drag, but they may be reusable—if they survive the removal intact and if the color matches the new trim. Some aluminum styles are easily kinked, so have someone help you take them down. If you’re planning to reuse them, leave the drainpipes in place and simply disconnect them at the elbows. Be careful; you may end up having to replace the gutters along with the new trim if things don’t go well.
Most homes already have soffit vents. They conduct outside air into the attic to help improve ventilation, prevent ice dams in the winter, and keep attics cool in the summer. It’s best to remove existing vent covers for freer airflow before installing ventilated soffit panels. You should have roughly one square foot of vents for every 300-sq.-ft. of ceiling area, so add more holes if you’re lacking ventilation. The holes don’t need to be pretty; they’ll be covered with new material. For ease of cutting, position new holes in the spaces between the soffit framing (look for soffit nails to locate). For even ventilation, space holes fairly evenly across each soffit section.
Repair the Fascia Boards
The old wood fascia boards must be sound enough to hold the new fascia nails. Check the wood quality by jamming a screwdriver tip into the wood. Replace spongy or rotten wood with straight pine boards the same width and thickness as the old.
Shingle moldings are narrow trim boards nailed to the top of the fascia if gutters aren’t used. They, like drip edge, direct water runoff away from the face to forestall weather damage. Pry them off with a flat bar and pull any leftover nails to prepare for the aluminum.
If the house has frieze boards (trim boards directly below the soffits), pull them off unless their removal leaves an unfinished gap between the siding and the new soffit. If that’s the case, leave it and butt the J-channel against it. Removing the frieze board is optional. Do it if you ever expect to replace your siding. That way, you’ll be able to strip off the old siding without wrecking the new soffits.
Aside from the jigsaw, none of these tools costs much, so it’s usually cheaper to buy rather than rent them. Home centers carry the same quality tools the pros use.
- Pair of tin snips for cutting straight lines.
- Pair of left or right cut snips for cutting curves, if you have circles to cut (for example, round lights and electrical boxes).
- Trim nail punch for holding and setting nails into soffit grooves and tight places. Combination square for making clean fascia bends to go around corners.
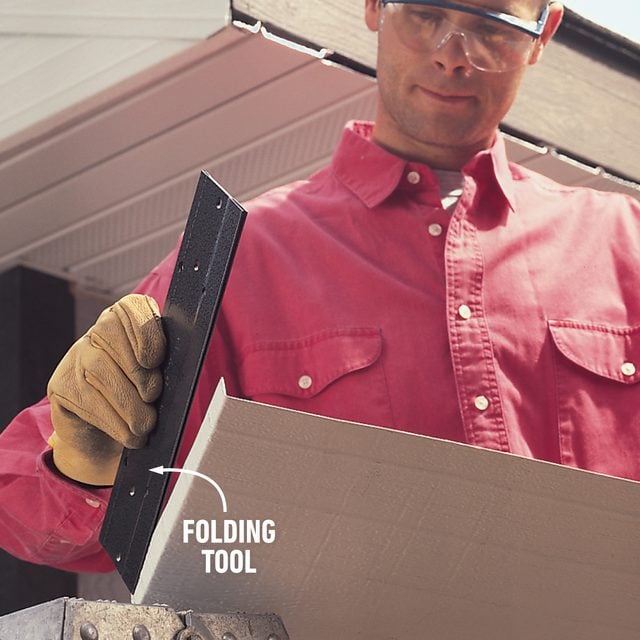
- 12-inch folding tool for making small bends in fascia. Jigsaw for cutting vents and removing projecting corners.
- Carpenter’s square for squaring up the first soffit panel to the house.
- Hammer, utility knife, tape measure, chalk line.
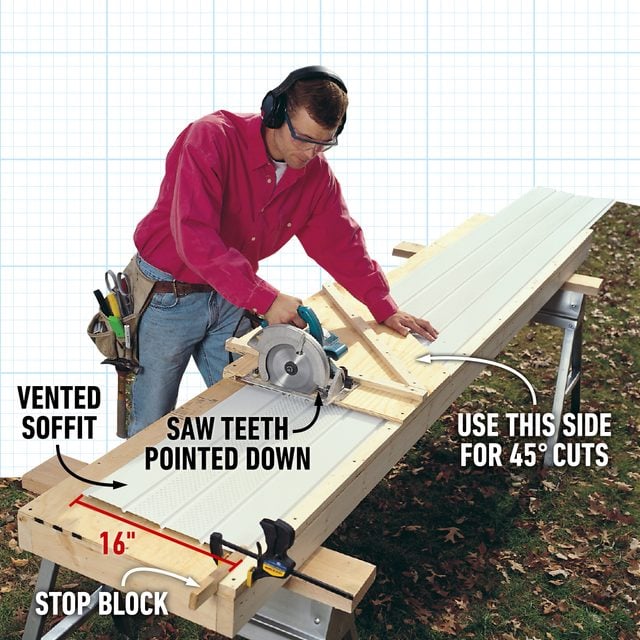
Build a Soffit Panel Cutting Table
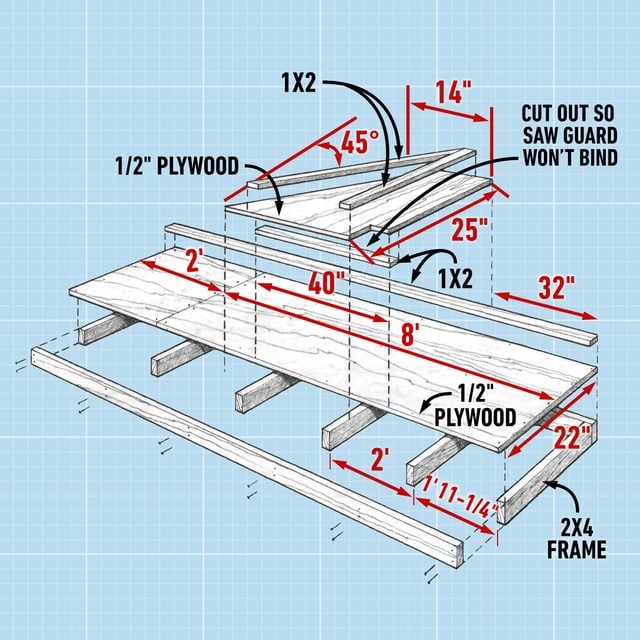
Cutting dozens of soffit panels with a pair of tin snips is tiring and crushes the grooves together. A circular saw makes clean, precise cuts easy—when it’s coupled with a cutting table. You can make a plywood-cutting table (Fig. B) in about an hour. The 45-degree side of the table is for cutting miters on hip roof soffits (see “How to Handle Soffit Corners on Hip Roofs.”).
Use a plywood crosscutting blade mounted backward—the saw teeth point down in a clockwise direction. Before reversing the blade, make a pass halfway through the top of the plywood saw table to create a saw blade groove. This allows the blade to cut completely and cleanly through the aluminum. For multiple cuts of the same length, clamp a stop block to the table fence. Cut panels 1/4-inch short of the measured width. Caution: Wear hearing and eye protection.
Note: You can download and print Figure B from the Additional Information section below.
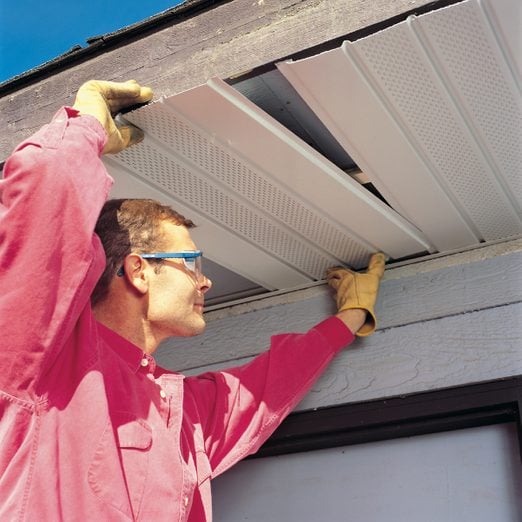
Install the Soffit Panels
Install the Aluminum J-channel
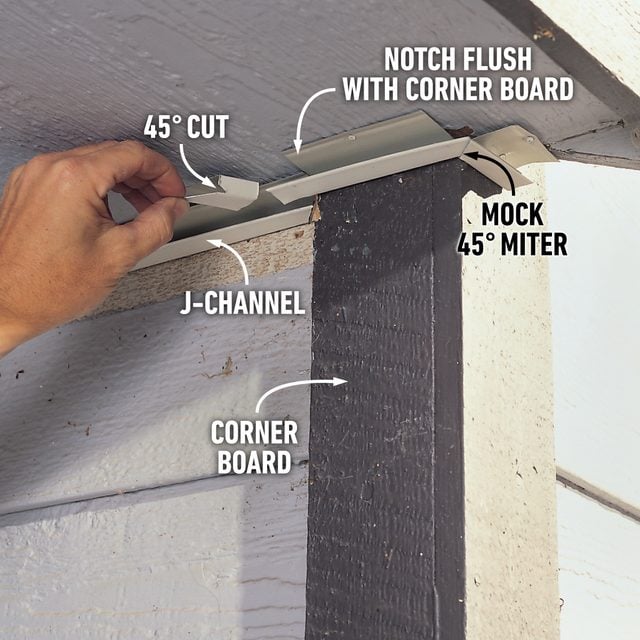
Nail J-channel against the existing soffit into the soffit framing. On corners, notch the top and backside of the J-channel the width of corner boards and cut the bottom to extend past corner boards the width of the next piece. Cut a 45-degree angle on adjoining pieces to give a mock miter appearance to corners.
Cut Soffit Panels
Measure the distance from the inside of the J-channel to the outside of the wooden soffit at several locations to make sure the soffit depth is consistent. Cut soffit panels 1/4-inch shorter than the measurement. If there are variations in depth, adjust cut lengths accordingly.
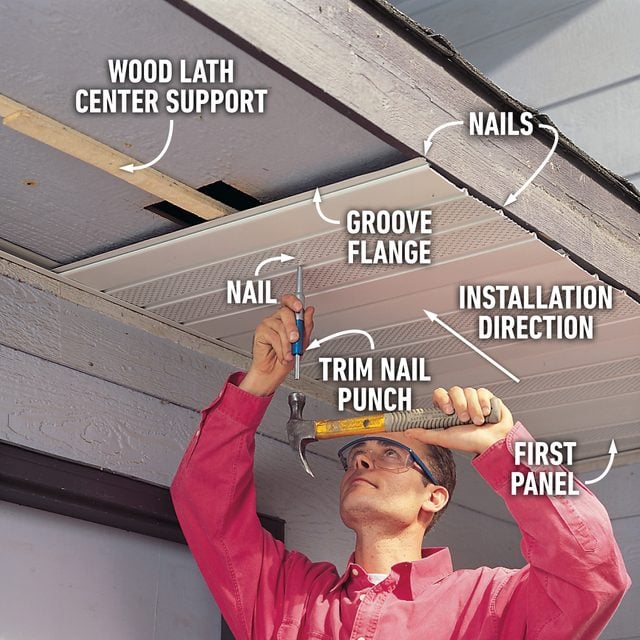
Nail Up the Panels
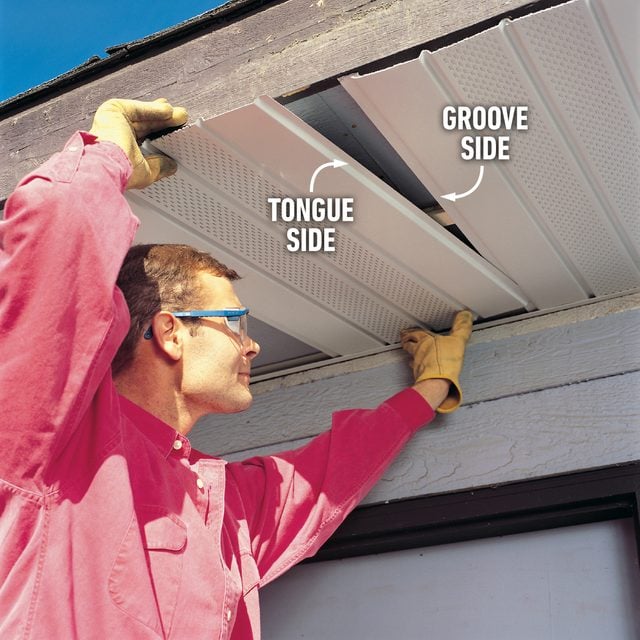
Slip the first panel into the J-channel against the wall with the groove side toward the installation direction. Square up the panel to the house with a carpenter’s square and nail the outside of the panel to the bottom of the wooden fascia. Use a trim nail punch to drive 1-1/2-inch soffit nails into each of the outer V-grooves, the groove flange and the center groove of panels that have center backing.
Add Additional Panels and Nail Them Together
Slip the corner of the tongues of consecutive panels into the grooves of the previous panels and slip the sides nearest the house into the J-channel, mating the tongues and grooves at the same time.
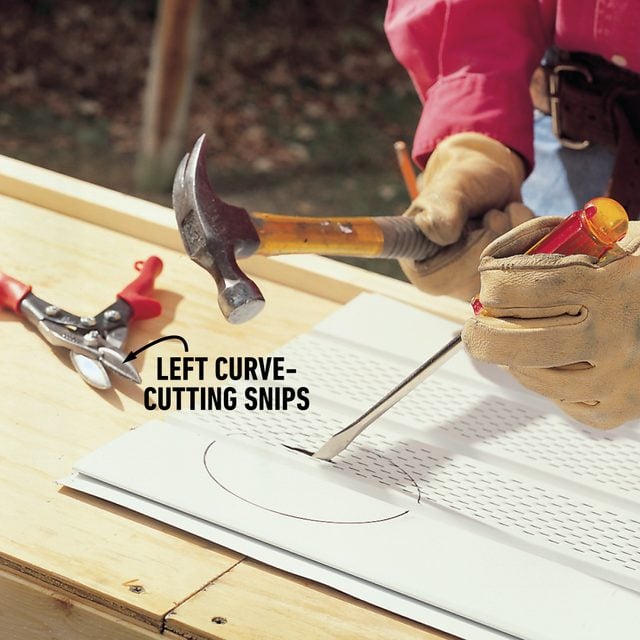
Cut Holes for Lights
Cut circular openings for soffit lights by driving a screwdriver in the center of marked circles to make an entry point for curve-cutting snips. Recessed lights have housings with adjustable Wing-Nuts to drop the cans down flush with the new surface. Extend conventional electrical boxes with extension rings to bring them down flush with the aluminum.
Tips for Soffit Installation
Install the Components in the Correct Order
The job goes smoother when you follow the correct installation sequence. First nail up the J-channel, then soffit panels, then fascia, then drip edge. It’s a hassle to continually move your ladders (or scaffolding) and cutting table around the house, so concentrate on completing one overhang at a time until you get to the corners. Then you’ll have to jump back and forth between gable and eave ends when you’re finishing tying the corners together. The trick is to finish as much as possible on one soffit before moving all the gear.
Follow the step-by-step photos for complete step-by-step installation instructions for soffit panels. The devil is in the details. The difference between poor and quality workmanship is obvious when you examine crisp corners, clean miters and flat surfaces. Here’s the important stuff:
J-channel Tips: Nail J-channel in place tight against the existing soffit with 1-1/4-inch shingle nails driven into the soffit framing. Spend time on corners. You’ll be looking at them for a long time.
Soffit Panel Tips: Use a carpenter’s square to install the first soffit panel perpendicular to the house with the groove side toward the direction you’re installing. Oftentimes you’ll need to notch and fit the first and last panel around corners and trim. The ones in between the ends practically install themselves.
The J-channel anchors the house side soffit edge. Nail the opposite soffit edge to the bottom edge of the wooden fascia. Place one nail in each of the outer V-grooves and in the lip of the groove flange. For soffits that are wider than two feet, put a nailer across the center of the soffit for more support. Nail the lath to the bottom of the wooden soffit by driving two-inch nails into the soffit framing members.
Nailing Tips: Fasten all aluminum trim with 1-1/2-inch aluminum or stainless steel nails, color-coated to match the trim. Select stainless if there’s a choice. They hold better and don’t bend as readily as aluminum nails. A trim nail punch has a recessed sliding driver that not only holds nails while you pound (saving smashed fingers) but also allows you to set nails in deep crevices where the hammer can’t reach. Buy one!
Use Scaffolding for High Areas
This isn’t the time to be a cheapskate. Rent scaffolding for high areas. If you’re blessed with a one-story home, you can do the whole job with stepladders. But if you have loftier ambitions, like working on second-story soffits, you’d best get to the rental yard or home center and order up section-style, steel scaffolding. Measure the height of your soffits and the clerks will help you put together the right parts. You’ll pick up speed when you conquer the basics of soffit installation, but for the average sized house you should plan to use the scaffolding for at least a week. Before you rent it, take care of the low soffits with ladders to save rental costs.
Caution! Be careful not to contact overhead power lines.
Call the power company for help with electrical lines that are near or pass through soffits or fascias.
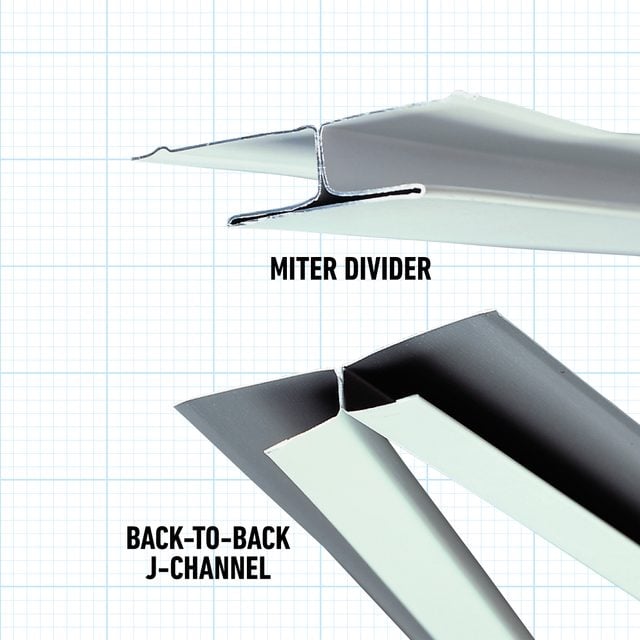
How to Handle Soffit Corners on Hip Roofs
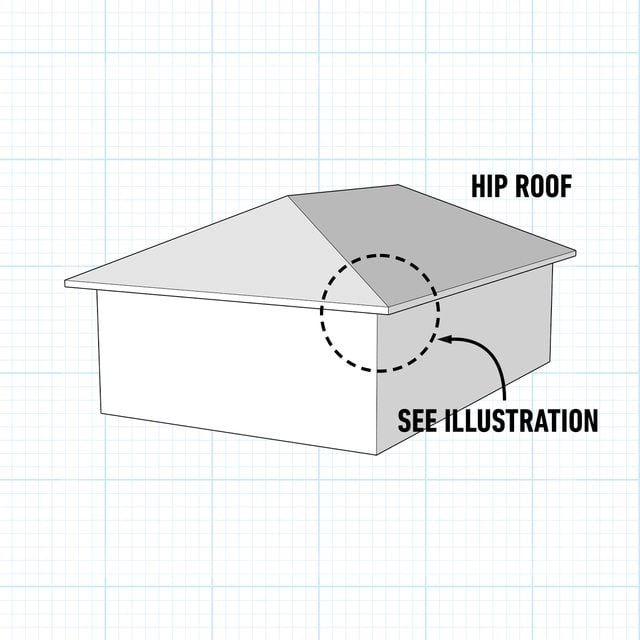
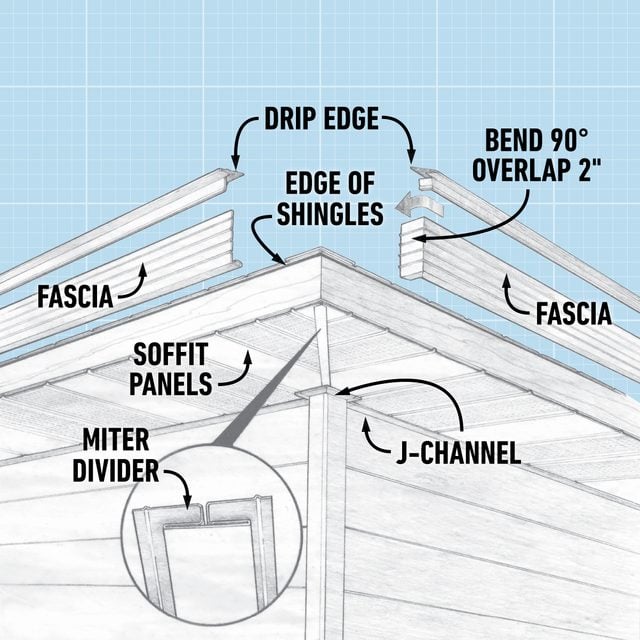
Hip roofs are pyramid-shaped, so all the roof surfaces slope up from the eaves. All the roof edges are eaves (no gable ends), so flat soffits continue around corners. Fit soffit around corners by installing back-to-back J-channel or miter divider to handle the splice. Make 45-degree cuts on panels using the 45-degree feature on your soffit table. See Figure A.
Install the Fascia Panels and Drip Edge
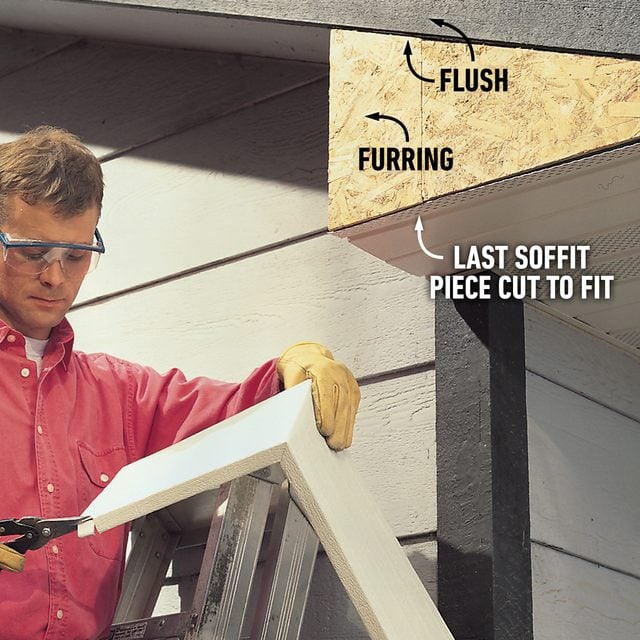
Create a Flat Fascia Surface
Saw off projecting trim on corners of boxed returns for smooth, well-supported aluminum corners. “Fur out” the ends of returns to make them flush with the existing fascia for a flat surface all the way up to the shingles.
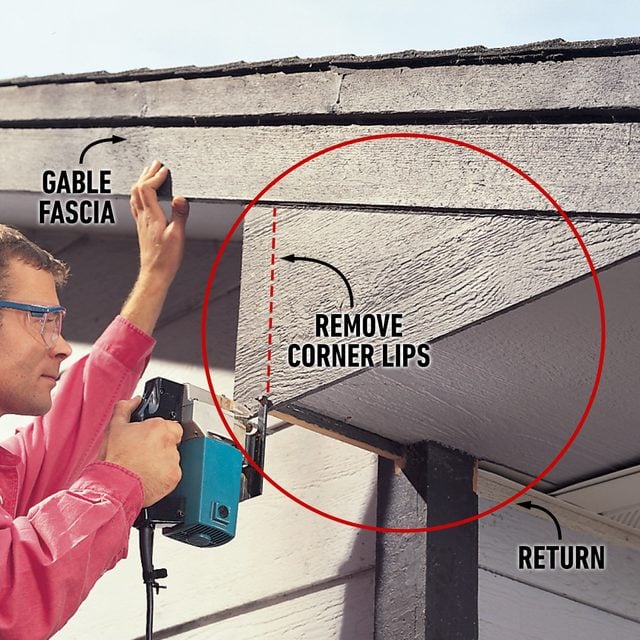
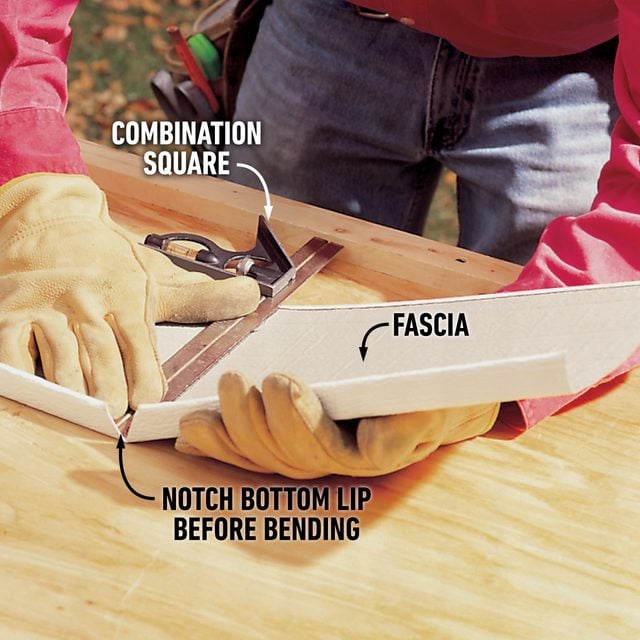
Cut and Bend Fascia Corners
Add the back and side of the return to get the total distance. For a clean bend, notch the bottom lip with two 45-degree cuts and bend the corner using a combination square.
Cut Fascia to Fit
Hold the fascia piece in place to mark notches around house trim. Then cut them with tin snips.
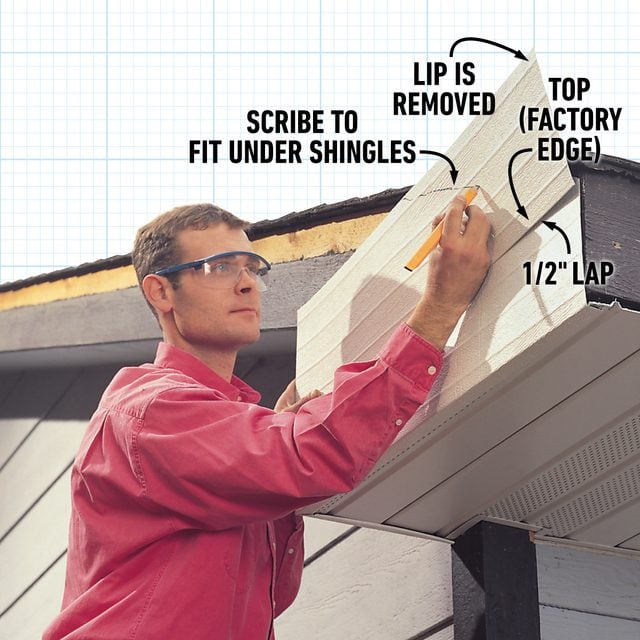
Trim the Second Piece
Cut another identical length of fascia and remove the lip. Orient the aluminum fascia upside down to use the top, neat factory edge on the bottom where it shows. Bend it and cut it to fit around the boxed return, lapping over the bottom piece of fascia 1/2-inch.
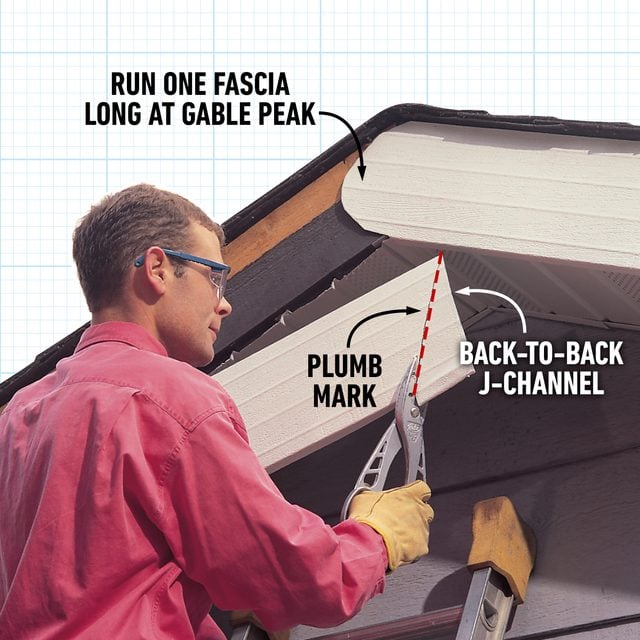
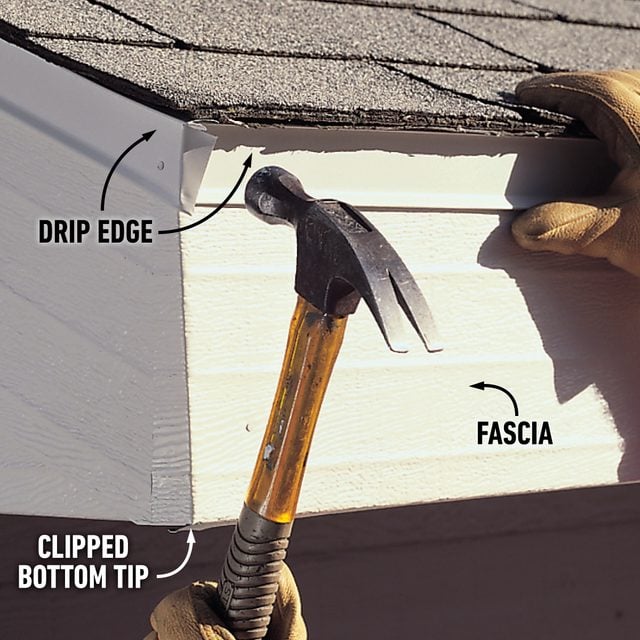
Install the Gable Fascia
Install the lowest fascia on the gable end first. Remove enough of the fascia lip to cover returns, then nail them in place and cut the ends off flush with eave ends. Either bend or clip the bottom tip flush with the bottom of the soffit.
Trim the Peak
Run one fascia long at gable peaks. Hold the second overlapping piece in position and draw a vertical line with a level for the top cut.
Bend Corners Crisply
Bend the ends of horizontal fascias with a 12-inch folding tool to cleanly wrap around corners. Hold corners tight with two nails.
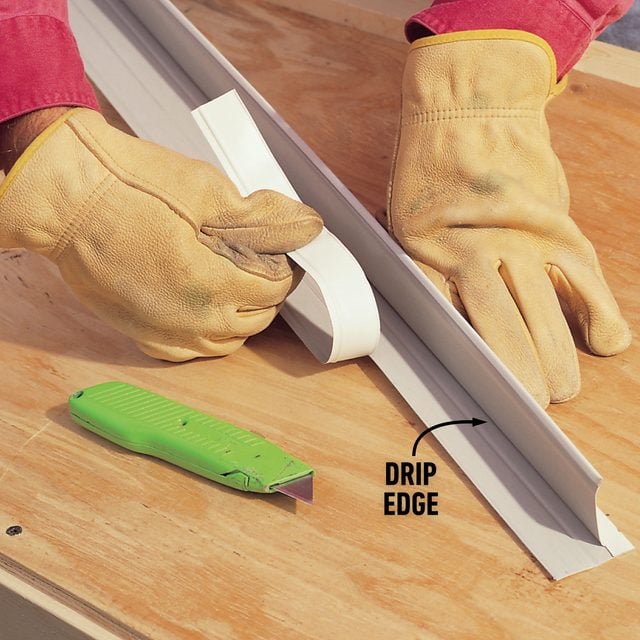
Trim the Drip Edge
Cut aluminum fascia, soffit and drip edge to width by scoring it with a sharp utility knife. Guide the score with a straightedge for flat work. Then either peel back the material or bend it back and forth until it snaps off. You could use metal snips, but this method yields a cleaner, straighter cut.
Install the Drip Edge
Slip drip edge under all roofing material and face-nail it through the aluminum fascia. Notch the tops of corners to interlock flanges and bend the bottom around for a neat appearance.
Tips for Fascia and Drip Edge Installation
Follow the photos above for complete step-by-step installation instructions for the fascia and drip edge.
Fascia Tips: Use extra care nailing up the aluminum fascia. Hammer dents and bent or overset nails really show up later. Begin installing aluminum fascia at the center of each length by pushing it up snug to the bottom of the soffit panels. Nail it, then work your way in both directions, driving nails every 16-inches, placed about an inch from the top and bottom. Overlap joints between one and two inches and nail through the lap. On slopes, like eave ends, work your way uphill with the lowest fascias first. That way, lapped joints will shed water.
Older Homes Call for Creative Solutions
Instead of the flat “boxed” soffits shown in this article, older (and some newer) homes may have a soffit style that features either exposed rafter tails or enclosed soffits that follow the slope of the roof.
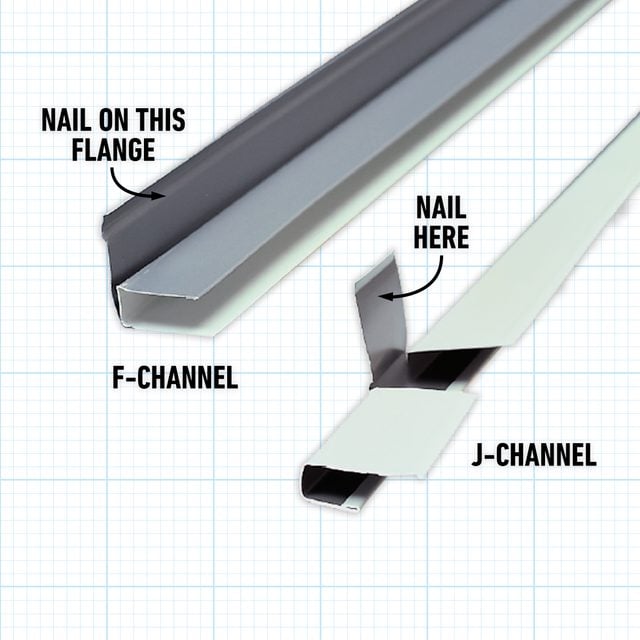
Aluminum soffits can also be angled to follow the slope of the roof. Or you can convert sloped soffits to flat with 2x4s to provide a nailing form for the aluminum trim. Since there won’t be a soffit to nail J-channel to, it has to be fastened to the wall. Cut one inch wide notches every two feet in the long leg of J-channel and bend it up. These tabs can then be nailed to the wall. An alternative is to nail F-channel (serves the same purpose as J-channel, but the F-shape lets you nail the flange to the wall) flush with the line, upside down to receive the soffit.
If yours is a classic old home with elegant detailing on the eaves, think twice before you hide all that innate beauty behind manufactured materials. If the eaves can be restored, you may want to roll up your sleeves and do it the old-fashioned way.
Buy Top-notch Materials—They’re Easier to Install and Will Last for Decades
Most suppliers will sell to the public. Manufacturers of premium-grade aluminum use thicker-gauge metal with sturdier edges, so the soffits are more resistant to kinking and denting. Their color finishes are less likely to scratch or wear off and they hold color tones better over time. They also supply complementary colors in siding if you decide to go the next step and make your whole house maintenance free.