Drain water away from your home and dry out your soggy yard with this in-ground system.
Multiple Days
Beginner
$101–250
Introduction
Stop dealing with water problems in your home and yard by installing this in-ground drainage system. This is a permanent, long-term solution to your wet yard. These step-by-step instructions and how-to photos walk you through the DIY installation. This project requires a lot of digging, but you won't have to deal with drainage issues ever again.
If you happen to be among the unlucky 60 percent of homeowners who have some type of water problem in their yard, you’ve got two options: Sell your house and buy one of the homes from the other 40 percent, or roll up your sleeves and deal with it.
Most wet yards can be drained effectively. It’s rare to have unsolvable water problems such as a low water table that pushes water up from below. If you’re in this sorry situation, however, consult a pro—it’s nearly impossible to fix unless you have a sump pump and a place to dump all that water.
In this article, we’ll familiarize you with the products available and show you a step-by-step method of getting rid of excess rainwater and draining it clear of the house. We can’t guarantee that a system like this will dry up all your water troubles, but it’ll definitely help.
Determine the Source of Your Water Problem
In most cases, it’s pretty obvious where the water is coming from. Often there’s a slope approaching the house, a depression in the yard that causes pooling, or excess roof water draining next to the foundation. You can take care of minor foundation drainage problems by making sure the soil slopes away from the house.
Also, properly installed gutters, with a well-directed downspout that empties clear of the foundation, can be very effective. If you’ve already zeroed in on those solutions and still need help, stick with this article.
Call Before You Dig
As with any yard project that requires digging, you must find where buried electrical, telephone and TV cables and gas piping are located. Call your local utilities or 811.
The location of underground wiring cables and pipe may influence the routing of your drainage plan. You may want to consider an alternate route or have the utility disconnected until the job is completed.
Now that you’re familiar with the basic parts, follow our step-by-step instructions.
Tools Required
- Chisel point bar
- Cordless drill
- Garden rake
- Hammer
- Level
- Line level
- Spade
- Tape measure
- Utility knife
- Wheelbarrow
Materials Required
- Crushed rock
- Drain cover
- Drain tubing
- Dry well
- Fabric sock
- Landscape fabric
- Stakes
- Y-fittings
Project step-by-step (10)
Step 1
Start digging
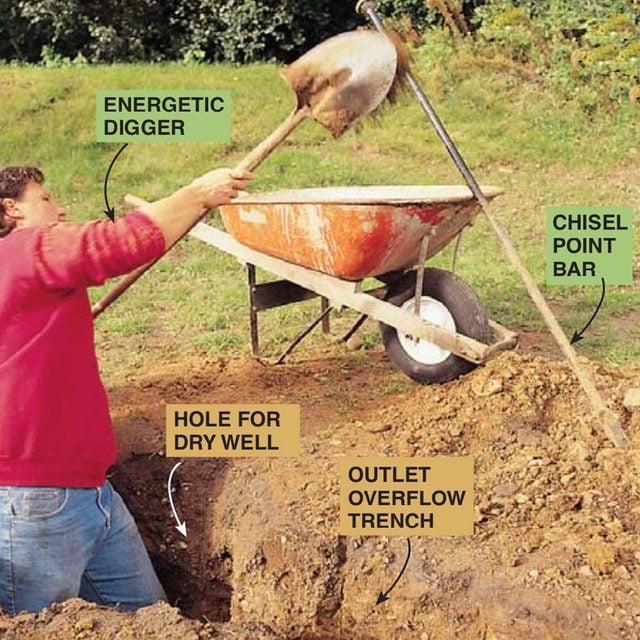
Dig a really big hole
Dig a hole deep enough to accommodate your dry well and the overflow tube. Haul away most of the dirt, but keep some handy to partially refill the hole.
Step 2
Dig an adjoining trench
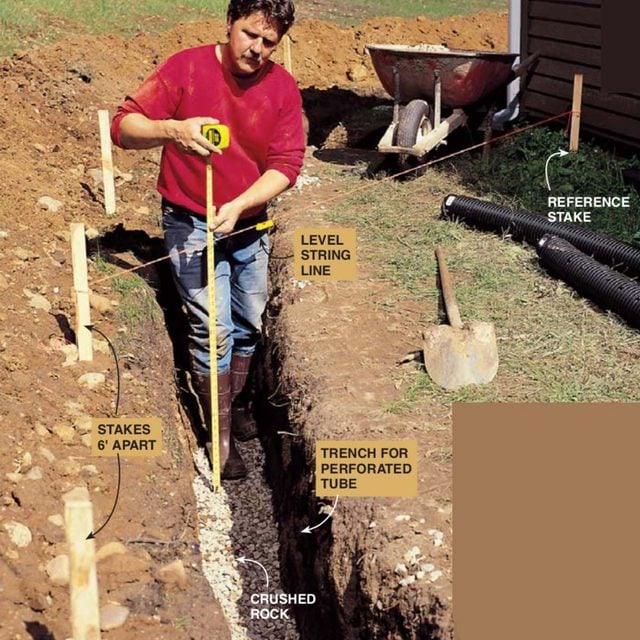
Dig the trench deep enough to drain downhill from the side of the dry well. You’ll also need at least 3 in. of crushed rock to add to the bottom of the trench to promote water absorption. Assuming your lot isn’t shaped like a large salad bowl with the house at the bottom center, look for a spot that’s lower than the house to drain the excess water. If one of those spots is right next to your neighbor’s garage, resist the temptation. If the lay of the land isn’t obvious, use a line level with stakes and a tape measure to check for water escape routes. Remember, you might not be able to use all the techniques we show, so pick those that best meet your needs.

Some Soils are Tough to Dig
The soil we dug up for our 70-ft. long trench and dry well was among the worst (next to solid rock) for digging. The mostly clay soil (a poor-draining type) was full of 4- to 8-in. fieldstone—a far cry from the ideal sand soil. The digging took me and a helper two solid days of backbreaking labor. With any luck, yours will be a lot easier to dig, but be prepared. Get a large chisel-point bar to pry stones out of the way just to make room for each shovelful.
Buy Everything You Need for This Job at a Home Center
The dry well we used has a capacity of nearly 30 gallons. This unit can also be stacked on top of or alongside another if you need extra holding capacity. The dry well is very strong, and once you bury it, you can drive your car over it without breaking it. In fact, the dry well can be installed under a driveway. The drain inlet at the top is optional.
You can also choose to: (1) drain water directly into the side port of the unit from a run of perforated or unperforated drain tubing, (2) link two or more dry well units together, or (3) use it independently with a top drain for small pooling areas. You can purchase snap-together tube in 10-ft. lengths as we did or buy a 50-ft. roll, which is difficult to transport. You’ll find the tube is available in either perforated (1/2-in. holes randomly cut into the sides) or unperforated.
Choose a perforated tube if you’d like it to drain as it carries water. However, if you only want the tube to deliver water from one spot to another, buy unperforated tubing and don’t use a sock. The sock is typically sold in 100-ft. lengths. You can also buy a wide assortment of fittings to connect lines, as well as a fitting to attach to your downspout. The materials for this system cost about $200. We spent another $200 for 2 cu. yds. of crushed rock delivered to our driveway.
Before going to the home center, make sure you’ve got a good shovel, a string line and level, and a solid wheelbarrow. If you don’t, buy them.
Step 3
Install the dry well
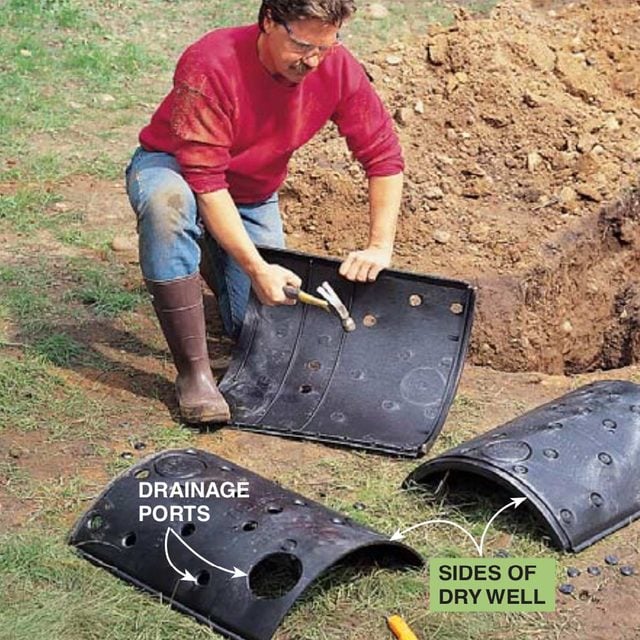
Prepare the dry well
Knock out the drainage ports in the sides of the dry well. First score around the “knock-out hole” with a utility knife, then strike it with a hammer.
How to Build an Under-Deck Roof
Step 4
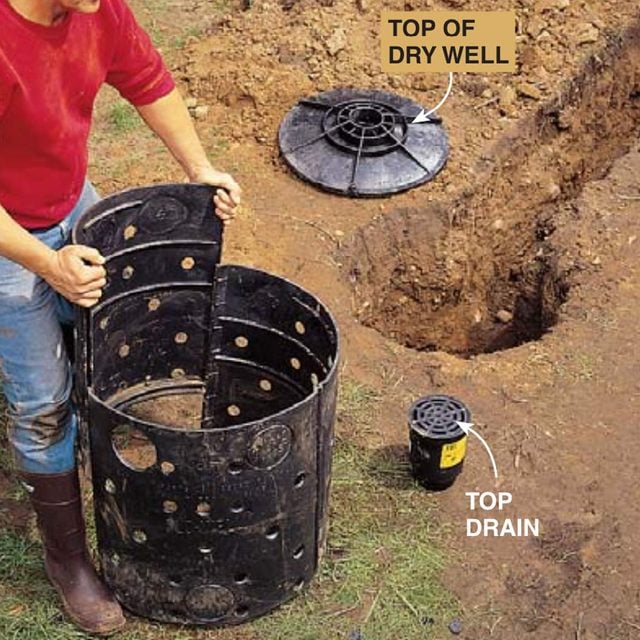
Put the dry well together
Assemble the dry well once the perforations are knocked out of the sides. Next, screw the top of the dry well to the side walls with the 2-in. stainless steel screws.
Step 5
Set the dry well in place
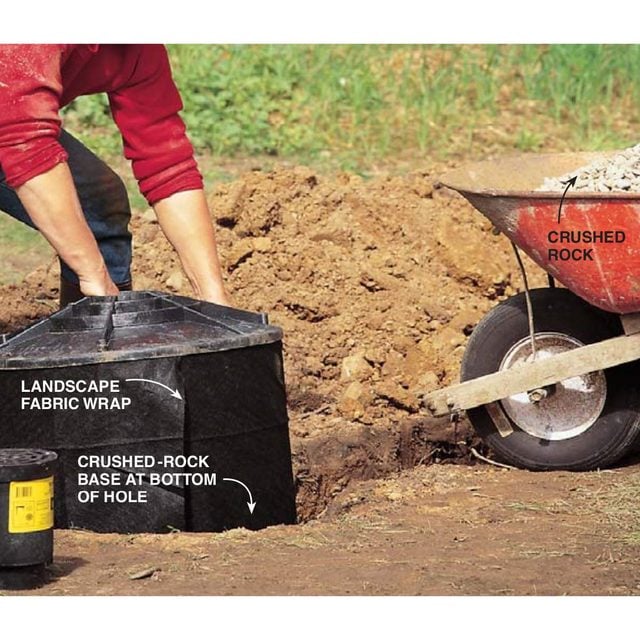
Lower the dry well into the hole after wrapping the sides with a special silt blocking landscape fabric. To tuck the fabric under the dry well top cover, loosen the screws, push an inch of fabric under the cover, then re-tighten the screws. Once it’s lowered into place, insert the top drain fitting and make sure it’s level with the surrounding soil. Our situation is a low spot in the back yard. The only practical place to drain the puddle was along the garage and then into a downward-sloping hill toward the front yard. Instead of draining all the water to the front yard, however, we decided to install a dry well, which is merely a holding tank for a large water runoff. After a rain, it slowly drains itself (percolates) into the surrounding soil.
We also connected a 4-in. perforated drain tube to the side of the dry well to help drain off and percolate overflow water. This tube rests on a bed of 3 to 4 in. of crushed rock or small river stone and slopes downhill (minimum 1/8 in. per foot) from the dry well. A sock sleeve made of a rot-resistant fabric is slid over the tube to filter out any small grains of soil that would otherwise eventually collect in and clog the tube.
How to Build a Rain Garden in Your Yard
Step 6
Connect the drain tube
Slope the trench to ensure proper drainage
Measure the depth of your trench using a line level. Pound a stake in near the house to use as a reference point. Tie the string exactly level to each stake and measure the depth. You’ll need to increase the depth as you get farther from the well. Adjust the gravel at the base of the trench as needed.
Step 7
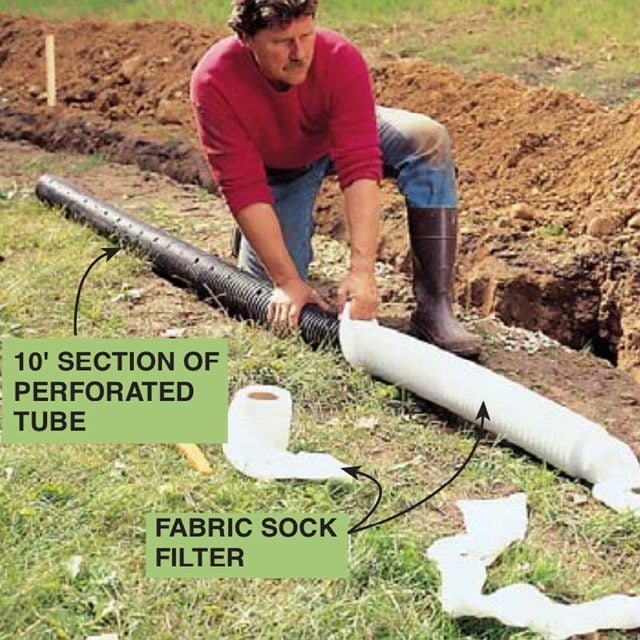
Cover the tube with fabric
Slip the fabric sock over the tubes, leaving a few inches at each end to overlap the adjacent section of tubing. The fabric filters out small particles of soil to prevent the tube from eventually clogging with sludge.
Step 8
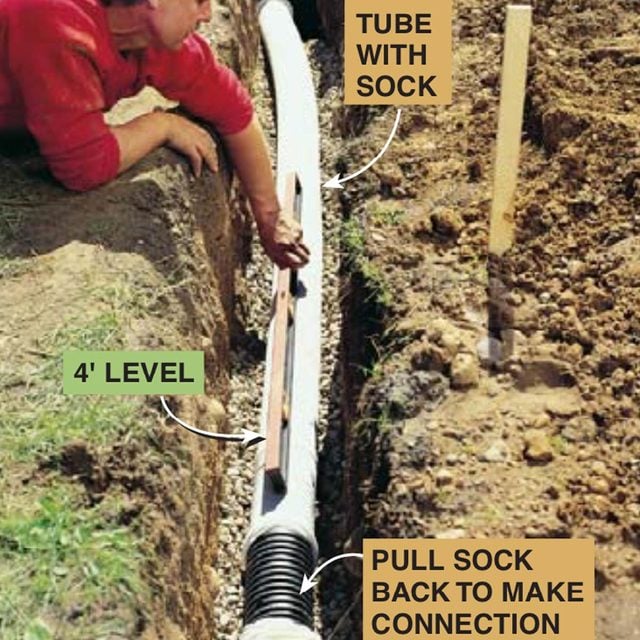
Make sure the tube slopes to drain the water
Check the drainage tubing with a 4-ft. level to make sure you have at least 1/8 in. of slope per foot of tubing (1/2 in. every 4 ft.). Adjust the gravel base as needed. Overlap the sock ends after you connect them.
Step 9
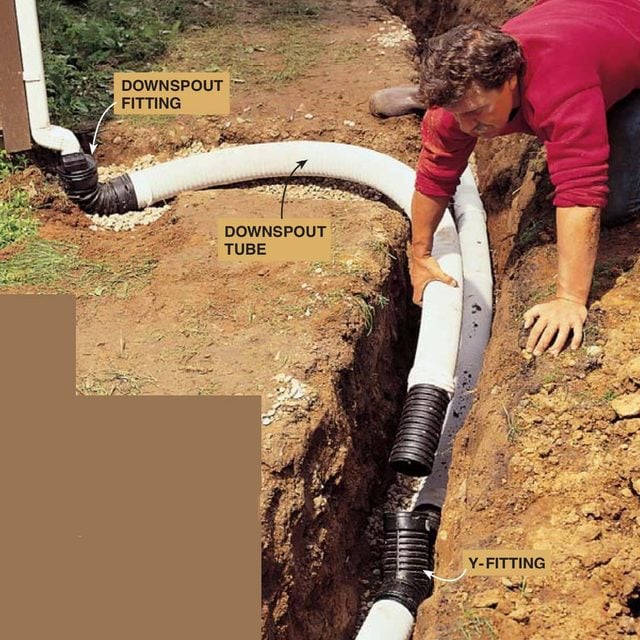
Connect the downspouts to the drain line
Snap the downspout tube into the main drain line. Use a Y-fitting to make the connection. Slip the sock over the connection. Once the tubing is in place, cover it with at least 3 in. of gravel. Cover the gravel with landscape fabric and spread topsoil over the trench.
6 Common Lawn Problems and How to Fix Them
Step 10
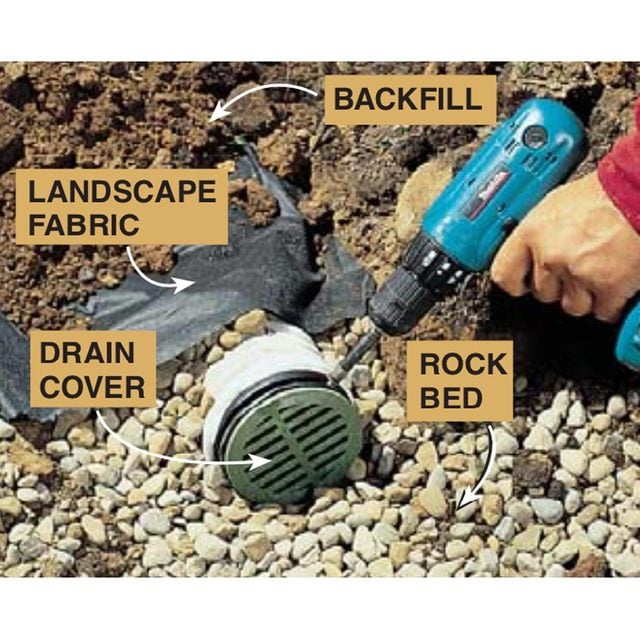
Attach a cover over the end of the tube
Screw a drain cover over the end of the tubing as it approaches daylight to keep critters out. To prevent erosion, make a rock bed around the end of the tube. Where the tube passes by the downspout from the gutter, we installed a Y-fitting and drained the roof water from the gutter system directly into the main drainage line. That line eventually emptied into the low spot in the back yard. Once all the parts of the drainage system were installed, we covered the tubes with several inches of rock. We then covered the rock with landscape filter fabric (black fabric that does the same thing as the sock) and finally tamped the soil to the surrounding grade over the rock and fabric. This meant digging, and lots of it! There’s no magic number for the depth of your trench.
Figure that you’ll need at least 3 in. of gravel under the 4-in. tube, 3 in. on top of the tube and about 6 in. of soil over that. Also, figure in whatever slope you need to get to the low spot.
Dealing With Backfill
When you backfill your trench, you’ll have a lot of extra dirt. Keep a little on hand for settling and think about where else you might use it. You may need to rent a trash container or schedule a truck to pick up the excess.
How to Plumb a Basement Bathroom
Additional Downspout Drain Box Information