


Transform your kitchen into a place you’ll love to be with this innovative lighting project.
Our editors and experts handpick every product we feature. We may earn a commission from your purchases.Learn more.


Updated Jul. 17, 2023
Transform your kitchen into a place you’ll love to be with this innovative lighting project.
Our editors and experts handpick every product we feature. We may earn a commission from your purchases.Learn more.
A half day
Intermediate
$150 - $400
Transform your kitchen into a place you’ll love to be with this innovative lighting project.
I’ve tackled several kitchen projects over the years, but I’ve never made such a major improvement with so little time and money. I spent less than $350 and just four hours brightening our kitchen. My original intent was strictly practical: I just wanted better light to make food prep and cleanup easier. But replacing the single fixture with bright LEDs transformed the room, surprising me and amazing our guests.
LOW-PROFILE LEDs MADE IT EASY
Initially, I thought I’d install recessed can lights for a sleek look and lots of light. Then, I ran across these ultra-slim Halo LEDs by Eaton. These LED lights are super bright (900 lumens) and have such a low profile (less than 1/2 in.) that you can even locate them directly under a joist if needed. They’re rated for insulation contact and wet locations, so you can use them in a shower or even outdoors. A switch on the side of the box lets you adjust the color temperature. They’re also dimmable.
All you need is a power supply, a means to cut round holes, 14-2 NM-B cable, basic electrical tools and a drill. The transformer box converts 120V to low voltage, and it’s UL-listed as a junction box with room for power in and power out. That lets you take power from the first box and string together as many lights as you want. You might need to fish wire, but aside from that, installation is easy. Several companies make a similar product, but this was in stock at the local home center.
PLANNING THE JOB
If you have an attic above, you can access the joists from there instead of working from below as I did. That simplifies fishing wires, but you’ll still have to dig through insulation. Before starting the job, remove the ceiling fixture and look inside the junction box. My box had just one incoming cable. If your box contains more cables, wiring will be a bit more complicated. You may need to install a second junction box because the box for these LED fixtures can house only two 14-2 cables. I replaced the existing fixture with an LED like all the others. Here are a few tips for wiring LED lights.
If you want a standard fixture in the center of your ceiling, you’ll still have to remove the existing junction box (Photo 2) to access the joists. Then, after installing the new lights, install a remodeling box in the same hole. I found everything I needed at a home center. Two special tools made the project much easier: an adjustable drywall circle cutter and a 54-in. flexible drill bit.

Mark all the joists involved in the installation using strips of tape. Then mark the location for each new light with tape. The lights can go anywhere, but I kept them close to the joists to get better access for attaching the transformer boxes to the joists.
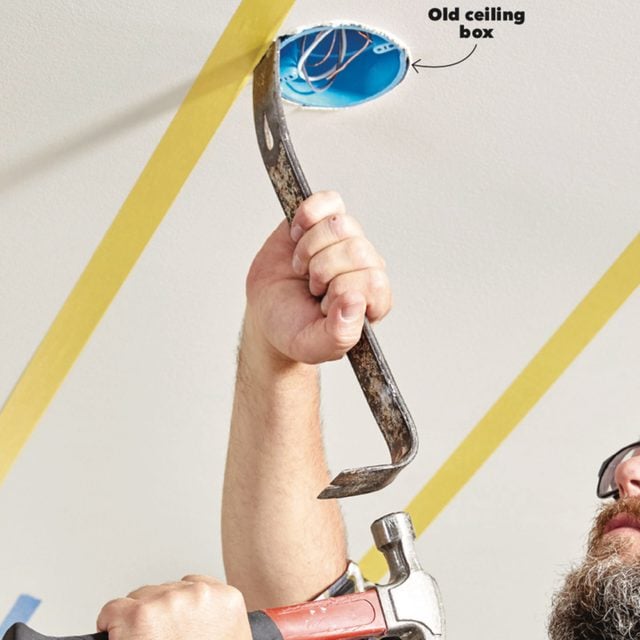
Shut off power to the fixture at the breaker panel. Use a noncontact voltage detector to verify that there’s no current, and then pull out the old ceiling box. Depending on how the box is attached and what it’s made of, this may entail different methods. For instance, you could break a fiberglass box to remove it. Ours was a plastic box, nailed to the joists, so I was able to pry it out.
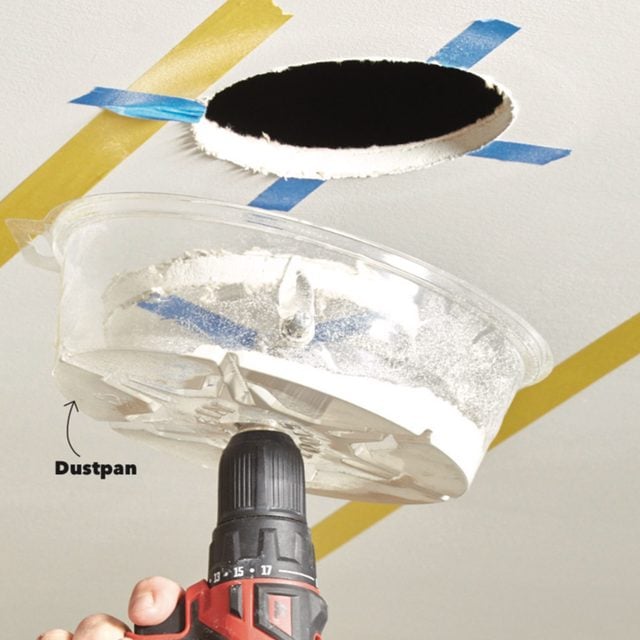
Cut all the holes for the new lights. This adjustable drywall circle cutter (above) slices out perfect holes, saving lots of time. It includes a pan to catch the dust. But it can’t be used to enlarge the existing hole that held the old box. For that, trace the provided template and cut it out using a manual drywall saw. Now it’s time to fish wires.
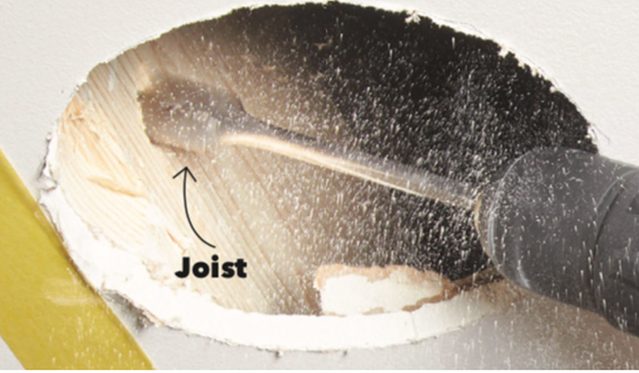
Drill through the joist at least 2 in. from its bottom edge. I drilled a 1-in.-diameter hole here to make it easier to maneuver the long, flexible bit in the next step. If you’re just going through one joist, you won’t need the flexible bit.
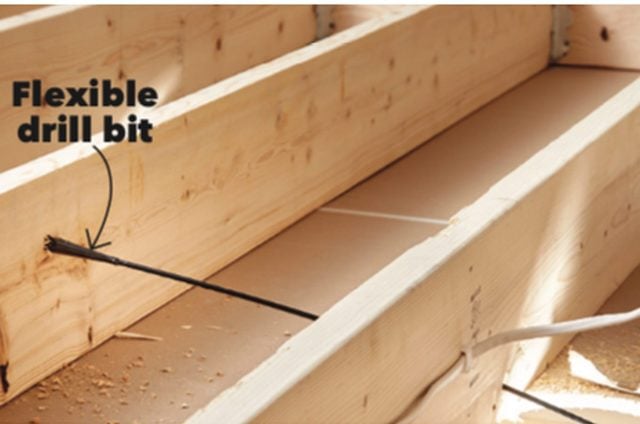
Pass a flexible bit through the hole you just drilled until it hits the next joist. Flex the bit downward to get close to the center of the joist. Unless you have access from above, this is guesswork. Drill through the joist, and then loosen the drill’s chuck and set the drill aside, leaving the bit in the hole.
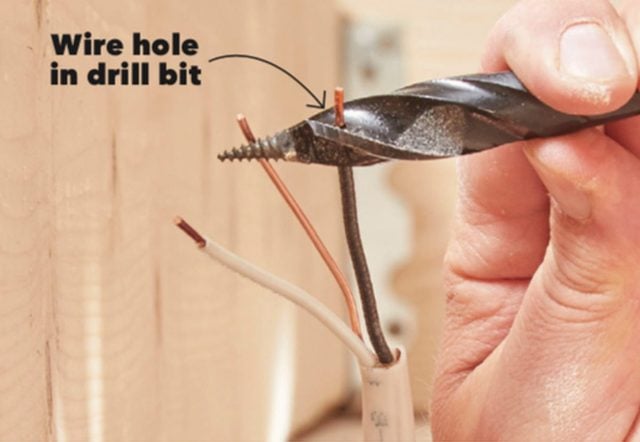
Run one of the wires from a new cable through the hole in the bit’s tip and bend it over. Twist the other wires together and wrap everything with electrical tape.
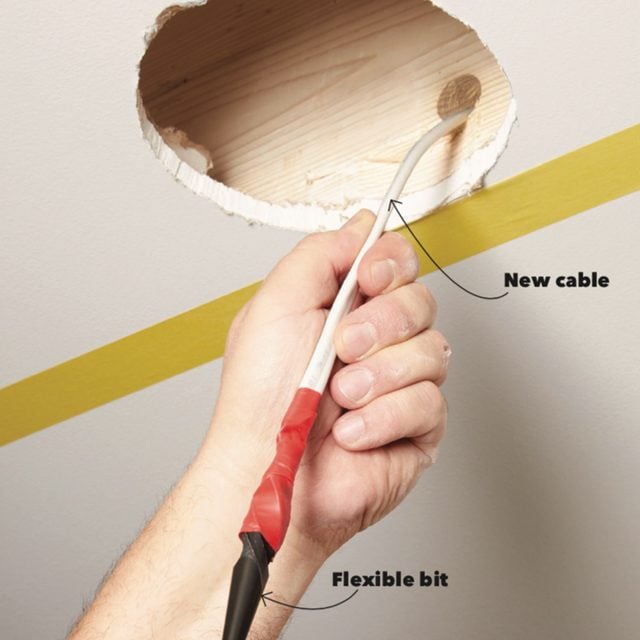
Pull the bit back through the hole along with your new cable, and then unwrap the tape. Each light cutout (except the last one in the chain) requires two cables: power in and power out. As you’re running wire from hole to hole, leave plenty of extra length. It’ll be much easier to make the connections.
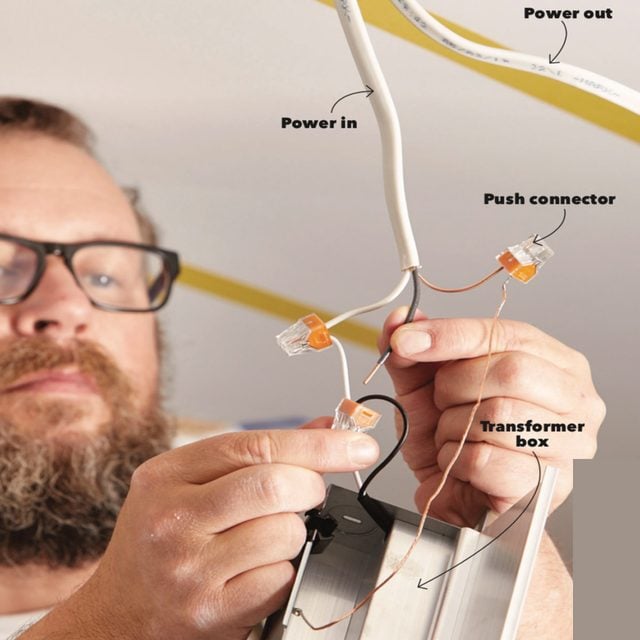
Connect the power source to the first transformer box. Connect your “downstream” cable to power the next box in line. These lights are outfitted with push connectors, which are far simpler to use than wire nuts and take up less space. Secure the cables using cable clamps in the knockouts or the built-in cable traps. In this situation, code doesn’t require the cable to be secured to the joists.
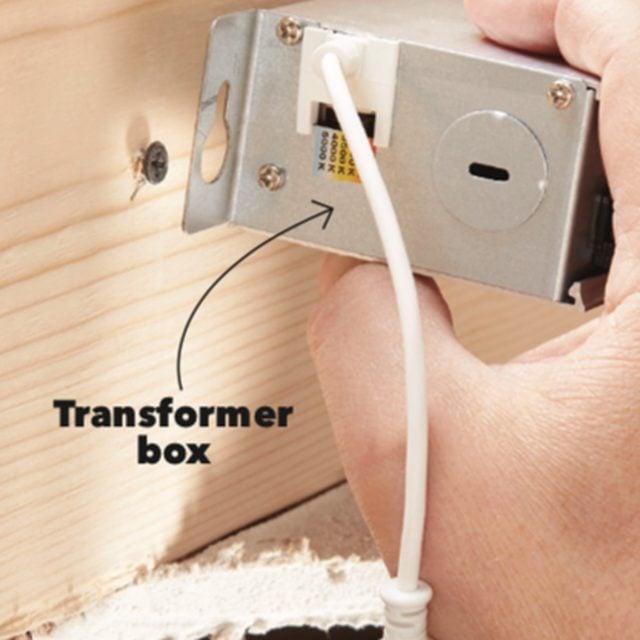
Hold the transformer box against the joist and mark the keyholes. Set the box aside and install the two screws. Hang the box, and then tighten the screws with a screwdriver. Working space is limited, so hang the box directly above the hole.

Connect power to each box and hang all the transformers. Each box has power in and power out except for the last one.

Plug the low-voltage cables from the lights into the cables from each transformer box. Set the desired color temperature using the switch on the side of each transformer box.
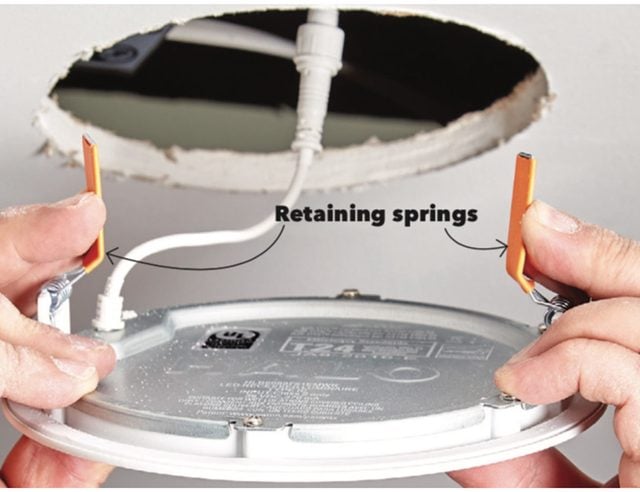
Press the retaining springs upward and pop each light into place, and then switch the power back on at the breaker panel. If you want to change the color temperature after the lights are installed, carefully pull down on the light’s flange to remove it, keeping your fingers clear of the mousetrap-like retaining springs!
Originally Published: February 22, 2021