
How to Cast Concrete Fountains
Updated: Jun. 23, 2023
Use basic materials and clever techniques to create a water feature in one weekend.

Multiple Days
Beginner
$101–250
Introduction
Enjoy the splash and sparkle of water indoors or out—with minimal maintenance and expense. We'll show you how to build this fountain out of concrete. You'll save several hundred dollars building this fountain yourself instead of buying it. So make a trip to your local home center to pick up the supplies, then follow these how-to steps to cast the fountain.Tools Required
- Bucket
- Circular saw
- Cordless drill
- Dust mask
- Hearing protection
- Pliers
- Putty knife
- Safety glasses
- Sawhorses
- Straightedge
- Tape measure
- Utility knife
Materials Required
- 1/2-in. galvanized hardware cloth
- 12-in. flowerpot
- 2 ft. of 1/2-in. PVC pipe
- 2 ft. of 10-gauge insulated copper wire
- 2 ft. of pump tubing
- 20-minute setting-type joint compound (1 bag)
- 3-in. ABS toilet flange
- 3-in. screws
- 9- or 10-in.-diameter ball
- Duct tape
- Four 10-oz. bottles of Quikrete Cement Color or equivalent
- Four 80-lb. bags of concrete mix (or five 60-lb. bags)
- hot glue
- One 4 x 8-ft. sheet of 2-in. extruded polystyrene foam insulation
- river pebbles
Everything You Need to Get Started
If you want to add the sight and sound of moving water to your yard without the heavy work and frequent maintenance of a pond or waterfall, consider a fountain. Unlike a pond or waterfall, a freestanding fountain doesn’t require hard labor and there’s very little maintenance to do later. Best of all, you can place a fountain just about anywhere: among plants, inside a sun porch, or on a deck or patio. You could even build a pair to flank a gateway or path.
Project step-by-step (14)
Concrete Water Fountains: Basic Materials
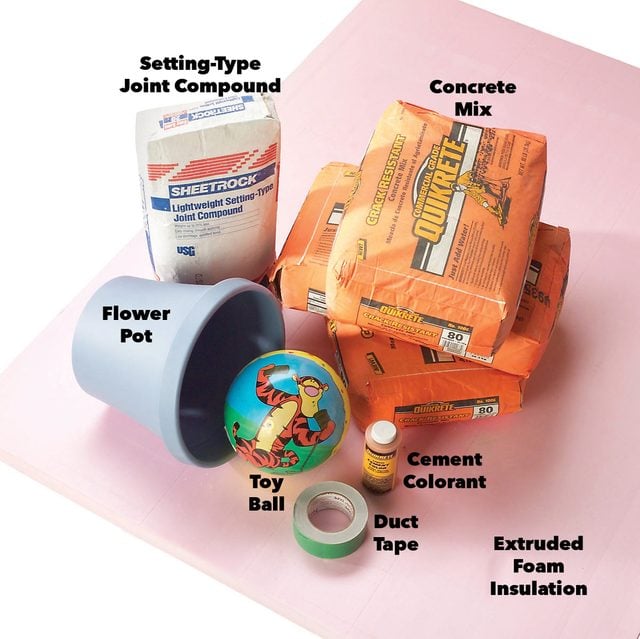
We will show you how to cast a fountain using inexpensive off-the-shelf materials. Our design combines the style of top-selling models found at garden centers with super-simple construction techniques. If you can handle basic tools like a circular saw and drill, you can build it, even if you’ve never worked with concrete before. Expect to spend about six hours assembling forms and pouring concrete, plus another couple of hours removing forms and setting up the fountain. The materials for this fountain cost about $120. Fountains of a similar size and style (usually made from fiberglass or plastic) cost about $500 at garden centers. You can create this fountain in one weekend.
Cast Concrete Fountain
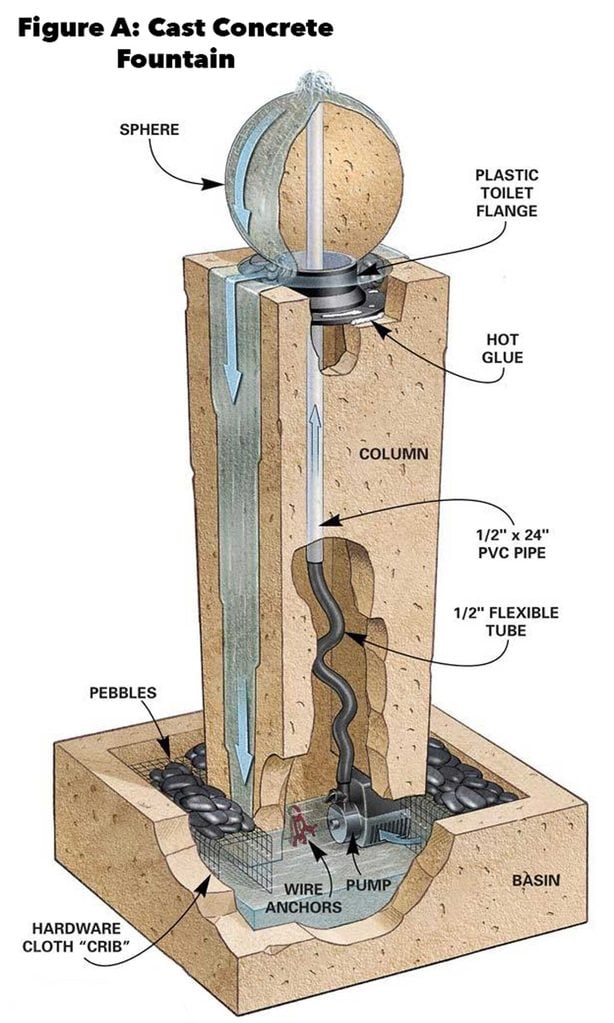
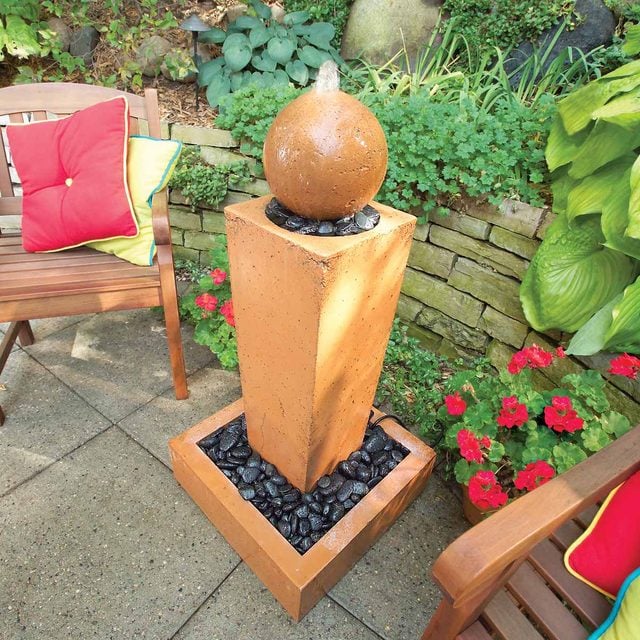
The fountain consists of three separate parts: a sphere, a hollow column and a basin. A pump drives water up through the sphere, where it bubbles out, cascades down the column and returns to the basin. The hollow column sits in the basin, and a sphere sits on top of the column.
Overall height: 42 in.
Basin footprint: 20 x 20 in.
Build Forms From Foam
To mold concrete, you pour wet concrete mix into a form. You can build forms from wood, but we found that rigid foam insulation is perfect for a small project like this. Foam is lightweight, smooth and easier to cut.
Concrete won’t stick to foam, so you can reuse the outer form parts to cast several fountains. Best of all, you can assemble sections of foam with the ultimate quick-and-simple fastening system: duct tape! “Extruded” polystyrene works best, but “expanded” polystyrene bead board will also work. Inspect the sheet before you buy, and handle it carefully—deep scratches or dents will show up as bumps on the surface of your fountain.
Figure B: Column Form and Figure C: Basin Form shows the dimensions of the column and basin form parts. The column and basin are formed and cast upside down.
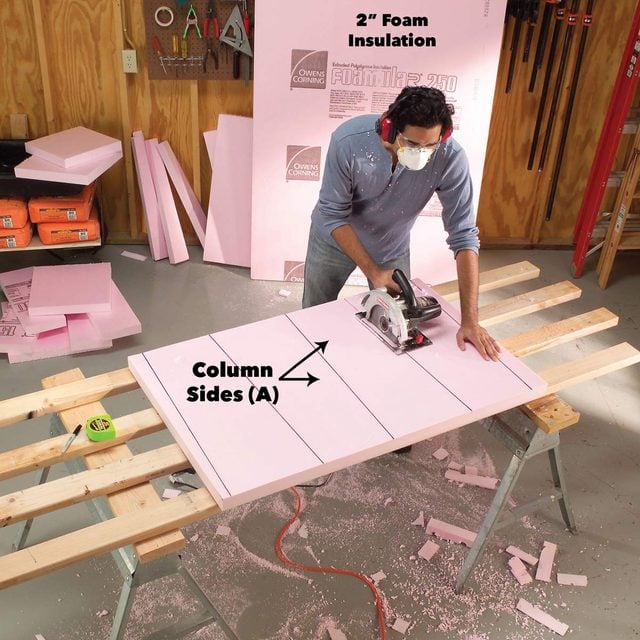
Mark out the form parts and cut the tapered parts (A and C) with a circular saw using a standard wood-cutting saw blade. It’s difficult to make perfectly straight cuts with a circular saw because the blade can easily wander in the soft foam. But don’t worry about slightly wavy cuts; they won’t affect the final product.
Cut the square and rectangular parts with a table saw or circular saw and support the foam with 2x4s. Cut the 8-in. round disc (D) with a drywall saw. Wrap the disc with duct tape to cover the rough edges left by the drywall saw.
Assemble the Column
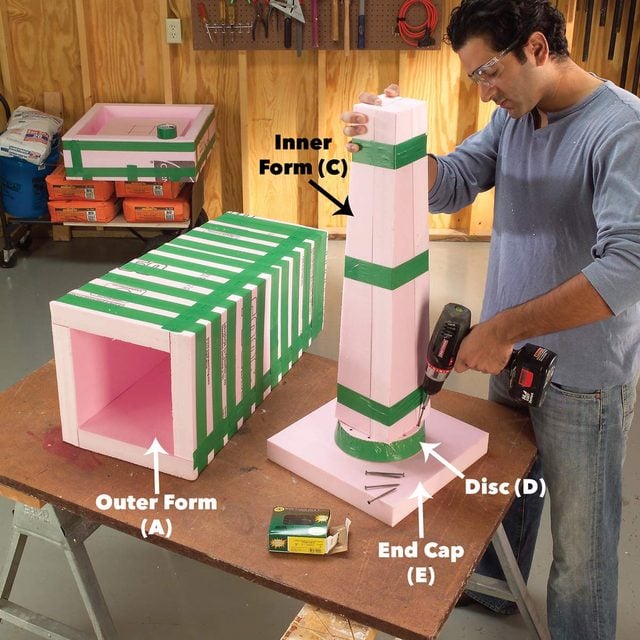
To begin, cut out the foam parts and assemble them. Keep in mind that you’ll build the column and base forms and pour them in the upside-down position. Also, be sure to place the printed side of the foam face out; the ink can stain the concrete. Tape the seams of the outer column form together and then wrap it with tape. Stretch the tape firmly as you wrap to create tight seams.
Assemble the inner form with tape and 3-in. screws. Screw the disc (D) to the inner form, then screw the disc to the end cap (E). Slip the inner form into the column form and tape it in place.
Assemble the Basin
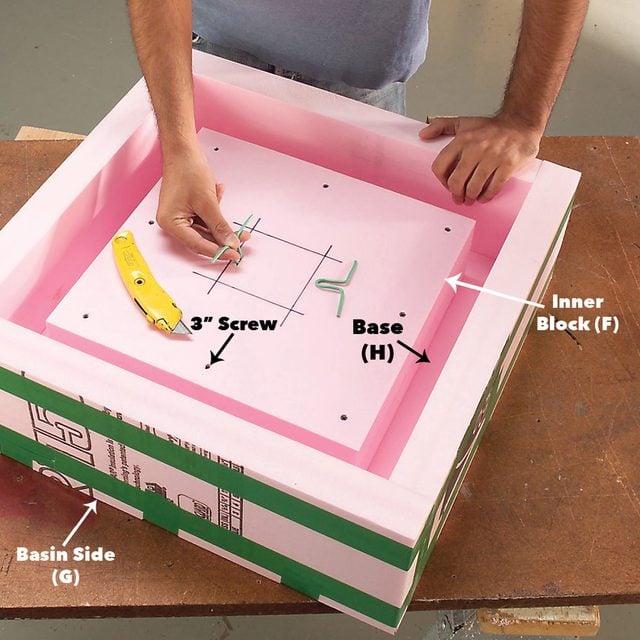
Tape the basin form sides (G) to the base (H). Screw one basin block (F) to the base, then screw the second block onto the first. Mark a 4 x 4-in. square on the block to represent the opening at the bottom of the column. Then cut two slits in the foam (1/4 in. inside the square) and insert anchors made from 10-gauge copper electrical wire.
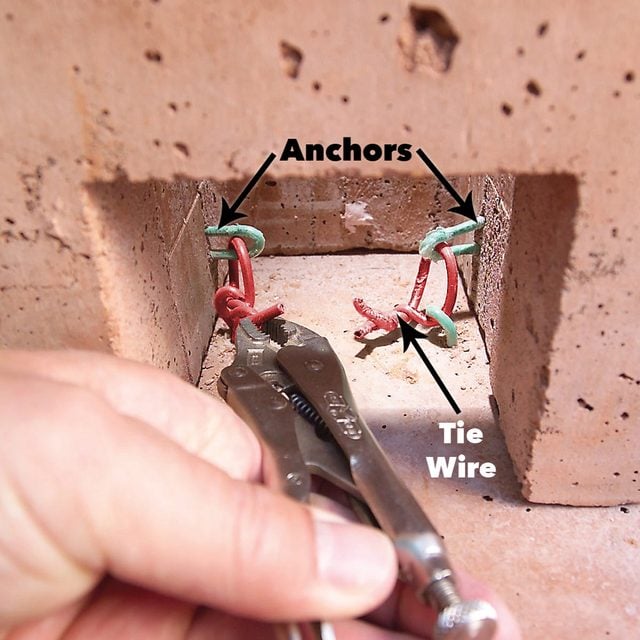
Wire Anchor Details
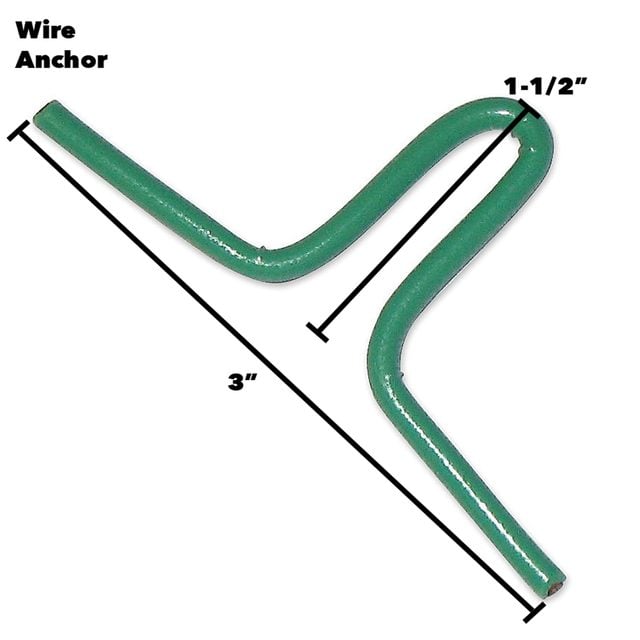
Leave the legs of each anchor protruding 3/4 in. from the foam. You’ll use these anchors later to tie the column and basin together. Be sure to use plastic-coated wire. Copper that’s in direct contact with concrete eventually corrodes.
Cover a Ball with Joint Compound

To form the sphere, you’ll need a toy ball, a plastic flower pot and a bag of 20-minute setting-type joint compound (which is meant for covering drywall joints). Buy a cheap ball made from smooth, thin plastic and make sure it’s fully inflated. Don’t use a thick-skinned ball like a soccer ball or basketball.
Cover the holes in the flowerpot with duct tape. Mix the joint compound powder with water until it’s the consistency of pancake batter. It’s OK if the mix is a bit lumpy. Then pour 3 in. of compound into the pot and set the ball into it with the air plug facing straight up. Hold a 3-in. cardboard ring (left over from duct tape) on the ball as you cover the ball with at least 1 in. of joint compound. Work fast—the joint compound will start to stiffen after about 10 minutes. You may have to hold the ring in place for a minute or two to prevent the ball from floating up.
Remove the Ball
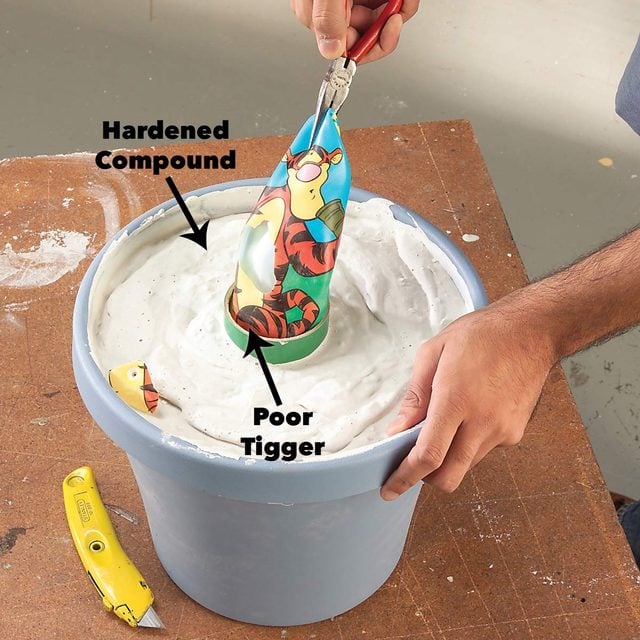
Let the compound harden overnight. Then puncture the ball with a utility knife and pull it out through the ring. Slather margarine onto a small rag and coat the inside of the form so the concrete won’t stick to it. If your hand won’t fit through the ring, recruit a helper with smaller hands.
Put Concrete in the Column Form
Since the concrete isn’t reinforced with wire mesh or rebar, concrete mix that contains tiny threads of fiberglass is best for this project (Quikrete Crack-Resistant concrete is one brand). We used one 10-oz. bottle of Quikrete Cement Color per 80-lb. bag of concrete to pigment the mix. Home centers typically carry three or four colors (we used “buff”). For mixing tips, check out how to mix concrete so you get the right strength and consistency every time. Fill the sphere form first, before the mix begins to stiffen.
Shake the form to drive out large air pockets. Then insert a 24-in.-long piece of 1/2-in. PVC pipe (see Figure A). Cover the end of the pipe with tape to keep out the concrete. Center the pipe and hold a level against it to make sure it’s standing straight up.
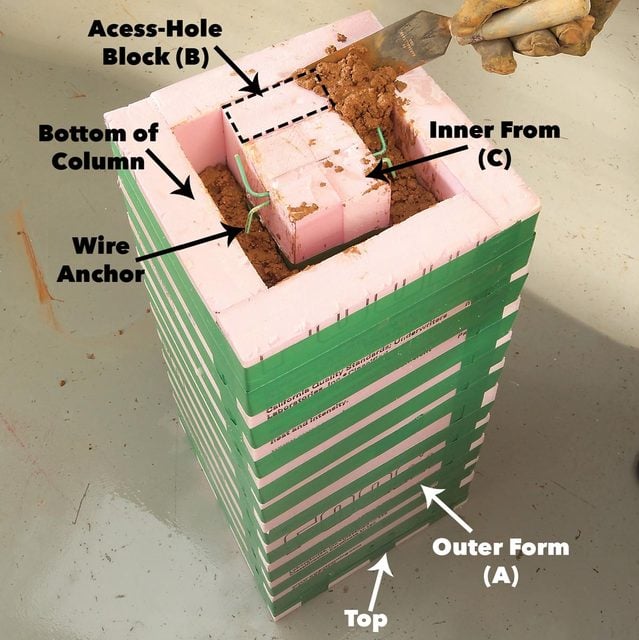
Fill the column form by dropping in scoops of concrete on all four sides. If you fill only from one side, you’ll bend the inner form. When you’ve dropped in about 6 in. of concrete, tamp it with a 1×2 to fill in large voids. We tamped for about 10 seconds; more tamping will give the concrete a smoother surface, while less tamping will leave more craters and crevices. Whatever surface texture you want, be consistent with your tamping all the way up for a uniform appearance. Continue to fill and tamp in 6-in. increments until the concrete is 4 in. from the top of the form. Then insert the access-hole block (B) and wire anchors that creates the access hole. Then finish filling the form.
Level Concrete in the Basin Form
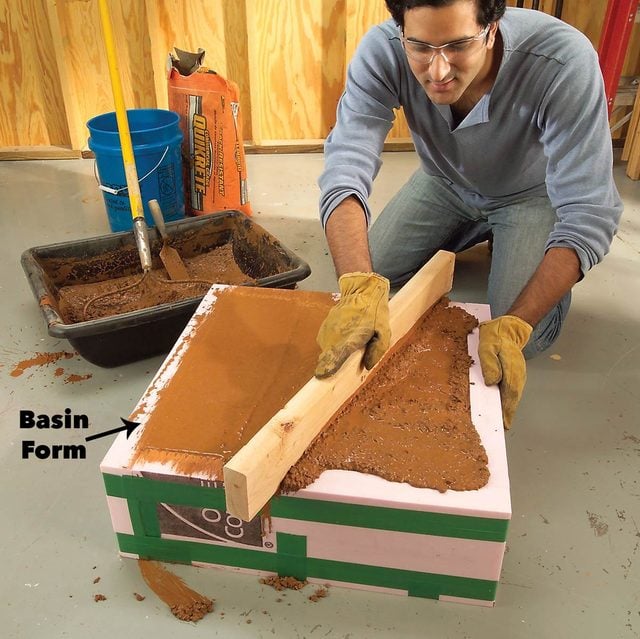
When you fill the basin form, tamp the concrete the same way and be careful not to dislodge the wire anchors you installed earlier. When it’s nearly full, insert the access-hole block (B) and wire anchors. Then finish filling the form. Slide a 2×4 back and forth as you drag it across the form to screed off the excess concrete.
Wait, Then Remove the Forms
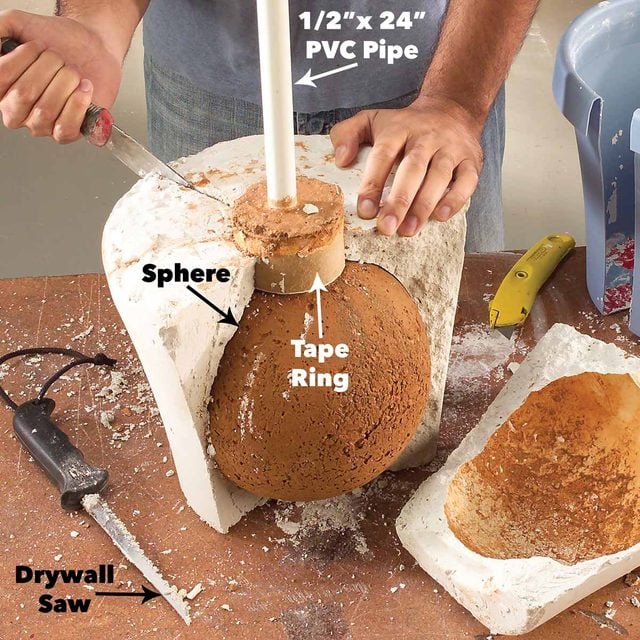
Let the concrete “wet cure” for at least a week before you remove the forms. The longer concrete stays damp, the stronger it gets. Cover the column and basin with plastic garbage bags to slow down evaporation. To remove the sphere form, just break it away. To remove the outer forms of the column and basin, simply slice the tape with a utility knife.
To remove the blocks (F) inside the basin, cut the foam into sections with a drywall saw and break them out. Removing the column’s inner form is a slower process; cut the foam with a drywall saw and pry out small chunks with a putty knife, and then cut some more. Cut away the plastic pot with a utility knife. Saw deep kerfs in the sphere form and break it open by prying with a stiff putty knife.
Anchor Column and Base Together
The column and basin weigh about 100 lbs. each, so you’ll need a helper or a mover’s dolly to move them. Tie the anchors together with the same wire you used for the anchors. Then nudge the column to make sure you twisted the wires tightly enough. It’s OK if the column rocks slightly, but it must be absolutely tip-proof since the fountain will attract curious kids.
Put It All Together
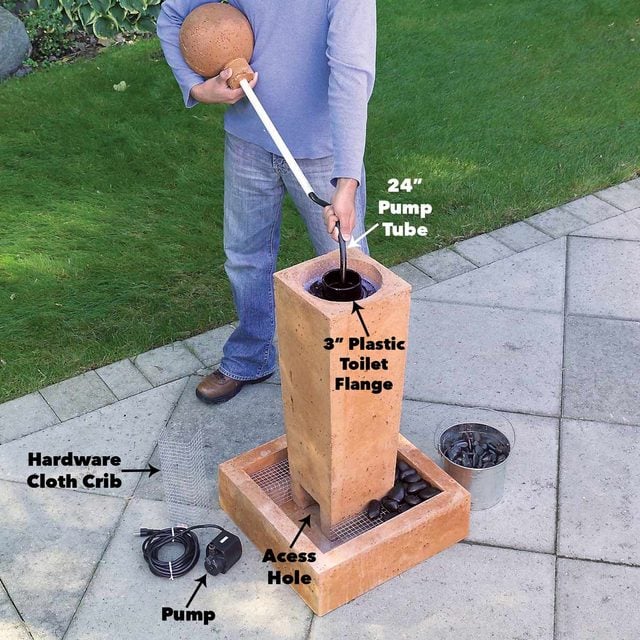
Before you assemble the fountain, mount a 3-in. black plastic toilet flange in the recess at the top of the column (see Figure A). The flange supports the sphere and stands about 1/4 in. above the top of the column. This allows water to fill the recess and spill out over the sides of the column.
Cover the screw holes and bolt slots in the flange with duct tape, then set it in place. Apply lots of hot glue over the flange and around it to lock the flange in place and plug all the holes watertight (the tape prevents the glue from dripping through holes).
Connect a 2-ft. section of flexible tubing to the sphere’s PVC pipe. The vinyl tubing made to fit our pump slipped tightly inside the PVC pipe. If your tubing doesn’t fit tightly, use hose clamps or other fittings. Feed the tube into the column and set the sphere in place. Pull the tube through the access hole and trim the tubing to length and connect it to the pump. Cover the reservoir with hardware cloth and pebbles. Set the ball in place and position the pump. We filled the recess at the top of the column with smooth black “river pebbles. ”
In the basin, support the pebbles with four “cribs” from 1/2-in. wire mesh (called “hardware cloth”). Cut the mesh into 9-1/2-in. x 12-in. sections, then bend them over a 2×4 block to form cribs 3 in. tall, 3-1/2 in. wide and 12 in. long. Cover the cribs with pebbles. This leaves all the space below the cribs open for water storage. If you simply fill the basin with pebbles, you’ll greatly reduce the water holding capacity.
Add Water
Fill the basin with water and start the pump (the outlet that powers the pump must be GFCI protected). Turn the flow control knob on the pump to adjust the water flow. If the water spills down one side of the column but not the others, slip a flat pry bar under that side of the basin. Raise the basin and place shims under it until water flows evenly down all four sides of the column.
The fountain loses water because of splashing and evaporation, so keep an eye on the water level whenever you run the pump. If the basin runs dry, the pump will burn out. On a very hot, windy day, you may need to add water after just a few hours. In a cold climate, freezing water could crack the basin and destroy the pump. Each winter, remove the pump, empty the basin and either move the fountain indoors or cover it with a plastic bag.
Want to Buy It Rather Than Build It? Most garden centers and some home centers carry fountains in several sizes and styles. Prices start at about $100 for a small fiberglass model. Don’t say we didn’t warn you about the prices, though. Fountains like the one in made in this project can cost more than $500. Or check out this other DIY low-maintenance water feature.
Additional Information: