
How to Install a Paver Patio Base

Updated: May 03, 2024
Plastic paver patio base panels can save your back from the labor of gravel bases, but they aren't without pitfalls. Here's how to install them.

Two or more days - depending on patio size and excavation complexity
Intermediate
Varies
Introduction
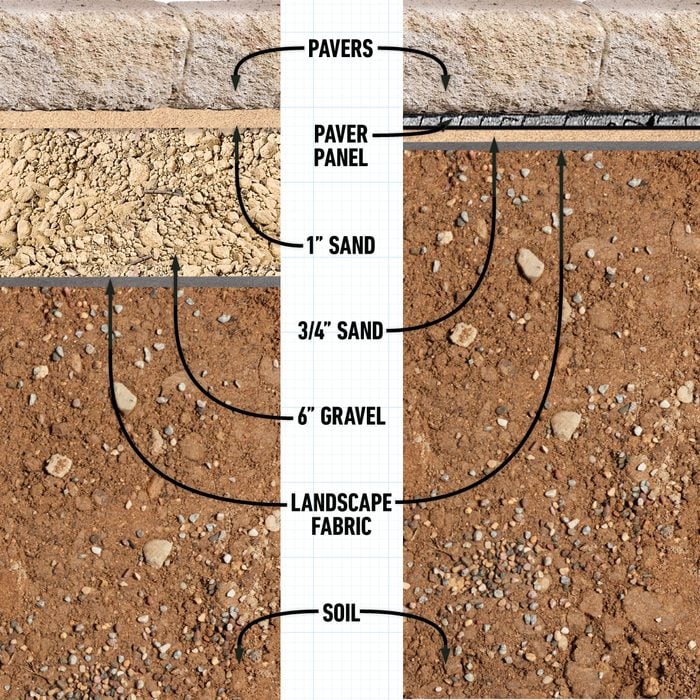
A traditional base for an 11 x 13 paver or stone patio involves digging up and hauling out about six tons of dirt, and then bringing in the same amount of gravel. But, in some situations, you can save about half of that hassle by using plastic paver base panels for your patio.
What Is Paver Base Patio?
"A plastic paver base offers several benefits over gravel," says Jay Sanders, contractor and owner of Castle Dream Construction. "Firstly, it's lightweight and easier to handle, making the installation process quicker and less labor-intensive. Additionally, plastic bases provide excellent stability and drainage, ensuring the longevity of your paver project."
Paver patio base panels are made from lightweight high-density polypropylene. The panels typically have tongue-and-groove or shiplap edges to keep the panel edges flush with one another. You may wonder how a thin plastic mat can effectively replace a 6-inch-deep layer of compacted gravel. The answer is that the panels spread out the load, so the weight of a person walking on the patio is distributed more widely. Distributing the load puts less pressure on the soil and prevents the paver bricks from becoming uneven.
Paver patio base panels also have built-in channels and holes to drain water to the sand layer below. Studies from independent engineers have concluded that the panels are equivalent to a compacted gravel base for load distribution and superior for thermal resistance.
Traditional Patio Base vs. Paver Base Patio Panels:
Tools Required
- Broom to sweep sand into joints
- Concrete trowel
- Hammer and tin snips - to install edge restraint
- Level and string line - to ensure a level base and proper slope for drainage
- Masons saw or splitter - to cut the pavers
- Pencils and other marking tools
- Plate compactor for larger areas or hand tamper for smaller ones - rated at 7000+ pounds of centrifugal force
- Rake - to level the ground and spread materials
- Round point and a flat blade shovels for excavation and moving materials
- Rubber mallet or compactor rated at 4500-5500 pounds with a rubber pad to set pavers into bedding layer
- Screen rails and a 2x4 board - to level the sand layer on top of the base material
- Stakes and string - to mark the area of your patio
- Tape measure
- Utility knife - for cutting fabric
- Wheelbarrow - for moving materials easily around the site
Materials Required
- Edge restraints or concrete wet sand - to keep pavers in place
- Geo-textile or landscape fabric - to separate subgrade and bedding layers and prevent weeds (in clay areas or use geotextile)
- Pavers
- Plastic paver base panels
- Sand for bedding layer - either washed concrete or polymeric or resin sand
Project step-by-step (9)
Plan the Paver Area
- Plan the size of your patio and mark out the area with paint, a garden hose or string.
- Measure the width and length and determine how much material you’ll need.
- Divide the square footage of your patio by the square-foot coverage of each panel to determine the number of panels you’ll need. Add about 20 percent if your patio is an irregular shape.
- Pro Tip: Plan to build the patio base 1 foot wider and longer than the size of the finished patio so that it will extend 6 inches beyond the paving on all sides.
Excavate the Patio Paver Area
- Remove grass or other vegetation and skim off 2 to 4 inches of soil.
- Pro Tip: You can speed up sod removal by renting a sod cutter.
- Pro Tip: You also must remove soil evenly and leave a flat surface, as there’s no thick layer of gravel to make up for uneven ground. After digging and grading, there shouldn’t be more than about 1/2-inch variation in flatness over the area.
- Use a plate compactor to tamp down the soil.

Roll Out Landscape Fabric
- Add a layer of landscape fabric over the tamped soil.
- Note: The purpose of the landscape fabric is to prevent the sand from mixing in with the soil. But it’s important to use a non-woven fabric, as woven landscape fabric isn’t very permeable and can trap water under your patio. Look for fabric with at least a 20-year lifespan.

Add the Sand Bed
- Spread out a layer of sand with an average depth of 3/4 inches.
- Screed the sand layer to provide a flat, properly sloped surface for the paver patio base panels.
- Pro Tip: Buy all-purpose or fill sand, not sandbox sand. It’s too fine. If you’re buying bags of sand, figure about one 50-lb. bag for every 8 square feet of patio.

Lay Paver Mat Panels on Leveled Sand
- Lay the paver base panels over the sand bed, staggering them to avoid continuous seams.
- Pro Tip: If you plan to lay stones that vary in thickness, you’ll have to put a layer of sand over the panels to allow stone leveling.

Install Paver Edging
- Attach paver edging to the paver mats by screwing the edge restraint into the base panels. The exact type of fastener will depend on the type of base panel. Stainless steel screws are ideal.

Install the Pavers
- Install the pavers as you would over a conventional gravel base, keeping in mind that there will be no 1-in. bedding layer under the pavers, but rather, the pavers are laid directly onto the synthetic base panels. “Beyond that, it’s paver laying 101,” says Martin.
Determine your starting point and snap a chalkline; this is usually parallel with the home. - Use a folding square or the 3-4-5 method to snap a perpendicular line.
- If using a border paver, lay this first on the straight line, then lay the rest of the pavers.
- Cut pavers as needed to fit within the space.
- Fill joints with the appropriate material.
- Note: Installation method of joint material is complicated as there are so many options, and not all are compatible with synthetic bases.

FAQ
How deep should paver base for a patio be?
A patio with a gravel base should be minimum of 4 inches deep in a warm, sandy climate and 6 inches deep on wet soils or areas with significant freeze/thaw cycles. For synthetic patio paver bases, there is just a bedding layer, which should be 1 to 2 inches of compacted sand or fine gravel for a bedding layer under the plastic/foam panels. Always check local building codes for area-specific needs.
What should I use for patio paver base?
Depending on your budget, environment and yard configuration, you can use either compacted gravel or plastic paver bases.
Do you need paver base for a patio?
“Absolutely have to have some kind of base, whether it’s synthetic, compacted gravel or a concrete slab,” says Martin. “Anything else is guaranteed to fail.”
About the Experts
Jay Sanders is a licensed contractor based in Baltimore. He owns Maryland Contractor and Castle Dream Construction, and has been working in construction for more than a decade.
Jeremy Martin is owner of Willow Gates Landscaping in Mohnton, Pennsylvania, which he founded in 2005. He shares his passion for the industry by teaching installer courses for retaining walls, concrete pavers, permeable pavers and advance hardscape projects, plus speaking at industry events.
Tim O’Shea is co-owner of the San Diego-based general contracting company The Build Pros. For more than three decades his company has specialized in bespoke construction and renovation projects.
Originally Published: October 01, 2020