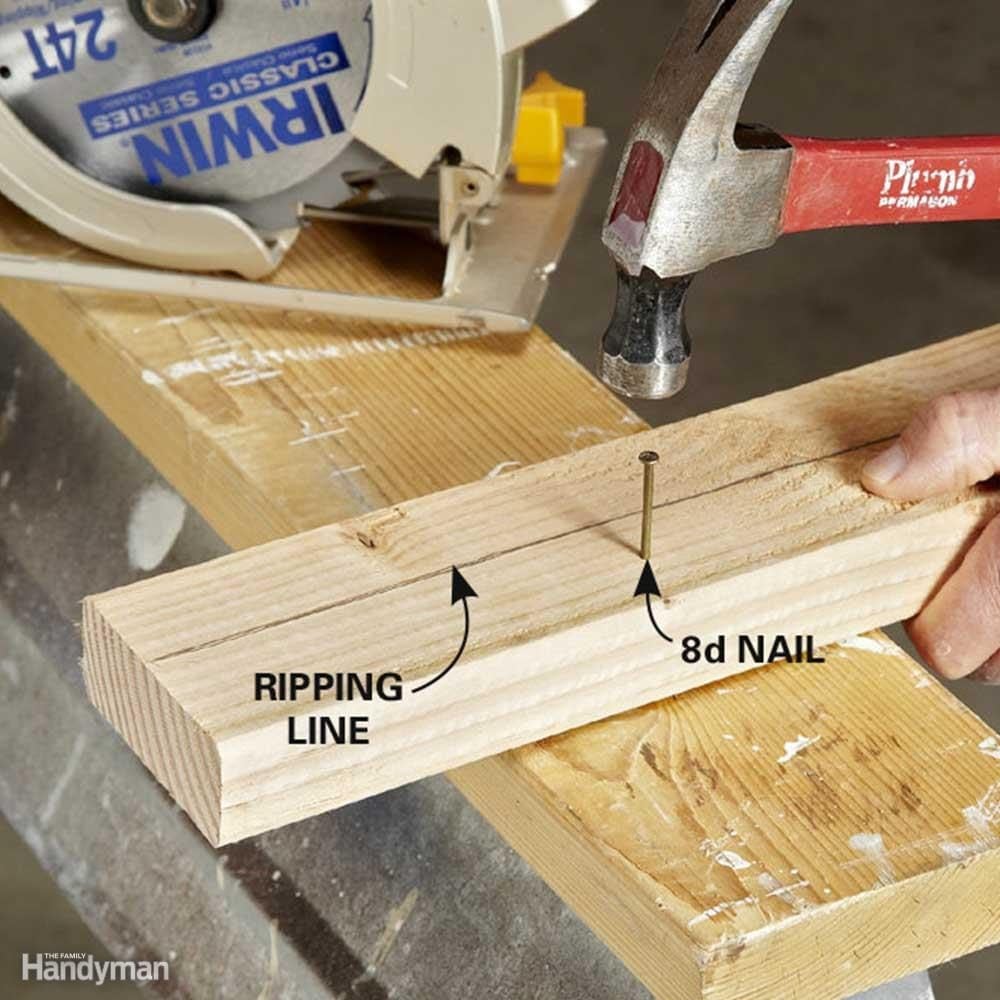
Use an 8d Nail as a Third Hand
If you’re without a table saw and need to rip boards with a circular saw, here’s a tip to make the job a lot easier. Drive an 8d nail through the board and into the sawhorse to prevent the board from slipping while you rip it. When you’re done ripping, just pull the board off the sawhorse, flip it over and pound the nail through and pull it out. It only takes a few seconds and eliminates the frustration of a slipping board.
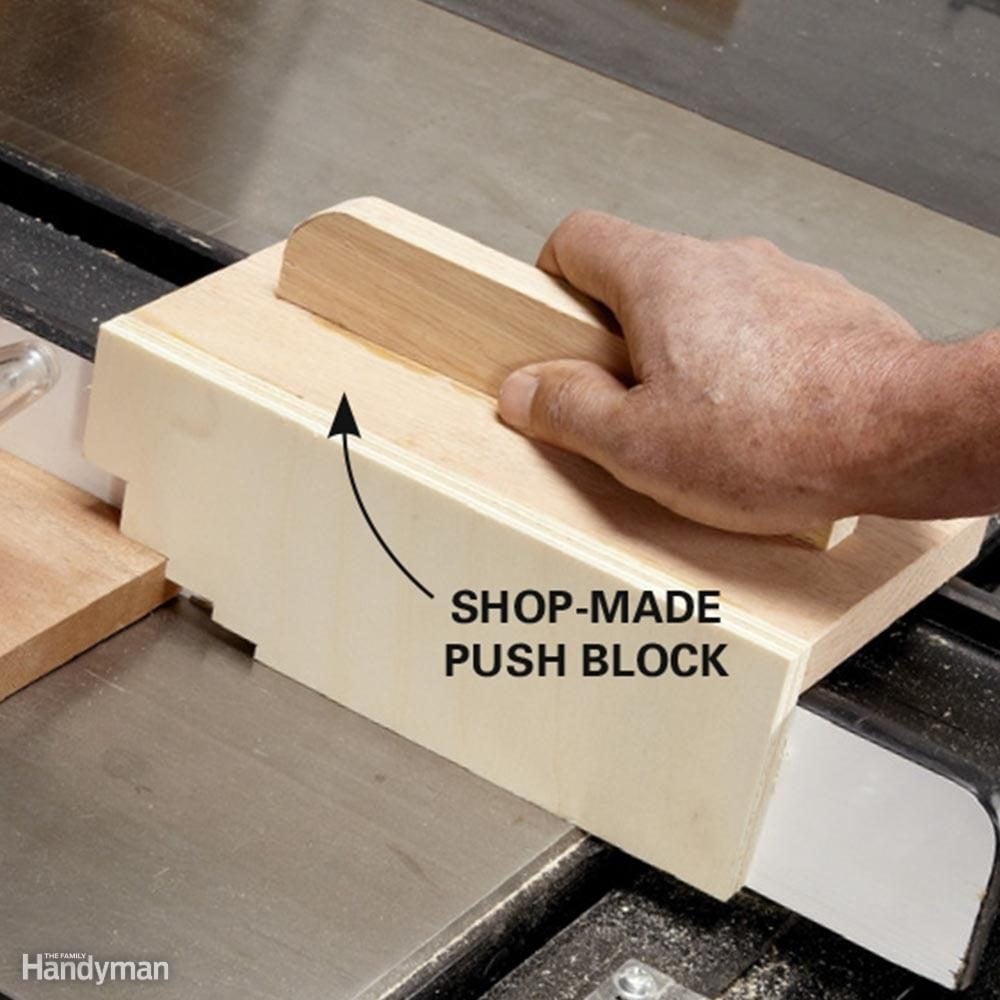
Build a Custom Push Block
Here's a push block that works great and keeps your hand safely away from the blade. It's just a piece of 1/2-in. plywood with notches to fit 1/4-in., 1/2-in., 3/4-in. and 1-1/2-in. boards or plywood. The notches help hold the board tight to the saw table, and the top handle slides along the top of your fence.
Make the notched plywood 11/16 in. taller than the height of your fence. Then glue it to a 3/4-in.-thick board with a handle attached.
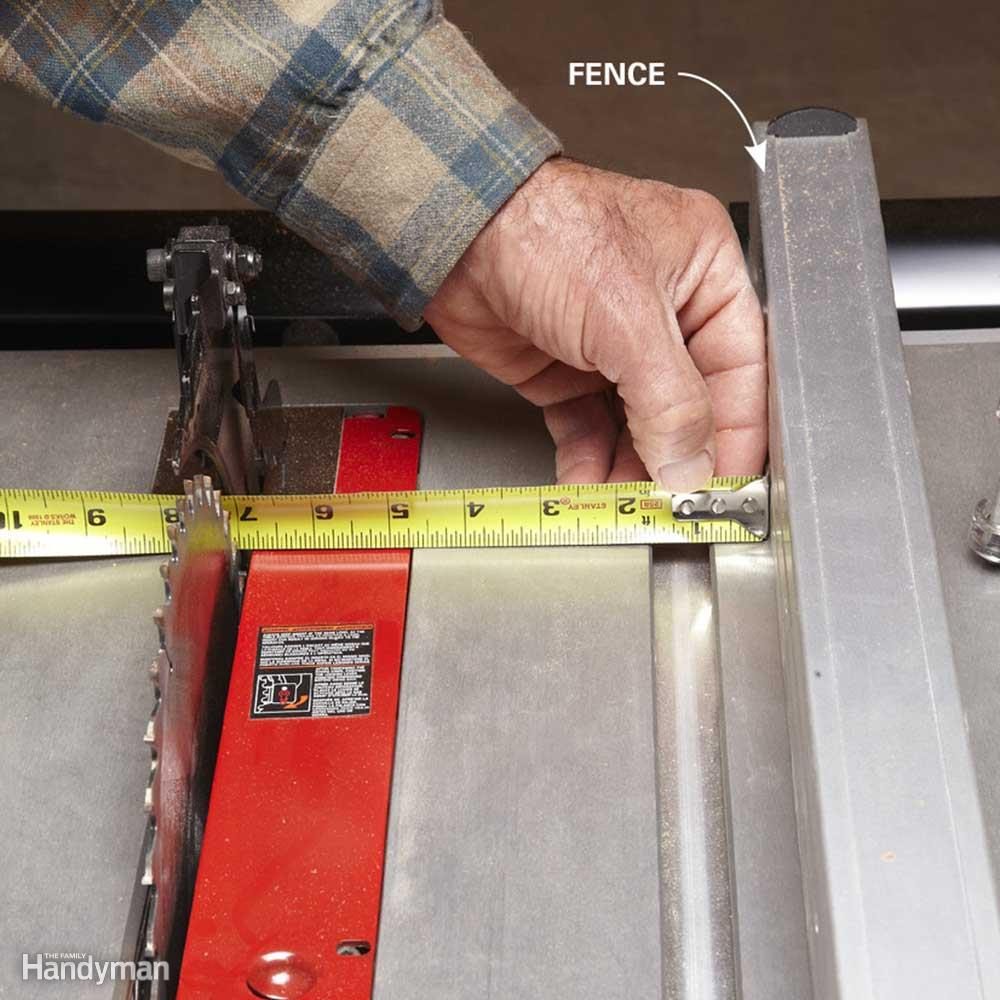
Check the Fence Alignment
It's critical that the fence be parallel to the saw blade. If it's not, the blade will bind on the wood and cause a burned edge on your board, or worse, a dangerous kickback. If you have a saw with a top-quality fence that locks down squarely, then you should only need to check and adjust the fence the first time you use it. Read your owner's manual for instructions on adjusting your fence. Fences on less expensive saws can be inconsistent, and you'll need to check every time you reposition the fence.
Here's how: Measure the distance between a saw tooth and the fence at the front and back of the blade. Raise the blade fully for the most accurate check. For an accurate reading, make sure to choose two teeth that lean toward the fence. If the measurements are different, either adjust the fence or nudge it into position until the measurements are equal before locking it down.
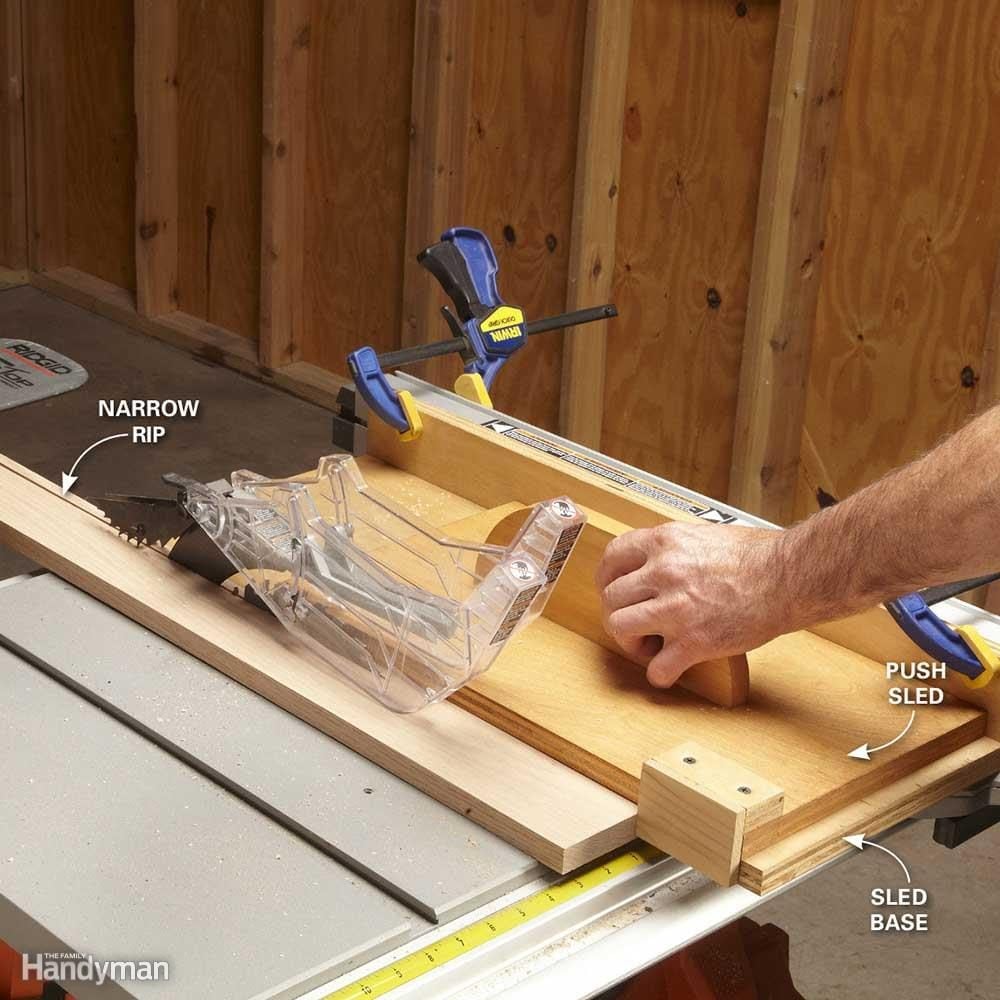
Make Narrow Rips Safely
The problem with making repetitive narrow rips on a table saw is that the blade guard and the fence are too close together to allow a push stick to fit between them. The solution is to move the fence away from the blade and clamp the sled base to the fence. Then build a push sled like the one shown (see next tip for measurements) to push the narrow rip through the blade. The sled slides under the blade guard and keeps your hand a safe distance from the blade, allowing you to make thin rips safely and easily.
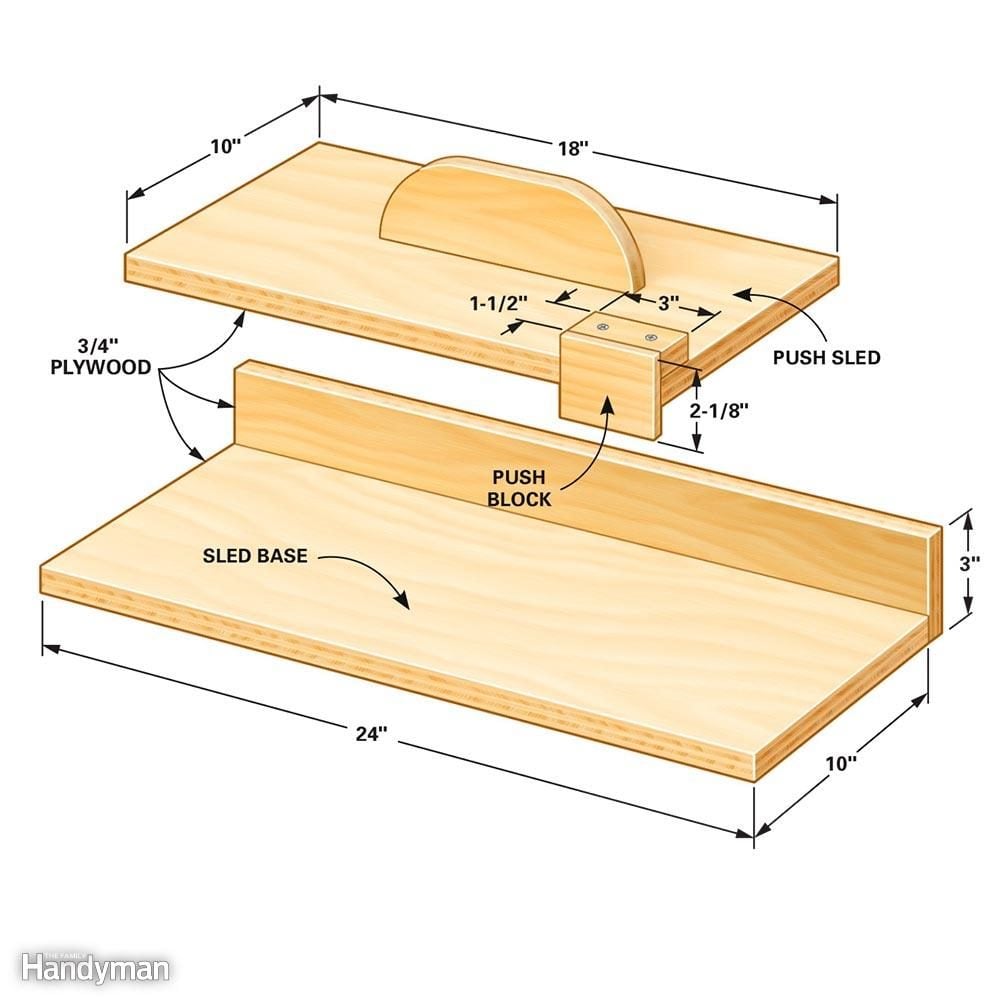
Build a Push Sled
To make a push sled, rip your board as you normally would by sliding it against the fence extension. When you get within reach of your push sled, hook the sled behind the board you're ripping and push it through, just like you would if you were using a regular push stick.
Straighten a Crooked Edge
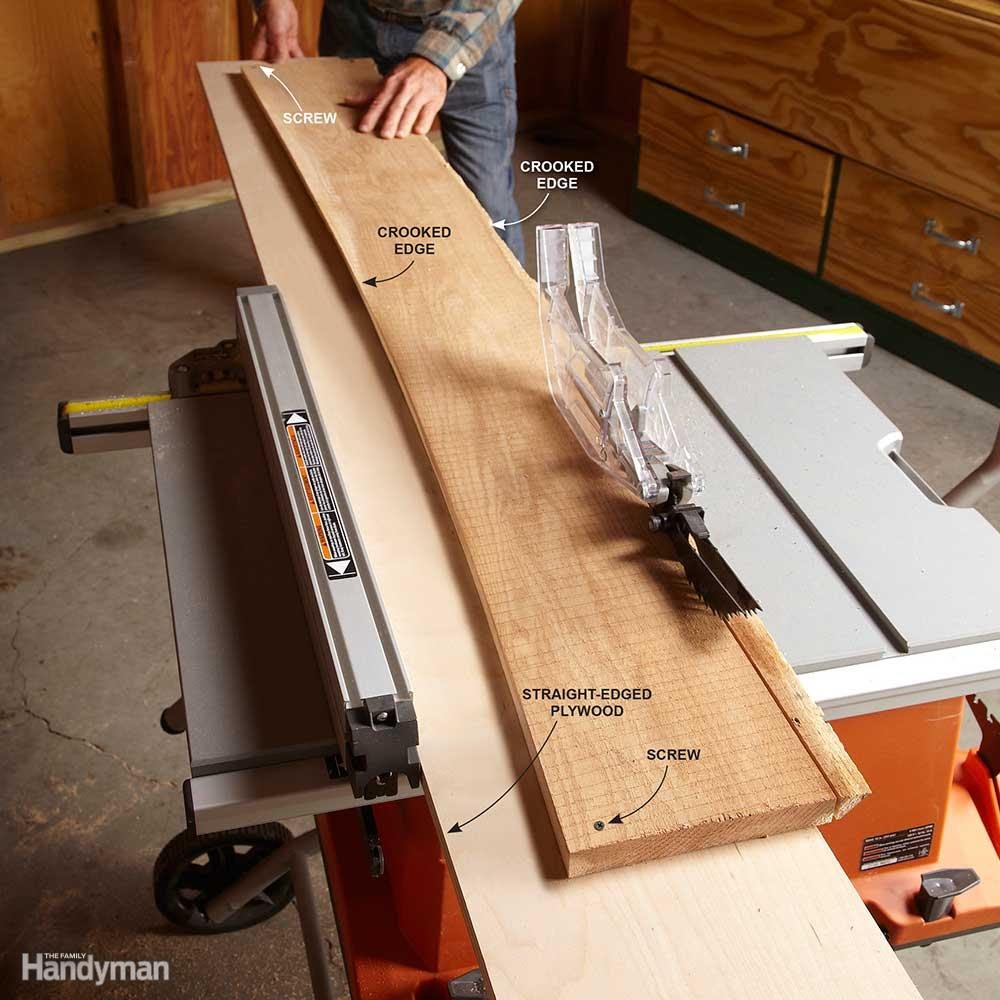
If you run the crooked edge of a board against the table saw fence, you'll still have a crooked board when you're done. Or worse, the board will get bound between the fence and the blade during the cut.
Here's a handy, low-tech way to straighten the edge of any board. Just fasten the crooked-edge board to a straight strip of plywood, letting it overhang the edge. Then run the straight edge of the plywood against your table saw fence to make a perfectly straight edge on your crooked board.
Mount a Featherboard for Accurate Rips
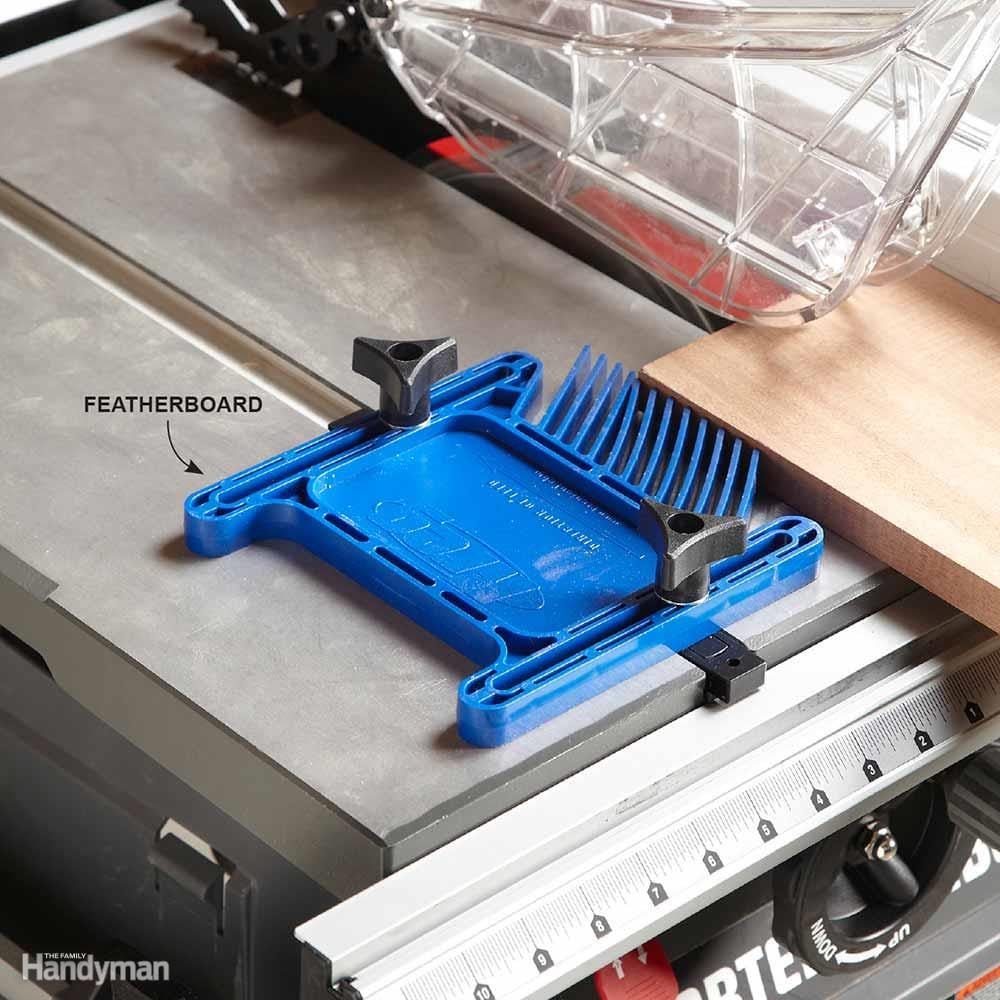
There are times when you want your rips to be super accurate, like when you're building face frames, door parts or other cabinet components. The key to accurate rips is to keep the edge of the board in constant, tight contact with the fence. It's easy with a featherboard mounted on your table saw top. This featherboard has expanding rails that lock into the miter gauge track.
If you have a cast iron bed on your table saw, you could buy a featherboard that attaches with super-strong magnets that make it simple to position and adjust. You can also make your own featherboard out of wood, and clamp it to the saw. Some saw manuals have instructions for this, or you can search online. Adjust the featherboard to apply a small amount of pressure to the board as you feed it through the blade. Make sure the “feathers” are in front of the infeed side of the saw blade to prevent binding. With a featherboard, your rips will be dead-on accurate every time.

Make Table Saw-Quality Rips With a Circular Saw
Even if you own a table saw, sometimes it's easier to rip large sheets of plywood with a circular saw. The trick to a perfectly straight cut is to clamp a straightedge to the plywood and use it as a guide for your saw. On most circular saws, the distance between the edge of the saw's base and the blade is 1-1/2 in., so you can simply position the straightedge 1-1/2 in. from your cutting line. But measure this distance on your saw to be sure.
You can buy a straightedge or use the factory edge of a plywood sheet. If your straightedge only has one straight edge, be sure to mark it to avoid using the crooked side.
Support Long Boards
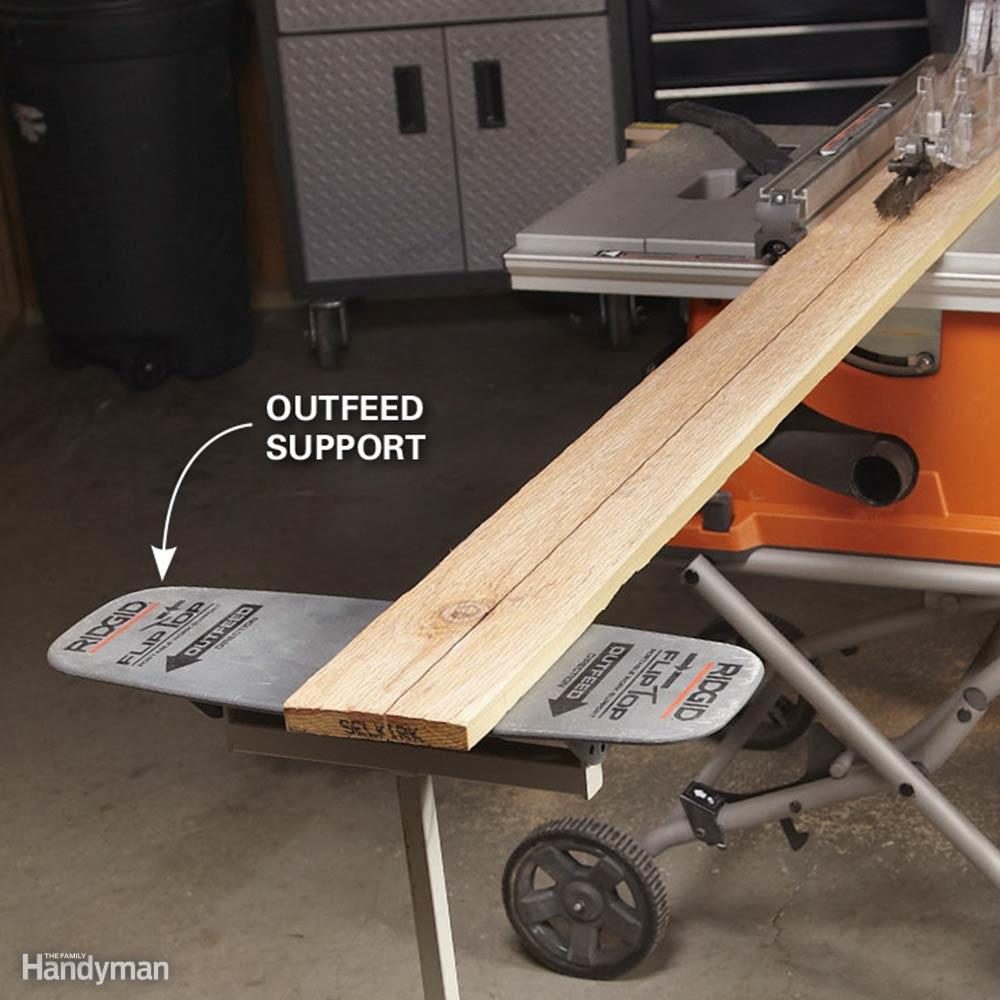
Table saws excel at ripping long boards, but it's dangerous to do it without supporting the board as it leaves the saw.
There are all kinds of ways to provide support. This photo shows a Ridgid Flip Top work support. The top surface swivels to allow the board to ride onto the support without catching.
There are several other types of outfeed supports you can buy, or just build your own. What's important is that you use a support every time you make long rips on a table saw.
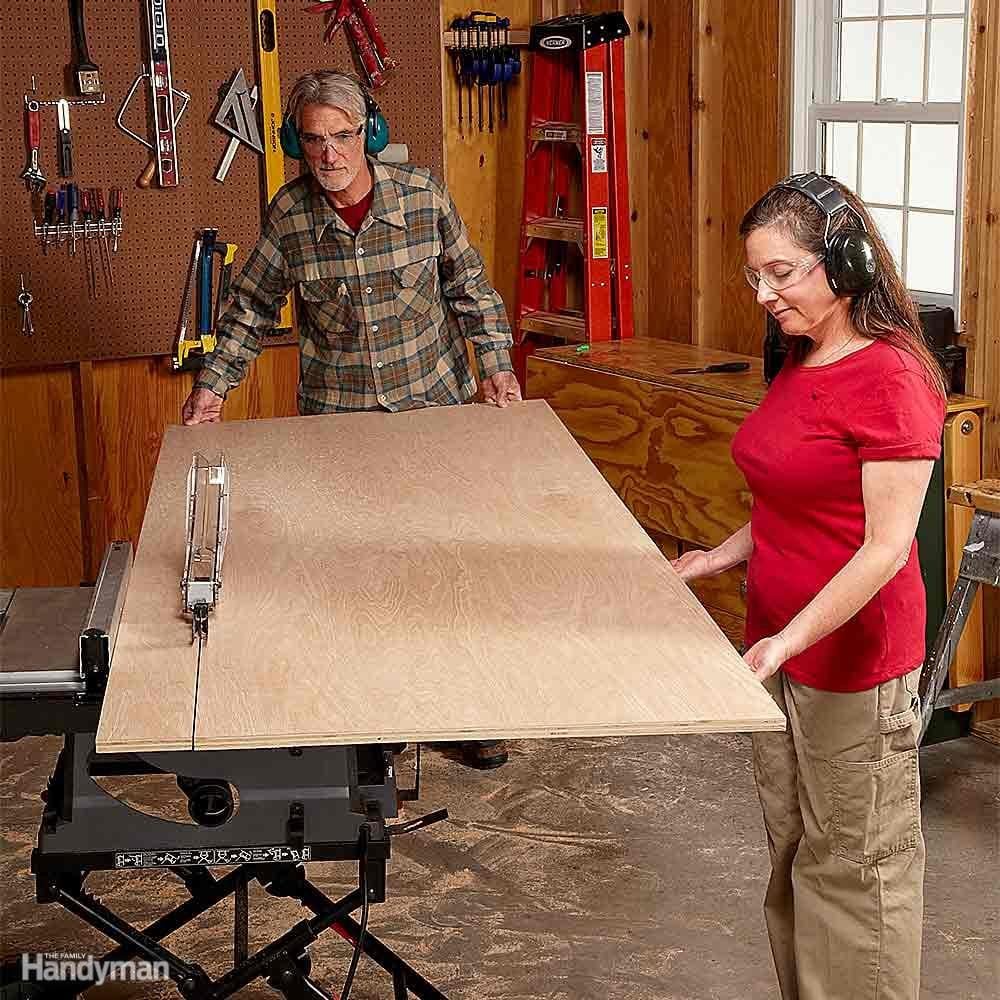
To Rip Large Sheets, You Need Well-Trained Help
Sometimes you need assistance to rip large sheets. The trouble is, most helpers try to be too helpful. They naturally want to grab the plywood and pull it or push it or steer it. Before you start, take time to teach your helper the right way. Instruct your helper to simply support the plywood, flat palms up, level with the saw bed, and let you do all the work. The helper should move along with the wood, but never grab the board or try to direct it. These simple rules will keep you both safe, and allow you to make a straight rip with no danger of binding or kickback.
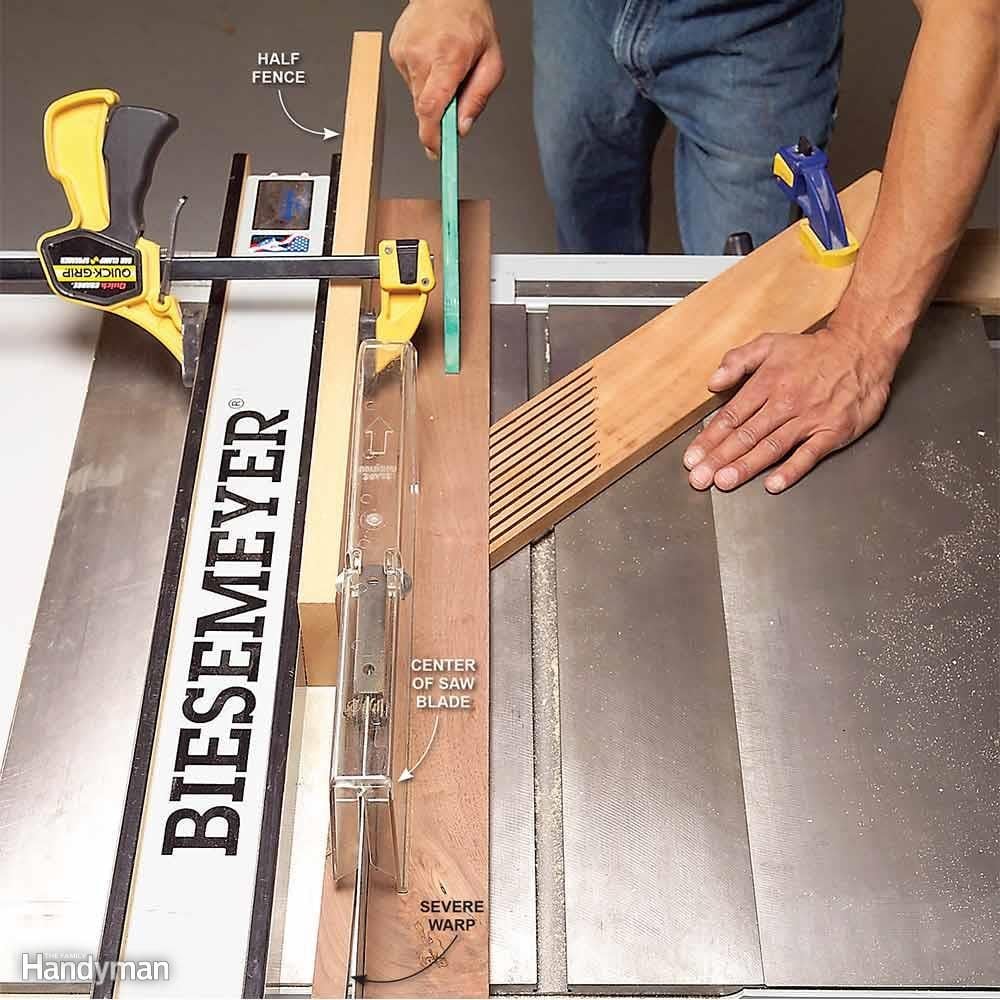
Use a Half Fence for Unruly Boards
Wood with knots or wavy grain and wood that has been dried unevenly will often warp badly as you rip it. If the halves bend outward, one will push against the fence and could cause burn marks or a dangerous kickback. If this begins to happen, shut off the saw and remove the board. You can rip the board safely by clamping a smooth, straight length of 3/4-in. wood against the fence, ending at the center of the saw blade. This half fence gives the trapped piece (the section between the blade and the fence) room to bend without pushing back against the blade. Keep push sticks handy so you can work around the clamps and complete the cut smoothly.
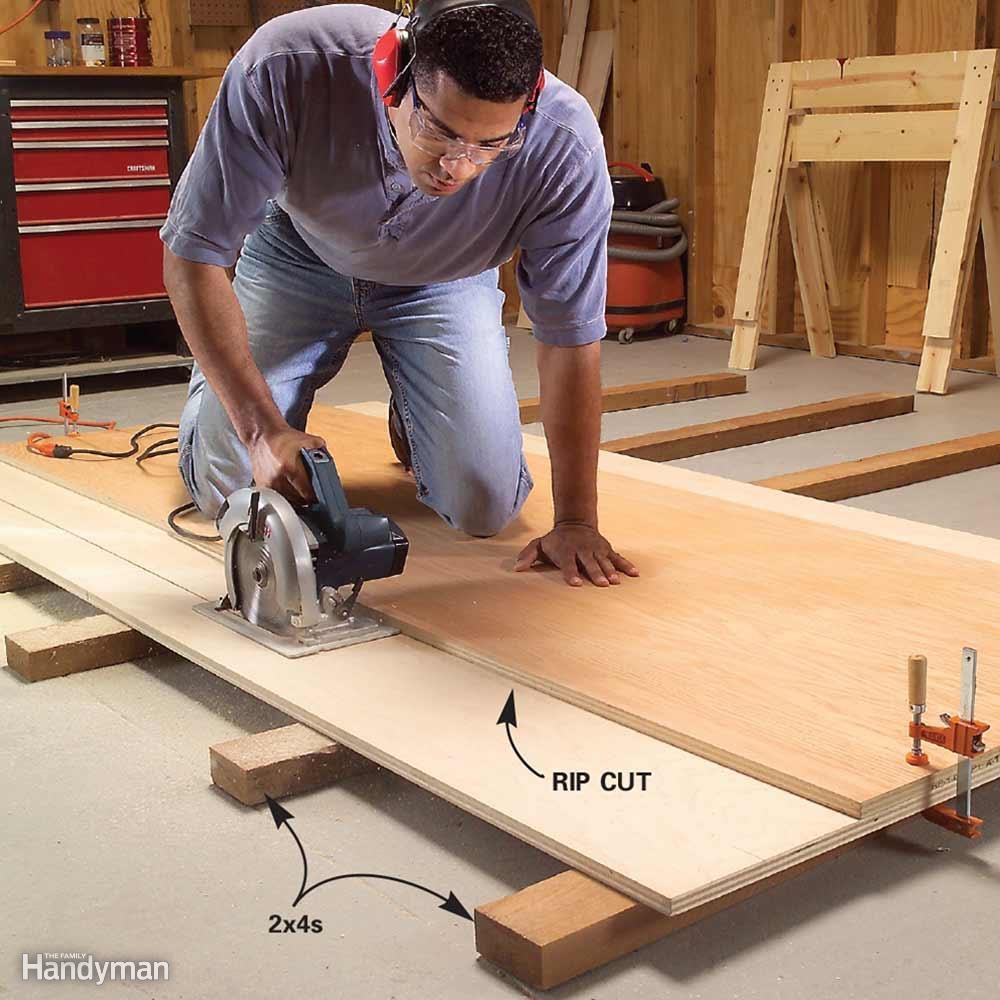
Cut Plywood on the Floor With Full Support
You can cut plywood on sawhorses with pretty good results, but when you want really smooth finish cuts on an expensive sheet, always cut on the floor. That way you're sure to get solid, stable support so the plywood won't move, even if you have to climb on top of it to complete your cut. It also ensures that the cutoff piece won't splinter, break or fall off as you finish the cut.
Lay 2x4s under the plywood perpendicular to the direction of the cut. The 2x4s will be cut just a bit when the blade passes over them, but that won't affect the quality of the cut. The system works well for both rip cuts (parallel to the grain) and crosscuts (perpendicular to the grain). The more stable the plywood, the better your chances for a perfectly smooth cut.
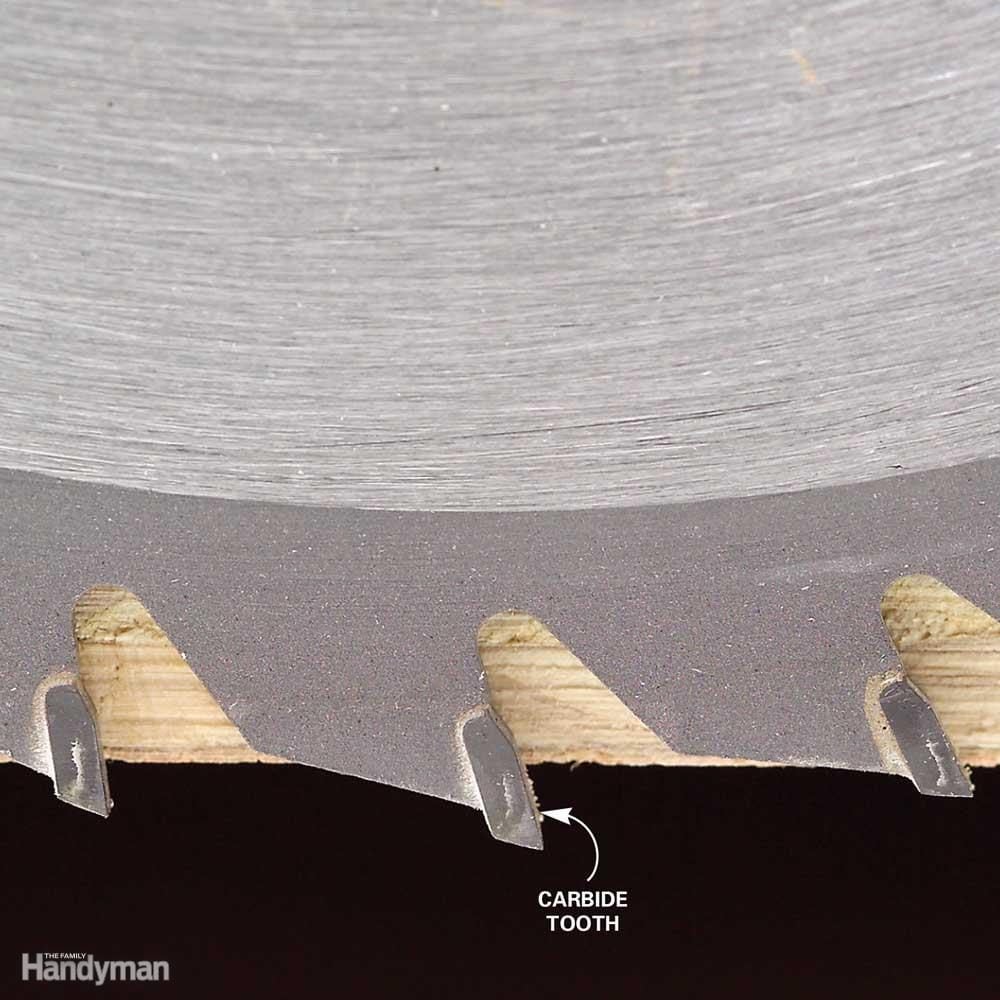
Set the Blade Depth to Just Clear the Plywood Thickness
Adjust the depth of your blade so that no more than half a carbide tooth falls below the bottom of the plywood. That may seem unnecessarily fussy, but blade depth makes quite a difference in achieving smooth results. This setting lets the teeth shear the wood fiber rather than chop it, and it helps stabilize the blade (less vibration). Both factors minimize saw tooth marks. The deeper you set your saw blade, the more marks you get.
Set the saw along the plywood edge, lift the guard and look closely as you set the depth. It's also a good time to check the blade for chipped or missing teeth. A blade with bad teeth or wood pitch buildup won't cut cleanly. Also note that a circular saw cuts on the upstroke, which often splinters the top edge (veneer) slightly. The bottom edge usually remains splinter-free. So always cut plywood with the good side down.
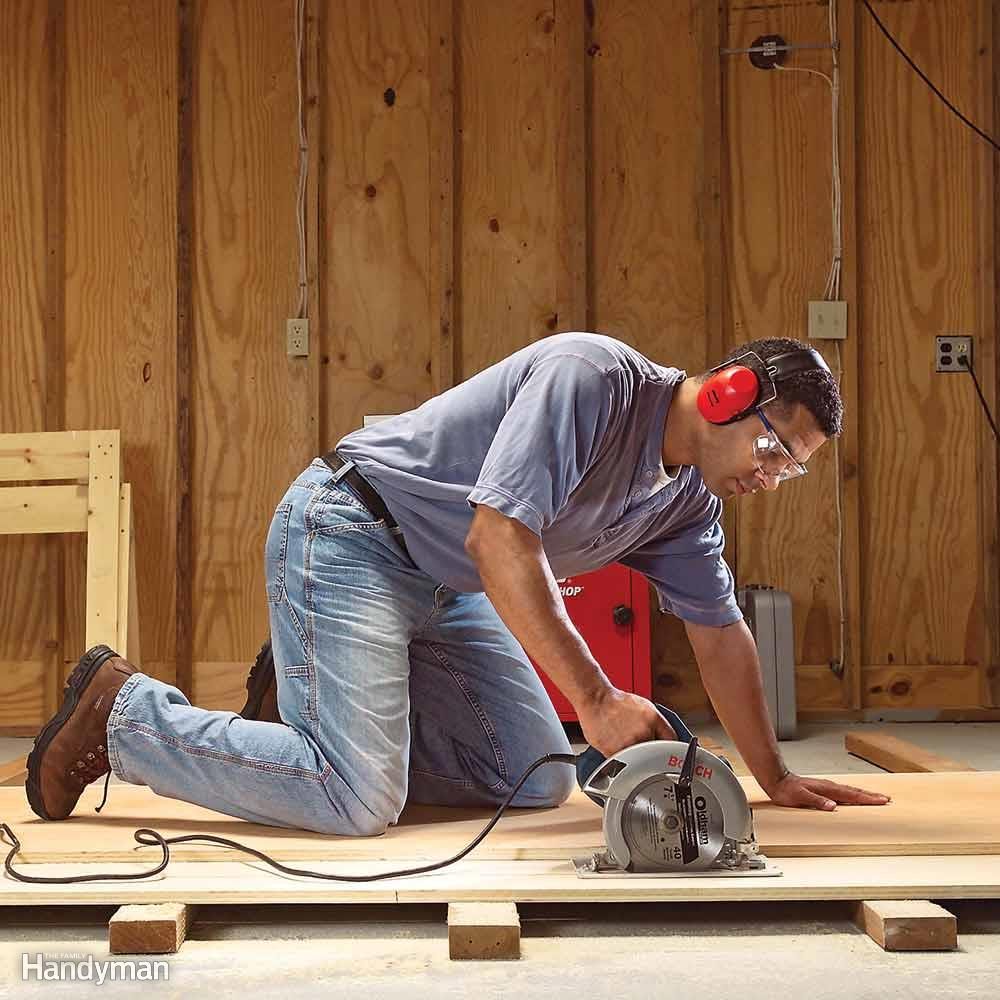
Make the Cut at a Steady Speed Without Stopping
Cutting speed depends on many factors, including the type and sharpness of the blade and the type of plywood you're cutting. In general, a sharp blade should flow through the wood with little force, as if it's melting the wood away. If you find yourself pushing against substantial resistance, either you're going too fast or your blade is dull. Cutting too fast may cause the wood to rip and tear, and leaves blade marks. Going too slowly may cause the blade to overheat and burn the wood.
You'll get both blade and burn marks if you let the blade spin in one place, so it's important to keep moving. This is where working on the floor pays off for long cuts. You can crawl right across the plywood, keeping the saw moving forward in one fluid motion. And you don't have to bend or stretch into an awkward position.
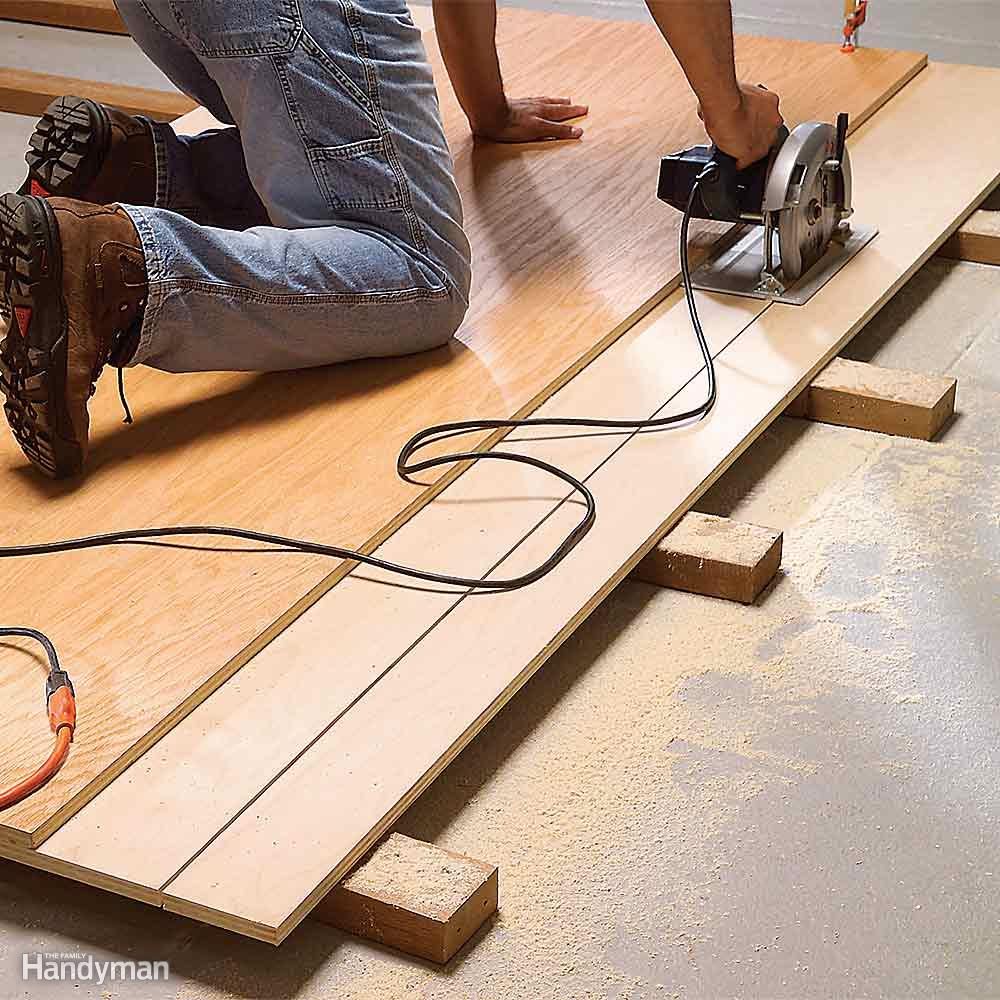
Watch for Cord Snags
If a cord gets hung up, it can ruin a cut. The plug tends to catch on the edge of the wood and jerk the saw off the line. Sometimes the saw even comes unplugged. Be sure to set enough slack on top of the plywood so you don't get hung up. Also, be sure to keep the saw going all the way through the end of the cut.
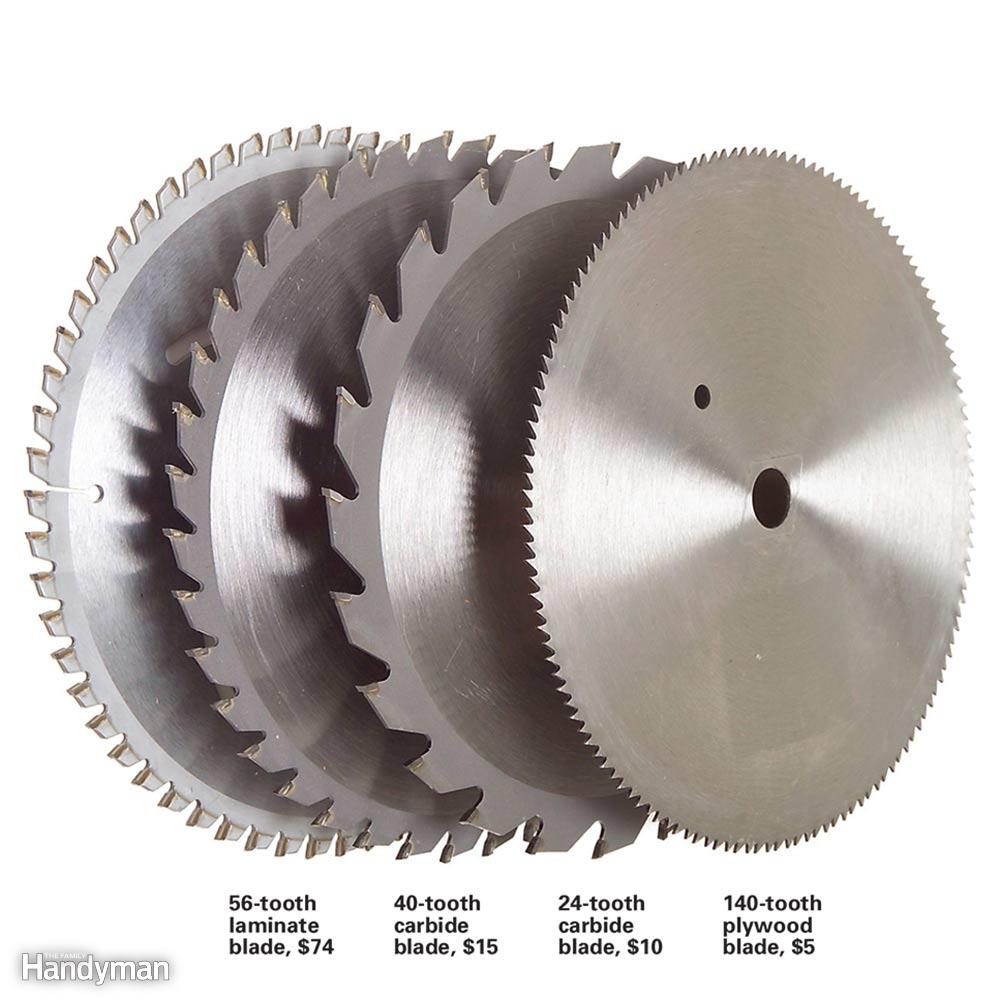
Choose a Circular Saw Blade With More Teeth for Smoother Cuts
As long as they're sharp, any of these four 7-1/4-in. blades will make smooth rip cuts in plywood and reasonably good crosscuts. In general, the more teeth, the smoother the cut. The disadvantage of the 140-tooth plywood blade is that the teeth will dull much faster than the teeth on the three carbide blades. This is especially true if you cut particleboard. The 40-tooth carbide blade is a good all-around blade. However, if you have a project that calls for a lot of fine cuts in expensive plywood, don't hesitate to buy the special 56-tooth laminate-cutting blade.