
25 Ways to Fix Gutter Leaks and Other Roofing Issues
Updated: Apr. 23, 2024
A solid, leak-free roof with good gutters defends your home against the elements. Arm yourself with the knowledge to understand how roofs work and keep your home safe and dry.
Leaky Roof Overview
If you have water stains that extend across ceilings or run down walls, you probably also have a leaky roof. The guesswork lies in finding the leak; the repair is usually pretty easy. We’ve gathered some simple tricks for finding and repairing most of the common types of leaky roofs. But if you live in the Snow Belt and your roof leaks only on warm or sunny winter days, you probably have ice dams. We won’t go into that roof leak repair in this story.
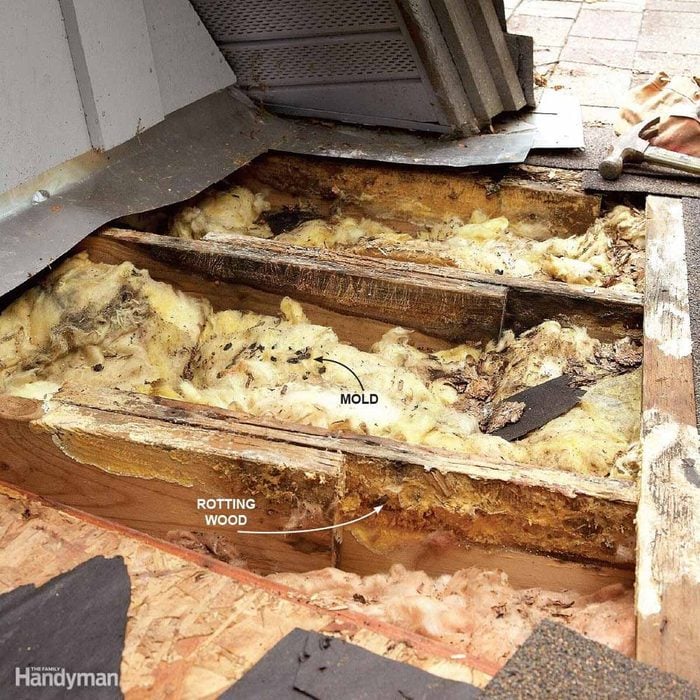
If you have a leaky roof, you’d better fix it immediately, even if it doesn’t bother you much or you’re getting a new roof next year. Even over a short time, small leaks can lead to big problems, such as mold, rotted framing and sheathing, destroyed insulation and damaged ceilings. The flashing leak that caused an expensive repair bill was obvious from the ceiling stains for over two years. If the homeowner had dealt with it right away, the damage and subsequent repairs would have been minimal.
How to Find Roof Leaks
When you’re trying to track down a leak, start by looking at the roof uphill from the stains. Look for any roof penetrations first. Items that penetrate the roof lead to most of the common leaks. In fact, open areas of uninterrupted shingles rarely leak, even on older roofs. Penetrations can include plumbing and roof vents, chimneys, dormers or anything else that projects through the roof. They can be several feet above the leak or to either the right or left of it.
If you have attic access, tracking down a leak becomes easier. Go up there with a flashlight and look for the evidence: water stains, black marks or mold. Poor access or vaulted ceilings present a problem; in these cases you have to go up onto the roof and examine the suspect(s).
A Trick for Finding Difficult Leaks
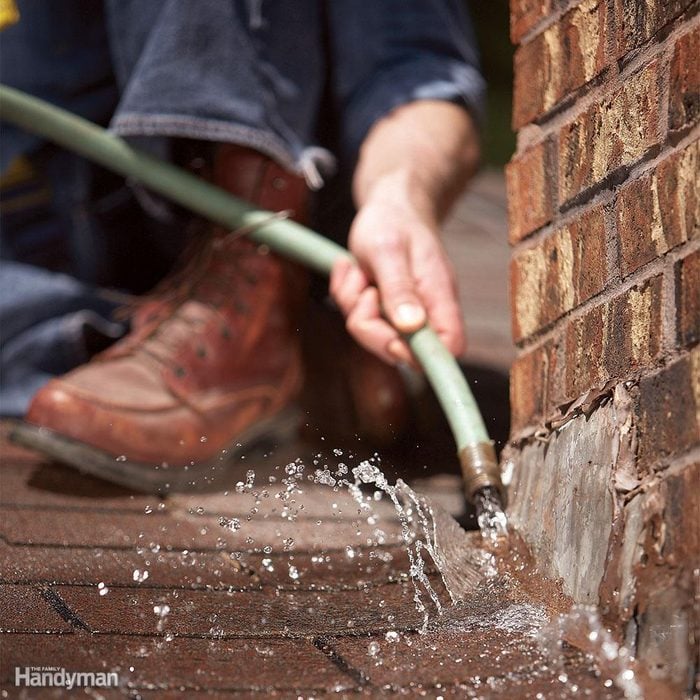
When dealing with a difficult leak, enlist a helper, and then go up on the roof with a garden hose. Start low, soaking the area just above where the leak appears in the house. Isolate areas when you run the hose. For example, soak the downhill side of a chimney first, then each side, then the top on both sides.
Have your helper stay inside the house waiting for the drip to appear. Let the hose run for several minutes in one area before moving it up the roof a little farther.
Tell your helper to yell when a drip becomes visible. You’ll be in the neighborhood of the leak. This process can take well over an hour, so be patient and don’t move the hose too soon. Buy your helper dinner. If running water doesn’t reveal the exact location of the leak, don’t be timid.
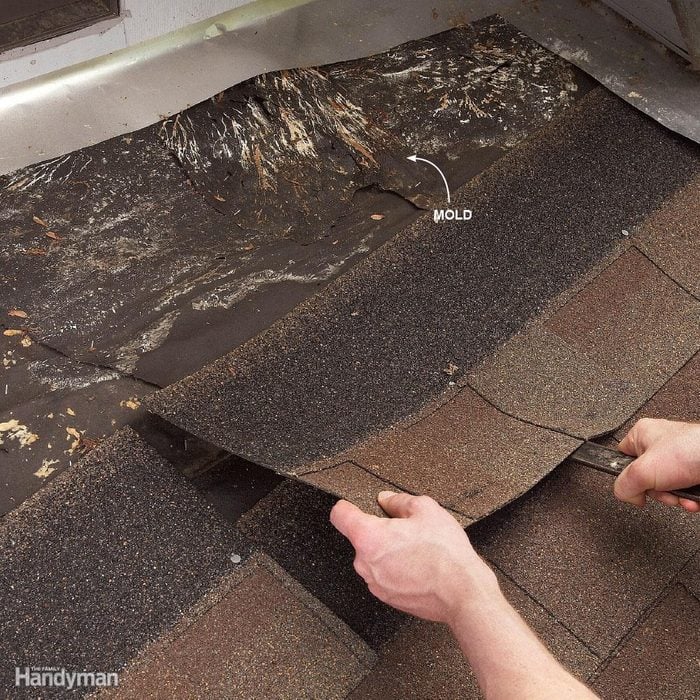
Start removing shingles in the suspect area. Once removed, evidence of the leak becomes visible and you can track it right to the source. Discolored felt paper or water-stained — even rotted — wood shows up directly below and around leak.
Solution for a Small Leak
Sometimes you can’t find a leak because the water shows up at a ceiling spot distant from the problem spot. If your ceiling has a plastic vapor barrier between the drywall and the attic insulation, push the insulation aside and look for flow stains on the plastic. Often water runs to openings in the vapor barrier, such as at ceiling light fixtures.
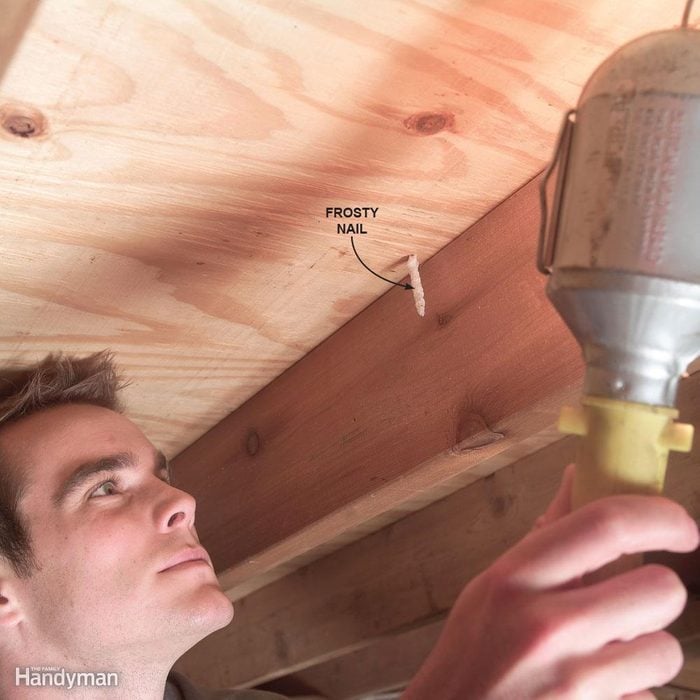
If you can’t see any telltale flow marks, and because the stain is fairly small, look at the underside of the roof for ‘shiners.’ A shiner is a nail that missed the framing member — in this case, when the carpenter nailed the roof sheathing to the rafters.
Moisture that escapes into the cold attic from the rooms below often condenses on cold nails. Sometimes you can spot this if you climb up into your attic on a cold night. The nails appear white because they’re frosted.
When the attic heats up a bit during the day, the frost melts and drips, then the nails frost up at night again, and so on. Simply clip the offending nail with a side-cutting pliers.

Fix Plumbing Vent Boots
You’ll find plumbing vent boots made entirely from plastic, plastic and metal, or even two-piece metal units. Check plastic bases for cracks and metal bases for broken seams. Then examine the rubber boot surrounding the pipe. That can rot away or become torn, both of which allow water to work its way into the house along the pipe. With any of these problems, you should buy a new vent boot to replace the old one.
If you see missing nails at the base or find some that have pulled free you can replace them with the rubber-washered screws used for metal roofing systems — if the boot is in good shape. You can get them at any home center, located with the rest of the screws.
To replace a roof vent, you have to work the neighboring shingles free on both sides. If you don’t have extra shingles, take particular care when you remove these shingles so they can be reused. Use a flat bar or putty knife to separate the sealant between the layers. Then you can drive a flat bar under the nail heads to pop out the nails.
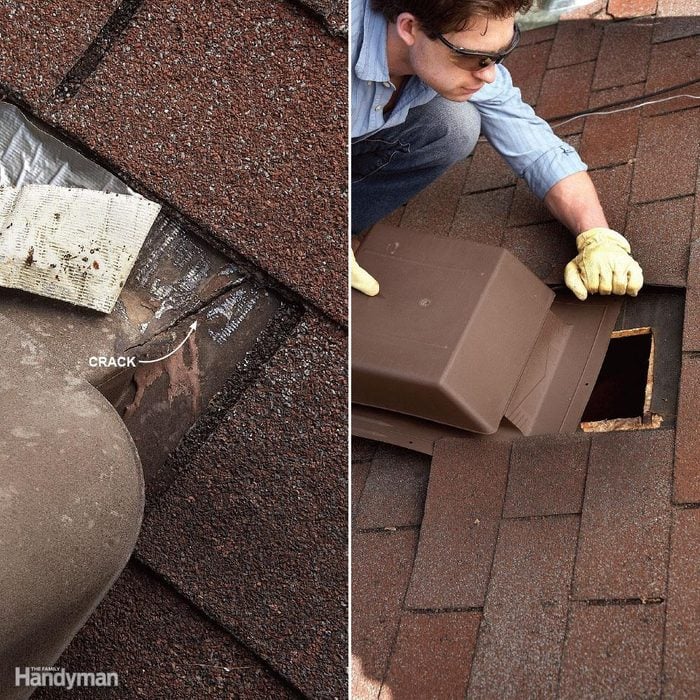
How to Fix Roof Vents
Check for cracked housings on plastic roof vents and broken seams on metal ones. You might be tempted to throw caulk at the problem, but that solution won’t last long; you must replace the damaged vents.
Also, look for pulled or missing nails along the base’s bottom edge. Replace them with rubber-washered screws. In most cases, you can remove nails under the shingles on both sides of the vent to pull it free. You should find nails across the top of the vent, too.
Usually you can also work those loose without removing shingles. Screw the bottom in place with rubber-washered screws. Squeeze out a bead of caulk beneath the shingles on both sides of the vent to hold the shingles down and to add a water barrier — a much easier task than renailing the shingles.
Fix Walls and Dormers
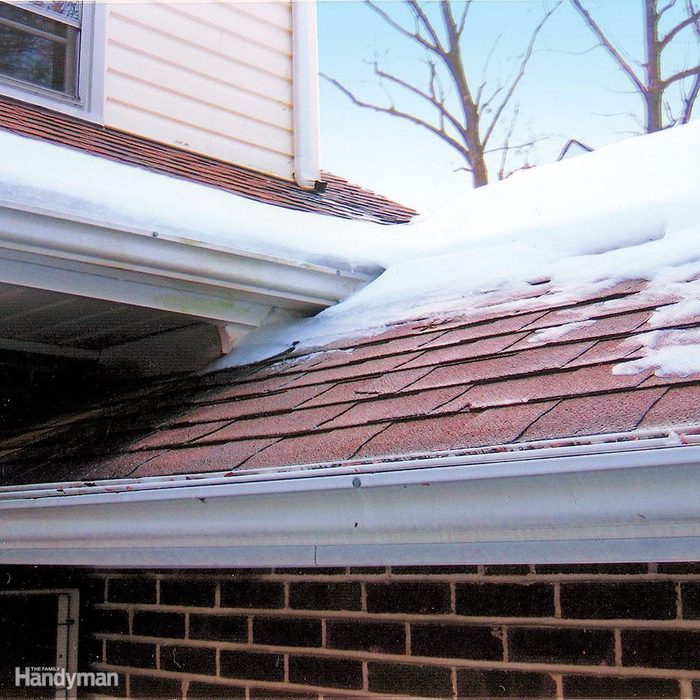
Complex Roof Problem
This roof leaks during the snowy part of winter and during storms in the summer, certainly because of poor flashing. The soffit that meets the roof is one of the toughest areas to waterproof. In the photo, you can still see signs of an ice dam. An ice dam occurs when snow melts and the water refreezes as it hits the colder edges of the roof. Eventually, water pools behind the dam and works its way back up under the shingles and under the soffit until it finds an opening through the roof.
The solution begins with good flashing, as this should stop leaks from rainfall and might stop the leaks from ice dams, as well. Begin by removing the shingles down to the wood sheathing and slip a strip of adhesive ice-and-water barrier (available where roofing repair products are sold) under the soffit/main roof joint.
Depending on how the roofs join, you may have to cut a slot to work it in far enough. It should overlap another piece of ice-and-water barrier laid below, all the way down to the roof edge. Doing this should cover the most leak-prone areas.
Then reshingle, sliding metal step flashing behind the fascia board (the trim behind the gutter). The valley flashing, laid over the joint where the two roofs meet, should overlap the step flashing at least 2 in. If leaks continue to occur from ice dams, consider installing roof-edge heating cables.
Improved attic insulation and ventilation usually provide the best strategy to prevent ice dams, but they may not resolve this complicated leaky-roof situation.
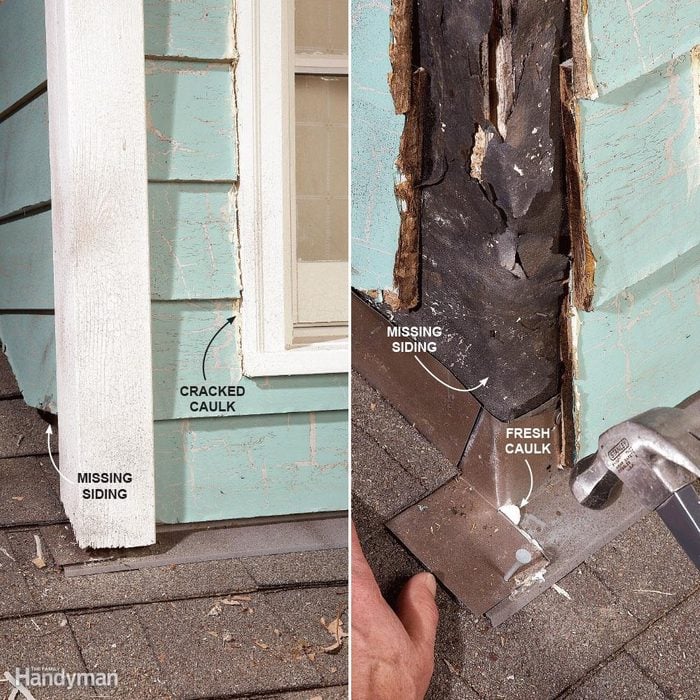
Fix Step Flashing
You find step flashing used along walls that intersect the roof. Each short section of flashing channels water over the shingle downhill from it. But if the flashing rusts through, or a piece comes loose, water will run right behind it, and into the house it goes. Rusted flashing needs to be replaced.
That means removing shingles, prying siding loose, and then removing and replacing the step flashing. It’s that simple. But occasionally a roofer forgets to nail one in place and it eventually slips down to expose the wall.
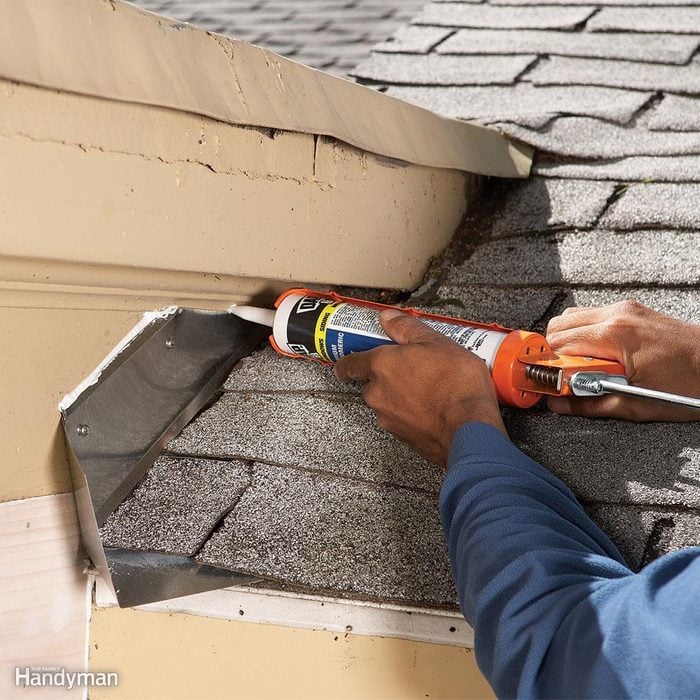
Don’t Count on Caulk
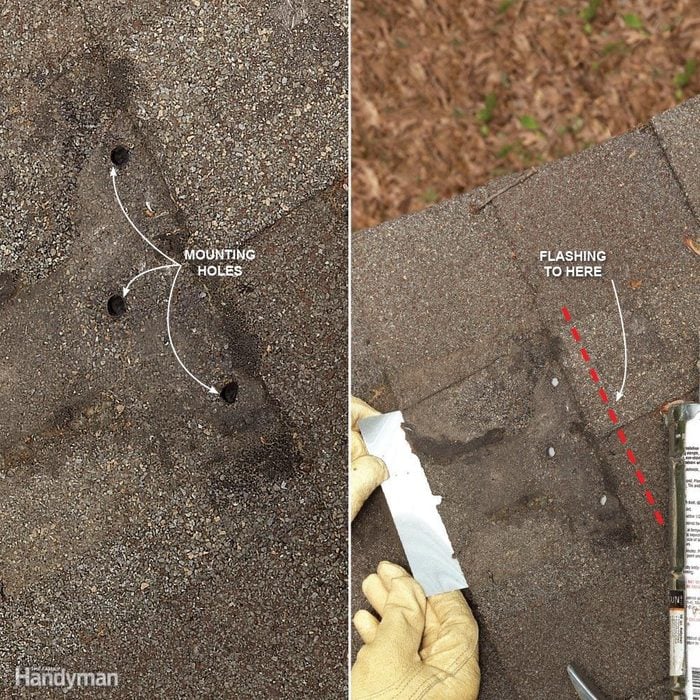
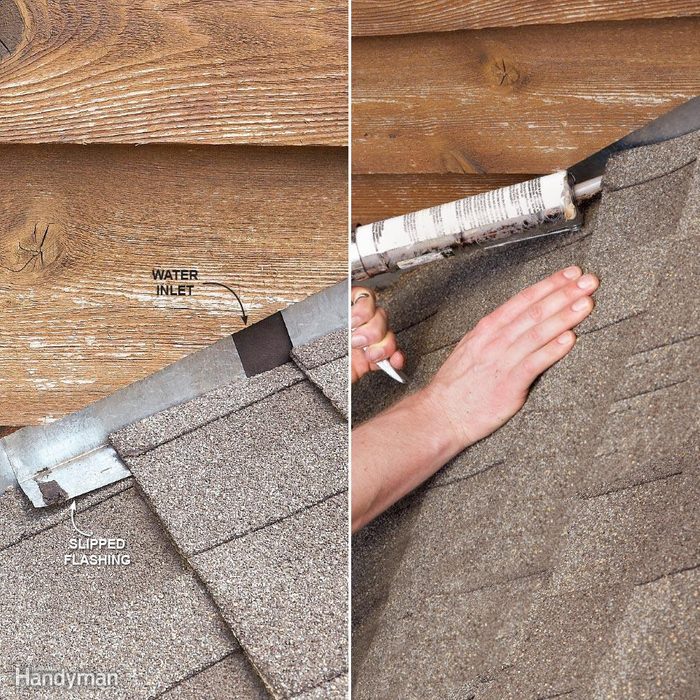
Fix Small Holes
Tiny holes in shingles act as sneaky sources of damage because they can cause rot, a water penetration and other problems for years before you notice the obvious signs of a leak. You might find holes left over from a removed satellite dish or antenna-mounting brackets or just about anything.
And exposed, misplaced roofing repair nails should be pulled and the holes patched. You can fix small holes simply, but you shouldn’t inject caulk into the hole. You fix this leaky roof problem with flashing.
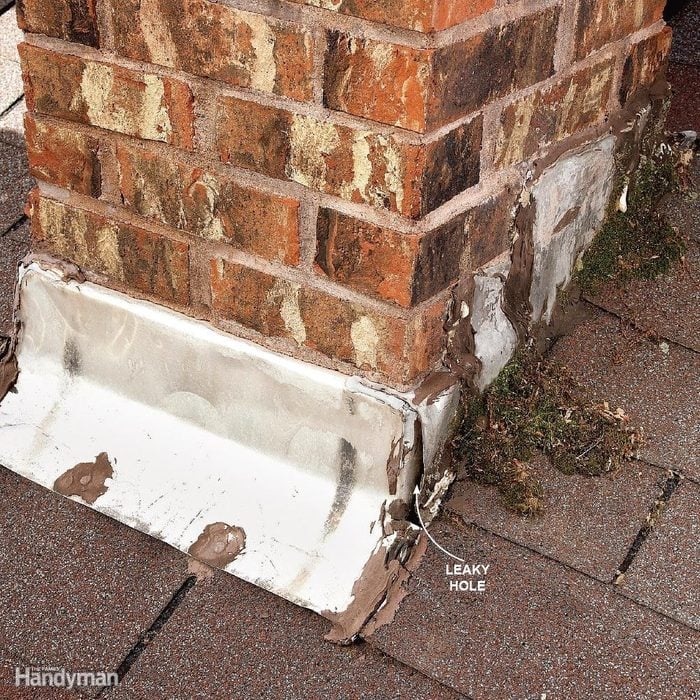
Leaks Around Brick Chimneys
All kinds of bad things can happen around brick chimneys. Too many, in fact, to cover in this article. Galvanized-steel flashing around chimneys can rust through, particularly at the 90-degree bend on the chimney’s downhill side.
Execute a quick but fairly long-term fix by simply slipping new flashing under the old, rusted stuff. That diverts any water that seeps through and solves the issue. The best fix, though, lies in cutting a new saw kerf into the mortar and install a fresh piece of flashing.
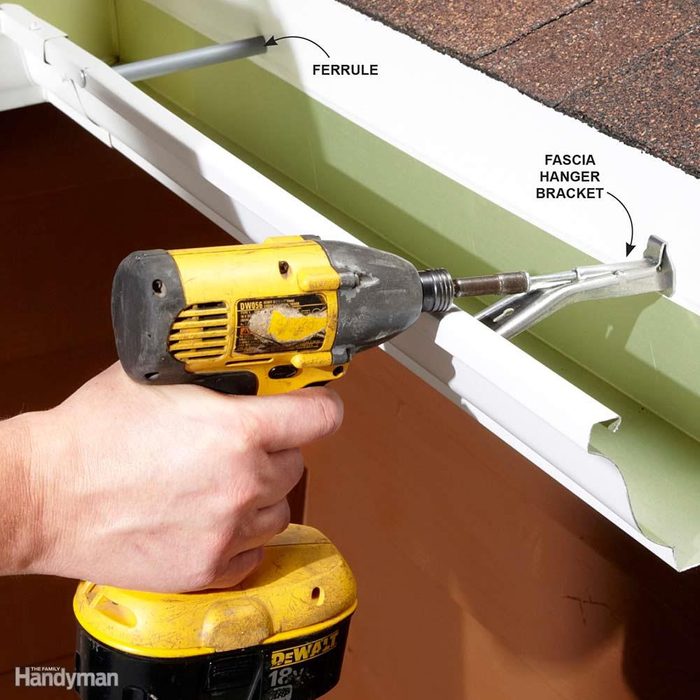
Loose Gutters
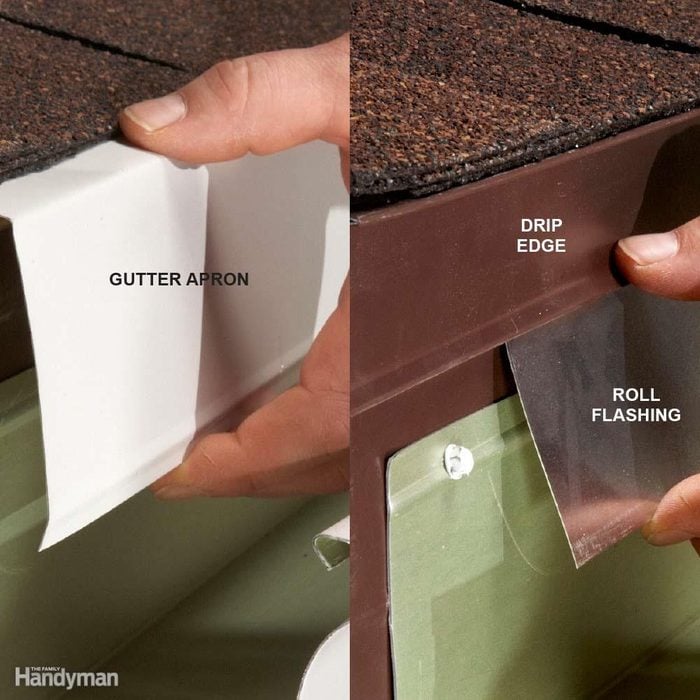
Water Gets Behind the Gutter
Annoying Drips
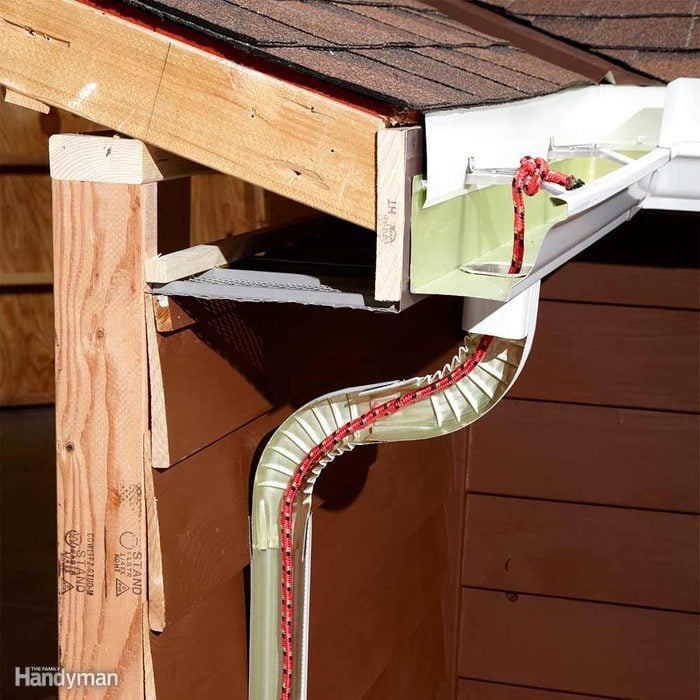
Is the sound of dripping in your downspouts driving you mad? Eliminate the problem by tying a rope onto one of the gutter hangers and running it down into the downspout. Drops of water will cling to the rope instead of plummeting the whole length of the downspout and causing that loud dripping noise.
Adding a rope does restrict water flow, so think twice if your gutter tends to overflow or if your downspout clogs with twigs and leaves. Choose a rope made of a synthetic like nylon — a rope made from natural fibers will rot away.

Make Repairs With a Slip Joint
If a tree branch falls on the last 4 ft. of your 60-ft. seamless gutter, you don’t need to replace the whole thing; just replace the damaged section. For white or brown gutters, you can easily add a section to the existing gutter. Most home centers sell white and brown sections of gutters as well as slip joints to tie them together.
For custom-color, gutters, a home center can special-order your color but not the slip joint to match. But don’t worry; you can make your own from a box miter, and box miters are available in every gutter color made.
When you buy the new gutter section, make sure you order either an inside or outside box miter at the same time. Cut a 3-in. section from the box miter with a tin snips, and you’ve got yourself a custom slip joint. Hang the new gutter next to the old one, and then slide the patch under the seam.
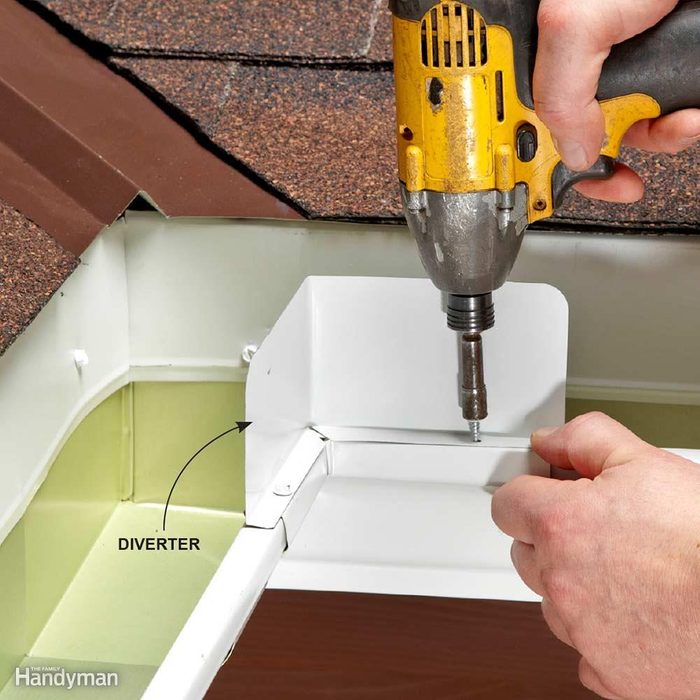
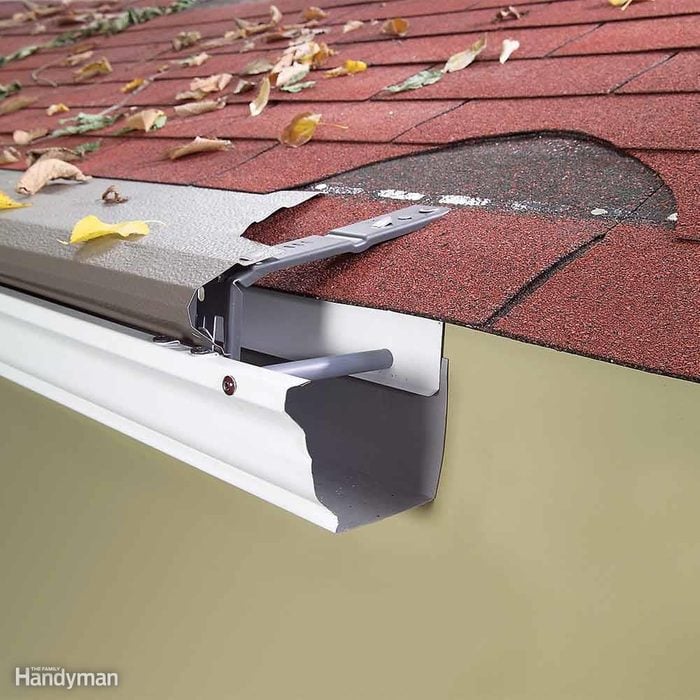
Water Spills Over Gutter
Some roofs have long sections of valley that carry a lot of rainwater at high velocity. When that water comes blasting out the end of the valley, it can shoot right over the gutter. A diverter will help direct the water back into the gutter where it belongs. Fasten a diverter with a couple of sheet metal screws to the top of the outside edge of the gutter. Here, learn how to install ice-proof rain gutters.
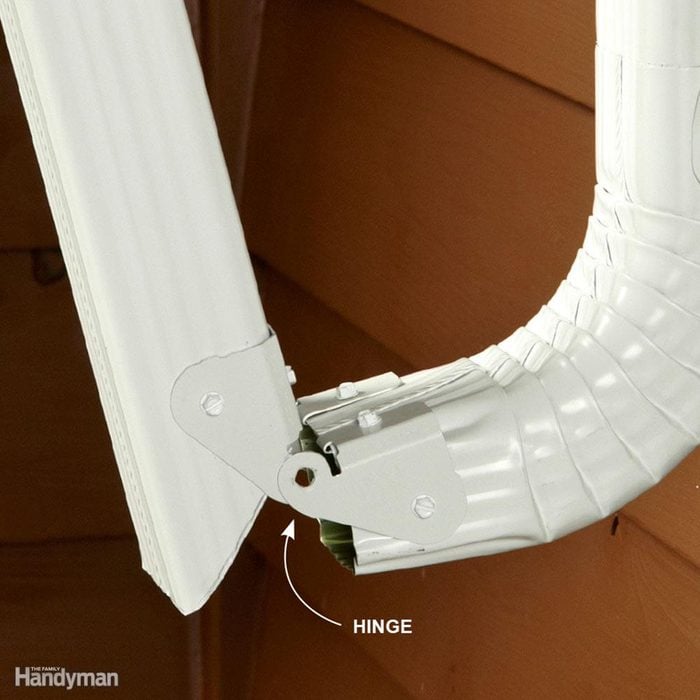
Downspout in the Way
Are you tired of removing your downspouts every time you mow? Consider installing a hinge where the lowest elbow meets the section of downspout that runs into your yard.
Install it easily: Just cut the downspout at a 45-degree angle with a tin snips or metal-cutting blade, and then fasten a two-piece Zip Hinge with eight sheet-metal screws. The hinges come in white only, so you might have to spray-paint them to match.
Leaky Gutters
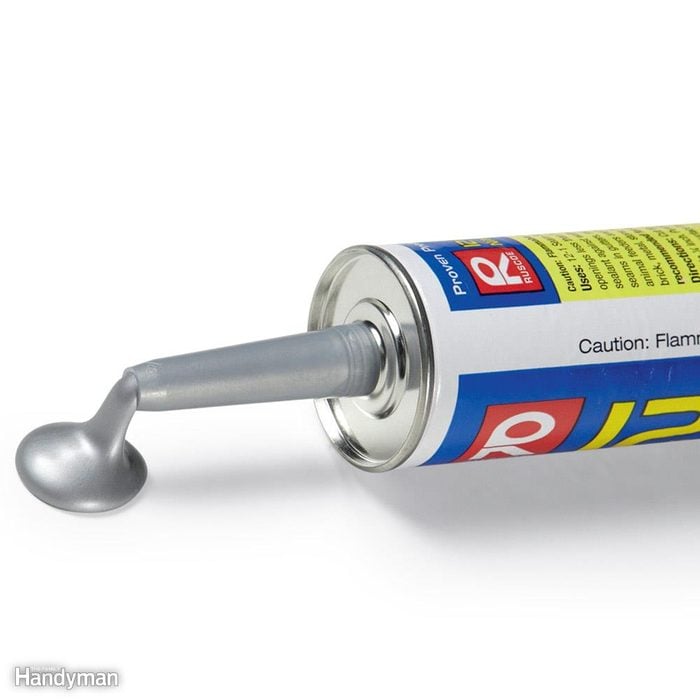
Every connection on a metal gutter needs to be sealed: end caps, splices, drop outlets and miters. Buy a product that’s specifically formulated to seal gutter seams. Seam sealer can handle submersion for long periods of time. It also resists decay from sunlight, which it will get plenty of.
Most importantly, high-quality seam sealer is runny, so it can penetrate down into the seam for a durable, long-lasting connection. Most products refer to this property as “self-leveling.” And the runnier the better, so if you need to apply it on a cold day, keep the seam sealer somewhere warm so it stays fluid.
Remove as much of the old sealer as you can, and make sure the area you’re sealing is completely dry. Home centers usually stock seam sealer near the gutter parts.
Gutters Overflow
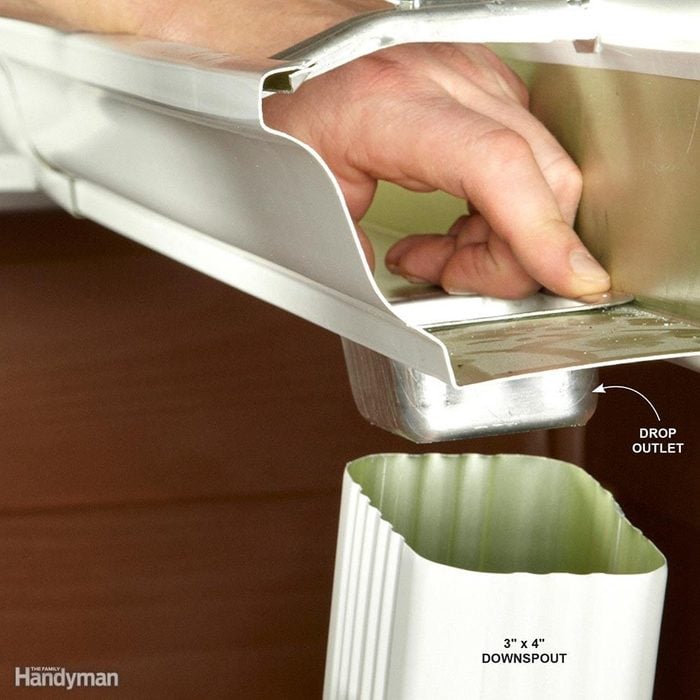
If you have a 50-ft. gutter with one 2 x 3-in. downspout, your gutter probably overflows during heavier rainfalls. When installing an additional downspout isn’t an option, install a 3 x 4-in. downspout in place of the smaller one.
Start by removing the old downspout. Use the new 3 x 4-in. drop outlet that you buy with your new downspout as a template to trace an outline for the larger hole. You can cut out the larger hole with a tin snips, or you could use an oscillating multi-tool equipped with a metal-cutting blade. Insert the drop outlet in the hole and fasten the new downspout with sheet metal screws. Make sure to seal the drop outlet to the gutter with seam sealer.

Sidewalk in the Way
There is no perfect way to get water from one side of a sidewalk to the other, but consider installing a retractable downspout. It rolls out when it rains and then rolls back up when the water stops flowing. Products like these do leak when the water flow lacks the volume to extend the plastic downspout, but they should keep your landscaping from washing away during moderate to heavy rains.
Retractable downspouts hook up super easily, and they might offer just the solution you need. Pick one up at a home center or order online.
Gutter Guards Work
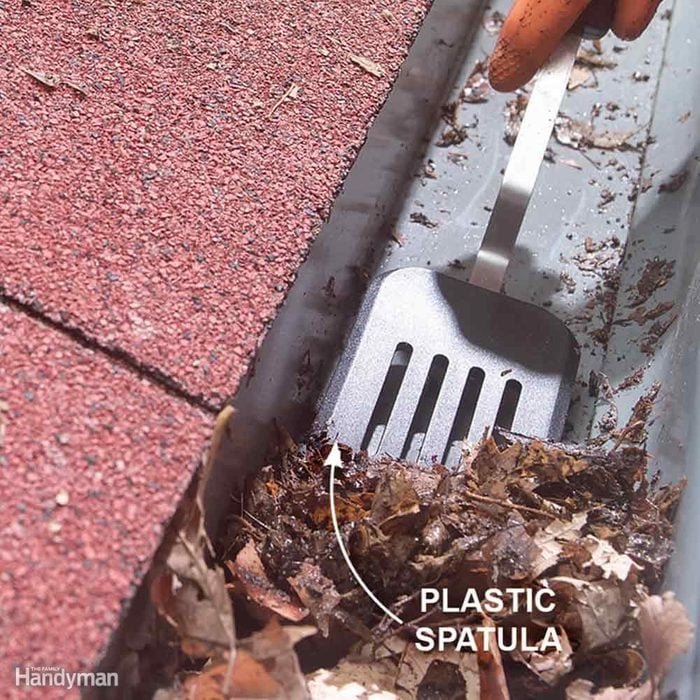
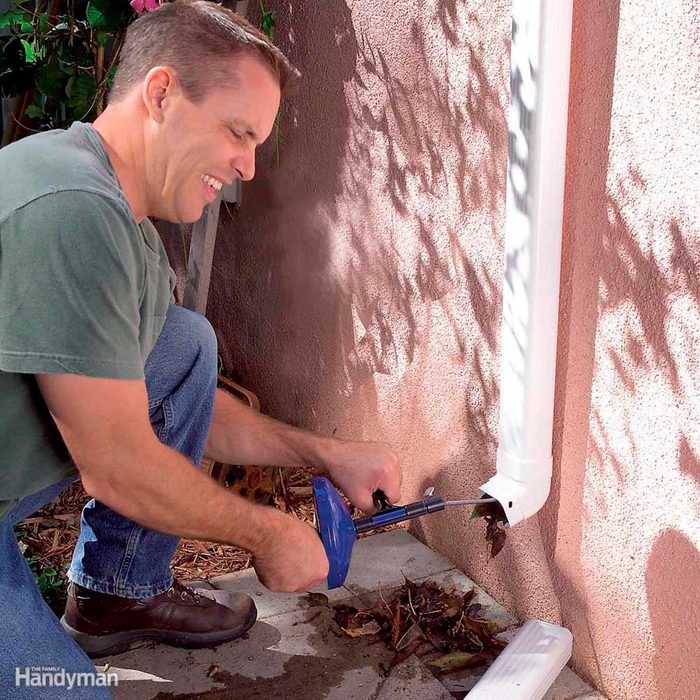
Gutter Cleaner
Gutter Spouts
Rusting Metal Gutters
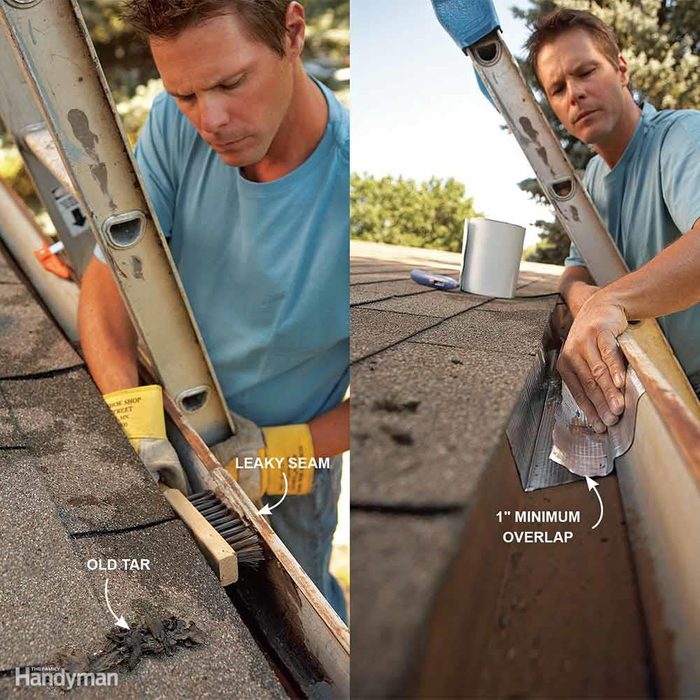
Gutter leaks usually start at rusty spots or seams that have opened up because of expansion and contraction. Repair a leak in a basically sound gutter easily by covering the damaged area with roof-and-gutter repair tape.
Prepare the gutter by scraping out as much old tar or caulk as possible. Wire-brush the metal thoroughly to get rid of rust and to give the tape a clean surface for bonding. If the gutter is badly rusted or has been heavily coated with tar that you can’t scrape out, spray on a special adhesive primer before applying the tape.
Cut the tape with a scissors or a razor knife. Tear the paper backing off the tape and lightly adhere one edge of the tape to the top of the gutter. Roll the tape down the wall of the gutter, pushing it firmly into curves and corners (right image). Work wrinkles and bubbles flat. Overlap long seams by at least 1 in. and end seams by 4 in.