
How to Seal Attic Air Leaks
Updated: Jan. 08, 2024It's dusty, dirty work, but it's the quickest, cheapest way to save money on your energy bills.
- Time
- Complexity
- Cost
- A full day
- Beginner
- $51–100
Overview
Chances are, your ceiling has the equivalent of a 2-ft. square hole that’s acting like a chimney, drafting expensive heated air into your attic and sucking cold air in around your windows and doors. You can’t see the hole because it’s the sum of many smaller openings. These gaps around plumbing pipes, light fixtures, chimneys and other attic bypasses are hidden under your insulation.
With some inexpensive materials and a day’s labor, you can save lots of money on heating every year by sealing these holes. We’ll show you where to find the bypasses in your attic and simple techniques for plugging and sealing them.
You’ll find everything you need at any full-service hardware store, home center or lumberyard. If you can’t find the reflective foil insulation (Photo 3), substitute drywall or pieces cut from 4 x 8-ft. sheets of rigid foil-faced insulation. Fitting rigid material requires more precise measuring, but the result is the same.
Figure A: Common Attic Air Leaks
Warm air flows out through tiny gaps in the ceiling and walls, resulting in cold drafts of air around windows, doors and other leaky areas. Avoid leaks with the help of these attic door insulation covers.
Get your bearings from below
Before you crawl into the attic, make a quick sketch of the floor plan. Make note of dropped soffits over kitchen cabinets or bath vanities, slanted ceilings over stairways, or any other dropped-ceiling areas. These areas usually have open stud cavities leading directly into the attic that are huge sources of air leaks (Photos 1 – 3). Locate the main plumbing stack, furnace flue or chimney and note this on your sketch for a reference point once you get into the attic.
Pressurize your house
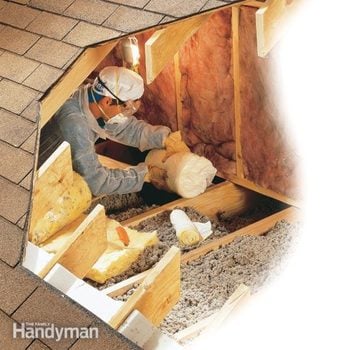
Once you’re ready, place a box fan in a window so it’s blowing air into the house and close all the remaining windows and doors. Tape cardboard around the fan to cover large gaps. When you turn the fan on high, the house will be pressurized, like an inflated balloon. And just as you can feel the air from a leaky balloon, you’ll be able to confirm leaks in the attic by feeling the draft with your hand. You may even be able to locate bypasses visually by looking for insulation being blown about. Close the attic access door or hatch behind you to maximize the effect. Gather your supplies and suit up. Attics are miserable places to work.
Plug the big holes first
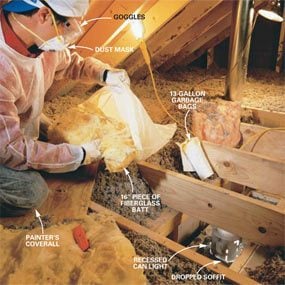
Photo 1: Wrap insulation in plastic
Cut a 16-in. long piece from a batt of unfaced fiberglass insulation and fold it at the bottom of a 13-gallon plastic garbage bag. The plastic bag creates a vapor barrier.
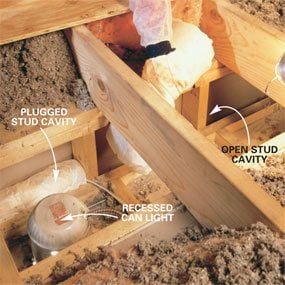
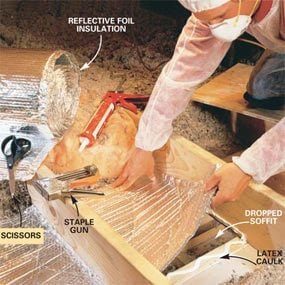
It’s tempting to grab a can of expanding foam and squirt it into all the little holes, but your biggest savings will come from plugging the large holes. Find the plumbing stack or flue for a reference point. Then use your sketch to locate the soffits, stairwells or other dropped-ceiling areas. You’ll probably have to dig around in the insulation to uncover them. Soffits may be filled with insulation or covered with cardboard or fiberglass batts. Push back the insulation and scoop it out of the soffits. Now plug the open stud spaces (Photos 1 and 2) and seal the top of the cavities with reflective foil (Photo 3). Cover the area with insulation again when you’re done.
CAUTION!
Some attics have vermiculite insulation, which may contains asbestos, a health hazard. Vermiculite is a lightweight, pea-size, flaky gray mineral. Don’t disturb vermiculite insulation unless you’ve had it tested by an approved lab to be sure it doesn’t contain asbestos. Contact your local health department for the name of an approved lab.
Stuffed bags seal joist spaces too
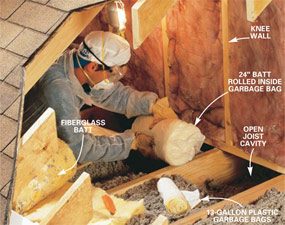
Heated rooms built into attics often have open cavities in the floor framing under the walls. Even though insulation may be piled against or stuffed into these spaces, they can still leak air. Photo 4 shows how to stuff these spaces with the same type of garbage-bag plug we used to seal stud cavities.
Furnace flues require special techniques
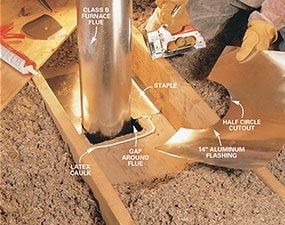
Photo 5: Fit flashing around the flue
Cut aluminum flashing to fit around the flue. For round flues like ours, cut half circles out of two pieces so they overlap about 3 in. in the middle. Press the flashing metal into a bead of latex caulk and staple it into place. If there’s no wood, staple it right to the drywall.
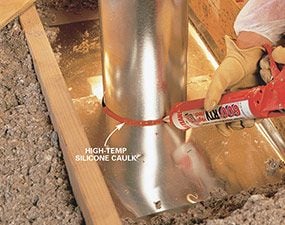
Photo 6: Seal the gap
Seal the gap between the flue and metal flashing with special high-temperature silicone caulk. Don’t use spray foam here.
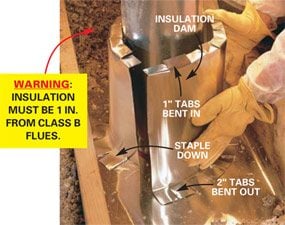
Photo 7: Separate insulation from the pipe
Form an insulation dam to prevent insulation from contacting the flue pipe. Cut enough aluminum from the coil to wrap around the flue plus 6 in. Cut slots 1 in. deep and a few inches apart along the top and bend the tabs in. Cut slots about 2 in. deep along the bottom and bend out the tabs. Wrap the dam around the flue and secure the bottom by stapling through the tabs.
The opening around a furnace or water heater flue is a major source of warm air into the attic (Photo 5). Because the pipe gets hot, building codes require 1 in. of clearance from Class B flues (2 in. from masonry chimneys) to any combustible material, including insulation. Photos 5 and 6 show how to seal this gap with lightweight aluminum flashing and special high-temperature silicone caulk. Before you push the insulation back into place, build a metal dam (Photo 7) to keep it away from the pipe. Use this same technique for masonry chimneys.
Use foam and caulk to seal small holes

Photo 8: Use foam around pipes
Stuff a small piece of fiberglass batt insulation into the space around the plumbing vent pipe as a backer for the expanding foam (be sure it’s the fireblocking type). Then follow the directions on the can to fill the space around the pipe with expanding foam insulation.
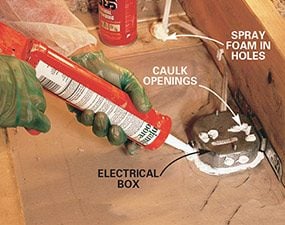
Seal openings around plumbing vents and electrical wires with expanding foam (Photos 8 and 9). Be careful though; this stuff is super sticky and almost impossible to get off your clothes and skin. Wear disposable gloves and eye protection. Seal around electrical boxes with caulk (Photo 9).
Telltale Signs: Finding Attic Bypasses
Even though most of the gaps spilling warm air into your attic are buried in insulation, you’ll still see evidence of the escaping air. While in your attic, look for areas where the insulation is darkened (see photo), a result of filtering dusty air from the house. In cold weather, you may see frosty areas in the insulation caused by warm, moist air condensing and freezing as it hits the cold attic air. In warmer weather, you’ll find water staining in these same areas. If you pressurize the house with a window fan, you may be able to feel the leaks with your hand as the air finds its way into the attic.
Recessed can lights—no easy solution
Cut a 6-in. hole in your ceiling and add a 100-watt bulb—enough heat to bake cookies—and you have a recipe for huge heat loss as well as a major contributor to ice dams. That’s what a recessed light does. Here are the solutions we recommend if you have recessed can lights protruding into your attic:
- Replace incandescent bulbs with cooler-operating compact fluorescent bulbs.
- Replace your old recessed lights with air-tight, insulated can models (available at home centers and lighting stores). This is the best solution for those with electrical skills. New cans are relatively inexpensive, and can usually be installed in a few hours each.
Complete the job by sealing the hatch
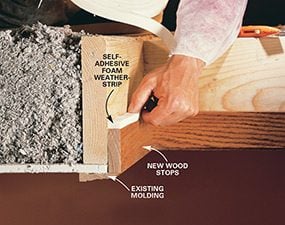
Photo 10: Seal the attic access
Weatherstrip the attic access hatch or door. Cut 1×3 boards to fit the perimeter of the opening and nail them on with 6d finish nails. Apply self-adhesive foam weatherstrip tape to the top edge of the stop. Here are a few essential things you should do while finishing your attic.
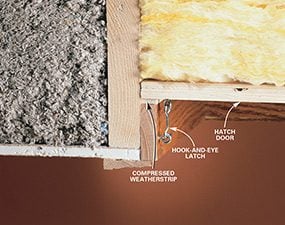
When you’re done sealing your attic bypasses, push the insulation back into place with an old broom handle or stick as you back out of the attic. Then finish up by sealing the access hatch with self-sticking foam weatherstrip (Photos 10 and 11). If your hatch rests directly on the moldings like ours did, add 2-1/2-in.-wide stops around the opening. The stops provide a wider surface for attaching the weatherstrip and a space to mount hook-and-eye fasteners. Position the screw eyes so the weatherstrip is slightly compressed when the hooks are latched.
Check for backdrafting
Whenever you make energy improvements—like sealing attic bypasses—that result in a tighter house, install carbon monoxide (CO) alarms if you don’t already have them. Allow one per floor. Also have a pro check your combustion appliances for backdrafting at the next servicing.
Tips For Working in the Attic
- Start in the morning when it’s cool. Pick a cool, cloudy day if possible. Don’t spend more than 15 or 20 minutes in a hot attic.
- Wear a lightweight disposable coverall (available in paint departments), gloves and a hat to keep itchy insulation off your clothes and skin.
- Always wear a double-strap dust mask or an OSHA-approved particulate respirator.
- Wear knee pads if you have them. Crawling around on joists gets painful. Use scraps of plywood to kneel on and as a platform for your supplies.
- Buy a rough-service light bulb and a clamp-on light, both available at hardware stores. Have a flashlight handy just in case.
- Minimize trips in and out of the attic by collecting all of your tools and supplies and placing them in the attic before you go up.
- Look out where you step. You must walk on ceiling joists or truss chords and carry a small piece of plywood to work from. Don’t step on the ceiling drywall.
Required Tools for this Project
Have the necessary tools for this DIY project lined up before you start—you’ll save time and frustration.
- Caulk gun
- Dust mask
- Flashlight
- Knee pads
- Safety glasses
- Utility knife
Required Materials for this Project
Avoid last-minute shopping trips by having all your materials ready ahead of time. Here’s a list.
- 13-gallon plastic garbage bags
- 14-in. wide aluminum flashing
- Acrylic caulk
- CO2 detectors
- Expanding foam
- Foam weatherstrip
- Reflective foil insulation
- Silicone caulk
- Unfaced fiberglass insulation
