How to Build a Rain Garden in Your Yard
Updated: Mar. 20, 2024
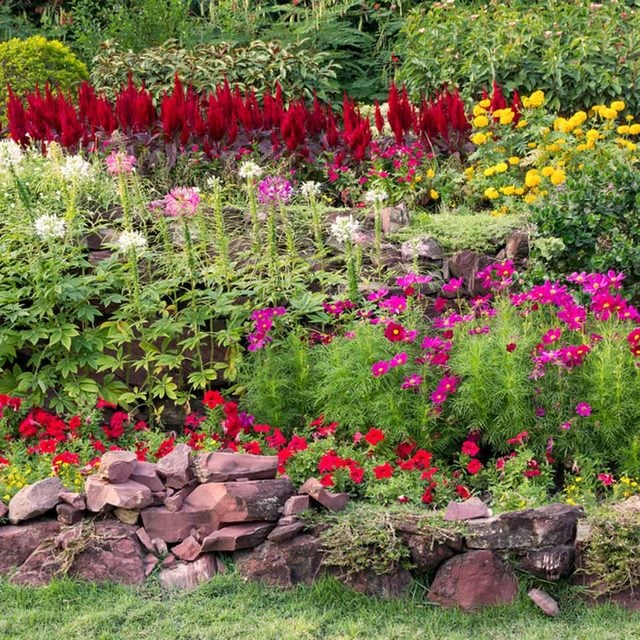
It's a beautiful flower bed—and a reservoir for yard and roof runoff
Multiple Days
Beginner
Varies
Introduction
Nurture the land in your yard and protect the environment by channeling rain water and runoff from gutters into a rain garden planted with deep-rooted, colorful native plants.Tools Required
- Level
- Spade
- Wheelbarrow
Materials Required
- 1-1/2-in. river rock
- Decorative rocks and boulders
- Landscape fabric
- Native plants and grasses
- PVC pipe
Too Much Water Can Undermine Your Home
If you worry about a wet or damp basement, a busy sump pump, or muddy puddles in your yard after a heavy rainfall, this story is for you. We want to introduce you to a new tool to improve drainage. Read on to learn how to build a rain garden.
A rain garden is basically a plant pond, that is, a garden bed that you plant with special deep-rooted species. These plants help the water rapidly seep into the soil, away from your house and out of your hair. You direct the rainwater from the downspouts to the garden via a swale (a stone channel) or plastic piping.
The garden captures the water and, when properly designed, drains it into the soil within a day. You don’t have to worry about creating a mosquito haven; the water drains before mosquitoes even have time to breed. When paired with a rain chain, which slows the water as it falls, your yard should be well protected from erosion and soil loss.
If there’s an especially heavy rainfall, excess water may overflow the rain garden and run into the storm sewer system. Even so, the rain garden will have done its job. It will have channeled water away from your foundation and reduced the load on the sewer system.
A rain garden also reduces the amount of lawn chemicals and pet wastes that may otherwise run off into local lakes and rivers. In some communities, the runoff problem is so big that homes with rain gardens qualify for a tax break! Call your municipality to learn your local policy.
In this article, we’ll tell you how to design, build and plant a rain garden suitable for your yard. We’ve condensed it to a few handy guidelines. You won’t need any special tools or equipment. A shovel and a level will do. But expect to sweat through some heavy digging!
Also, don’t worry if you don’t have too much time in hand, here are a few gardening tips for busy people.
Project step-by-step (6)
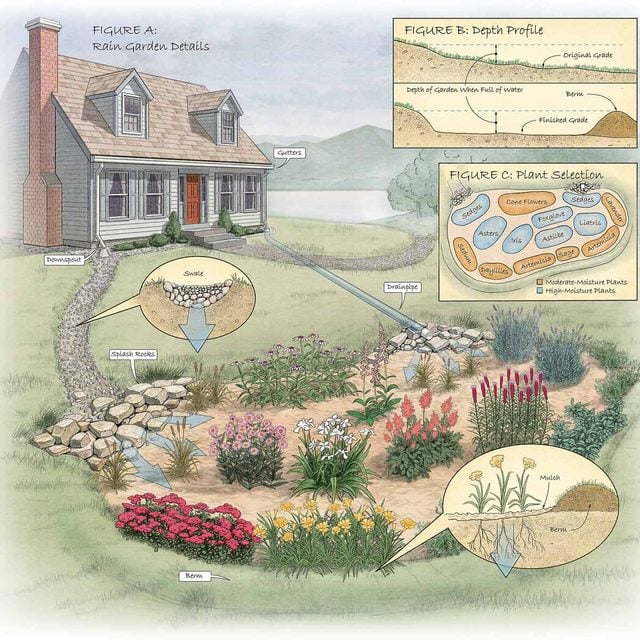
Rain Garden Details
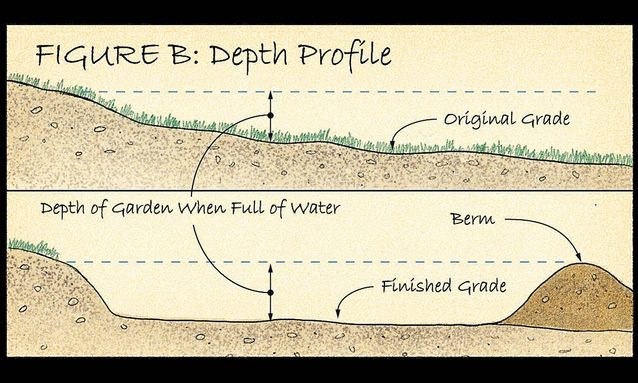
Create the rain garden by building a berm in a low spot in the yard, then build swales to channel runoff from the gutters and higher parts of the yard. The water is then absorbed into the soil through the network of deep plant roots. Use a mix of plants adapted to your area and to the different water depths.
Location and Slope
Check the slope of your yard with a level and a long, straight board. You’ll need a minimum slope of 1 in. in 4-1/2 ft. (2 percent) for water to flow into your rain garden. If you don’t have this slope, you’ll have to do major landscaping, both to create the slope and to improve drainage.
- Locate your rain garden where rainwater will feed into it from downspouts, driveways or low points in your yard.
- Lay attractive river rock (1-1/2 in. diameter and, if desired, larger decorative rocks) or run an underground 4-in. PVC pipe to channel water from a downspout to your garden. Use PVC for a better flow if the garden is more than 30 ft. from a downspout.
- Place your rain garden at least 10 ft. away from your home. Otherwise, water may saturate the soil close to the foundation or even back up against it. If you already have water pooling close to your home, channel it with an underground PVC pipe to the garden. This may mean tunneling under a walkway or other obstruction.
- Keep in mind “the big rain,” that storm a couple of times a year that will overflow your garden. Create an overflow zone, a slightly lower area on one side with stones that will channel water away once the garden fills. Locate it away from your house and your neighbors’ homes as well.
- Do not locate the garden over a septic tank or underground utility lines. Remember to call 811 (national number) to have your utilities marked before digging.
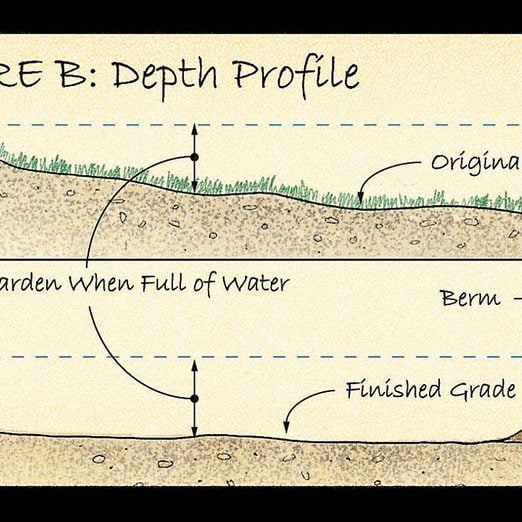
Garden Depth
Determine the size and depth of the rain garden based on how quickly the soil absorbs the water. An average rainfall should fill most of the garden but drain away in 24 hours. The easiest way to calculate this is to dig a small test hole in the garden area, fill it with water, and see how fast it drains. Then do a rough calculation of how much runoff will be coming down the gutters (see ‘Garden size’ below).
You only want to capture as much water as will sink into the soil in 24 hours after a storm—a garden dug in sandy, well-draining soil can be deeper than a garden dug in poorly draining clay. To determine the ideal depth, first test the porosity of your soil.
Dig a hole in your garden area about the size and depth of a large coffee can (8 in. x 8 in. x 8 in.) and fill it with water. Time how long it takes for the water level to drop. If in one hour the water level has dropped by 1/2 in., you can figure the soil drains an inch in two hours. At this rate, the garden soil will handle 12 in. of water in a 24-hour period, making the ideal depth of this garden 12 in.
Garden Size
To determine the best size for your garden, estimate the volume of water that would flow off the roof and down the spout that feeds it during a 1-in. rainfall (the rainfall from an average storm). To do this, calculate the rough area of the roof that drains down the spout.
For example, in a 2,400-sq.-ft. rectangular home with a downspout at each corner, you’d have approximately 600 sq. ft. of runoff going to each downspout. Multiply by rainfall depth (1 in., or 1/12 ft.) to get the volume of water—50 cu. ft. in this case. If your soil porosity can handle a 6-in.-deep (that is, 1/2 ft.) garden bed, dividing by 1/2 ft. gives you a 100-sq.-ft. (10 x 10 ft.) garden size.
However, it’s okay to vary the size. A smaller garden can still yield big benefits. Rain gardens that are 30 percent smaller than ideal still handle nearly 75 percent of the storm watershed from a house. Of course, you can also make it larger. In any case, make sure the size of the garden fits your landscape.
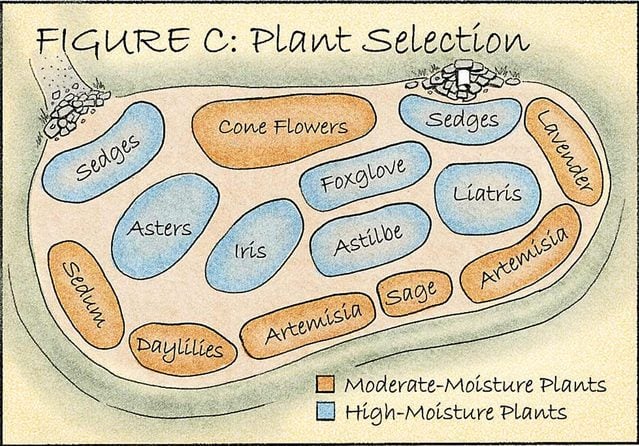
Plant Selection
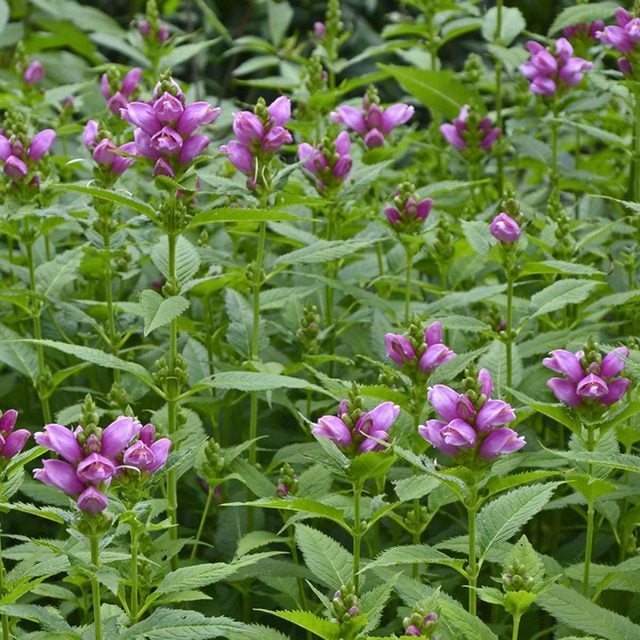
While growing zones and soils vary dramatically throughout the country, plant selections for this type of garden are fairly standard. Aster, daylily, iris, sedum, coneflower, artemisia and sedge are examples of good rain garden specimens. Talk to your local university extension or other garden experts about other options for your area.
Choose plants that have “average to moist” water requirements listed on their tag. Position them in the deepest parts of your rain garden. On the higher edges of the bed, position plants that thrive in “average to dry” water conditions.
While it may seem intuitive to purchase moisture-loving plants for your rain garden, don’t do it. Since your garden is designed to drain in 24 hours, the moisture-loving plants will soon be left high and dry.
While almost any plant with the right moisture requirements will do fine in a rain garden, there are some good reasons to select native plants. Native grasses, wildflowers and shrubs generally have very deep root systems, sometimes burrowing down 10 ft. or more.
Most native plants also cast off their roots annually, growing new roots and providing more soil aeration and pathways for water to flow. And because they’re indigenous, you know these plants will thrive in your zone and soil conditions.
TLC for the First Year
Part of knowing how to build a rain garden is knowing how to help it thrive. Here are a few tips to get you through that first year:
- Baby your garden its first year. Mulch with shredded hardwood mulch (not pine bark or wood chips, which will float away) and weed regularly.
- Dig a notch into the berm on the low side to allow about half the water to flow out for the first year. Young plants can’t handle a large volume of water.
- Add large decorative rocks at the garden’s entrance to prevent heavy rain from washing out young plants.
- Water your new garden about an inch per week during dry spells. If you select native species, you’ll find that these plants will be highly tolerant of dry conditions once they mature.