


Dado joints are easy to make joint and useful for bookshelves, drawer dividers and other woodworking projects.

The Basics of Dado Joints

Updated Sep. 25, 2024
Cutting dado joints is a great skill for beginning woodworkers to develop. Dado joints are particularly helpful when making beginner-friendly projects like bookshelves.
On This Page
What Is a Dado Joint?
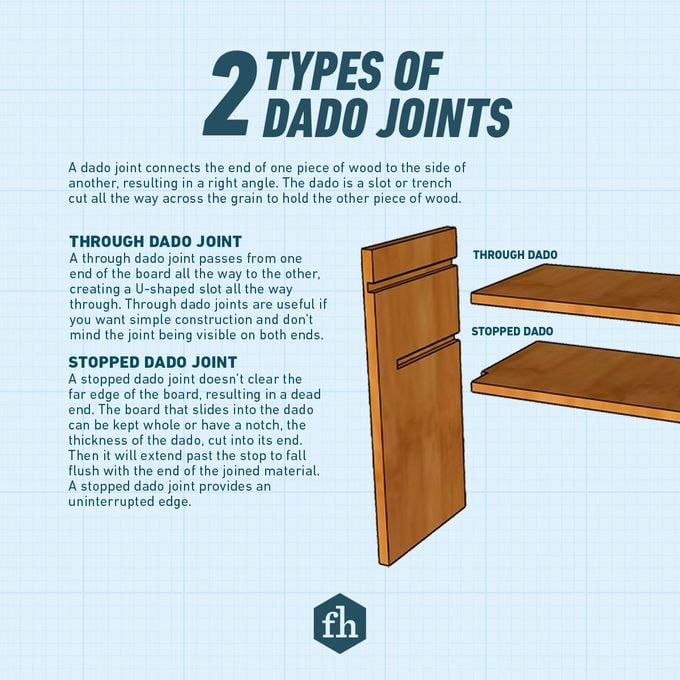
A dado joint connects the end of one piece of wood to the side of another, creating a right angle.
You start by cutting a slot across the grain of the one board. This dado slot has a bottom and two sides, or “shoulders.” The space between the shoulders should match the thickness of the wood you’re inserting, creating a physical connection that can be easily reinforced with glue.
Dado joints are commonly used in bookshelves, drawer dividers and any other project where the material will be supported by dadoes on both sides.
Is There a Difference Between Rabbet and Dado Joints?
Yes. Dado joints should not be confused with rabbets.
A dado falls within the center of the material, consisting of a slot with a bottom and two shoulders. When viewed from the side, a dado looks like a capital ‘U.’ A rabbet, on the other hand, is cut into the end of the material. It has a bottom and one side, leaving the other side open. A rabbet’s profile resembles a capital ‘L’ cut into the wood.
However, there’s one variation of dado joint known as a “rabbet dado” or “rabbet and dado” joint. In this version, the dado is cut at a width that’s less than the thickness of the material to be joined. Then a rabbet is cut into the second material so the end can be inserted into the dado.
Types of Dado Joints
A quick note on terminology: Dado joints are typically cut across the grain of the receiving piece. If a cut goes along the grain, many woodworkers refer to it as a channel or groove (as in “tongue and groove”). In practice, many woodworkers simply refer to all of the above as a “dado” joint. As always, terminology varies by region and even from woodworker to woodworker.
There are two main types of dado joints:.
- Through dado joints pass from one end of the board to the other, creating a U shaped slot all the way through. Through dado joints are great if you want simple construction and don’t mind a visible joint on both ends.
- Stopped dado joints don’t clear the far edge of the board, resulting in a dead end. The board that slides into the dado can be kept whole or have a notch the thickness of the dado cut into its end. That way, it will extend past the stop to fall flush with the end of the joined material. Stopped dado joints hide the wood grain on the far end.
Dado Joint Advantages and Disadvantages
Advantages
- Simple to make: Especially when using a dado insert on a table saw or a router.
- Strong when properly supported: There’s a reason these joints are so common, and it’s because they provide a high level of strength for relatively little effort.
Disadvantages
- Not as strong as other joints: Although dado joints are strong when properly supported, they don’t have the strength of a mortise-and-tenon or tongue-and-groove joint. Sufficient torque on the far end of the inserted material will make the the joint come loose.
Dado Joint Tools
While it’s possible to cut a dado joint by hand (usually with a dado plane), it’s far more common to make the cut with a table saw or router and clean it up with hand tools.
Table saw
Perhaps the most commonly-used tool to make dado joints is a table saw with a dado set. For those unfamiliar, a dado set is like a blade sandwich, with a stack of chippers sandwiched between two saw blades. The number of chippers determines the thickness of the dado.
Router
But not all table saws accept dado sets, and not every woodworker owns a table saw. The other most common way to make a dado is with a router. Use a jig or a straight-edge clamped to your work piece and select an appropriately-sized router bit.
Pro tip: Use a router and straight edge to cut a wide dado. It can be easy to fall out of parallel when resetting the straightedge to make multiple passes, resulting in a tapered cut. Instead, set up two straightedges to establish clean, parallel edges of the dado. If there’s any additional material remaining in the center, simply remove it with a freehand router pass.
Clean-up tools
No matter how you make the initial pass on the dado, it’s common to smooth and level the opening with a combination of chisels, planes and files or sandpaper.