
3 Tips on Refrigerator Gasket Replacement
Updated: Dec. 16, 2022
Install a new refrigerator door gasket.
An hour or less
Beginner
$51–100
Introduction
We'll show you how to replace your refrigerator door gasket in three easy steps. A new gasket will help your refrigerator run more efficiently, which will save you money. So replacing a worn out gasket will pay for itself over time.Tools Required
- 4-in-1 screwdriver
- Allen wrench
Materials Required
- Door gasket
- Petroleum jelly
How to Replace the Door Gasket
Each door of your refrigerator has a molded rubber gasket to keep the cold in and the heat out. When this gasket gets old and brittle, it leaks. If your refrigerator is running more frequently and you suspect it’s losing cold air, conduct these simple tests.
First, inspect the refrigerator door gasket. Is there condensation or even blackish mold anywhere around it? If so, leaking cold air is probably causing warmer kitchen air to condense. Next, close the refrigerator door on a dollar bill. Pull the bill out slowly. If there is a slight drag on the bill, your door gasket is OK. If the bill slips out easily and moisture and/or mold are present, it’s time to invest about $50 to $75 (depending on the appliance brand and door size) and 30 minutes to replace the refrigerator door gasket.
Find the refrigerator make, model and other identification information in the owner’s manual. If you don’t have a manual, look on the inside edge of the refrigerator door or inside either compartment, near the door, for the manufacturer’s identification plate. Search online under “Appliances, Major, Parts” for stores or manufacturer service centers that stock your door gasket. You may also be able to find a parts source by visiting your manufacturer’s website.
Project step-by-step (3)
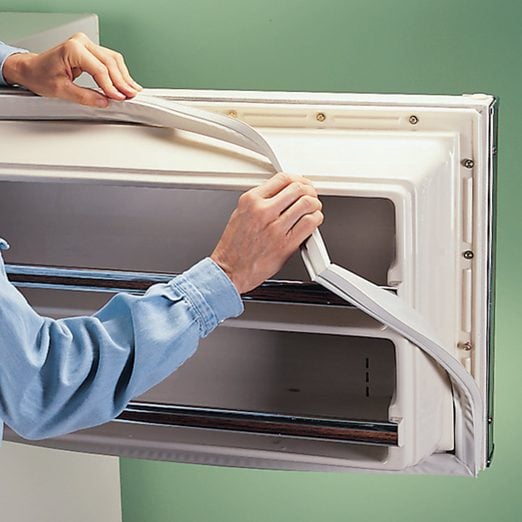
Take Off the Old Door Gasket
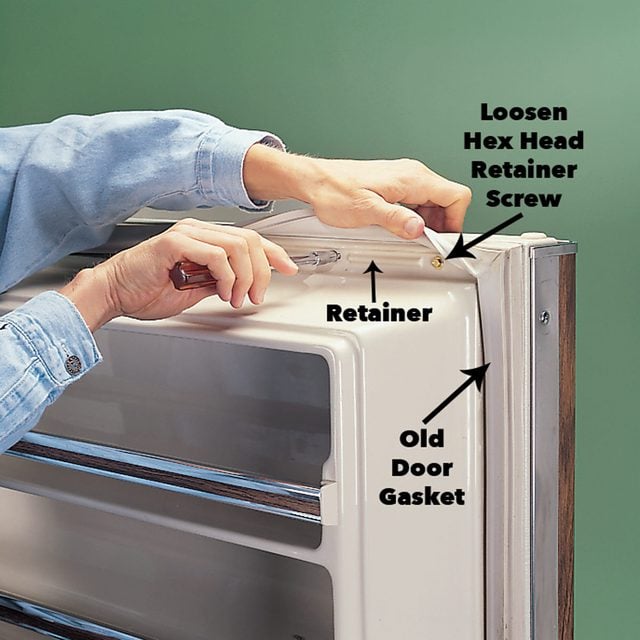
While you’re removing the old refrigerator door gasket, lay the new one in warm water for a few minutes to make it easier to install. Some gaskets (like ours) are held in place by a metal retainer attached around the door perimeter. Lift the inside edge of the old gasket to reveal the screws locking the gasket into the retainer, then loosen them. Remove the old refrigerator door gasket by grabbing the inside flange of the gasket and pulling it back. Using a properly sized hex head nut driver, loosen—but don’t remove—the retainer screws around the perimeter of the door and pull the old gasket off.
Install the New Door Gasket
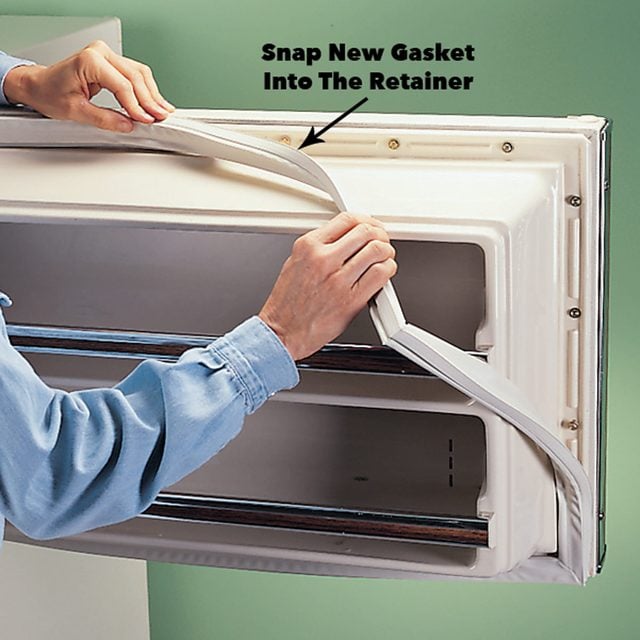
Install the new freezer gasket. Starting at one of the top corners, work the gasket lip behind the metal retainer, then continue around the entire perimeter of the door. The gasket fits only the one correct way. Use the hex nut driver to “snug up” but not fully tighten the freezer gasket retainer screws. Close the door and check whether it has warped during the repair. If necessary, straighten it by gripping both the top and the bottom. Push and pull the door, then close it and recheck for proper alignment. Repeat as necessary, then finish tightening the retainer screws.
Rub Petroleum Jelly on the Refrigerator Door Gasket
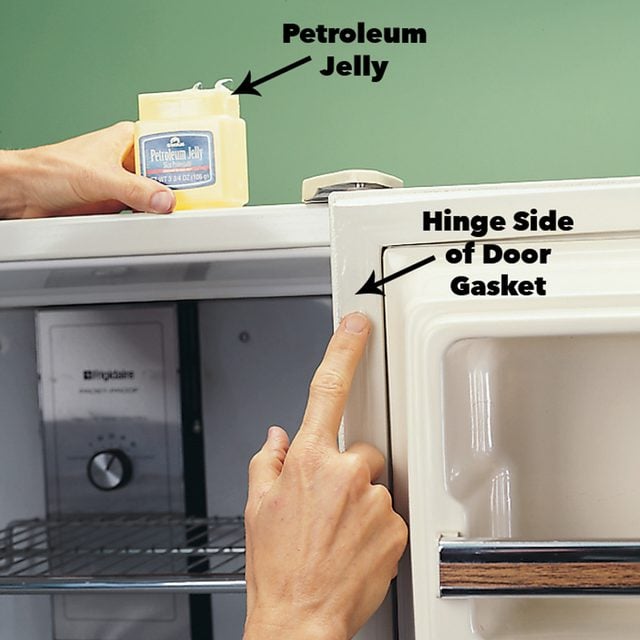
Study the position of the refrigerator door relative to the other door and the refrigerator cabinet. If either the refrigerator or freezer door is sagging or too high, loosen its hinges and align it. Finally, reduce the freezer gasket drag by applying a thin layer of petroleum jelly only along the hinge side of the gasket.
Plus, these six maintenance steps will prevent most refrigerator breakdowns.