
Tips and Techniques for Safe Extension Ladder Setup and Use
Updated: May 21, 2019Tips and Techniques for Safe Extension Ladder Setup and Use

- Time
- Complexity
- Cost
- An hour or less
- Beginner
- $51–100
Tip 1: Set the correct angle
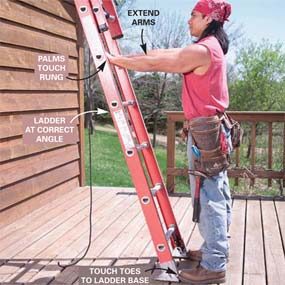
Ever climbed halfway up an extension ladder and felt it sliding off to one side beneath your feet? You quickly realize you should have spent a few more minutes making sure the ladder feet were solidly set before starting your climb. Climbing a ladder can be safe, even under the less-than-perfect situations you find around your home. We'll show some easy ways to provide solid footing and a stable top to avoid heart-stopping experiences.
Setting the ladder at the correct angle is one of the most important steps to a safe ladder setup. Too steep and it could tip over backward. Too much angle and it could bend or the bottom could slide out. Photo 1 shows how to get the angle just right. If an obstacle prevents you from setting the ladder at the correct angle, don't take chances —consider using methods like scaffolding instead.
Tip 2: Secure the feet
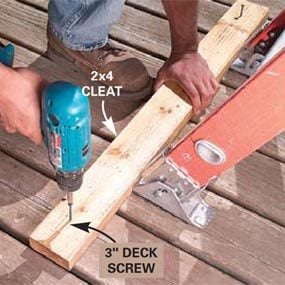
In addition to establishing a level base, make sure the feet can't slip backward. On soft ground, flip up the ladder shoes so the spurs poke into the ground (Photo 5).On decks, it's a simple matter to screw down a cleat (Photo 2). Before you set up the ladder on hard surfaces, clean the bottom of the ladder feet and sweep away sand and dirt that could cause the ladder to slip. If it still seems like the ladder could slip, tie ropes to both ladder legs beneath the lowest rung and tie the other end of the ropes to a solidly anchored object at or near the base of the wall.
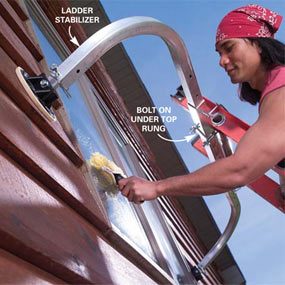
Tip 3: Secure the ladder top against the wall
Providing a stable base is only half the battle. You also have to make sure the top of the ladder can't slide when the rails rest against a wall. Make sure the ladder is vertical and the top is resting on an even surface. Angling the ladder to the left or right to reach a remote spot is asking for trouble.
There are a couple of add-on accessories that help stabilize the top of ladders. The first is a pair of rubber or soft plastic “mitts” (from hardware stores and home centers) that slip over the top of the ladder's rails. They provide a better grip on the siding and protect it from ladder damage. Ladder stabilizers are another great add-on accessory (Photo 3). The large rubber pads grip almost any surface to keep the top from slipping sideways and help spread out the load to prevent damage to fragile siding materials like vinyl or aluminum. Stabilizers also span window openings and hold the ladder away from the building to allow work on gutters and overhangs. These are available almost everywhere ladders are sold. We highly recommend them for any kind of extensive work, such as washing and painting.
Tip 4: Tie the top for extra security
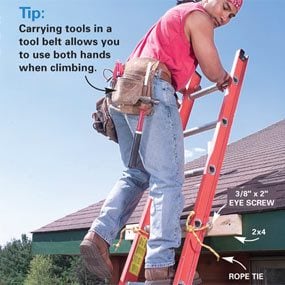
If you plan to make several trips up and down while the ladder is in the same location, it pays to secure the top to keep it from sliding. This is especially important if you'll be stepping onto a roof (Photo 4).Ties will prevent the ladder from sliding sideways as you step to and from the roof. Using the setup we show has the added advantage of protecting the edge of the shingles. It will only take a few minutes to screw the two eye screws into a 2×4 and the 2×4 to the fascia board. You can keep the rig handy for future use. You'll be left with a few small screw holes in the fascia, but that's a small price to pay for this extra measure of security.
Here are a few more tips for steadying the top of the ladder. If you have a choice, set up the ladder where there's an adjoining wall, chimney or other structure to hold it in place. Also, if you regularly set the ladder against the same location on your metal gutters, add extra gutter straps to strengthen the gutter in the area where the ladder top rests. Then install eye screws out of sight above the gutter to provide anchors for securing your ladder with rope or wire.
Tip 5: Provide a level base
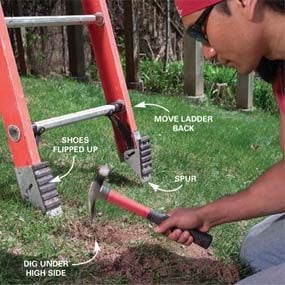
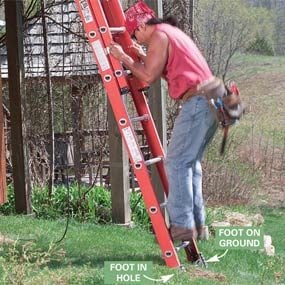
Even with the ladder at the correct angle, it can still tip sideways if the feet aren't level with each other and on solid ground. It's unsafe to stack boards, bricks or other stuff under one of the feet to level the ladder. Instead, scrape out a shallow trench under the high-side foot (photo above). The claw of a hammer is perfect for this task, and it's almost always handy.
If digging is impractical because your site is steeply sloped, or you want to set the ladder on stairs or some other uneven, hard surface, don't opt for a makeshift solution. Instead, buy adjustable leg-leveling extensions that bolt onto the bottom of your ladder. You'll use them often if you live on a sloped lot. To see what's available, check the ladder manufacturer's catalog or a store that sells your ladder brand.
Required Tools for this Project
Have the necessary tools for this DIY project lined up before you start—you’ll save time and frustration.
- Drill/driver - cordless
- Extension ladder
- Hammer
Required Materials for this Project
Avoid last-minute shopping trips by having all your materials ready ahead of time. Here’s a list.
- 3-in. deck screws
- 3/8-in. x 2-in. eye screws
