
Air Hoses: Install a Retractable Air Hose Reel
Updated: May 29, 2019Put air power right at your fingertips
Overview: Parts and planning
There’s nothing like having compressed air handy for filling tires or running air-powered tools in the garage. But what a hassle it is to unfurl (and trip over) and stow an air hose all the time. However, you can reach up and pull the air hose down from the ceiling if you install a retractable air hose reel just like pros have in their shops. It’s really very easy to do and quite affordable.
The whole job will only take an afternoon. You’ll need to have copper soldering tools and the know-how to sweat copper joints.
Many home centers carry air line accessories. If yours doesn’t, check out local tool suppliers or online sources. Hose reel prices range from $60 to over $250. For the average DIYer, the 25-ft., $60 model will work just fine. Expect to pay about $99 for a 50-ft. model. The high-end models offer smoother operation and a sophisticated rewind mechanism that reduces the possibility of “hose whip.” (Hose whip is a great way to take out a windshield—don’t ask how we know!)
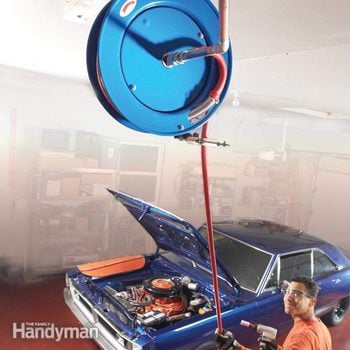
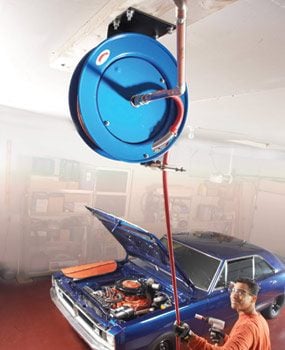
Find a location directly in front of the hood of your car or in the middle of a two-car garage. Position the compressor in a permanent, out-of-the-way spot. Then measure the distance across the ceiling and down to the compressor, and also over to your workbench. Add about 15 percent for waste, and purchase that amount of 1/2-in. copper tubing. (Type L is fine.)
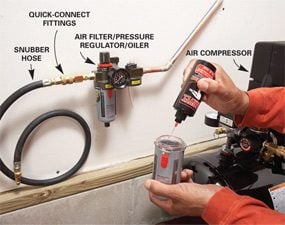
Consider adding an optional filter/pressure regulator/oiler to your system. At about $61, they’re a little pricey. But the filter and oiler will keep your air tools in top condition. Use a snubber hose to connect and disconnect the compressor from the air line.
Buy whatever fittings you need to make the runs. Use 45-degree fittings at turns rather than 90-degree ells to reduce pressure drops. Buy solder-on male pipe thread adapters to connect to the air hose reel and the filter/oiler.
Install the retractable hose reel
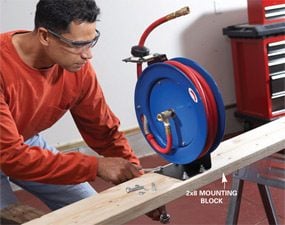
Photo 1: Mount the reel
Predrill the ceiling-mounting holes and hose reel–mounting holes in the 2×8. Bolt the hose reel to the 2×8.
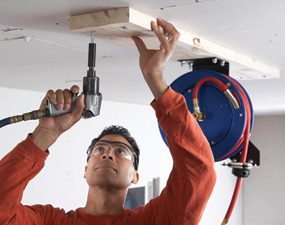
Photo 2: Bolt the assembly to the ceiling
Hold the assembly against the ceiling and lag-screw it into the rafters.
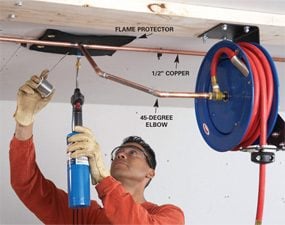
Start by measuring a 2×8 long enough to span two rafters. Trace the mounting holes from the hose reel onto the 2×8 plank and drill four 5/16-in. holes. If you have a finished ceiling, countersink the bolt heads on the back of the plank. Next, predrill two 5/16-in. holes at each end of the plank for the rafter mounting bolts and matching holes in the rafters. Mount the hose reel to the plank with the nuts facing down. With a helper on the opposite side to hold the rather heavy assembly in place, mount the plank to the rafters using 5/16-in. x 4-1/2-in. lag screws.
Assemble the fittings and copper tubing from the hose reel up to the ceiling and sweat the parts for that portion of the run. After it cools, apply pipe dope to the threaded fitting and screw the section into the hose reel. Then assemble and sweat the rest of the copper tubing. Anchor the tubing to the framing every 4 ft. with mounting straps as you work your way toward the compressor.
Mount the air filter/regulator/oiler securely on the wall and attach a quick-connect fitting. Connect the assembly to your air compressor with a snubber hose.
Note: A Materials List is available in Additional Information, below.
Additional Information
Required Tools for this Project
Have the necessary tools for this DIY project lined up before you start—you’ll save time and frustration.
- Adjustable wrench
- Air compressor
- Circular saw
- Drill bit set
- Drill/driver - cordless
- Safety glasses
- Socket/ratchet set
- Soldering torch
- Stud finder
- Tape measure
- Tube cutter
Required Materials for this Project
Avoid last-minute shopping trips by having all your materials ready ahead of time. Here’s a list.
- Air tool oil
- See Materials List in "Additional Information"
