
How to Fix a Bifold Door
Updated: Mar. 28, 2023Tricks for tuning up a sagging bifold

Adjusting the position of the door
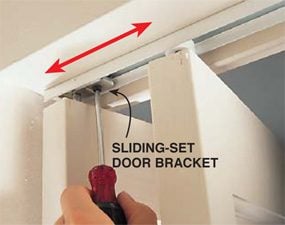
Photo 1: Top bracket
Loosen the set screw on the top bracket and slide the bracket slightly along the track to adjust the space between the top of the doors. Then retighten the screw, close the doors and check the fit. Adjust both doors.
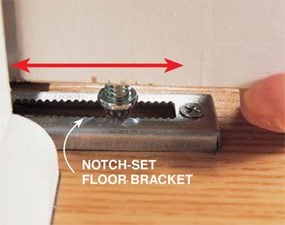
Photo 2: Floor bracket
Move the pin in each bottom floor bracket to adjust the vertical gap and the space between the bottom of the doors and the floor. There are two types of bottom brackets. One requires you to loosen a set screw and slide the bracket in or out. The style shown in the photo requires you to lift the door and drop the pin into a different notch in the bracket.
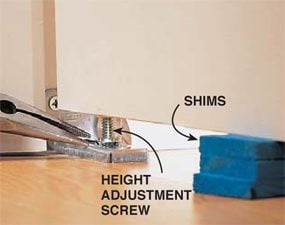
Photo 3: Height adjustment
Adjust the height of the doors by screwing the bottom pin in to lower them or out to raise them. One type of pin adjustment requires a wrench and the other pliers. For the easiest adjustment without taking the door out of its track, take the weight off the door by shimming underneath it.
Like a car that needs new spark plugs, bifold doors tend to run a little ragged after a few hundred uses. They stick, they rub, they don’t line up. Luckily they’re easy to tune up once you know the tricks.
The goal is to adjust the doors to leave an even 1/8-in. vertical gap between them (Photos 1 and 2) and an even horizontal space along the top—without allowing them to scrape on the door jambs or floor. You can’t always get the doors perfectly aligned on all four sides, especially if the opening is out of square. If you encounter this situation, get the highly visible gaps between the doors and the top even (Photo 3), and leave uneven spaces either where the doors meet the side jambs or at the floor. Once you get your doors fine-tuned, spray a little silicone lubricant on the track for a really smooth glide. Here are a few tips for installing a door on an uneven floor.
Required Tools for this Project
Have the necessary tools for this DIY project lined up before you start—you’ll save time and frustration.
- 4-in-1 screwdriver
- Adjustable wrench
- Needle-nose pliers
- Pliers
Required Materials for this Project
Avoid last-minute shopping trips by having all your materials ready ahead of time. Here’s a list.
- Shims
- Silicone lubricant
