
How to Sharpen a Knife
Updated: Feb. 19, 2024This simple, sure technique for how to sharpen a knife requires only two inexpensive tools
How to Sharpen a Knife Must-have tool #1: A sharpener
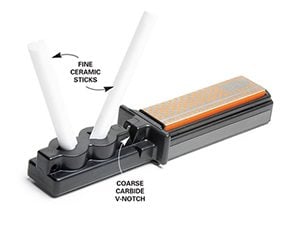
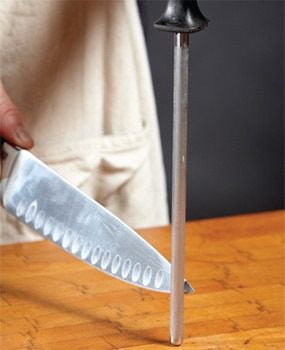
Photo 1: A stick sharpener
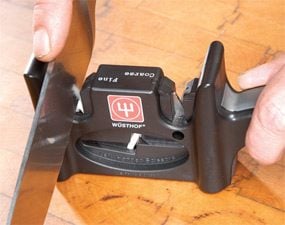
A stick sharpener comes with a pair of fine ceramic sticks and a carbide notch for roughing (Photo 1). Learn how to use a knife sharpener like a stick sharpener, simply hold the knife edge down while you drag it across and down the stick surfaces as you learn how to sharpen a knife.
Joe Gamache, our expert cutler, says there are hundreds of devices, techniques and theories about how to sharpen a knife. Some sharpening methods are arcane; some ridiculously complicated. Still others are only for those obsessed with incredibly sharp edges and require investing a boatload of money in gadgets.
But Joe has a quick, drop-dead simple approach that he’s been teaching to amateurs to learn how to sharpen a knife. You’ll only need a couple of inexpensive sharpening tools and a bit of practice. Master it and you’ll be amazed at how well your knives perform and how much more fun food prep, carving, slicing and peeling can be. Or at least how much less painful. Read on to learn how to sharpen a knife.
Sharpener choices
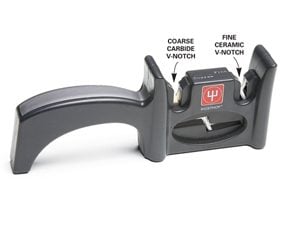
Joe suggests either of two choices for a sharpener: a V-sharpener or, if you’re a more serious cutler, a stick sharpener. Each has two sharpening surfaces, one for roughing out an edge and the other for the final edge. Both styles are easy to use for those learning how to sharpen a knife. But the stick sharpener will probably last your entire life. And with that style you’ll look pretty impressive when your guests watch you sharpen your knife before carving up the roast.
Meet the Pro! Joe Gamache
Joe has sharpened well over 1 million knives in the past 20 years. And believe it or not, he’s only needed 16 stitches. That’s less than a stitch a year! He’ll show you how to safely achieve sharp edges without any trips to the ER.
Joe says, “To get and keep your knives sharp and true, you’ll absolutely need two tools: a sharpener and a steel.”
Must-have tool #2: A steel

A steel is the shorthand term for a steel rod used to straighten knife edges. Any decent knife set includes one, but few people know exactly what it does, much less how to properly use it. If you don’t have a steel, go buy one for about $20. Joe will show you how to use it to maintain a sharp edge. Don’t waste your money getting a diamond-coated surface. You don’t need it to know how to sharpen a knife.
All the sharpening tools you’ll need are available anywhere knives are sold. Go online and search for specific products or generic tool names. Or just visit Joe’s store at eversharpknives.com.
How to Use a Knife Sharpener: 3 Steps to sharp
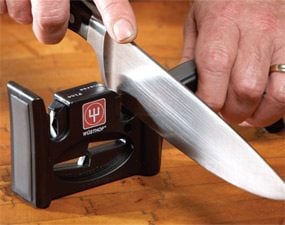
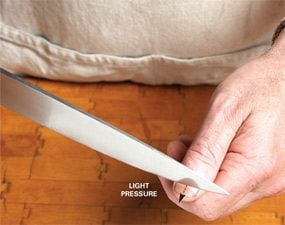
Photo 1: Rough out the edge
Draw the knife through the coarse notch with light pressure until you feel it glide smoothly without any catches. Those indicate nicks or very dull spots. Heavy pressure doesn’t help; it’ll just remove more material and wear away the knife.
Go for good enough— not perfection!
Super-sharp edges are great—at first. Then the razor edge quickly dulls. That’s because an edge that sharp is necessarily very thin, and it bends and dulls easily because there’s not enough metal to support it. A knife that’ll easily slice through food is sharp enough. The tomato test (below) will tell you when a knife is ready for food prep.
Follow Photos 1 – 3 for the 3-step sharpening process. After sharpening and before any food prep, wipe off the blade with a cloth to remove any metal filings.
Joe says, “Don’t strive for razor-sharp edges—’sharp-enough’ edges stay sharp longer.”
When to take your knives to a pro
If you follow Joe’s instructions and still can’t get a good edge, chances are your knives have been abused to the point that they need a pro’s touch to restore the edge. You can do it yourself, but it takes expensive electric tools or a lot of tricky manual grinding on a stone. But for well under $10 per knife, a sharpening shop can bring your edges to better-than-new condition. Then you’ll be able to keep them that way using Joe’s techniques. Search online for “knife sharpening” followed by your city and you’ll surely find a local sharpener. And don’t give up on high-quality knives that have a chip or notch in the blade. A pro can grind out any imperfections and reshape the edge. Yes, you’ll have a slightly narrower blade, but you won’t even notice.
Joe says, “If you cook five meals a week, take your knives to a pro for a tune-up once or twice a year.”
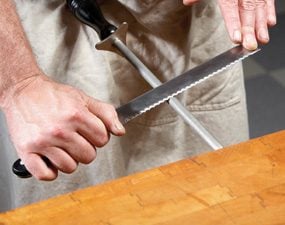
Use a steel—often!
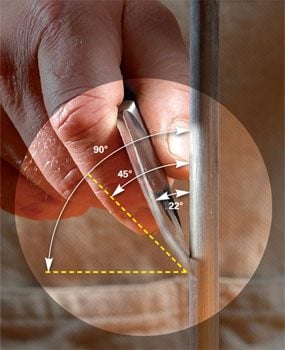
Photo 1: Steel at a 22-degree angle
Start by holding the knife at 90 degrees to the steel. Cut that in half and you’ll be at 45 degrees. Cut it in half again and you’ll be very close to 22 degrees, a good angle for steeling. Don’t fret about having the exact angle; this system will get you close enough.
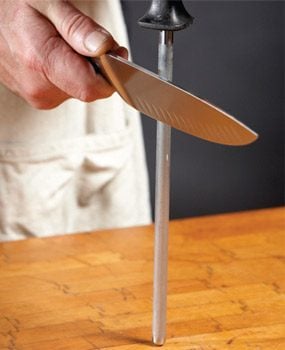
Steeling restores the edge
Chefs and meat cutters frequently pause and “steel” their cutting edges. Steeling doesn’t sharpen an edge; it straightens it. That’s necessary because the thin edge actually bends or warps while you’re cutting. If you could see the edge under a microscope, it would look wavy, and it would feel dull while cutting. Steeling the knife straightens out all those waves to restore a straight, even cutting edge. So when your knife begins to seem dull, don’t sharpen it—steel it first. Every time you grab a knife for the first time to begin cutting, steel it before you even get started. But it’s important to do it right or you’ll just make the edge worse. And don’t act like one of the Iron Chefs on TV and do it all up in the air—you’ll eventually wind up in the ER. Rest the end of the steel on a cutting board and do your steeling the safer and more accurate way. It’s very important that you steel at an angle between 20 and 30 degrees. Photo 1 shows you how to figure that out.
If your knife isn’t restored by steeling, you may need to hit the fine ceramic stone a few times. You should rarely need the coarse notch after your knife is properly sharpened. That is, unless you’ve wrecked the edge by cutting on a too-hard surface or trying to hog your way through a bone. If that’s the case, you’ll have to hit the coarse and then the fine.
Joe says, “The steel keeps a knife sharp.”
The Purpose of Steeling
Photo A shows what your knife edge looks like after a dinner’s worth of cutting—all bent and wavy.“ Photo B shows what your knife edge looks like after steeling. The edge is straight and ready for cutting again.”
Video: Hand Tool Hacks and Modifications for Woodworking
The tomato test for sharpness
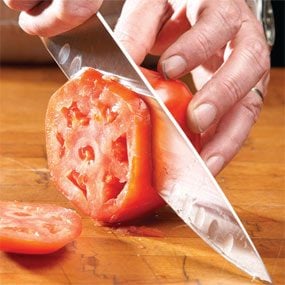
Joe says, “Tomato skins are the perfect way to test for sharpness.”
If you can slice through a tomato skin without having to saw your way through or poke a starter hole with the knife tip, you have a sharp edge that’s ready for food prep.
Cutting-Edge Tips From Joe
Cutting boards:
Drag the tip of your knife across your cutting board. If the surface doesn’t scratch, it’s too hard and it’ll dull your knife in no time. Some plastics and certainly glass and laminate surfaces won’t pass the test, even if they’re called “cutting boards” on the label.
Acidic foods:
Rinse knives after cutting acidic foods like citrus fruits or pickled goods. Acid promotes corrosion right at the cutting edge, even with stainless steel. Dry them right afterward.
Cleaning:
Don’t ever throw knives in a dishwasher. Wooden handles will get ruined, and even stainless steel blades will corrode and get dull. Instead, wash your knives by hand and dry them off right away.
Protect the edges:
Don’t just toss unprotected knives into a drawer. Either use a knife block or stow them away with blade protectors. Simple cardboard sheaths held together with duct tape will do the job.
Avoid bones:
They’ll dull even a high-quality knife. Electric sharpeners: Don’t ever use a cheap electric knife sharpener, especially the ones found on electric can openers. They’ll do more harm than good. If you love gadgets, spend at least $125 for a decent electric sharpener. (You’ll still have to steel your knives, by the way.)
Other knives:
“I sharpen all knives the same way—hunting knives, fillet knives, what ever. Keep a mini sharpener in your tackle box and use the same techniques.”
Sharpening serrated knives
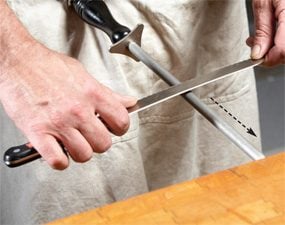
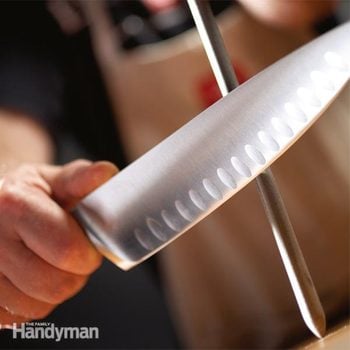
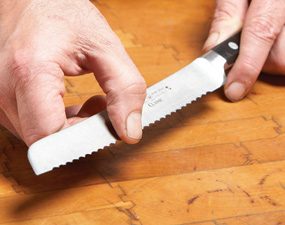
Photo 1: Match the bevel to the pushing angle
Sharpen each scallop with the steel. Match the angle of the scallop and push the knife away from you. Do each scallop two or three times, then move on to the next.
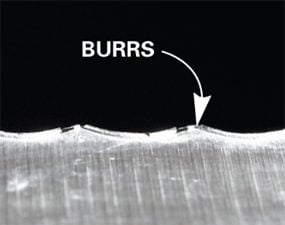
Serrated knives can be sharpened, but unlike ordinary knives, they need a diamond-coated steel that’s properly sized to match the knife.
If you want to master the technique, take your serrated knives to a knife or cookware store and ask to have your knife matched to the correct diameter diamond-coated steel. Its diameter has to match the scallop profiles. If you have more than one serrated knife, choose a tapered steel that’ll work for different scallop sizes.
If you examine the blade, you’ll see that one side is tapered and the other is flat (this is called a chiseled edge). The tapered side is the only one that gets sharpened. When you’re through sharpening, drag the knife through a scrap of corrugated cardboard to knock off any leftover filings.
