
Edge Gluing Boards
Updated: May 12, 2023Here's how to get great results with minimum hassle!
How to Join Two Pieces of Wood End to End Video: Edge Gluing Boards
Ken Collier, an editor at The Family Handyman, will show you how to edge glue boards. This basic woodworking skill will help you in many different woodworking projects. All you need are boards you want to join, clamps, glue and wax paper.
How to Join Two Pieces of Wood Tip 1: Buy good boards
Gluing boards together to make wider panels is a handy woodworking skill that’s easy to learn. Woodworkers with well-equipped shops often buy rough lumber and then rip, plane and joint the lumber to get straight edges for tight-fitting joints. But you can get the same results by carefully choosing boards from a home center or lumberyard. Look for boards with similar color and grain patterns. Then sight down the edge of each board to be sure it’s straight. Finally, make sure the boards are flat and not twisted.
How to Join Two Pieces of Wood Tip 2: Arrange the boards for the best appearance
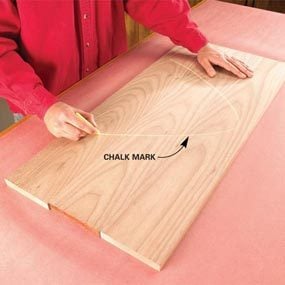
For projects like tabletops where one side of the glued-up boards will be more visible, choose the best-looking side of each board to face up. If the boards vary in shade, arrange them so differences blend as well as possible. Don’t put a dark board between two light ones, for example. Finally, flip the boards end for end and shuffle them until the grain patterns look natural and pleasing. When you’re happy with the results, draw a “V” (photo) across the boards with chalk or pencil. If you’re assembling several panels, also number them. When it’s time to glue the boards together, simply align the marks to make sure the boards are properly arranged.
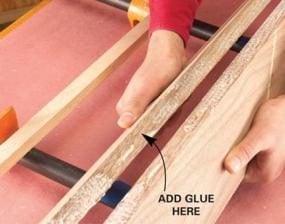
How to Join Two Pieces of Wood Tip 3: Apply an even bead of glue
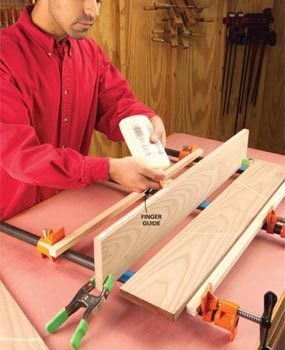
Apply wood glue
Apply wood glue smoothly and evenly along the board edge, using your finger as a guide.
Use white or yellow woodworking glue for interior projects. For projects exposed to moisture, use water-resistant glue. Spread a 1/8- to 3/16-in.- diameter bead of glue along the edge of one board. For an even bead that’s perfectly centered on the edge, hold the glue bottle with one hand and the spout with the other hand. Move the glue bottle along the board quickly, letting your index finger ride along the board as a gauge to keep the bead of glue centered. Use a spring clamp to hold the board upright while you apply the glue. You only need to apply glue to one of the two boards being joined.
How to Join Two Pieces of Wood Tip 4: Don’t apply too much glue
Using too much glue won’t adversely affect the strength of the joint, but it will make a mess that will require extra time to clean up. The goal is to apply just enough glue so that when the boards are clamped there will be an even, 1/16-in.-wide bead of squeezed-out glue along the length of the joint. Also try to avoid getting glue on the face of the boards, where it will cause trouble with finishing later.
How to Join Two Pieces of Wood Tip 5: Slide the glued edges together
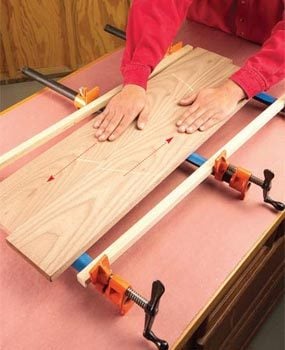
Press the two boards together and slide them back and forth against each other. This is the best way to spread the glue evenly on the edges of both boards.
Tip: Cover the top of the clamps with masking tape to avoid staining the boards and to make cleanup easier.
How to Join Two Pieces of Wood Tip 6: Inspect the glue joint before clamping
Separate the boards and inspect the edges. The goal is to have a thin, even layer of glue on each edge. If there are areas where the glue is thin or missing, apply a little more glue to these sections before clamping the boards together.
How to Join Two Pieces of Wood Tip 7: Don’t skimp on clamps
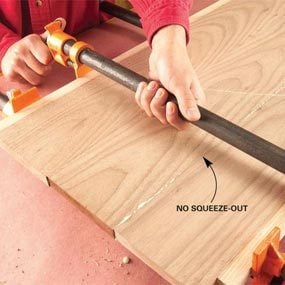
A good glue joint should have an even bead of squeezed-out glue along its entire length. Add clamps to areas where there is no squeezed-out glue.
How to Join Two Pieces of Wood Tip 8: Align the top surfaces carefully
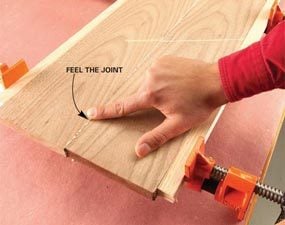
You’ll save yourself tons of sanding by making sure the top surfaces are as close to perfectly flush as you can get them. There are a couple of tricks to make this easier. First, glue and clamp only one joint at a time. It takes a little longer, because you’ll have to wait for the glue to set up before removing the clamps and adding the next board. But it’s much easier to get good results if you focus on one joint at a time. Second, start clamping at one end and work your way along the boards, making sure the top surfaces are flush as you tighten the clamps. Feel the surface with your finger and adjust the boards up or down until the tops are flush with each other. Then apply enough clamping pressure to close any gaps and squeeze out about a 1/16- to 1/8-in. glue bead.
How to Join Two Pieces of Wood Tip 9: Scrape the glue while it’s soft
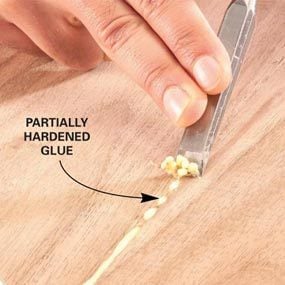
At room temperature and average humidity, the squeezed-out glue will be ready to scrape in about 20 minutes. Wait until the glue changes from liquid to a jelly-like consistency. Then scrape it off with a chisel or putty knife. If the clamps are in the way, you can safely remove them after about 20 minutes in normal conditions. Handle the glued-up panels carefully, though, since the glue won’t reach maximum strength for several more hours.
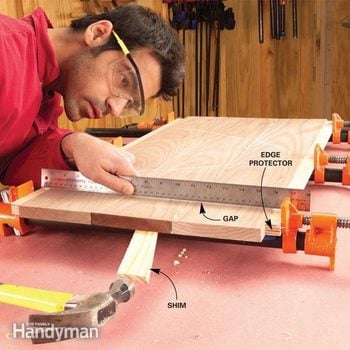
How to Join Two Pieces of Wood Tip 10: Don’t walk away from bowed glue-ups
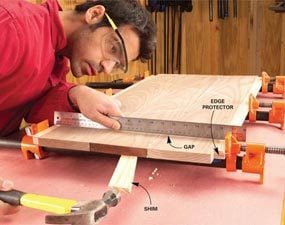
Glue-ups with bows are impossible to flatten after the glue sets. Hold a straightedge across the glued-up boards to make sure they’re flat. Flatten them by driving shims between the boards and the clamps. If the assembly is bowed up, add another clamp on top of the boards.
Tip: Place strips of wood between the clamps and the boards to protect the edges of the boards.
Required Tools for this joining two pieces of wood project
Have the necessary tools for this DIY project lined up before you start—you’ll save time and frustration.
- Clamps
- Hammer
- Straightedge
- Wood chisel
Required Materials for this joining two pieces of wood project
Avoid last-minute shopping trips by having all your materials ready ahead of time. Here’s a list.
- Chalk
- Shims
- Wood glue
