
If you think pocket screws and biscuits have put dowel jigs out to pasture, think again.
How to Use a Dowel Jig: The Ultimate Guide
1
/
20

Rediscover the dowel jig
If you think pocket screws and biscuits have put dowel jigs out to pasture, think again. I love pocket screws and biscuits, but dowels offer a combination of strength, simplicity and accuracy that can’t be beat. That’s why most furniture is still manufactured with dowels. For less than $50, you can buy a self-centering jig that can make joints as well as a machine can. All you need is a drill. Over the course of this article I will be going into detail on how a dowel jig works and how to use a dowel jig to create different types of joints, while also sharing a handful of tips on general dowel jig use. Plus: You can build this beautiful outdoor bench with dowel construction.
2
/
20

How it works
The heart of the jig is a steel block with holes to guide your drill bit. On many models, the holes are threaded, which lets you install bushings for drill bits of various sizes. The holes are precisely perpendicular and located in the exact center of the block.
Center lines for each hole are scribed on the side of the block. They’re visible through two windows.
A screw runs through the whole block. Turning the screw’s handle moves both sides of the jig an equal amount as it clamps onto the wood. That’s why the jig is “self-centering”: Clamping the jig centers the holes on the wood automatically.
3
/
20

Choosing a jig
Pro advice: You’ll find dowel jigs in various styles, and some carry tempting price tags. But they’re often flimsy, inaccurate or just hard to use. Every woodworker we talked to prefers the classic self-centering style shown here. Shop online… woodworking stores and some home centers stock dowel jigs. But at least start your search online, where you’ll find the widest selection.
- The basic model ($25 to $40) The most basic jigs have holes sized for various drill bits (no bushings). If you want to use more than one dowel in a joint, you have to move the jig. That can lead to alignment problems, so choose this type only if you’re on a tight budget.
- Bushings are better ($40 to $60) Some jigs come with bushings of various sizes that screw into threaded holes. That lets you drill holes of the same size without moving the jig. This model has two bushing holes and two drill bit holes that don’t accept bushings.
- More bushing holes is even better ($50 to $75) This model has four threaded holes. That gives you more options for spacing between holes, and you could drill four holes without moving the jig. Extra bushings are sold separately.
- Extra capacity is nice ($60 to $90) The other jigs shown here can clamp onto stock up to 2-3/8 in. thick. That’s almost always enough. But wide-capacity jigs handle stock of 6 in. or more.
4
/
20

How to make a joint
- Mark the parts. Position the parts and mark the dowel locations with a pencil. We’re showing a T-joint here, but most joints require the same steps.
- Match up the lines. Align your pencil lines with the center lines on the jig’s block. Tighten the screw to clamp the jig into place and then drill the dowel holes.
- Assemble. Add dowels and glue for a fast, strong, perfectly aligned joint. Next I’ll go into more detail on how to make specific types of joints.
5
/
20

Construct a vertical T-joint
A self-centering jig isn’t designed to make side-by-side holes in the face of a board (as shown in part A). But you can do it. Here’s the trick: Use the jig to make a guide block. The block itself will then act as a jig to position the holes. To start, measure how far your jig will open, then cut a block that length. Mark a center line on the block. Dowel the end of part B using your dowel jig. The next page shows a step-by-step breakdown of this process.
6
/
20
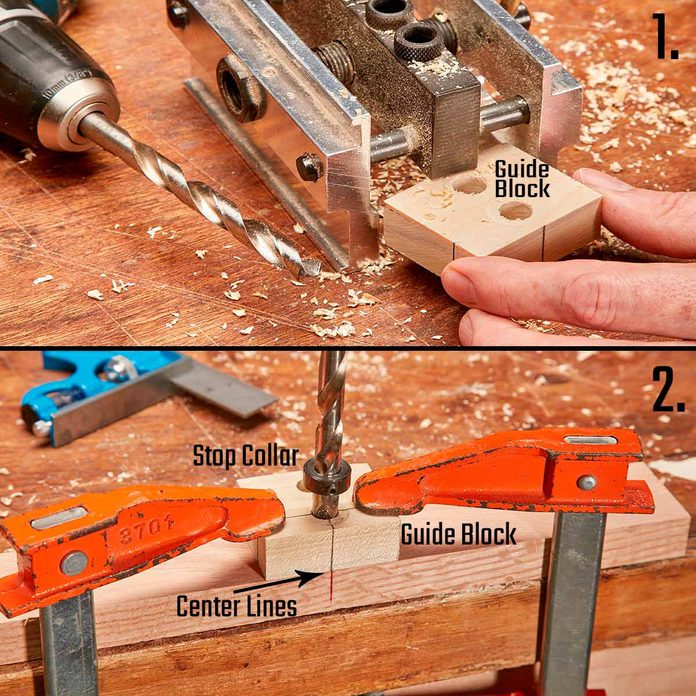
Construct a vertical T-joint step-by-step
- Make a guide block. Drill two holes through a block, using the jig to position the holes perfectly.
- Drill through the block. Align the block’s center line with the joint’s center line
7
/
20

Make better edge joints
Dowels are a big help when you’re edge-gluing boards; they keep the boards aligned and flush. They also strengthen a joint that’s not perfectly tight. Plus: Check out a bunch of our favorite shop tips here.
8
/
20

Edge joints step-by-step
- Mark dowel locations. Cut the boards 1-in. extra long and butt them together. Mark dowel center lines 2 in. from each end and 8 to 12 in. apart in between.
- Drill dowel holes. Align the jig with the center lines and drill. Control the hole’s depth using a stop collar. Glue dowels into one set of holes. Measure how far each one sticks out; cut any that are too long. Glue the boards together, then cut them to final length.
9
/
20

Build an L-joint
Two boards joined as an “L” make a great table leg or box corner. Glue alone will make the joint plenty strong, but dowels provide perfect alignment. L-joints are a little more tricky so check the next page for more steps.
10
/
20

L-joint step-by-step guide
- Make a guide. Cut a scrap the same length as your workpieces and mark one end with an “X.” Drill holes through the scrap using the dowel jig.
- Drill the face side. Clamp the guide to the face of part A and drill. Remember to align the “X” with the top of the part.
- Drill on edge. Drill matching holes in the edge of part B, again aligning the “X” end with the top.
11
/
20

Construct an offset joint
Usually, you want dowels in the center of a part. But sometimes you don’t and you can fool your self-centering jig into making a joint that isn’t centered. All you have to do is add a spacer block. Determining the precise width of the block is a little tricky, so test your setup on scraps before you drill the actual parts. You’ll need an extra-wide jig if part B is more than 1-1/2 in. thick.
12
/
20

Make an offset joint: Add a spacer block
Position dowel holes off-center by placing a block against the workpiece. Then drill the holes as usual.
13
/
20

Choose a standard bit
A twist bit with an aggressive design is intended to cut fast, but that’s not good for a doweling jig. An aggressive bit can grab the wood, pulling itself too hard and too deep, even causing the stop collar to slip. A twist bit with a standard shape is much better. A brad point bit is OK, too.
14
/
20

Don’t make dowels; buy them
Manufactured dowels with ribbed sides are much better than dowels made at home from smooth dowel rod. Fluted dowels are stronger, fit better and are easier to glue. When you clamp a joint together, excess glue in the hole flows up and out of the flutes. A bag of 20 costs only $2 at home centers.
15
/
20
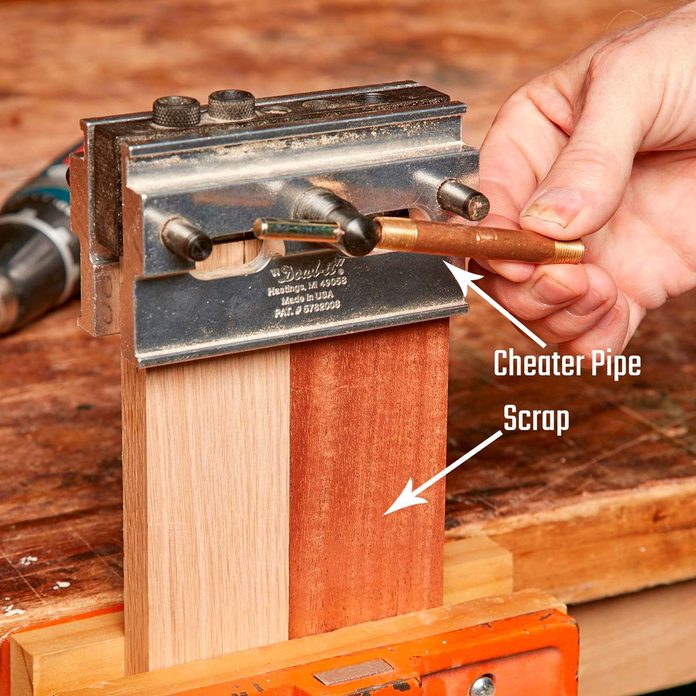
Add a scrap
When drilling into the end of a part, place a scrap of the same thickness next to it. This keeps the jig straight while you tighten it. A small pipe makes tightening easier.
16
/
20

Set a stop collar using a bushing
When you buy a doweling jig, pick up a set of drill bit stop collars ($3). A collar prevents you from drilling too deep, which can be a disaster. The easiest way to position a collar is by using one of the bushings from your jig. Measure to the beginning of the bit’s tip, not to the pointed end. Add 1/16 in. to allow space for glue at the bottom of the hole. This bit is set up to drill a hole 1-1/16 in. deep, perfect for a 2-in. dowel.
17
/
20
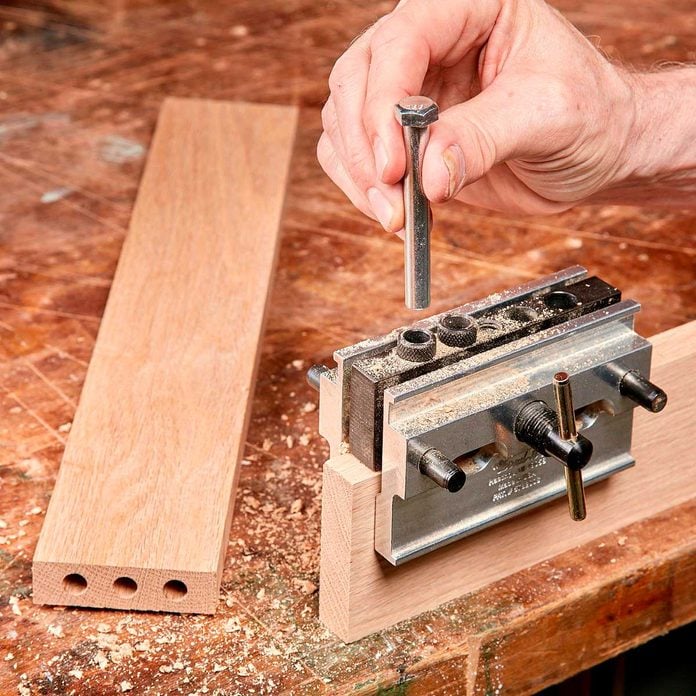
The three-hole trick
If your jig has two bushings, here’s a trick for drilling three, four or more holes exactly the same distance apart. Drill two holes, then move the jig and drop a bolt through one of the bushings and into a hole. (The bolt must be the same diameter as the bushing.) Clamp and drill through the empty bushing. To make the best indexing pin, saw the threaded end off a 3-1/2-in.-long hex bolt. This leaves just a smooth shaft of the perfect diameter.
18
/
20

Apply glue with a smaller dowel
Before inserting a dowel, coat the inside of each hole with glue using a 5/16-in.-diameter craft stick. Apply more glue to the surfaces around the holes and to the dowel pins with a small brush.
19
/
20

File if the fit is tight
The spacing between holes must be precise for two parts to fit together. If you find the spacing isn’t quite right, file one side of a dowel pin to make it skinnier. Put a few layers of tape under the file so you don’t mar the wood.
20
/
20

Improve the handle
The short handle on a doweling jig can dig into your hand when you loosen or tighten the jig. One solution is to use a cheater pipe, but heress a better one: Add round knobs ($4 each at a hardware store). Cut threads on the handle using a 1/4-20 die. Ready for more? Check out these dirt-simple woodworking jigs you need for your home shop.