


Clearing a clogged drain line requires a little more work than most household clogs, but with a little know-how, you can fix the problem yourself.
Introduction
If the plunger and the snake fail, you probably have a big clog somewhere in the drainpipe. Here's how to locate the clog and grind your way through it.
Tools Required
- Allen wrench
- Bucket
- Cold chisel
- Hammer
- Pipe wrench
- Rags
- Safety glasses
- Shop vacuum
- Slip joint pliers
Materials Required
- Expansion plug
- Hand cleaner
- Plastic cleanout plug
- Teflon tape
Clogged drains are always a hassle, but some, clogs are easier than others to fix. A plugged up P-trap under the kitchen sink or a stopped-up toilet, requires only a wrench, a plunger and a little elbow grease to unclog.
But sometimes the clog is deep in the drainpipe and requires more work and extra-powerful tools to root out. We’ll show you how to find and clear out these clogs, which are often hidden in the drain system under your floor.>
Video: How to Unclog a Drain
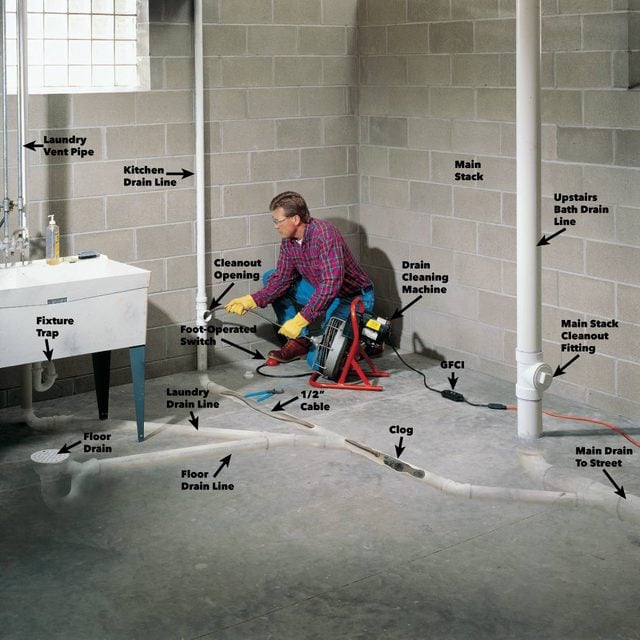
Under-Floor Drain System
The job of clearing clogs in the larger drain lines found under the floor isn’t for everyone. In the first place, you’ll spend about $50 a day or more to rent the large drain-cleaning auger required, and you have to be strong enough to heft the machine and to wrench loose those old, corroded cleanout plugs. Then there’s the mess, and the half-day you’ll spend running for rental equipment and miscellaneous plumbing parts. So why would anyone in their right mind attempt to clear out under-floor drains?
However, it’s like to cost more to have a professional plumber come to your house, and their schedule might not always sync up with yours.
Keep in mind, however, that some clogs require the services of a pro. Don’t hesitate to call a pro if you suspect that the main drain to the street is clogged by tree roots or caved-in pipes.