
How To Build Classic DIY Workbench for Kids

Updated: Sep. 28, 2023
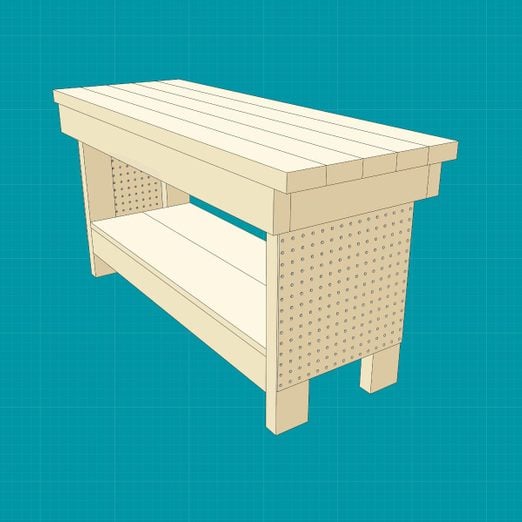
A simple and strong workbench for the smaller-sized DIYer in the family.
A full day
Beginner
Around $60
Introduction
What's better than having your little DYI helper in the shop with you? Having a workbench just for them! This bench is strong and super easy to build, providing your small-size shop partner plenty of room to grow. Run to the lumber yard in the morning, grab a few boards and have a perfectly functional mini workbench by the end of the day.
Cut the parts according to this Cutting List. We recommend using a miter saw, but a circular saw will work fine. Mark the 2x4s with a Speed square, then carefully cut the boards to length.
If you plan to stain or paint the bench, now is the time to sand the parts. And to really simplify your job, you could also stain or paint the parts before you assemble the bench.
Tools Required
- 6" F-style wood clamp
- Cordless drill
- Countersink bit
- Miter saw
- Orbital sander
- Safety glasses
- Speed square
Materials Required
- (1) 2'x4' Pegboard panel
- (1) 8' Pine 1x8
- (8) 8' Pine 2x4s
- 1-1/4" wood screws
- 2-1/2" Trim-headscrews
- 2-1/2" Wood screws
Cutting List
| KEY | QTY. | DIMENSIONS | PART |
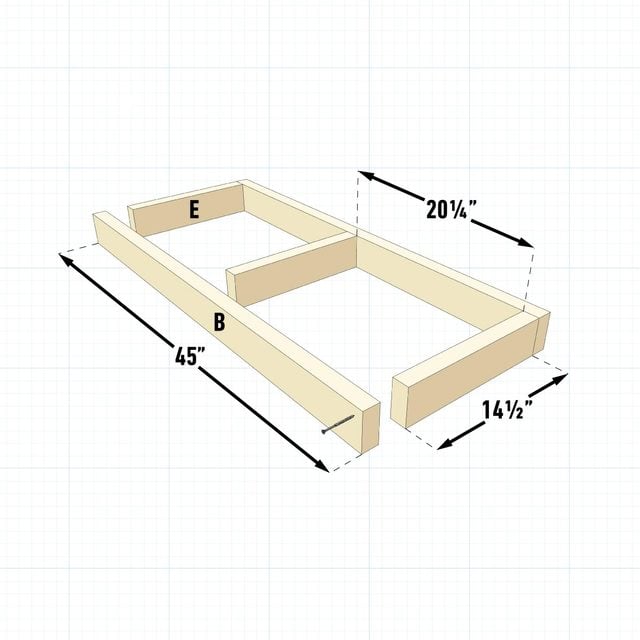
| A | 2 | 1-1/2″ x 3-1/2″ x 45″ | Top frame front and back |
| B | 3 | 1-1/2″ x 3-1/2″ x 17-1/2″ | Top frame crosspieces |
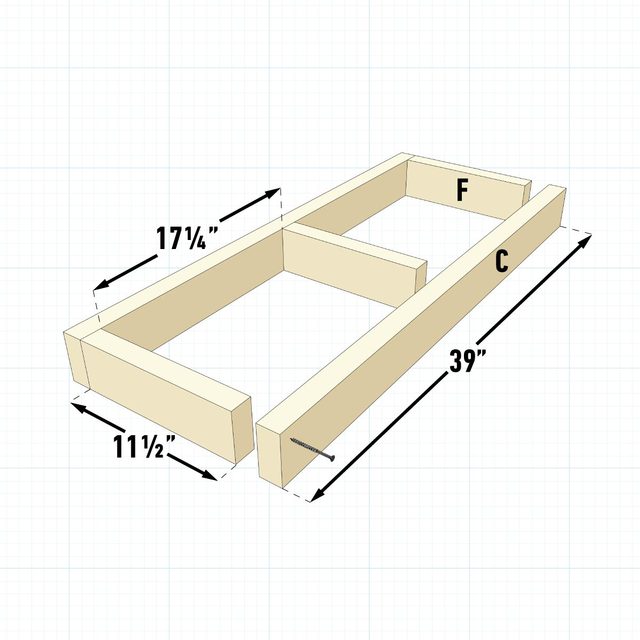
| C | 2 | 1-1/2″ x 3-1/2″ x 38-1/2″ | Shelf frame front and back |
| D | 3 | 1-1/2″ x 3-1/2″ x 14-1/2″ | Shelf crosspieces |
| E | 4 | 1-1/2″ x 3-1/2″ x 22-1/2″ | Legs |
| F | 2 | 1-1/2″ x 3-1/2″ x 4″ | Back shelf supports |
| G | 4 | 1-1/2″ x 5-1/2″ x 48″ | Top boards |
| H | 3 | 3/4″ x 5-1/2″ x 38-1/2″ | Shelf boards |
| J | 1 | 3/4″ x 7-1/4″ x 42″ | Back brace |
| K | 1 | 3/4″ x 7-1/4″ x 48″ | Backboard |
| L | 1 | 3/4″ x 3-1/4″ x 48″ | Backboard shelf |
| M | 2 | 17-3/8″ x 17-3/8 x 1/4″ | Pegboard leg braces |
Project step-by-step (7)
Build the top frame
- Use 2-1/2-in. screws to assemble the frames that support the top and the shelf.
- Lay the 2x4s for the front and back of the top frame on the floor or a large work surface and mark the centers.
- Now lay the shorter 2x4s between the front and back and screw them together.
-
- Pro tip: Use self-drilling construction screws like these from Hi-Point. Do not use drywall screws because they’re brittle and tend to snap.
-
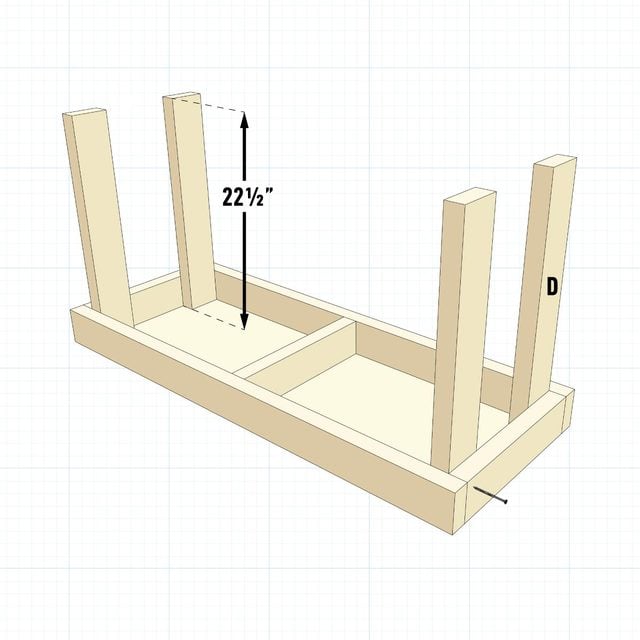
Add legs to the top frame
- Clamp the leg to the frame to keep it in place.
- Attach legs with 2-1/2-in. screws.
Make the shelf frame
- Build the shelf frame in the same manner as the top frame.
- Pro tip: Always double check your measurements. Once the legs are attached to the top frame, double check the inside measurement and cut the shelf frame parts to match.
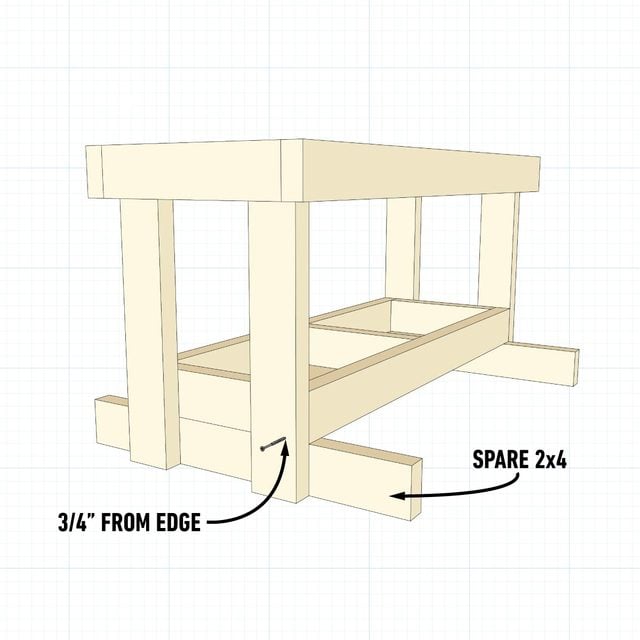
Attach the shelf frame
- Rest the bench on the floor and place spare 2x4s against the legs to act as spacers.
- Set the shelf between the legs resting on the spacers.
- Screw through the shelf into the legs.
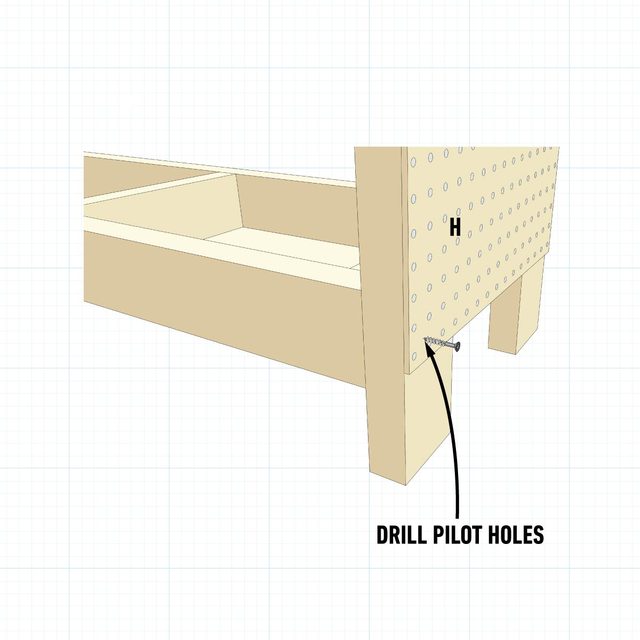
Add the pegboard
- Drill five holes about two inches from each edge of the pegboard with the countersinking bit.
- Attach the pegboard with 1-1/4-in. screws.
Attach the shelf boards
- Attach the shelf boards with 1-1/4-in. screws.

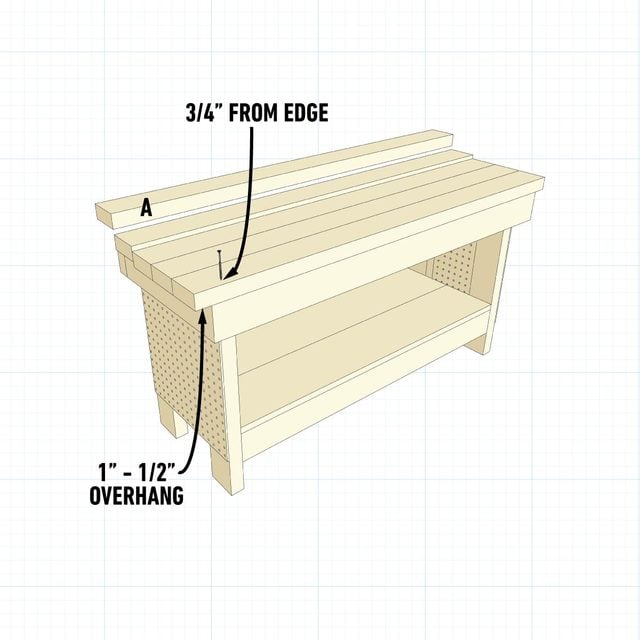
Set the top boards
- Attach the top boards with 2-1/2-in. trim-head screws.
- Pro tip: Trim-head screws tend to sink below the surface, so be careful not to go too deep.
Originally Published: September 04, 2014