
How to Spray Varnish on Wood
Updated: Apr. 05, 2024Flawless results with aerosol cans
Get set up for spraying
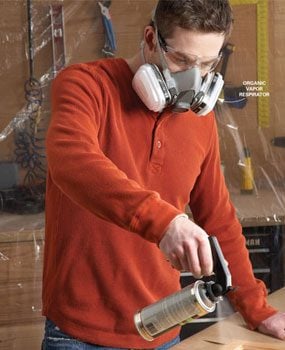
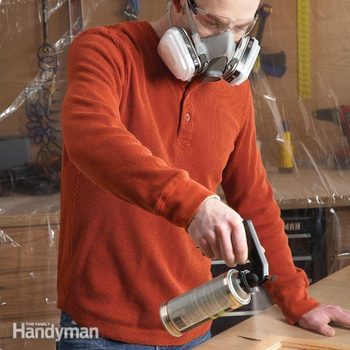
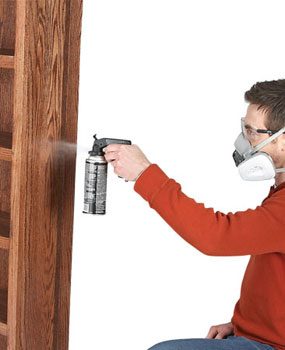
Protect yourself and the work area
Spraying is fast and gives a smooth finish, but it also creates a fine mist of solvent and finish that drifts and settles on everything in sight and is dangerous to breathe. To avoid problems, work outdoors if possible. If you spray indoors, cover everything with plastic sheeting or drop cloths and wear a respirator fitted with organic vapor filters, especially if you’re spraying lacquer. Also put an exhaust fan in the window. Read the label on the spray can for additional safety precautions.
Also, check French polishing, a technique for finishing wood with multiple coats of shellac.
Start the polyurethane spray paint off the edge
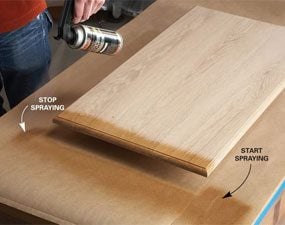
Spatter-free coverage
It’s hard to get even coverage if you start or stop spraying on the surface you’re coating. The spatters that happen when you first push the button can blemish your work, and products like polyurethane spray build up in one spot if you don’t move fast enough. An easy and foolproof way to avoid these problems is to start spraying before you reach the edge of the project, move across the project at an even pace, and stop spraying after you’ve gone past the far edge. This technique guarantees an even, spatter- free coat of finish across the entire surface.
Don’t swing the polyurethane spray paint can in an arc

Polyurethane spray paint application tip
It’s natural to swing the spray polyurethane can in an arc, but this results in uneven coverage. The finish will build up in the center and be light on the edges with a product like polyurethane spray.
Overlap the polyurethane spray paint

Avoid buildup
To get even coverage, overlap the spray polyurethane about halfway onto the previously sprayed section. If you just overlap the edges, you’ll get a narrow band of thicker finish where the two strips meet. Overlapping at least 50 percent solves this problem—you’ll apply about the same amount of finish everywhere with a finishing product like polyurethane spray.
Keep the spray tip parallel to the surface
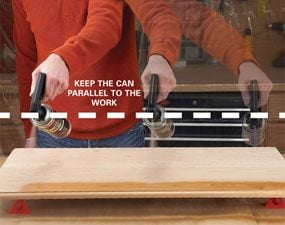
Build even coats
Focus on keeping the spray tip an equal distance from the surface as you move it along. At the same time, keep the can with something like polyurethane spray, moving at a steady pace to get an even coat. The goal is to apply just enough finish to wet the surface without creating runs. Prevent runs by applying several thin coats rather than one or two thick coats. The finish may look blotchy after the first coat, but additional coats will produce a uniform finish.
Don’t dent your finger

Buy a trigger handle
If you’ve ever used spray cans to finish a large project, you know how sore your fingertip can get from pressing down on the spray tip. A spray-can trigger handle saves your finger and gives you better control of the spray. You’ll find spray-can trigger handles at home centers and hardware stores.
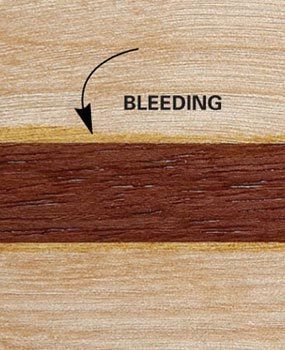
Seal dark stains and exotic wood with a mist coat
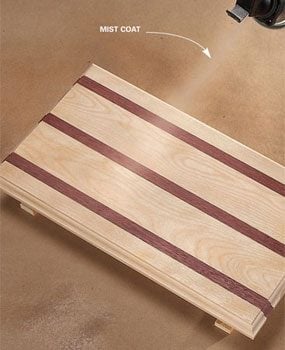
Prime potential problems
Spraying a heavy coat of finish over a dark stain or over some oily exotic woods can ruin your project’s appearance. The solvent in the finish can dissolve the stain or the color in the wood and cause it to bleed or get muddy looking. To avoid this, prime these types of projects with several thin mist coats before applying a thicker coat of finish. Apply a mist coat by raising the can higher than normal and moving the can faster than usual. This will reduce the amount of spray hitting the surface. Mist coats dry quicker than a full coat, so you can typically apply several mist coats with less-than-normal waiting time. Wait for the previous coat to dry to the touch before recoating.
Brush, then spray
Topcoat with spray
At $4-plus per aerosol can, it gets pretty spendy to build up a heavy, protective layer of finish on a large project. But you can still take advantage of the flawless finish provided by aerosol cans. Start by applying two coats of finish with a brush. Then carefully sand with 220-grit sandpaper and remove all dust before using spray cans for the final coat. If you don’t know much about finishes, just make sure your liquid and spray finishes are the same type.
Spin your project
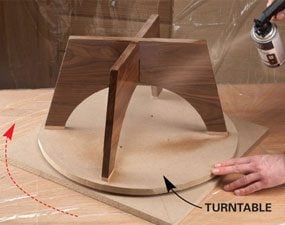
Build a turntable
When you have a small project with many sides to spray polyurethane, placing it on a turntable will speed up your job and make it easier to get good results. Instead of trying to move around the project as you spray polyurethane, just give the turntable a little spin. You can build a turntable like this by mounting lazy Susan hardware to a scrap of particleboard or plywood, and then mounting a plywood or particleboard disc to the hardware. Lazy Susan hardware is available at hardware stores and home centers. Check the instructions before leaving the store so you can pick up any screws you’ll need. While you’re at it, get to know if you can spray paint wood.
Required Tools for this Project
You’ll need an organic vapor respirator and a spray can trigger handle.
Required Materials for this Project
Avoid last-minute shopping trips by having all your materials ready ahead of time. Here’s a list.
- Aerosol spray finish
- Plastic drop cloth
