
Built-to-Last Viking Long Table

Updated: Oct. 21, 2022
Big enough for the whole clan and costs less than $200!

Multiple Days
Intermediate
$101–250
Introduction
When the Vikings of yore built something—a longboat, a lodge, even a drinking horn—it was sturdy and simple, functional yet attractive. This table fits that mold. It’s big, rock-solid and buildable with basic tools, yet it has a certain elegance to it.Tools Required
- Belt sander
- Circular saw
- clamps and basic hand tools
- Drill
- Jigsaw
- Router
The Viking Table
This style of viking table is known as a drawbore trestle. The “trestle” is the stretcher that connects the legs, and “drawbore” refers to the “bored” mortises and tenons that “draw” the legs and trestle tightly together to create a stable base.
You can easily shorten (and lighten) your table by modifying the dimensions given. The benches that accompany this table are built using the same template and same basic procedures. Check out the heavy-duty viking bench project directions here. If you’re thinking of building both the table and the bench, consider starting with the bench; it’s a great warm-up for the larger viking table project. Or check out our top 10 woodworking projects.
It’s “Knockdowable”!
The viking table, built as shown, is enormous— long, wide and weighty. But by removing two wedges and eight screws, you can separate the legs, tabletop and trestle so you can store the table for the winter or move it to a different location.
Pick the right wood
If you’re building this viking table for inside use, you can use everyday dimensional lumber or more expensive hardwoods. But if it will be used outside, consider one of the following weather-resistant options:
Cedar, Redwood or Cypress
One of these “premium” exterior woods is most likely available in your area. Select boards with the most heartwood— the darker inside part of the tree, which is more durable than the lighter colored sapwood. The downside? These woods can be wickedly expensive and, in some cases, soft.
Treated Lumber
It’s moderately priced and stands up well to weather, but it’s often wet from the treatment process, which means it’s more likely to shrink and twist, and less likely to glue up well. It’s also difficult to apply a good-looking finish until the wood fully dries.
Douglas Fir
This is the wood we used. It’s more expensive than the more widely available “standard” dimensional lumber—often labeled H-F, S-P-F or “white wood”—but cheaper than the premium woods. It’s about 20 percent harder, and stronger, heavier and more moisture resistant than standard lumber. Not all home centers and lumberyards stock Douglas fir; look for the “Doug Fir” or “DF” stamp. If in doubt, ask. In our area, Lowe’s and contractor lumberyards carry Douglas fir.
White Oak
We used white oak for the feet, the breadboard ends and the wedges. Other woods would work fine, but we liked the extra strength, hardness and contrast the white oak provided in these critical pieces. Red oak, the type you’ll often find at home centers, isn’t a good substitute, since it’s much more prone to rot. You can find white oak at specialty woodworking stores and online.
Project Directions:
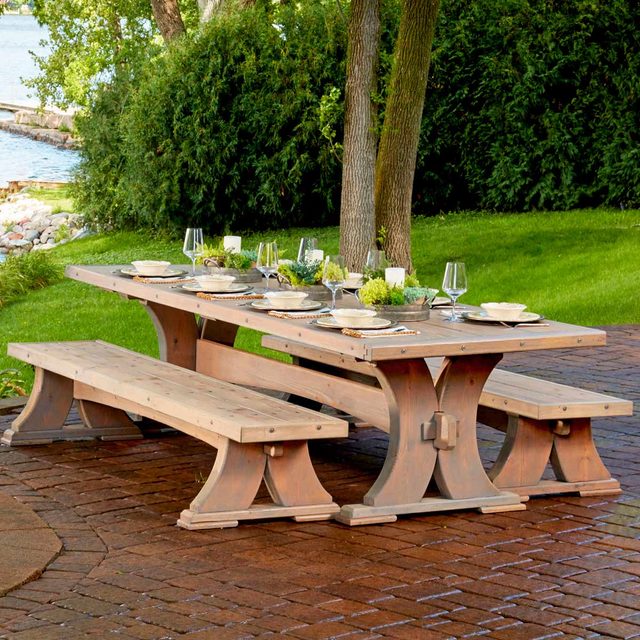
Douglass fir tables are extremely durable, and after four years all we had to do was give it a quick sanding and a coat of Cabot Australian Timber Oil every spring and cover it with a tarp during the tough Minnesota winters. The table remains as beautiful as it was on the day it was made.
Take your time at the lumberyard (check out our lumber yard guide) selecting flat, straight boards free of split ends, twists, cupping and loose knots—you’ll spare yourself a lot of clamping and cussing down the road. If you have trouble finding perfect 2x12s, purchase an extra board—or longer boards and cut around the defects.
Cut your boards into eight 22-in.-long pieces; make sure the ends are square. Pair up your boards so when one is laid atop the other, there’s little or no gap along the ends and edges. If you flip or rotate the boards, sometimes you’ll find the perfect fit. Try to have any defects fall in the areas of the wood you’ll be cutting away as you form the legs.
Project step-by-step (14)
Make the Leg Template
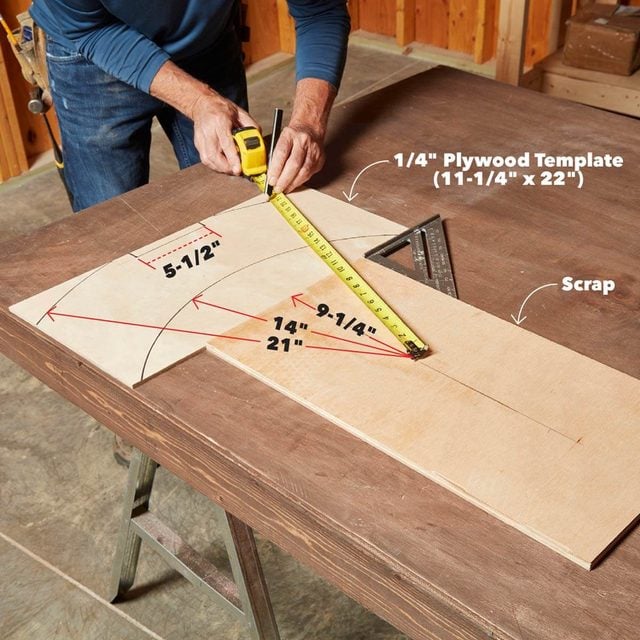
Mark out your leg template onto 1/4-in. plywood as shown above. Set another scrap piece of plywood against the template. Drive a screw 9-1/4 in. from the end of the scrap and use that screw as a pivot point for your tape measure. Then swing the two arcs to create the leg shape. Cut just outside the line with a finetooth jigsaw blade, then use a belt sander to sand right up to the line. Use your template to trace the leg shape onto two leg sections, which breaks down to eight separate leg pieces (Labeled “A”, in Figure B in Project PDF’s below). 10 DIY Tables You Can Build Quickly
Glue up the Leg “Sandwhich”
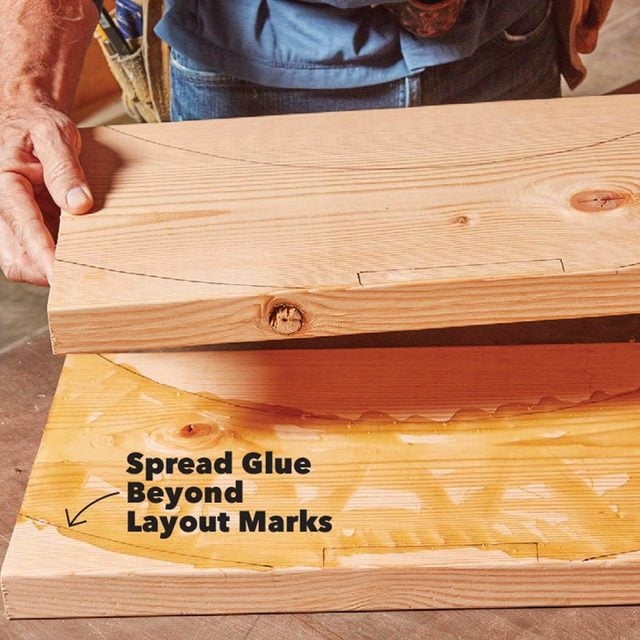
Trace the leg shape onto two 22-in. 2x12s, lightly dampen the bottom piece—polyurethane glue needs moisture to work— then apply healthy squiggles of the glue across the main body of the leg. Use a plastic putty knife to spread the glue slightly beyond the edges of the layout lines and across the main body of the leg.
Clamp the Leg Blanks Together
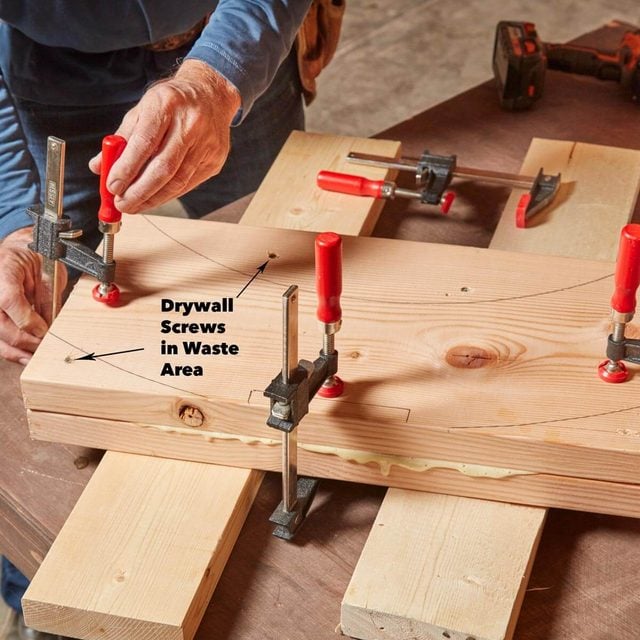
Place the top board over your glued board, taking care to even up the edges. Install two or three screws in the waste area to keep the pieces aligned and then use clamps— lots of them—along all the edges. Drive additional screws into the waste area to help draw the pieces tightly together. The glue will foam as it goes to work. Keep your boards clamped together at least two hours or overnight for good measure. Create three more leg blanks this way.
Cut the Legs to Shape
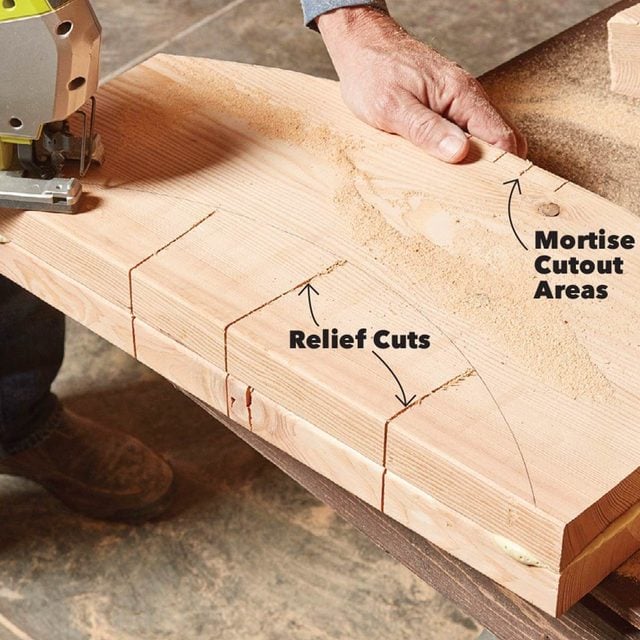
Cut out the legs. A jigsaw with a long, coarse blade works fine, but a band saw works better, so use one if you have access to it. Whichever tool you use, make a series of “relief” cuts as shown. These allow you to remove waste material as you cut. They also allow your blade to get back on track if it wanders and begins making angled cuts, which jigsaws in particular are prone to do. If you have a jigsaw with reciprocating action, set it at zero; it will cut slower, but your blade will wander less.
Sand the Legs and Rout the Edges
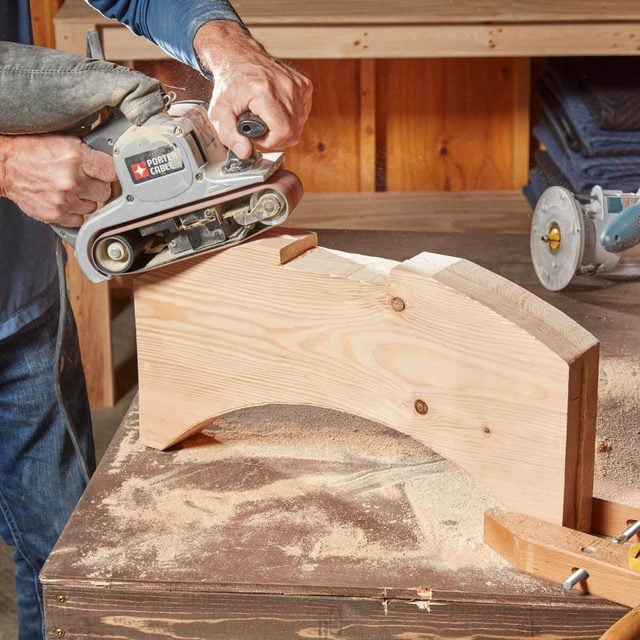
Next use a belt sander to smooth and true up the curved sides. Clamp the legs to your work surface. Begin with a coarse belt, then progress to finer grits. If you have access to a bench top belt sander or spindle sander, use it; you’ll get results faster.
Use a router with a 1/2-in. round over bit to soften the edges of the curved parts. Don’t rout the tops and bottoms of the legs or the flat area where the mortise cutout will be.
Create the Leg Assemblies
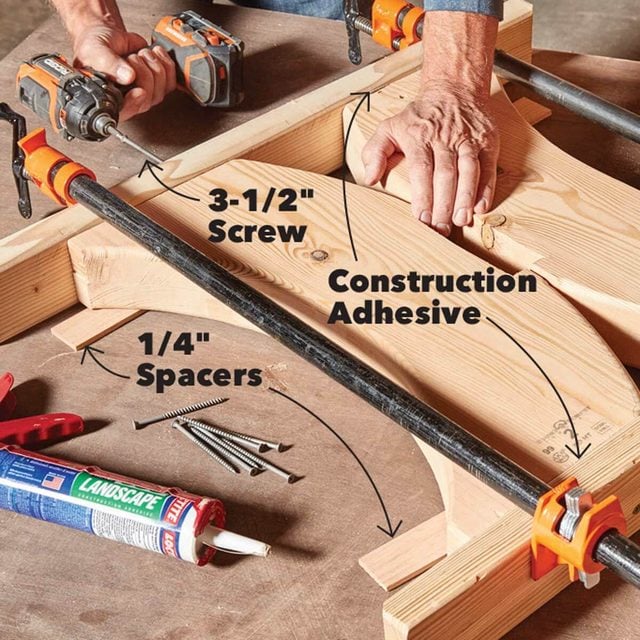
Position two leg sections next to each other and check to make sure the mortise cutout (where the stretcher tenon will go) can accommodate a 2×6 test piece. It’s easier to enlarge these areas now, before joining the legs. Set the legs on 1/4-in. spacers (so they’ll be centered on the 2×4 top and bottom plates). Then apply construction adhesive to the ends to add a layer of moisture protection, and cinch the leg sections tightly together and to the 2×4 plates (B, C) with clamps. Secure the legs to the plates using 3-1/2-in. exterior screws. Repeat for the other leg assembly. Cut the feet (D) to size and shape, then secure them with glue and screws to the bottom plates.
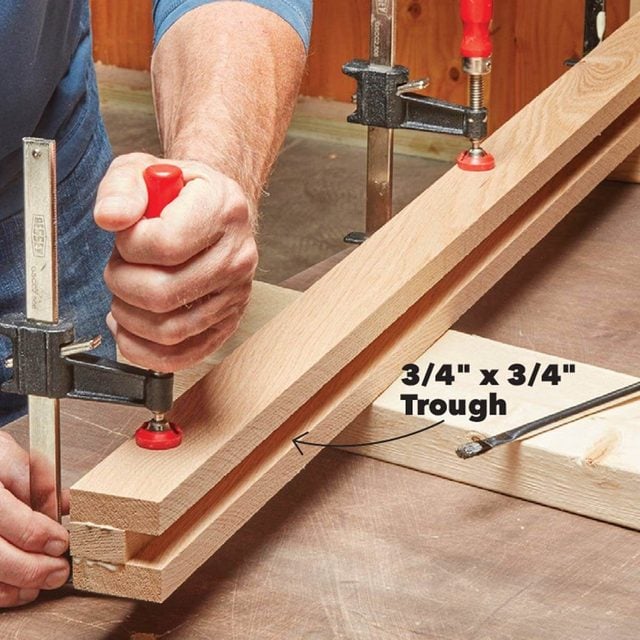
Cut the Tongues
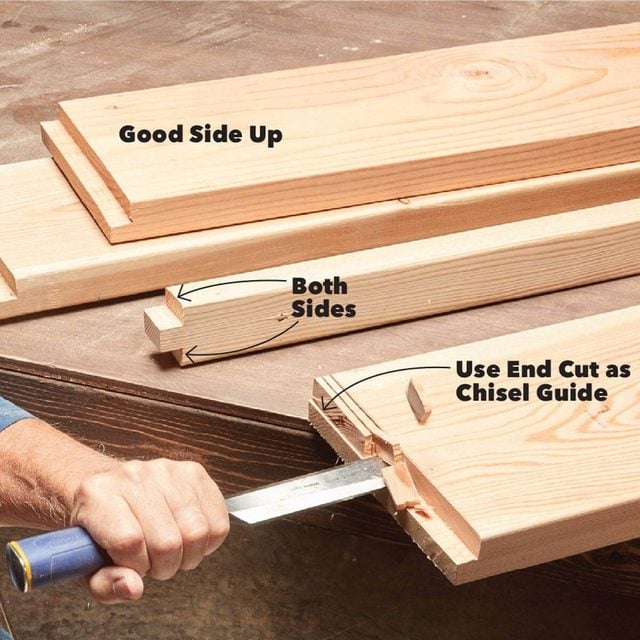
The 2-1/4-in.-wide boards along the long edges give the tabletop more mass to match the heft of the legs. Rip your two 2-1/4-in.-wide edge boards (F) from a 2×6. Cut these and your four 2×10 top boards (E) to length. To create the “tongues” that slide into the breadboard ends, set your circular saw to cut 3/4 in. deep, then make one cut 3/4 in. from each end of each board, another cut right along the end, and then a couple more cuts in between. Place your chisel along the end cut and use it as a guide to remove the waste material. When you’re done, each end will have a 3/4-in. x 3/4-in. tongue. Make the same cuts on the top and bottom of the edge boards (F) as shown. Be sure to position the top and edge boards good side up.
Build the Breadboard Ends
Next, make your board ends (H, J) as shown above; they’re essentially three-board sandwiches with the middle board inset 3/4 in. to accommodate the tongues you’ve created. We made ours from white oak for strength, appearance and durability, but you can make yours from the same wood as your table. Be sure to use waterproof glue. Rout the outer edges and cut the breadboard ends to length; make them 1/2 in. longer than the width of the finished tabletop to accommodate board movement.
“Breadboard” ends have been used by woodworkers for centuries—and for good reason:
• They help keep the ends of the tabletop boards flat and aligned.
• They help protect the end grain of the boards from moisture and wear.
• They allow the top boards to shrink and expand more freely without cracking.
• They provide a smooth edge for your tummy to rest against.
Assemble the Top
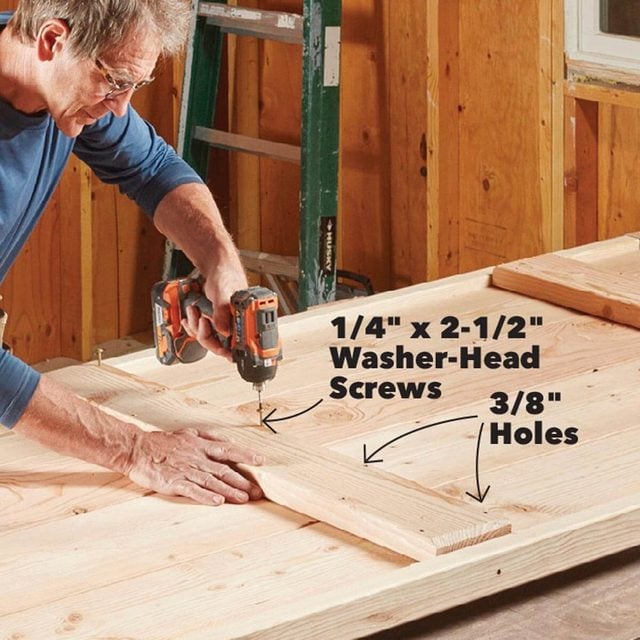
Place your two edge boards (F) and four tabletop boards (E) on your work surface upside down. Space your top boards 1/8 in. apart using drywall nails or shims. Even up the ends of the six boards, then tap the breadboard ends into place. Position the braces (G) and make sure everything is tight and square.
Then drill 3/8-in.- diameter holes through the support braces and secure the braces to the four tabletop boards using 1/4-in. x 2-1/2-in. washer-head screws. Note: The slightly oversize holes give the boards wiggle room to shrink and expand to help prevent cracking. Pre-drill holes in the breadboard ends—one centered on each of the four wide boards—and secure them with 3-1/2-in. washer-head screws. Finally, drill holes along the center of the edge boards (F); angle them slightly toward the top of the table so the screws will have plenty of meat to bite into, then drive home the 3-1/2-in. washer-head screws.
Take Measurements for the Stretcher
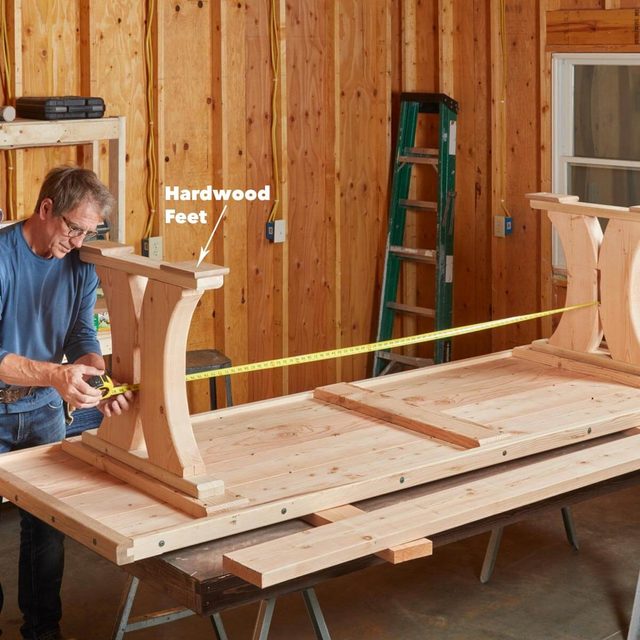
Position the two leg assemblies as shown above. Make sure they’re square to the tabletop, then measure the distance between them. This will give you the dimensions you need to create your stretcher. Note that we provide an exact stretcher length in the Cutting List (in Project PDF’s below), but your length will most likely differ.
There are a few key measurements you need to get right in order for your stretcher and drawbore wedges to do their jobs.
- The shoulder measurement. This is the distance between leg assemblies. This distance is key because the shoulders hold the leg assemblies the right distance apart and ”wiggle-proof” the table.
- The tenon length and width. The tenon extends 7 in. past the shoulder and should be 5-1/2 in. wide.
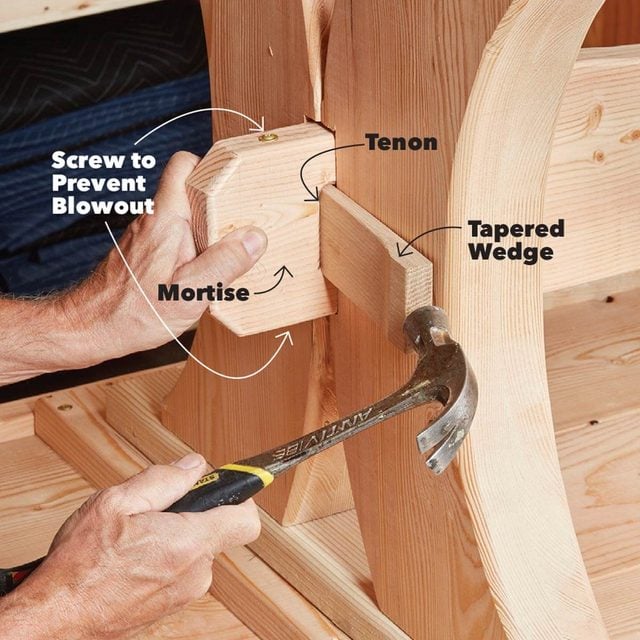
- The mortise cutout. The cutout is centered on the tenon and is 5/8 in. wide and 2-1/2 in. long. The edge of the mortise near the outside of the leg should be inset into the leg by about 1/8 in. so that when the wedge is installed, it will draw the shoulder tightly against the leg. When done properly, this joint is amazingly strong, so take your time to get it sized and positioned just right.
Layout and Cut the Stretcher
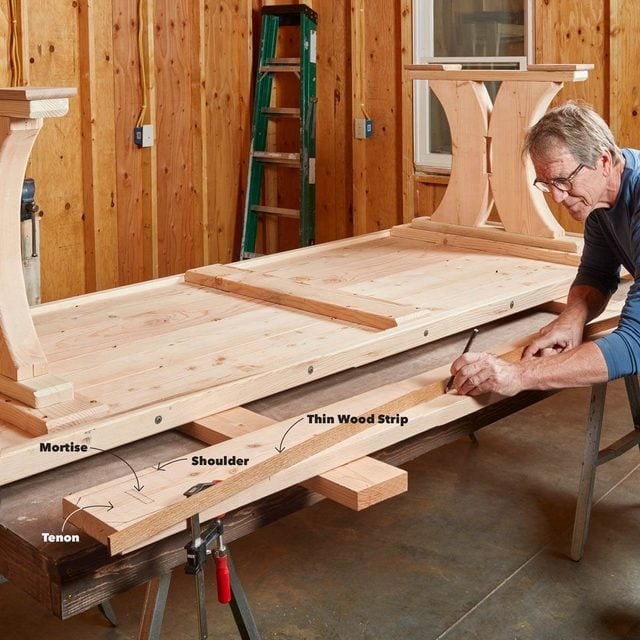
With all of this in mind, make the stretcher. Once you’ve marked the key stretcher length, tenon and mortise measurements, bend a thin piece of wood to create the arched bottom of the stretcher. Use a jigsaw to cut out the parts. Drill 5/8-in. starter holes in each end of the 2-1/2-in.-long mortises to give your jigsaw an entry point.
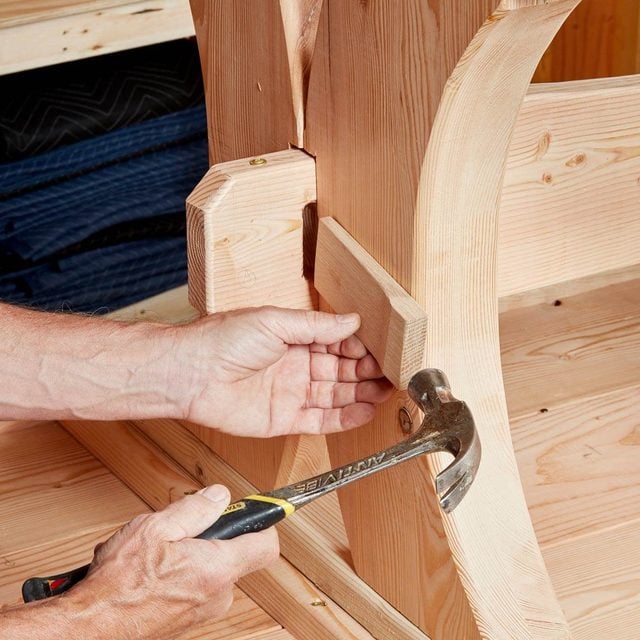
Install the Stretcher and Wedge it Tight
To make your wedges (L), first cut a 3/4-in. board 24 in. long, then rip it 2-1/4 in. wide. Use a belt sander to taper each end of the board, then cut them to their final 7-in. length and soften the edges.
Separate the legs and install the stretcher. Drive the wedges into place as shown above. The screw driven through the end of the tenon helps reinforce it to prevent the wedge from blowing out the end of the tenon when driven in tightly.
Screw the Leg Assemblies to the Braces
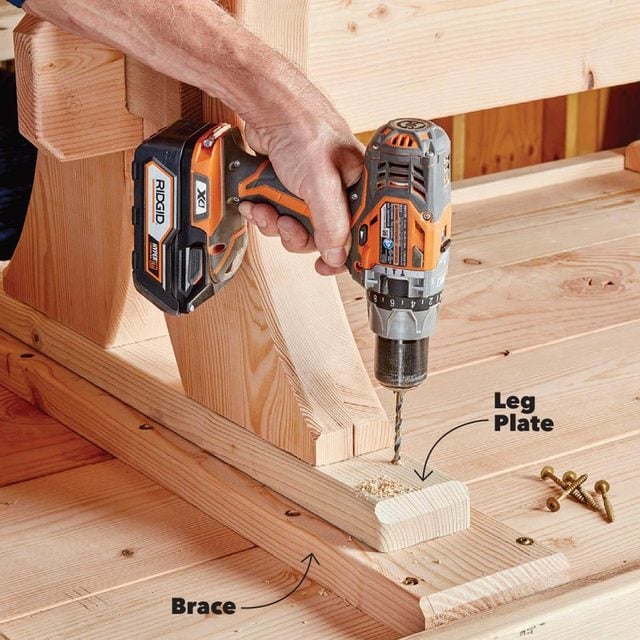
Once the stretcher and legs are locked together, secure the leg assemblies to the tabletop crosspieces (Photo above). Center the leg assemblies on the end braces. Drill oversize holes through the leg plates, then secure the legs to the top with washer-head screws.
Finishing Up
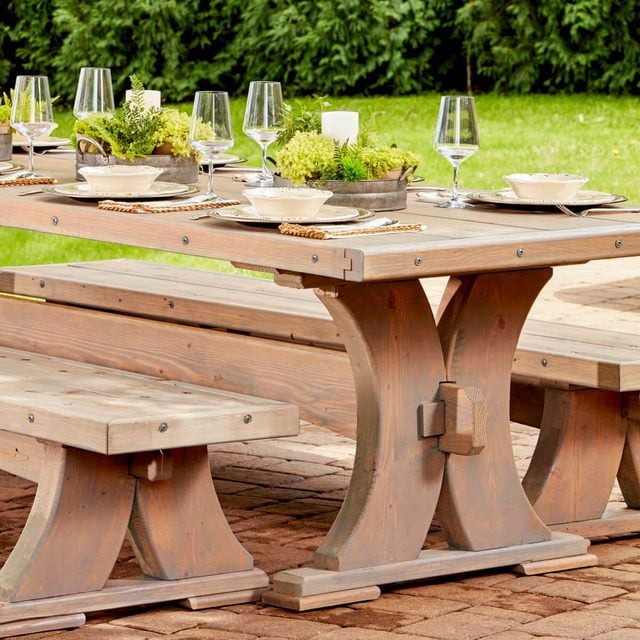
Sand and smooth out any rough areas, then apply your exterior finish. You now have a beautifully built viking table!
How to Build an A-Frame Picnic Table
Want more wood working projects? Check out these 15 amazing woodworking projects to try.
Project PDFs
Click the links below to download the materials and cutting lists for this project, as well as Figure A and B.
Originally Published: March 04, 2019