
Hard to Open Windows
Updated: Aug. 27, 2019Keep your casement windows opening like new.
Roll Out Windows Overview: Find the root cause
When a casement (crank-out) window is hard to open or close, people blame the operator (crank mechanism). It may have gone bad, but an operator usually doesn’t fail on its own. Operator gears strip out when you crank too hard while trying to open or close a binding or stuck sash. If you just replace the operator without fixing the root cause of the binding, you’ll be replacing it again—and soon.
We’ll show you how to get to the bottom of most casement window problems and explain how to fix each one. The parts are fairly inexpensive. But, as with many other home repair projects, you’ll spend more time searching for the right parts than you will on making the repairs.
First, the usual suspects: Loose screws
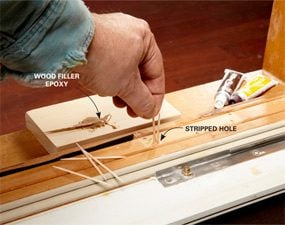
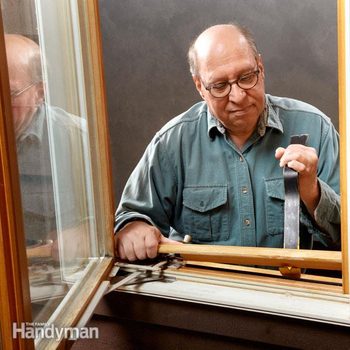
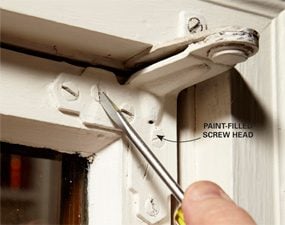
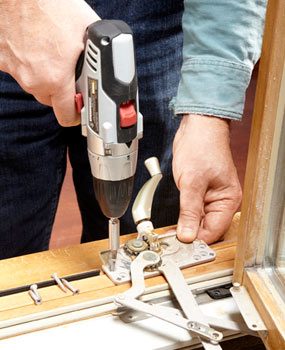
A sash can sag and bind in the frame from worn, dirty or corroded hinges; loose or stripped screws; or settling. Loose or stripped screws are the easiest to fix, and they’re usually the most common cause of binding, so start there. If you have interior hinges (hinges located in the head and sill area and covered by the sash), open the sash all the way to expose the screws. Tighten each one. If the screw holes are stripped, you’ll have to remove the sash first to fix them (Photo 1). Next, remove the hinge, enlarge the holes and refill them with toothpicks and epoxy filler (Photo 2). Then reinstall the hinge screws and sash and see if that solves the problem.
Next: Check the hinges on roll out windows
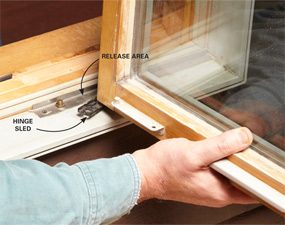
Next, check the condition of the hinges. It’s much easier to spot wear if the hinge is clean and lubricated. So clean away dirt and grease buildup with household cleaner and then lubricate the hinges (Photo 3). Open and close the window and examine the hinge pivots (top and bottom) as they move. If you see “slop,” replace the hinge. Exterior mounted hinges (common on windows from the ’50s) are especially prone to corrosion and binding since they’re constantly exposed to the elements. You can try lubricating them, but if the binding recurs, you’ll have to replace them (see “Find Parts for Old Windows”). Remove the old screws (Photo 4). Then, following the hinge profile, slice through the old paint with a utility knife. Pry off the old hinge and install the new one.
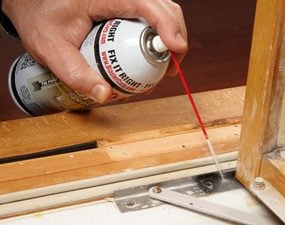
If the hinges are in good shape, or you’ve replaced them and the sash still binds, the window frame has probably settled and is out of square. Resquaring the window frame is a big job. But you can try to fix the problem by relocating the hinges.
Finish by checking the roll out windows operator
Now that the sash is opening and closing smoothly, turn your attention to the condition of the operator. First remove the sill operator cover trim (Photo 5). Then loosen the crank handle setscrew and remove the handle and operator cover. Reinstall the crank handle and rotate it while checking the condition of the gears. Look for gray dust or rough, chipped or missing teeth. Those are all signs the operator needs to be replaced. However, if the operator looks clean and moves smoothly, just tighten the screws, apply a dab of lithium grease to the gears, and reassemble all the trim. Now your window should be in tip-top shape.
Find parts for old windows
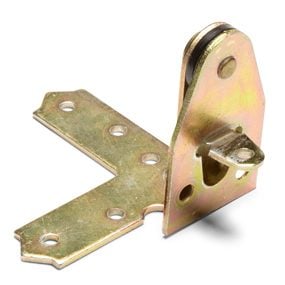
Photo 6: Even old windows can get new parts
They might not make your window any more, but they still make its parts. Just bring the old parts to a hardware store. If they don’t have it, take a picture of what you need, measure the dimensions and go online. Even if you can’t find an exact match, you’ll probably find something close enough.
You won’t find 1950s-era hinges like the one in Photo 6 (or other window parts) at many hardware stores, but they’re available online. The new parts may not be an exact match for your old hardware, but they’ll do the job and put your window back in the swing of things. Just measure the old parts, shoot digital photos of the top and bottom pieces (they may be different) and email the info to an online window parts seller (blainewindow.com is one very reputable source).
Required Tools for this Project
Have the necessary tools for this DIY project lined up before you start—you’ll save time and frustration.
- Cordless drill
- Drill bit set
- Drill/driver - cordless
- Extension cord
- Framing square
- Glue
- Pry bar
- Safety glasses
- Square
- Tape measure
- Utility knife
Required Materials for this Project
Avoid last-minute shopping trips by having all your materials ready ahead of time. Here’s a list.
- Silicone spray lube
- Teflon spray lube
- Toothpicks
- Two-part wood filler
- Wood glue
