
Hang Artwork and Wall-hangings Straight and Level for a Gallery Wall
Updated: Feb. 29, 2024With these four techniques, you can hang just about anything on your walls, and keep it there

Hang pictures straight and level
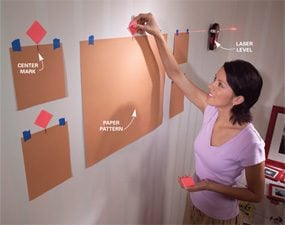
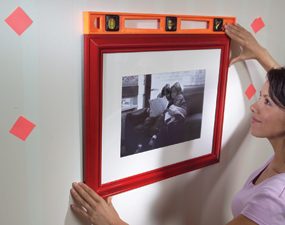
Photo 1: Level and align
Project a level line and tape exact-size paper patterns on the wall. Mark the top center of each pattern with the corner of a sticky note.
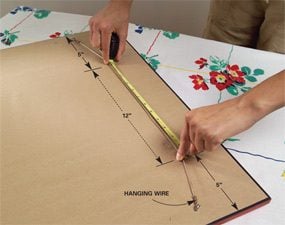
Photo 2: Find hanger locations
Stretch the hanger wire with two fingers spaced equally distant from the edges of the picture frame. Keep the wire parallel to the top of the frame. Measure the distance between your fingertips.
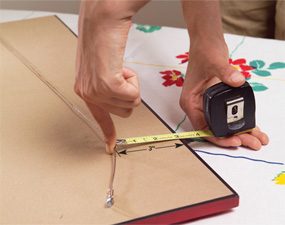
Photo 3: Find the distance from the top edge
Leave one finger in place and measure from the wire to the top. Use this dimension and the dimension from Photo 2 to position the picture hangers.
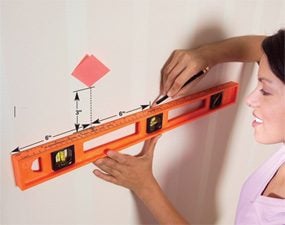
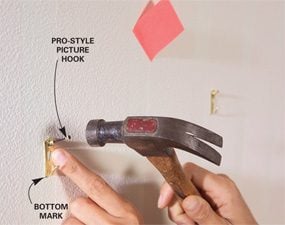
Photo 4: Transfer measurements to the wall
Find the hanger positions by measuring down from the sticky note and to each side from the center. Keep the hangers level.

The first challenge in hanging a picture is deciding exactly where you want it. It’s not so hard with just one picture. You can ask a helper to hold it up while you stand back and judge the position.
Most experts recommend hanging a picture with its center about 60 in. from the floor, or bottom edge 6 to 8 in. above a piece of furniture. Use these heights as a starting point. Then adjust the position of the picture to your liking, and mark the top center with the corner of a sticky note. Use the technique shown in Photos 2 – 6 to complete the job.
A group of pictures is trickier. First cut out paper patterns and arrange them on the wall with low-adhesive masking tape. The temporary red line from a laser level is helpful for aligning a series of photos level with one another (Photo 1). The laser level is ideal because you get a perfectly straight line without having to mark up the walls. A standard carpenter’s level will also work.
When you arrive at a grouping that’s pleasing, mark the top center of each pattern with the corner of a sticky note (Photo 1). You’ll use the bottom corner of each sticky note as a reference point for locating the picture hangers.
Now you’re ready to position the picture hangers (Photos 2 – 4). Use two hangers for each picture for extra support and to help keep the picture from tipping. Choose picture hangers that are rated to support the weight of your art. We recommend professional hangers like the one shown in Photo 5. They work fine in drywall. These are available at home centers or from most picture-framing shops. Plaster may not support pictures as well as drywall does. To hang heavier art on plaster walls, use picture hangers with double or triple nails.
Photos 2 and 3 show how to measure the space between the hangers and the distance from the top of the picture frame. The distance between hangers isn’t critical. Just space your fingers several inches from the outside edges of the picture frame. Transfer these measurements to the wall (Photo 4). An inexpensive level with inches marked along the edge is a great picture-hanging tool (Photo 4). Otherwise, just stick masking tape to the edge of a level and transfer measurements to the tape (Photo 2). Then line up the bottom of the hooks with the marks and drive the picture-hanger nails through the angled guides on the hooks (Photo 5).
Before you hang the picture, stick a pair of clear rubber bumpers on the back lower corners of the frame to protect the wall and help keep the picture level. You’ll find these with the picture hanging supplies or in the cabinet hardware department (they’re called “door bumpers”). Bonus: You can also opt for the Go Hang It kit that makes hanging just about anything a snap.
Video: Make a Floating Shelf Picture Ledge
How to hang heavy mirrors with confidence
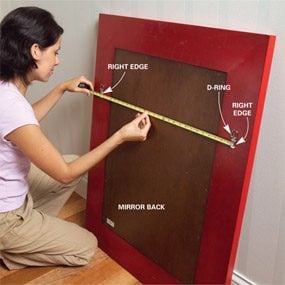
Photo 1: Find center-to-center distance
Measure from the right edge of one D-ring to the right edge of the second D-ring to find the exact distance between the centers of the hanging D-rings.

Photo 2: Find distance to top
Measure from the top of the D-ring to the top of the frame to determine the distance down.
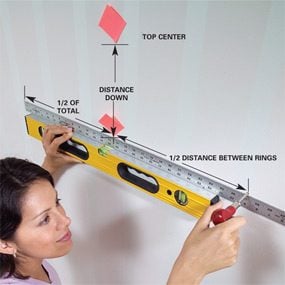
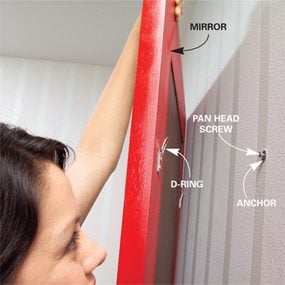
Take extra precautions when you’re hanging a heavy mirror. If the mirror has a hanging wire on the back, remove it and instead screw D-rings to the frame (Photo 1). (Mirrors without frames should be hung with special mirror hangers.) Locate the D-rings an equal distance from the top of the frame, about one-third of the total height down. Then measure the exact distance between the centers of the D-rings (Photo 1). The trick is to hook your tape measure on one edge of a D-ring, and measure to the same edge of the second D-ring. Record this measurement. Then measure down to the top of the D-rings (Photo 2).
Photo 3 shows how to transfer the measurements to the wall. But first, you’ll have to hold the mirror up to the wall and choose the best position. Start with the center of the mirror at about 60 in. from the floor. When you like the position, mark the top center with a sticky note.
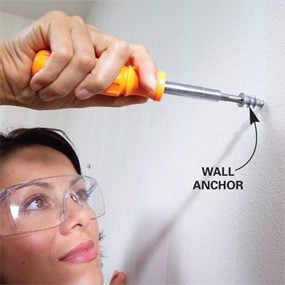
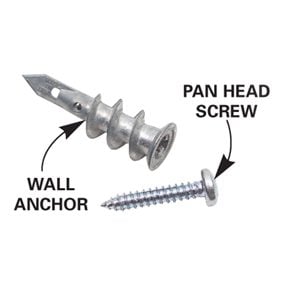
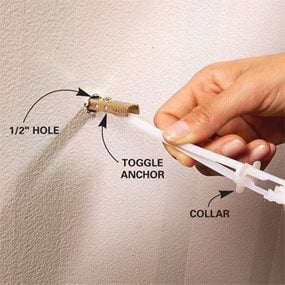
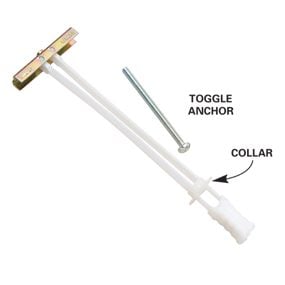
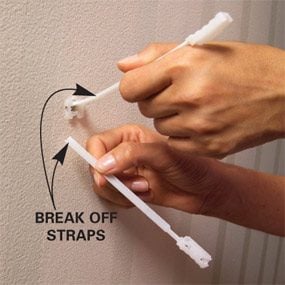
Some picture hangers are rated to support heavy mirrors, but it’s stronger and safer to install hollow-wall anchors instead. We recommend the screw-in type anchor shown in Photo 4. It’s rated to support 40 lbs. Weigh your mirror and choose the appropriate type of anchor. Use toggle-type anchors for heavier mirrors. Measure from your reference point to position the anchors (Photo 3). Make starter holes with an awl or Phillips screwdriver. If you hit a stud with the awl, simply drive a screw. Photo 5 shows how to hang the mirror. If the top isn’t level when you’re done, wrap a few turns of electrical tape around the D-ring on the low side to raise that side slightly.
Align keyhole-slot shelves
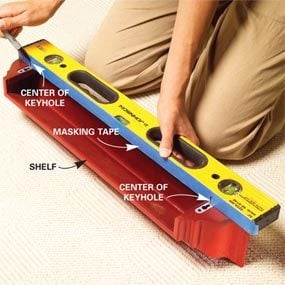
Photo 1: Mark keyhole locations
Stick masking tape to the edge of your level and mark the keyhole centers on the tape.
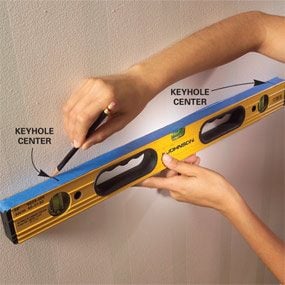
Photo 2: Mark screw locations
Place the level against the wall at the desired shelf height. Adjust it to level it and mark the wall at the two keyhole locations.
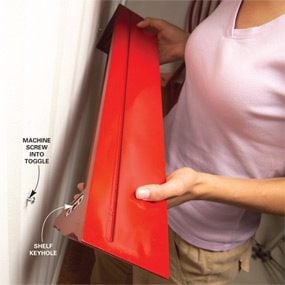
Many light-duty shelves have keyholes in the back. The keyholes slide over protruding screws for support. The trick is to precisely place the screws so they align with the keyholes.
Photos 1 – 5 shows a foolproof method that doesn’t require any measuring or math. Photo 2 shows a trick for transferring the keyhole locations to the wall. If the mounting screw locations don’t land over studs, use wall anchors to support the shelf. We’re using a slick toggle-type anchor that holds 60 to 100 lbs. and is easy to install. This brand is available at most home centers. Make sure the screw heads supplied with the anchor fit the keyhole slot before you install the anchor. Otherwise go to a smaller size anchor.
Drill holes for the anchors at each mark and mount the anchors in the wall. Let the screws protrude enough for the keyholes to slide over them. Test-fit the shelf by aligning the keyholes with the screws and sliding it down. If the shelf won’t slide on or is too loose, remove the shelf and adjust the screws until you get a snug fit.
Hang a quilt without damaging it
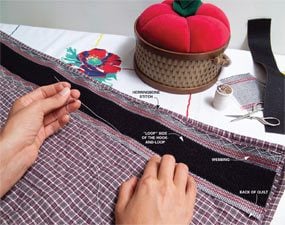
Photo 1: Sew on the loop
Sew the loop side of the hook-and-loop to the webbing. Then stitch the webbing to the back of the quilt using a herringbone stitch as shown.

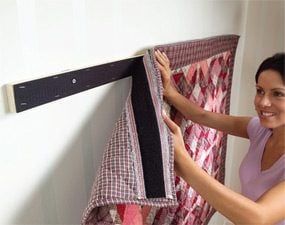
One good way to display a quilt is to hang it on a wall. But don’t just tack it up by the corners or it’ll stretch out of shape. Instead, use this method for hanging quilts or other decorative textiles because it distributes the weight evenly for smooth hanging and minimal stress to the fabric. The hand stitching (Photo 1) used in this method doesn’t damage the quilt because it only goes through the backing, and it’s easy to remove when you no longer wish to display the quilt.
Measure the top edge of the quilt and purchase the same lengths of 1-1/2-in.-wide sew-on hook-and-loop fastener strip and 2-1/2-in.-wide cotton or synthetic webbing. We found the hook-and-loop strip at a fabric store and the webbing at an upholsterer’s shop. You’ll also need a length of 1-1/2-in.-wide pine or poplar, a staple gun and several 2-1/2-in. wood screws.
Photos 1 – 3 show how to prepare and hang the quilt. If the quilt pattern allows, it’s best to rotate the quilt 180 degrees every month or so. This relieves stress on the fabric and helps prevent uneven fading. To be able to rotate the quilt, you’ll have to sew another strip of hook-and- loop along the opposite edge.
Dealing With Other Types of Walls
It’s usually not hard to hang things on drywall. You can drive nails easily, and studs are simple to locate. Other types of walls present unique challenges. Plaster is harder than drywall and can crumble. But the pros we talked to say as long as you use professional picture hangers like the ones we show here (these have sharper nails and built-in angle guides), and use hangers a little larger than required, you’ll usually be OK. In brick or stone, you can often drive a thin nail into the space between the mortar and the brick or stone. In brick, stone and concrete, you want to avoid making large holes because they’re virtually impossible to hide if you move the picture. A good method for brick, stone or concrete walls is to drill a hole that’s slightly smaller than the threaded part of a drywall screw. Use a masonry bit in a hammer drill and drill the hole at a slight downward angle. Then thread the screw into the hole, leaving about 1/4 in. sticking out for use as a hanger.
Video: How to Use a Tape Measure
You can use a tape measure for more things than just measuring. Travis Larson, senior editor at The Family Handyman, will show you how to use a tape measure to save time on your next project.
Required Tools for this Project
Have the necessary tools for this DIY project lined up before you start—you’ll save time and frustration.
- 4-in-1 screwdriver
- Cordless drill
- Drill bit set
- Hammer
- Level
- Stapler
- Stud finder
- Tape measure
Required Materials for this Project
Avoid last-minute shopping trips by having all your materials ready ahead of time. Here’s a list.
- 1-1/2-in.-wide hook and loop fastener
- 2-1/2-in. screws
- 2-1/2-in.-wide cotton or synthetic webbing
- D-rings
- Painter's tape
- Pan head screws
- Paper
- Picture hanging wire
- Picture hooks
- Post-it notes
- Rubber bumpers
- Screw in anchors
- Toggle anchors
