
(Sketch Up) How To Build a Rolling Clamp Rack

Updated: Feb. 09, 2024
As the saying goes, you can never have too many clamps. So let's make something to store them on!
A day
Beginner
Around $50
Introduction
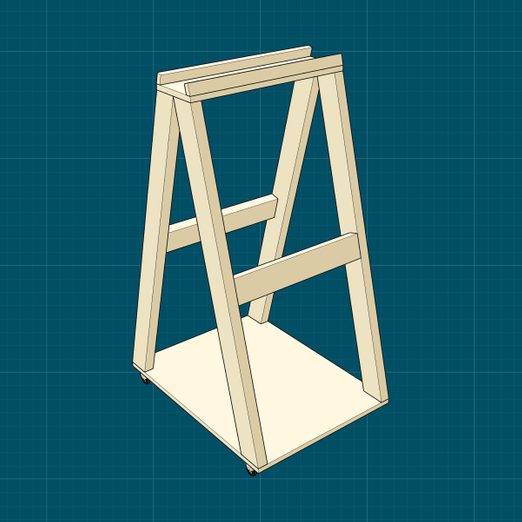
This rolling clamp rack is easy to make and clears up shop clutter. And because it has wheels, it can follow you around the shop, bringing your clamps to the work.
Constructed from a few 2x4s and a small sheet of plywood, this rack has room for more than just clamps. Store glue, solvents, rags and anything else you need for glue-ups, all in one place.
Let's get started.Tools Required
- Drill driver
- Miter saw
- Speed square
- Table saw
Materials Required
- (1) 24 in. x 48 in. x 3/4 in. plywood sheet
- (16) 1-1/4-in. button-head screws
- (3) 8-ft. 2x4s
- (4) 1-1/2-in.lockable casters
- #8 1-1/4-in.wood screws (box)
- #8 2-1/4-in. wood screws (box)
Cutting List
| KEY | QTY. | DESCRIPTION | DIMENSIONS |
| A | 4 | Leg | 46″ x 3-1/2″ x 1-1/2″ |
| B | 2 | Crossmember | 21″ x 3-1/2″ x 1-1/2″ |
| C | 1 | Base | 24″ x 31-5/8″ x 3/4″ |
| D | 1 | Top Shelf Plate | 24″ x 7-1/4″ x 3/4″ |
| E | 2 | Top Shelf Cap | 24″ x 1-1/2″ x 3/4″ |
Project step-by-step (8)
Step 1
Cut the plywood
- Follow the cutting diagram and cut the plywood parts on the table saw.
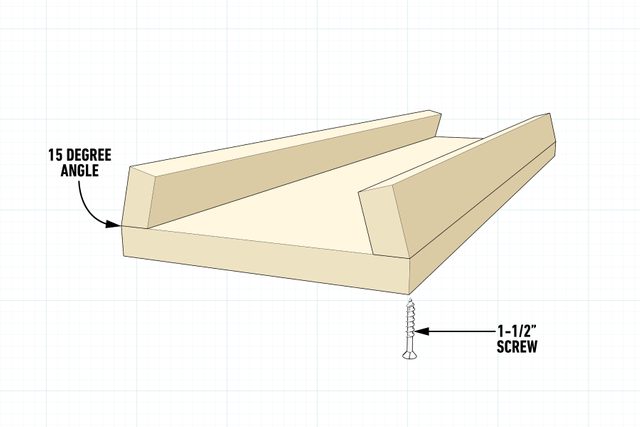
- Cut a 15-degree angle on one edge of both top caps (E).

Step 2
Cut the lumber
- Cut the crossmembers (B) to 24 inches long. I used two in this model, but you can add more if you need them.
- Cut the 15-degree angles of the legs (A) on the miter saw. The total distance from angle to angle should be 47 inches.
- Pro tip: Cut one end of all four legs, then use a stop block when you cut the other ends. This ensures they’re all exactly the same length.

Step 3
Make the top shelf
- Rub a little glue on the angled cut of the top caps and set them on the edge of the top shelf plate (D). Let the glue set up for about an hour. This will aid in keeping the part from moving while screwing it together.
- Drive 1-1/4-in. screws in from underneath.
Step 4
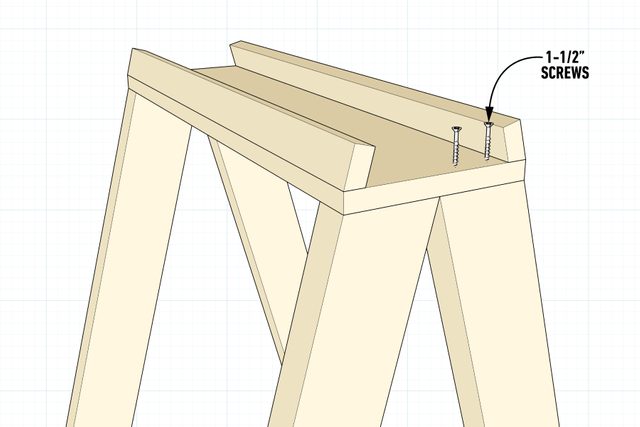
Construct the A-frames
- I found the easiest way to assemble this clamp rack was from the top down.
- Attach the top shelf to the legs using 1-1/2-in. screws. Having a helper for this step is nice.
Step 5
Add the crossmembers
- Place the crossmember (B) at the height that will serve you best. I put these 25 inches up from the bottom.
- Sink two 2-1/4-in. screws per side into the crossmembers.
- Pro tip: If you have a ton of shorter clamps, make more crossmembers.

Step 6
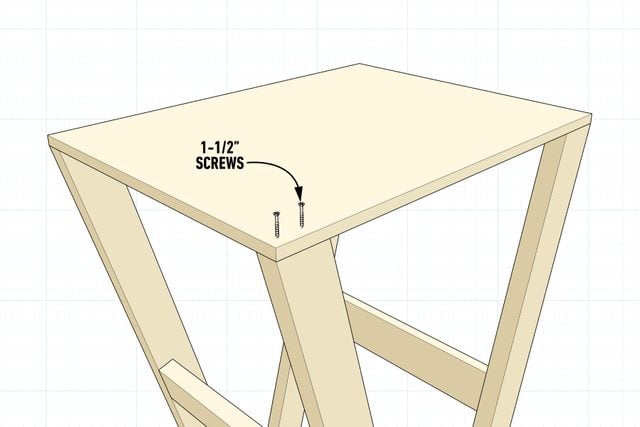
Attach the base
- Flip the rack upside down and set the base (C) on the legs.
- Line up the corners and attach the base using 1-1/2-in. screws.
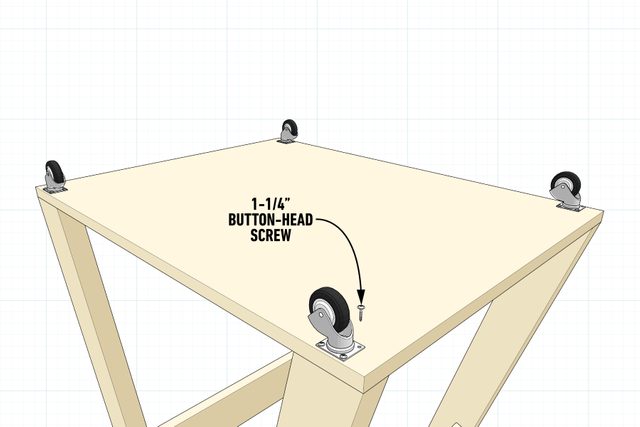
Step 7
Install casters
- With the rack still upside down, line up the casters with the legs of the A-frame. This provides a strong anchor point.
- Attach the casters with 1-1/4-in. pan-head screws
- Flip the rack over and start filling it up with clamps!
Step 8
Apply a finish (optional)
- Skip this step if you like. But for long-term durability, a clear urethane will perform well.