
Everything To Know About Belt Sanders
Updated: Mar. 16, 2023
What your belt sander does best, and what to watch out for
On This Page
What Are Belt Sanders?
Belt sanders are tools commonly used for trimming to a scribed line (photo), sanding rough surfaces, leveling surfaces (like a replacement board in a hardwood floor) and freehand rounding and shaping.
Because they have a lot of power and can handle coarse grits, they excel at the rapid removal of wood. Also, unlike orbital and vibrating sanders, the sanding action is linear. So even with coarse grits, you can sand with the grain and get a good-looking result.
Though a belt sander isn’t an essential tool in the homeowner’s arsenal, you won’t find many experienced DIYers or carpenters without one.
Benefits of a Belt Sander
Belt sanders are the big, powerful gorillas of the sanding world. Few tools can save you as much time, or wreck your project faster. If you’re new to belt sanders or have been frustrated by yours, read on to find out how to keep that big ape under control.
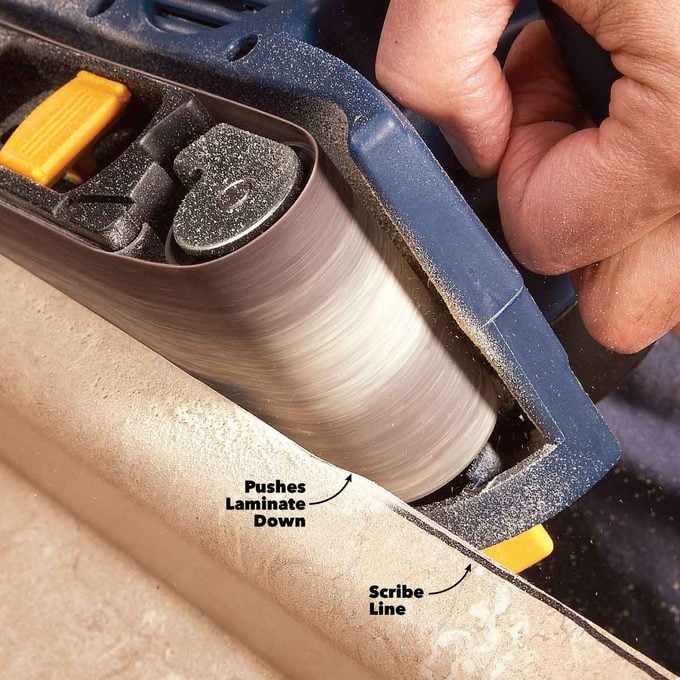
Perfect for scribing
A common use for a small belt sander is scribing. You can gradually sneak up on a curved line for a perfect fit. On a laminate countertop, make sure the direction of belt travel pushes the laminate down.
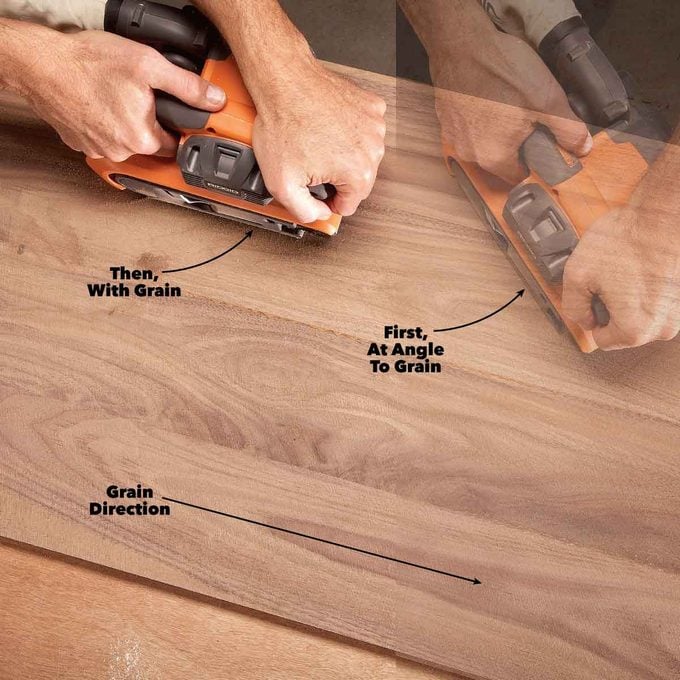
The top tool for rough flattening
Belt sanders excel at the rapid removal of wood, making them the best handheld power tool for leveling and smoothing rough boards. Start at an angle to the grain for aggressive leveling, then finish with the grain. 80-grit is good for starting, then switch to 120-grit.

How to Choose the Best Belt Sander
The best multipurpose belt sander takes a 3-in.-wide belt. You’ll see machines designed for wider and narrower belts, but they’re for specialized tasks.
- Within the 3-in. class, there are smaller tools that take 3- x 18-in. belts, midsize machines that take 3- x 21-in. belts and a couple of large sanders that take 3- x 24-in. belts. The smaller tools are lighter and easier to use one-handed for shaping and scribing. They’re good for smaller work and casual use.
- The larger tools have more surface area and weight for smoothing wide surfaces. They’re better for bigger work and shop use. The 3- x 21-in. machines are a good compromise.
- You’ll find 3- x 18-in. sanders for $50 to $150 and 3- x 21-in. sanders for $100 to $250 when looking for the best belt sander.
- You’ll also find smaller belt sanders that take 2-1/2-in.-wide belts. They’re light and very handy for one-handed use. Sanders with 4-in.-wide belts are heavy-duty machines best left to cabinetmakers.
Pick a belt, but not any belt
Personally, I use 80- and 120-grit belts regularly, and 50-grit rarely. Grits coarser than 50-grit leave deep scratches that are difficult to remove. And if you’re doing finer sanding, you’re better off using a random-orbit sander.
Remember one of the rules of sanding: You can skip one grade of grit, but it wastes time and you’ll just wear out belts skipping two. You can go from 80 to 120 grit, skipping 100, but don’t go from 50 to 120.
Aluminum oxide is the traditional grit material. You’ll find it in less expensive khaki-color form — good if you need a disposable belt — and longer-lasting, dark brown premium belts.
However, for grits of 80 and coarser, many people now prefer zirconia belts (sometimes called “planer” belts). They have sharper, tougher cutting particles that cut more aggressively, last longer and don’t clog as easily. These belts are usually bright blue or purple. Zirconia belts cost slightly more than premium aluminum oxide belts.
How to Use a Belt Sander
Don’t push down on the sander; let its weight do the work. Go slowly, overlap passes and allow the tool to go past the end without dipping. Be careful not to tip the sander or change speed or direction. Put the cord over your shoulder so it’s out of the way.
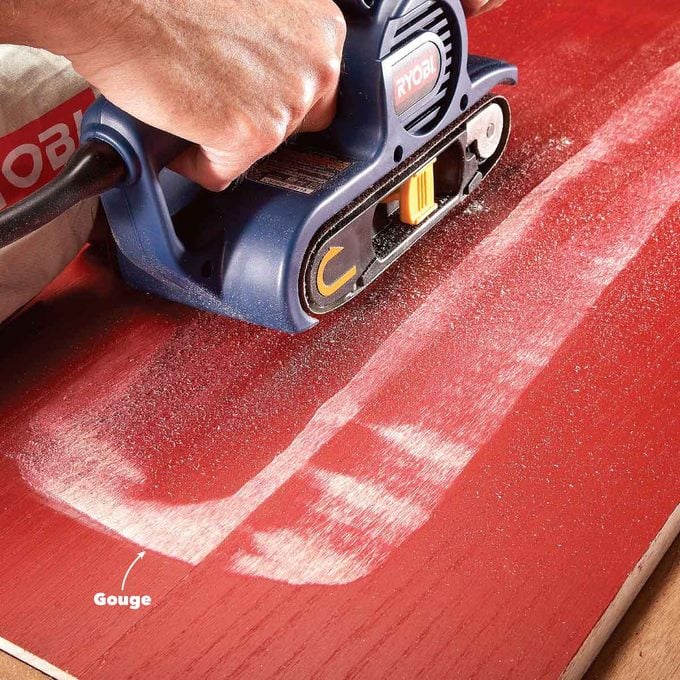
Watch out for gouging
This painted panel shows a common problem: horseshoe-shaped gouges at the end of a board. To prevent gouges, use clean, new belts, avoid grits finer than 120, and keep the plate under the belt (the platen) clean and free of dust buildup.
Belt Sander Safety Tips
Belt sanders are relatively safe tools, but it’s still smart to take precautions.
- Wear hearing protection. These babies are LOUD!
- Don’t breathe dust. It’s not just unpleasant; it’s bad for you. Wear a dust mask while sanding, unless you rig up a shop vacuum for dust collection (photo, below).
- Unplug the tool before changing belts or emptying the dust bag. I have a scar that attests to the importance of this seemingly grandmotherly precaution.
- If you use the belt sander to sand metal, you’ll create sparks, which can start a fire if they mix with the sawdust in the machine and the dust bag. Blow or vacuum the dust out of the sander before you use it on metal, and remove the dust bag.
- Make sure the trigger is off before plugging the sander in. Belt sanders have a locking button that holds the switch in the “on” position. Sounds kinda “duh,” but trust me, it happens. You don’t want the sander to fly across the room when you plug it in, do you?
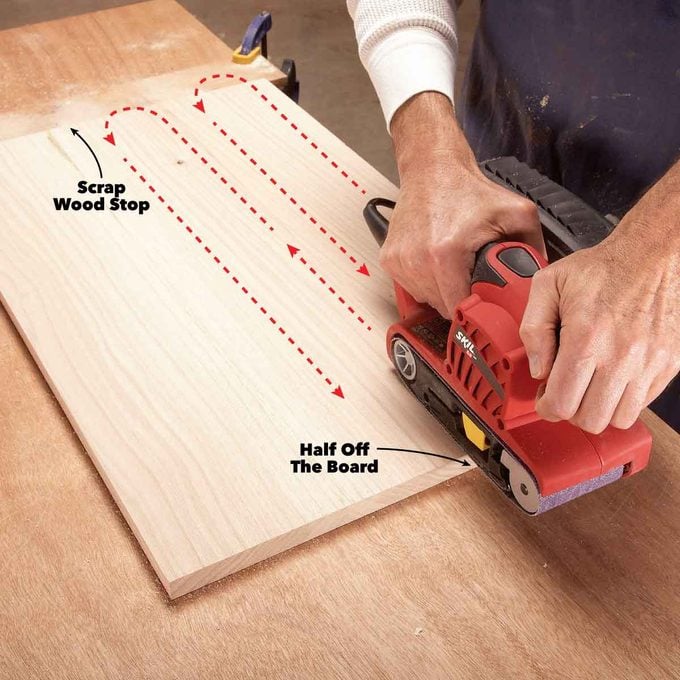
- Belt sanders exert a fair amount of force on the work. So if your work isn’t securely held, it’ll slide away from or right into you. Clamps get in the way, but a simple stop on the appropriate side of the workpiece (photo, “Use Good Technique” above) will keep it from sliding. Choose a stop that’s a little thinner than the workpiece so the sander will clear it at the edge.

Trim after sanding
It’s hard to keep a belt sander from gouging or rounding over the ends of a board. So if you can, belt-sand the board before cutting it to final length. You can then safely move on to a palm sander and finer grits.
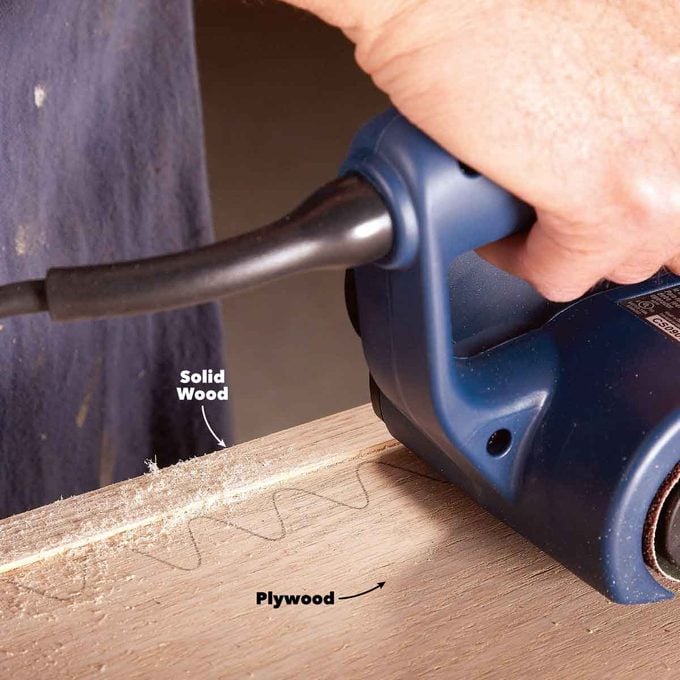
Watch out on plywood
Belt sanders take off serious amounts of wood, so they can wreck plywood pretty much instantly. If you have to sand solid-wood edging flush with plywood, draw a pencil line on the plywood to tell you when the sander starts removing veneer. If you have variable speed, dial it down.
Belt Sander Maintenance
First, make sure the belt is oriented properly. Some belts have a preferred direction, indicated by an arrow on the inside. Nondirectional belts can be installed either way. The only adjustment you’ll probably have to make is “tracking” to keep the belt centered on the roller.
Hold the sander up, turn it on, and see if the belt either rubs against the housing or starts working its way off the rollers. With the trigger on, adjust the tracking knob until the belt is centered on the rollers. You may have to make a slight adjustment when the sander is on the wood. If your sander has automatic tracking, you don’t need to mess with any of that nonsense.
Some sanders have variable speed. You can go at maximum speed most of the time, but you’ll want to throttle it back for delicate work.
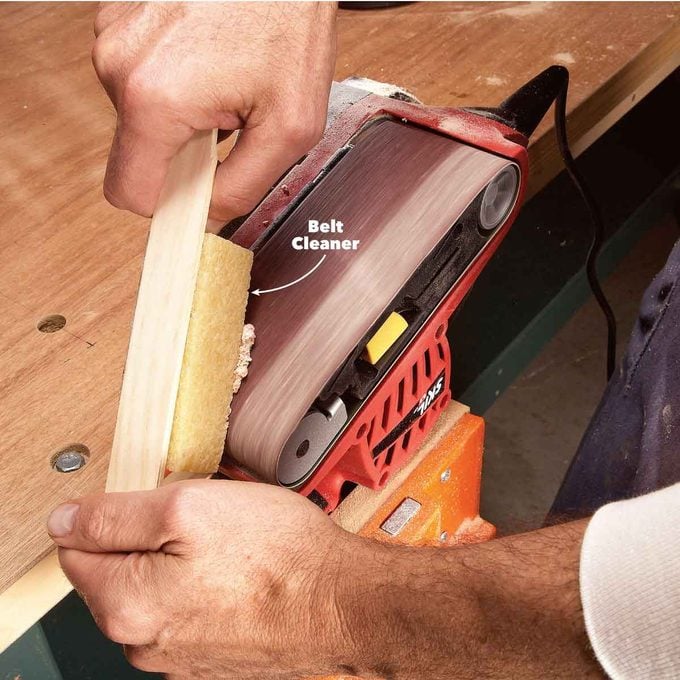
Keep the belt clean
Dirty belts make for lousy work. A belt-cleaning stick will remove the pitch buildup that happens with all woods, especially pine or sappy woods. Push it against the moving belt. For larger sanders, clamp the stick in a vise and sand it.
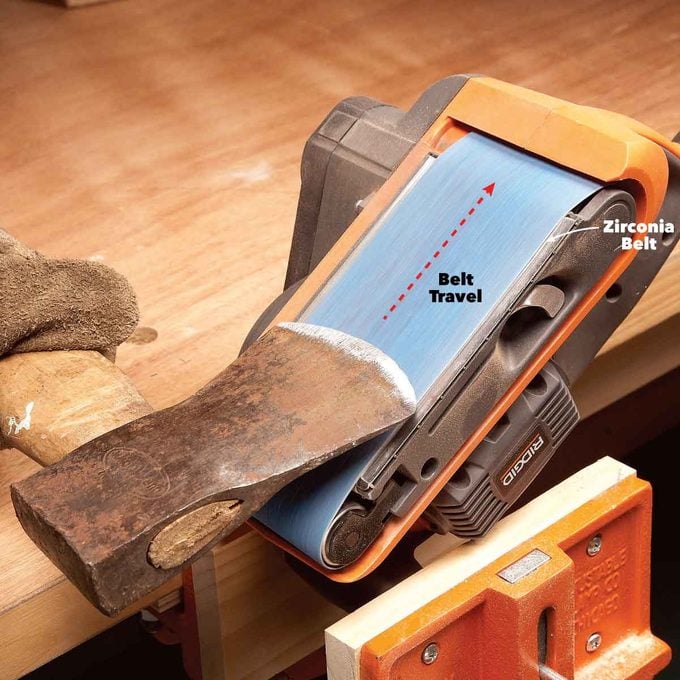
Good for rough sharpening
You can use a belt sander for rough sharpening of tools like axes, shovels, knives and chisels. Remove the dust bag and remove all dust from the sander; sparks and dust are a bad combination. Then use a zirconia belt for best results.

Upgrade Your Sander
Belt sanders are simple tools that don’t need many improvements. However, if you use your belt sander in the shop, consider these two upgrades.
Dust collection
Belt sanders always come with a built-in dust bag that collects most of the coarser dust and needs regular emptying. However, plenty of fine dust still gets into the air. If you’re doing a lot of belt sanding, it’s worth getting a hose that allows you to connect your sander to a shop vacuum. You’ll be able to sand all day with nary a speck of dust (lower photo).
You can sometimes use the hose that came with your shop vacuum, but it’s usually too large or too stiff. The alternative is a super-flexible, small-diameter hose designed for dust collection. You can buy one at a woodworking specialty store or online (search “vacuum hose”). I use one made by Porter-Cable that cost $25.
Dust ports vary widely — some are square, which is a challenge — so you may have to fiddle around to get the hose to fit. There are commercial adapters ($10 to $20; pick one up when you buy your hose) or you can cobble something together with — you guessed it — duct tape. It’s worth the fuss, though: No dust in your workspace.
Shop-made stand
A handy accessory if you do much woodworking is a stand that holds your sander on its side, upside down or vertical. This allows you to bring the work to the tool instead of vice versa.
The design of the stand depends on the shape of your sander, so we won’t give plans. However, it generally involves several layers of plywood, each with cutouts to accommodate the parts of the sander that protrude, plus a couple of hose clamps or other devices to hold the sander securely. Add another piece of plywood to act as a table, if needed.
Stands like this are particularly useful if you want to sand lots of small parts, say, if you’re making lots of wooden toys. For inspiration, search online for “belt sander stand photo.”