
How To Build a Shower Pan

Updated: Apr. 03, 2024
Learn how to DIY a custom-sized, waterproof pan for a tile shower by following these step-by-step instructions.

2 to 3 days
Intermediate
$200 to $250 not including tile
Introduction
A custom tile shower is a beautiful addition to any bathroom space. Not surprisingly, that shower also comes with a steep price tag if you have to hire a contractor to install it.
If you have intermediate DIY skills, you can build your own one-of-a-kind tile shower and save thousands in labor costs. Here, I'll guide you through the step-by-step process of building a traditional shower pan, covering everything from preparation and materials to the actual construction and waterproofing techniques.
Two industry experts, Derek Berard from Viable Construction and Chris Bernacki from WnC Home Improvement, weigh in to offer first-hand insights into this time honored shower-building technique.
Building a shower pan vs. buying a shower base
If you want to put in a shower, you could go to a home center and pick up a fiberglass or acrylic shower base. A pre-formed single piece unit, Berard says "a shower base is set into a mud base on the floor, then screwed into the wall to install."
Before this was possible, pros had to build a custom shower pan by mixing and applying mortar, troweling it flat and laying ceramic shower floor tile. This is the method I'll outline here.
There are modern alternatives to building a shower pan, too. "Today's shower pans can be a pre-formed, pre-sloped foam pan that is then waterproofed and tiled over," Bernacki says.
Many contractors today prefer the pre-formed pans because they're faster to install. But this is a tried-and-true method used for decades.
How thick must a shower pan be?
Two inches is typical. "Down by the drain is thinner due to the slope," Berard says. This can vary, depending on the overall shower floor dimensions.
What's the difference between a shower base and a shower pan?
While both provide a waterproof shower floor, the similarities end there. Shower pans are custom-built, finished with tile and take more skill to install than a shower base. Although fiberglass shower base units make installation quick and easy, they lack the uniqueness of a handcrafted mortar and tile floor.
A shower base also costs more, between $500 to $1,000, compared to $200 to $250 for a shower pan. (Tile is extra.)
However, a shower base can be installed in a day while a shower pan takes several days to complete, including tile work. Another difference? "Improperly constructed shower pans can leak water," Bernacki says. You can mitigate that risk with a one-piece shower base.
What's the best material for a shower pan?
To build a shower pan in the traditional style outlined here, Berard recommends a five-to-one ratio of sand and Portland cement.
What are the layers to a shower pan?
Sloped fill, waterproof membrane, metal lath and sloped mortar bed. Shower pans also contain a curb to contain water in areas that aren't bordered by walls. The curb, integrated into the design, and is usually four inches from the floor, Berard says.
A sloped fill layer is simply a mortar subfloor. It's sloped toward a special two-piece clamping-type drain (available at any home center) made specifically for a mortar bed shower floor. The sloped fill slants from the drain toward the perimeter of the shower.
The second layer, called the pan, is a durable chlorinated polyethylene (CPE) membrane. When installed, this vinyl liner turns up at the edges to create a waterproof membrane in the shape of a shallow pan. Water that works its way through the grout and the top layer of mortar will flow down the slope to be drained through the weep holes of the drain.
A layer of expanded galvanized metal lath on top of the pan reinforces the mortar. A final sloped mortar bed is laid over the lath.
How much slope should a shower pan have?
According to Berard, 1/4-in. per foot from the drain to the perimeter is standard.
When Should I Call a Pro?
This project requires plumbing skills to install the shower drain. If you're not comfortable with this aspect of the project, call a pro. Shower pans also need to be installed correctly or risk leaks and water damage. If this project is above your skill level, hire a pro.
About the Experts
Derek Berard is the owner of Viable Construction Inc, a home remodeling company in Westfield, Massachusetts. He has 20 years of experience in the construction and remodeling industries.
Chris Bernacki is the owner of WnC Home Improvement in Holyoke, Massachusetts. He has more than 30 years of experience in the trades, renovating and remodeling commercial and residential properties.
Tools Required
- 4-inch taping knife
- Bucket
- Caulk gun
- Chalk line
- Circular saw
- Cordless drill
- Drywall saw
- Framing square
- Hammer
- Level
- Needle-nose pliers
- Pencil
- Rags
- Reciprocating saw
- Steel finish trowel
- Tape measure
- Tin snips
- Utility knife
- Wood chisel
- Wood float
Materials Required
- 1-1/4-inch roofing nails
- 1/2-inch plywood
- 10d galvanized nails
- 1x3/4
- 1x4 board
- 2-1/2-inch construction screws
- 2x4 board
- 2x6 board
- 3-inch construction screws
- 3-inch drywall screws
- 3/4-inch plywood
- Cement backer board
- Cement board screws
- Duct tape
- Fiberglass mesh tape
- Finish materials (tile)
- Galvanized expanded metal lath
- Sand/Portland cement mortar mix - 5:1 ratio
- Shower drain assembly
- Silicone caulk
- String
- Thin-set mortar
- Vinyl membrane
Project step-by-step (15)
Plan your shower layout
Keep these elements in mind when you’re sizing and positioning your shower.
The tile layout: It’s easier to determine this if you select your wall tile ahead of time. Plan your tile layout to account for edges and corners, and shift the starting point if needed.
Shower doors: If your shower will have a door, pick it out in advance to make sure the shower opening accommodates it. Don’t forget to allow for the thickness of the tile and the cement board. When you’re determining the size of the shower door and the direction it should swing, consider other bathroom doors and fixtures.
Plumbing: It’s much easier to hook up a new shower located near existing plumbing. If you’re installing your shower in a remote location, create a plan that accounts for new plumbing configurations.
Joist span and floor supports: The shower we designed and installed here weighs upward of 1,000 pounds, or about the same as a spa with a couple of people in it!
If you live in an older home with 2×6 or 2×8 floor joists, you may need to beef up the floor with some beams or extra joists. If you’re unsure, consult a building inspector. And if your house was built in the 1970s, it could have a 5/8-in. particleboard underlayment that needs to be removed before starting.
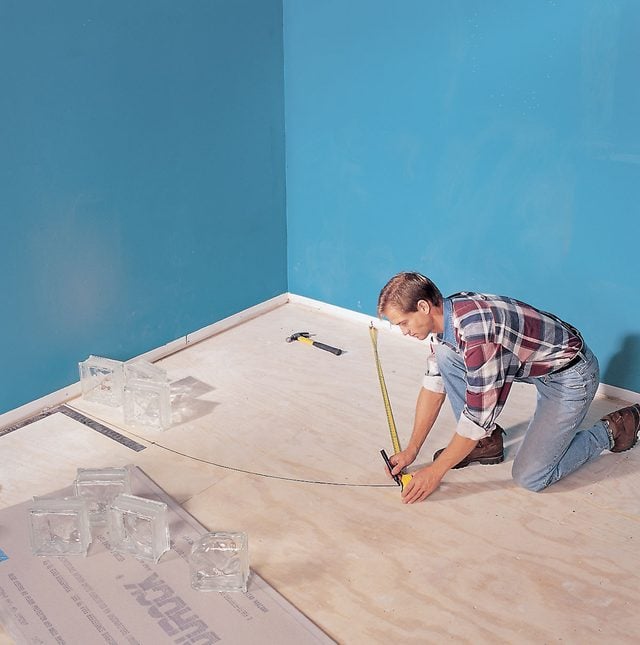
Draw the floor
- Draw the outline of the shower floor on the subfloor to use as a pattern for setting the mortar forms.
- If doing a curved curb, lightly hammer a 10d nail next to the wall. Tie string to the nail and strike an arc for the curved form board.
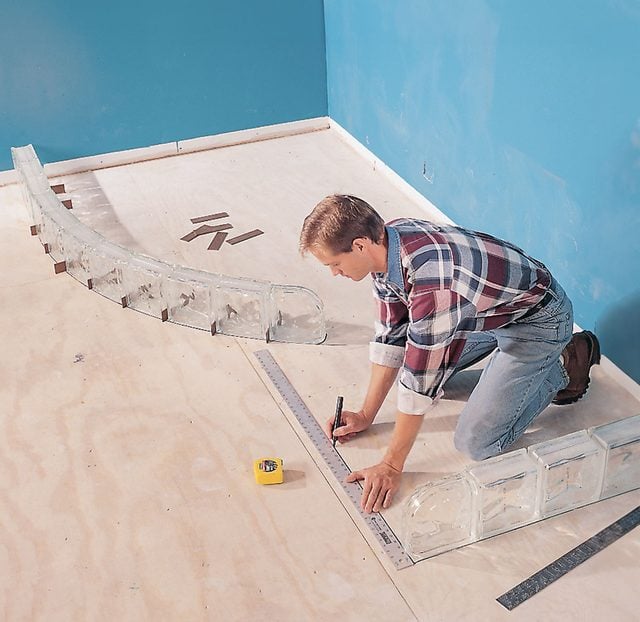
Confirm the layout
Lay out the shower on the subfloor using your finish materials to define its size and shape for shower pan installation.
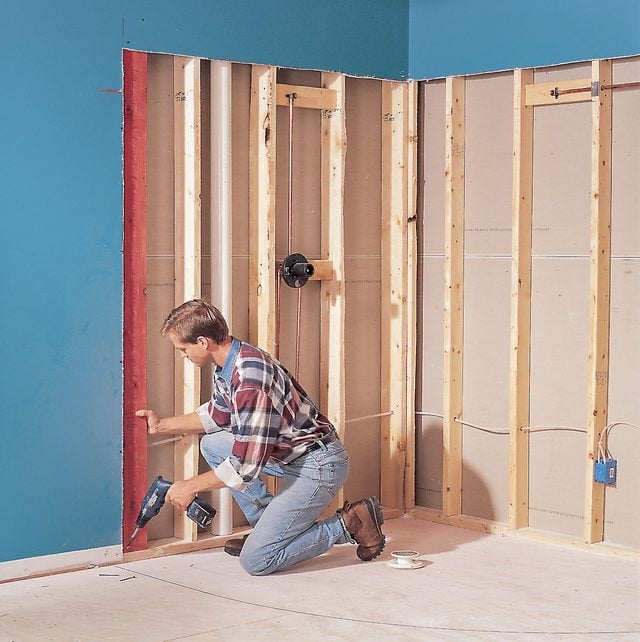
Open the walls
Caution: Turn off the main breaker at the electrical panel before cutting into walls to avoid electrical shock. Cut carefully and slowly to avoid damaging hidden wires or plumbing.
- Cut the existing walls to the planned width dimensions for the shower walls with a reciprocating saw or drywall knife.
- Use 3-in. construction screws to install additional studs in the wall to support the cement board/drywall seam.
- Cut the top of the drywall at six feet, two inches above the plywood floor to allow for the slope fill and two layers of 3-ft.-wide cement board. If your planned slope is higher than two inches, adjust as needed.
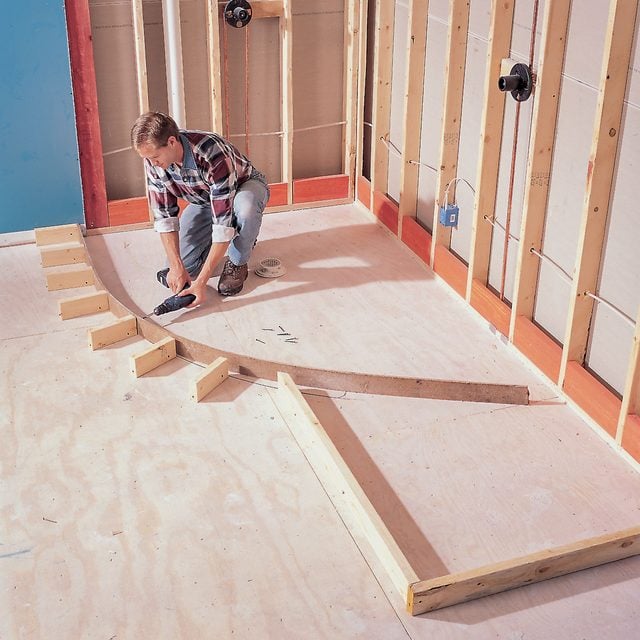
Form the curb
- Toe-screw 2×6 blocking between the studs with 3-in. construction screws on the interior walls at the base of the shower to support the vinyl liner.
For curved curbs:
Toe-screw 2×4 blocks to the subfloor every 12 inches and 1/2-in. outside the line to allow for the thickness of the plywood.
- Use the circular saw to rip the 1/2-in. plywood to four inches. Fasten it to the backside of the blocks with 2-1/2-in. screws.
- Use 10d nails to secure 1- by 3/4-in. screed guides against the inside shower walls only. Removable screed guides will be used against the curve. Screed guides provide a straight edge to rest a screed board on as it’s moved to level the mortar.
- Rough-in the plumbing and drain water lines.
For straight curbs:
- Fasten a 2×4 into the subfloor with 2-1/2-in. construction screws, right next to the line.
- Use 2-1/2-in. screws to secure two 2x4s onto the original 2×4 to create a 4-1/2-in. curb.
- Use 10d nails to install 1- by 3/4-in. screed guides against the inside of the shower walls and the curb.
- Rough-in the plumbing and drain water lines.
First layer of mortar
- Remove the top half of the shower drain and plug the drain pipe with a rag to prevent debris from falling in.
- For curved curbs, measure and mark a line 1-in. from the subfloor along the inside of the 1/2-in. plywood.
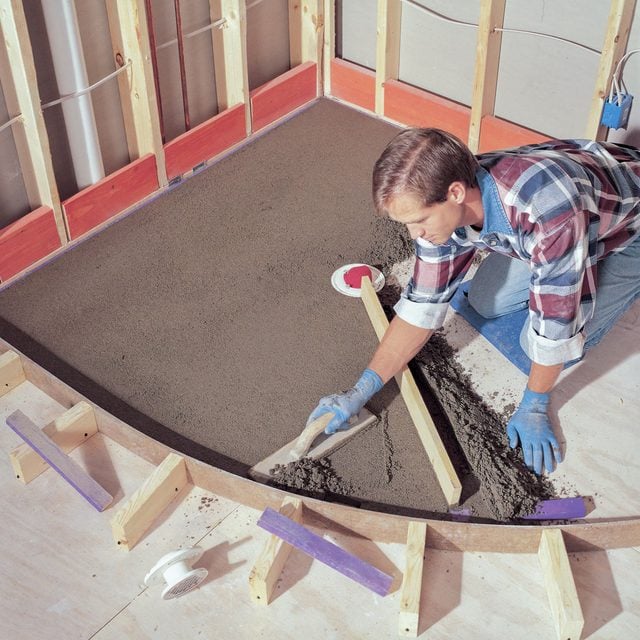
- Pile mortar against the curved plywood and compact it down to the line with a wood float.
- Pack the remaining shower area with mortar using a wood float, then use the 1×4 screed board to screed the mortar along the 1-in. screed guides. For straight curbs, do this step across the entire shower floor surface.
- Work the surface smooth with a wood float and smooth with a steel finish trowel.
- Let the mortar harden overnight.
Lay in the liner
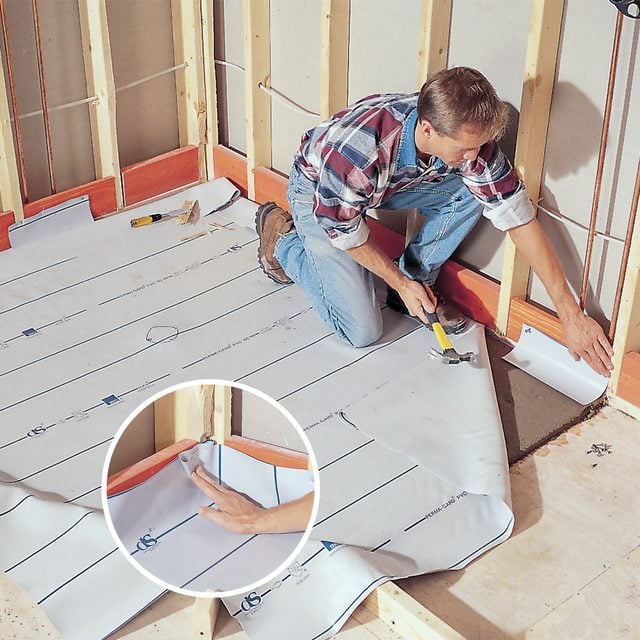
- Install the liner, running it up onto the walls at least six inches. Fasten it to the studs with roofing nails at the top edge.
- Feel the drain flange bolts with your fingers and draw and carefully cut the liner with a utility knife to fit just outside the bolts.
For curved curbs:
- Cut off the liner against the plywood 1/2-in. below the top of the form.
For straight curbs:
- Start at the top of the curb and carefully cut the liner to width.
- Wrap the liner over the curb to the bathroom floor outside the shower. Cut off any excess.
- From the outside of the shower, fasten the liner to the curb with roofing nails near the floor. Keep the liner close to the curb and shower floor inside the shower to keep a right angle. Do not use nails on the inside of the curb.
Fold the corners
- Chisel out the inside corners of the framing to create a recess for the liner folds.
- Fold in the liner corners to create a neat fold, then fasten it to a stud with a roofing nail at the top edge.
Make a drain hole
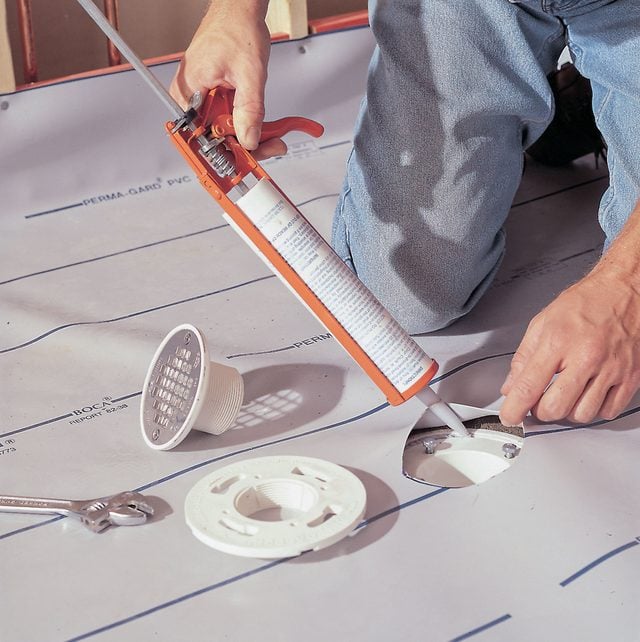
- Cut out the vinyl liner for the drain with a utility knife, cutting just outside of the bolt holes.
- Run a bead of silicone caulk around the outer edge of the flange.
- Bolt down the top half of the drain assembly.
- Cover the top of the drain with duct tape to protect it during the installation of the mortar bed and tile.
Attach the tile backer board
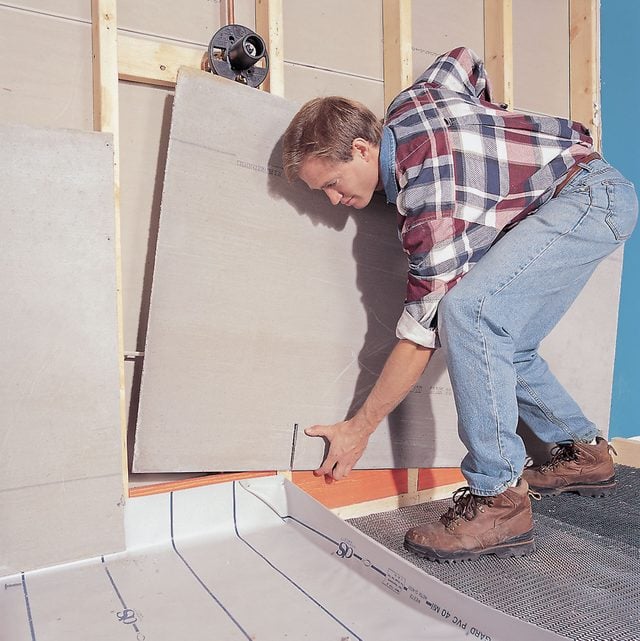
- Install cement board over the vinyl liner and screw it to the studs with coated cement board screws every eight inches.
- Use a drywall saw to cut slots in the cement board to go over curbed areas against the walls.
- Tape the seams with fiberglass tape.
- Use a 4-in. taping knife to apply a layer of thin-set mortar or mastic to the fiberglass tape.
Pro tip: When setting the cement board, face the smooth side out. This makes it much easier to spread the tile adhesive and get a flat surface for tiling and drawing tile layout lines.
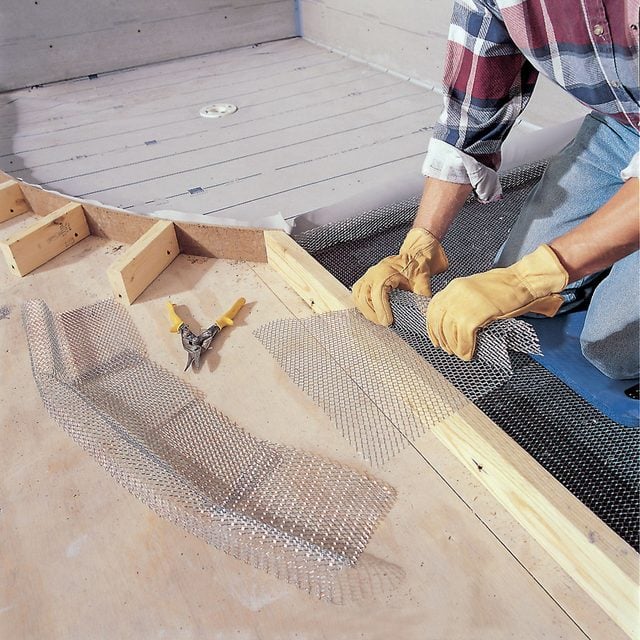
Add the metal lath
- With a pair of tin snips, cut and lay galvanized expanded metal lath on top of the liner, just short of the cement board edges.
- To shape the lath for the curb, bend 12-in. by 3-ft. lengths over a 2×4.
For a curved curb:
- Keep the lath height 1/2- to 3/4-in. under the form height to account for the final mortar layer.
- Fold the vinyl liner and drop the pre-bent curb lath over the top of it.
- Poke a galvanized 10d nail through the lath and top edge of the liner to keep the liner from collapsing while you pack the curb with mortar.
For a straight curb:
- Bend and wrap the metal lath around the curb to the bathroom floor.
Pro tips: For a curved curb, make a series of slits every 10 inches to bend it to the shape of the hardboard form. And avoid walking on the lath. Its sharp edges can puncture your waterproof membrane.
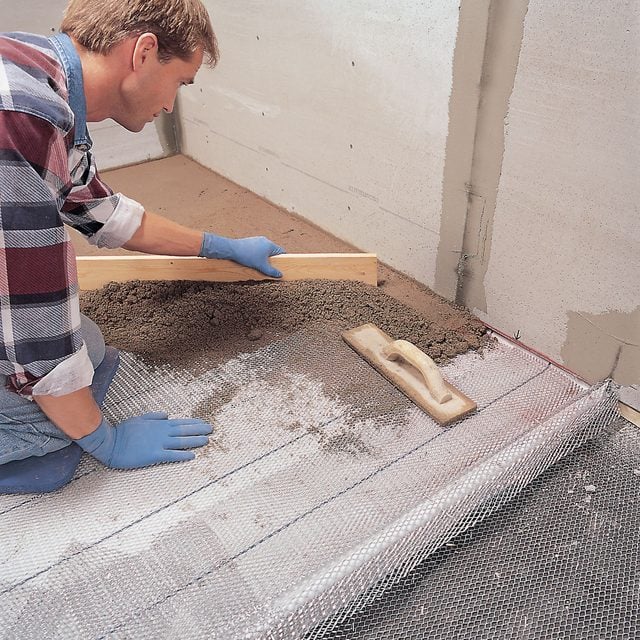
Cover the lath with mortar
- Snap chalk lines against the cement board 1-1/4-in. above the sloped fill.
- Use needle-nose pliers to adjust the top of the drain by screwing it up or down until it’s one inch above the top of the slope fill.
- Pile mortar against the wall and compact it down to the line with a wood float.
- Use the packed mortar as a guide for screeding off the mortar between the wall and the drain.
- Use the screed board to locate high or low areas.
- Pack in mortar to fill depressions. Scrape off excess in the high spots.
- Use a steel finish trowel to smooth the bed and to create sharp edges at all corners for a cleaner tiling job.
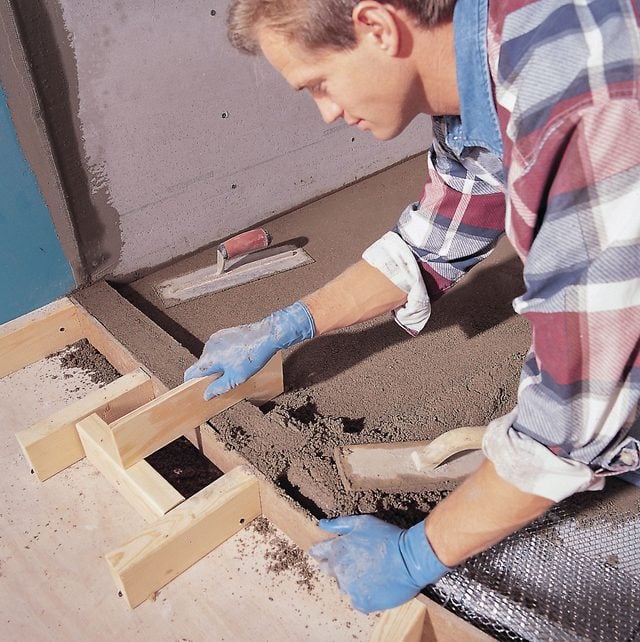
Mortar the curb
For curved curbs:
- Pack mortar into the lath with a wood float around the folded liner. Make sure to pack mortar down between the lath and the plywood.
- Screed the curb with a 3/4-in. plywood jig. The jig should be an L-shape, with a 1-1/4-in. height at the inside corner. The curb width should be 3-1/8-in., so mark this on the jig to follow as you screed.
- After screeding, tool the edges of the curb with a finish trowel to obtain crisp edges.
For straight curbs:
- Pack mortar into the lath on all three curb walls with a wood float. Use the float and finish trowel to smooth the mortar and create square edges.
- Work in sections until the curb is complete.
- Tool the edges of the curb with the trowel to obtain crisp edges.
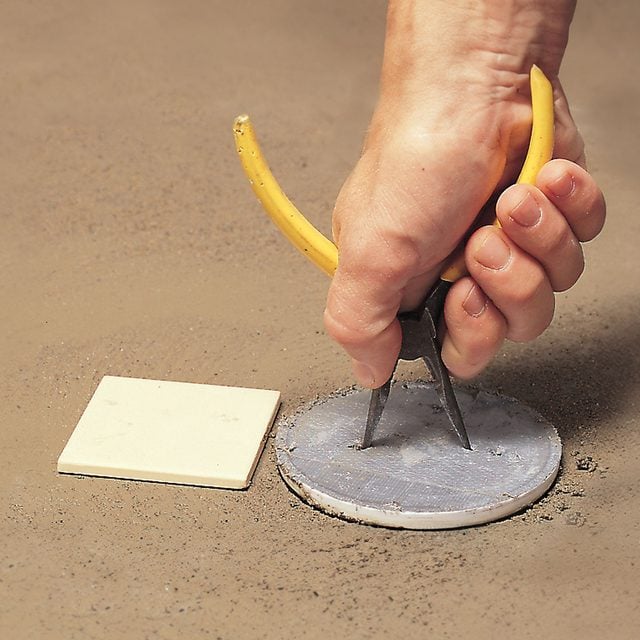
Adjust the drain
Use needle-nose pliers to raise the shower drain by unscrewing it until it’s the same height as the floor tile.
Note: You have to do this before the mortar sets.
Allow to dry
Allow the mortar to dry overnight, then apply thin set and tile.
Originally Published: November 26, 2020