
A Full Guide on Wood Siding Repair and Replacement

Updated: Apr. 16, 2024
Refresh your house's exterior by replacing damaged siding.
Introduction
Are some sections of your siding beginning to rot while the rest is still intact? Don't replace all the boards. Follow these easy steps to replace just the rotted boards or sections. Replacing these rotted areas takes only a few basic tools and materials and makes a huge improvement to your home's appearance. As a home improvement pro, I'm often called to repair or replace rotted or damaged wood siding. This can be a straightforward home improvement task if you work carefully and use the right techniques.
Read on to learn expert tips and tricks for replacing wood siding from Matt Fabry from Roots Construction, Will Martinez from W Remodeling and Handyman Services and Stan Pollack from Stan-the-Fixit-Man.
When to call a pro
- If you have a large area of rotted boards on your siding.
- If the sheathing or wall studs underneath the siding are rotted.
- If the rotted siding is at a considerable height.
Tools Required
- Caulk gun
- Circular saw
- Combination square
- Drill bit set
- Drill/driver - cordless
- Extension cord
- Extension ladder
- Hacksaw
- Hammer
- Hearing protection
- Level
- Marker or electrical tape
- Metal-cutting plunge blade (oscillating tool)
- Oscillating tool
- Pencil
- Piece of 1/4-in. plywood
- Pry bar
- Safety glasses
- Sawhorses
- Speed square
- Tape measure
- Wood-cutting plunge blade (oscillating tool)
Materials Required
- 8d galvanized ring shank siding nails
- Acrylic caulk
- Replacement siding boards
Project step-by-step (10)
Evaluate the Boards
Assess the siding for soft spots, rotting wood or areas of discoloration.
- Use an extension ladder to reach higher areas of damaged siding. Use safe ladder practices: maintain three points of contact at all times, secure and stabilize the ladder on flat ground and don’t overreach.
- Inspect the boards carefully to decide which ones need replacing and where to make your cuts.
- Make a plan to stagger butt joints if you’re replacing multiple courses. Cutting multiple boards the same length will be more noticeable as a repair patch.
Cut or Pull the Nails
Cut or pull the nails at the bottom of the row above the boards you’re replacing. Releasing these nails will let you remove rotted boards without damaging those you’re saving. “Gentle removal is necessary,” Pollack says.
How to cut the nails:
- Use wooden shims to carefully lift the bottom of the siding above the course you’re removing 1/8 to 3/16 inch.
- Use a small hacksaw with a sharp blade to cut the nails.
- Remove the shims when finished.
How to pull the nails:
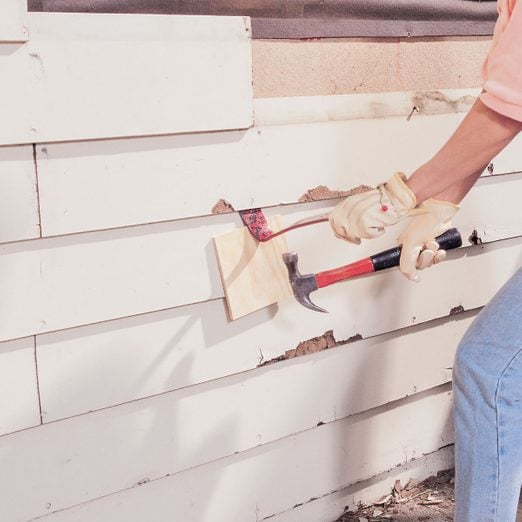
- Use a flat pry bar to lift the bottom of the course slightly above the one being replaced. Press the pry bar downward toward the house to lift the board 1/8 to 1/4 inch.
- Remove the pry bar.
- Press the lifted board back into place, which should cause the nail heads to protrude.
- Place a piece of 1/4-in. plywood next to the nail head.
- Rest a hammer claw against the plywood and pry up the nails. This protects the siding from damage.
Cut the Damaged Siding
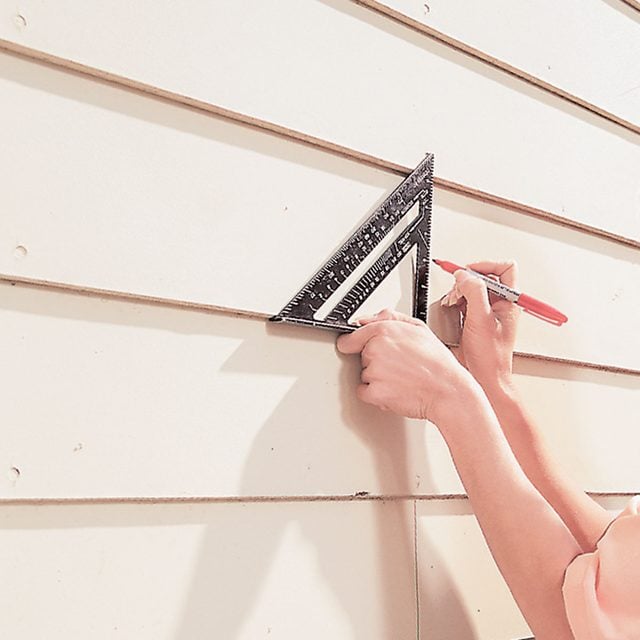
In this step, you’ll cut the siding reveal (the visible part). You’ll cut the overlapped remainder in the next step.
- Use a square to mark lines where you want to cut the siding, centered on a stud. The nail heads on the existing siding will show you where your studs are positioned.
- Measure the siding’s thickness.
- Mark this measurement with a marker or electrical tape on your wood-cutting plunge blade to avoid cutting into other courses.
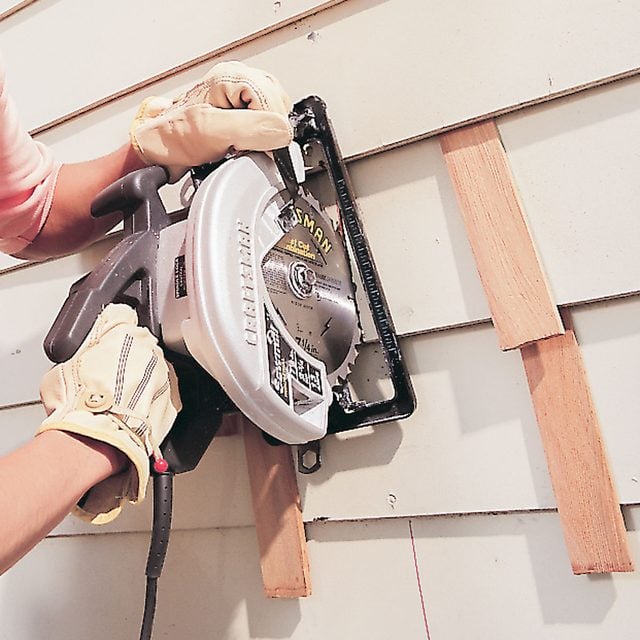
- Use an oscillating tool with a wood-cutting plunge blade to cut the siding along the marked lines. This is the method Martinez and Fabry prefer. “Work carefully and take your time,” Martinez says.
- Wear hearing protection and safety glasses when cutting. Use an extension cord to power the tool.
Pro tip: Fabry adds that he uses a circular saw if the siding reveal is more than five inches, then finishes with an oscillating tool.
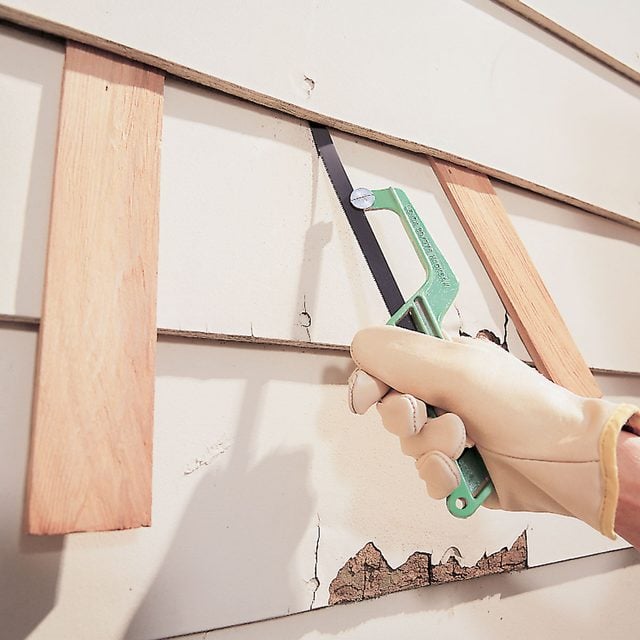
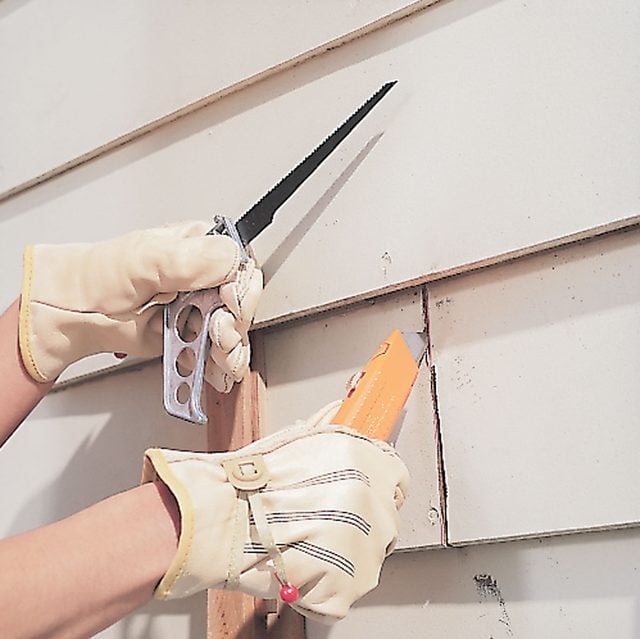
Finish the Cut With a Keyhole Saw
Finish cutting the overlapped siding with a keyhole saw.
- Use wooden shims to carefully lift the bottom of the siding above the course you’re removing 1/4 to 1/2 inch. Place the shims near the areas you plan to cut.
- Use the keyhole saw to finish cutting the siding.
- Remove the shims when finished.
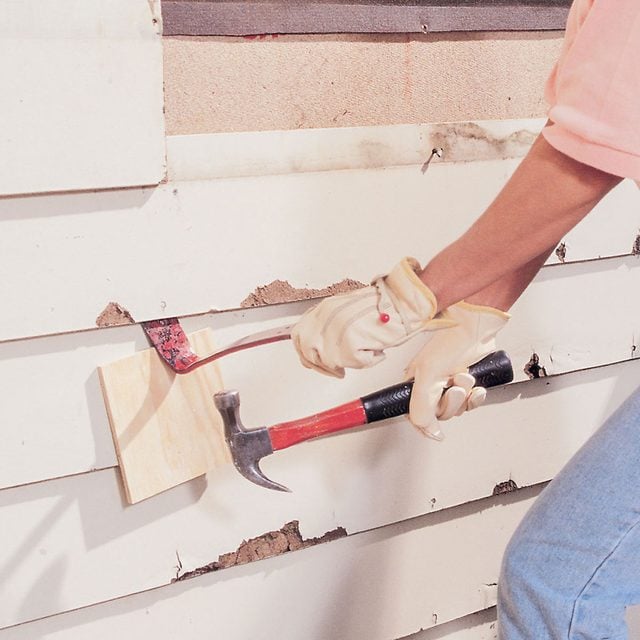
Pry Off the Rotted Boards
The key here is to remove the rotted boards without damaging nearby siding.
- Protect the siding near the piece you’re trying to remove with a scrap piece of 1/4 in. plywood.
- Leverage a flat pry bar against the plywood to remove rotted boards. “Make sure to pry carefully so you don’t damage other siding,” Martinez says.
- After you remove the rotted courses, use a small hacksaw or a metal-cutting plunge blade on the oscillating saw to cut any protruding nail shanks.
Pro-tip: Fabry suggests working from the top down to remove multiple courses of siding. “Removing the top piece exposes the nails to the next,” he says, speeding up the process.
Measure and Cut New Siding Boards
Use the removed siding to create replacement pieces. If this is not possible, use a tape measure to measure the length of the opening.
- Transfer the measurements of the removed siding onto the new board and mark them with a pencil. For butt and corner joints, adjust the measurement to leave a 1/8 in. gap when installed.
- Place the new siding on sawhorses and cut the new pieces with a circular saw.
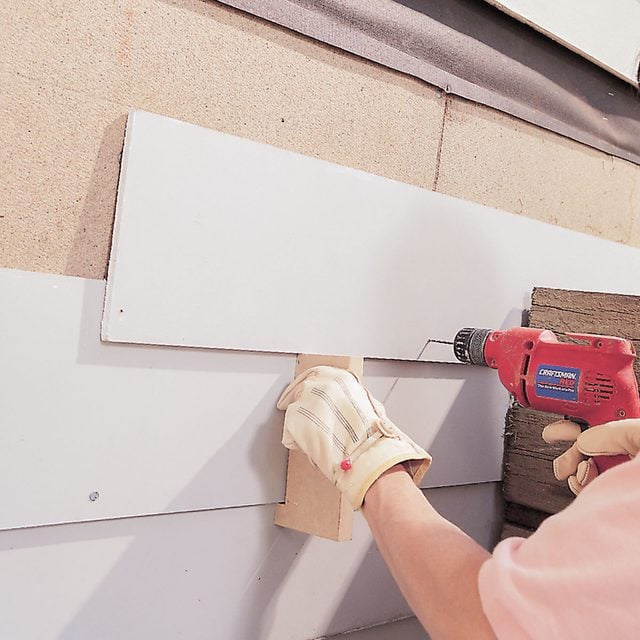
Install the New Boards
Replace siding by working from the bottom up (you might need a helper here).
- Hold the siding in place, leaving a 1/8 in. gap at the corner and butt joints. Use a speed square and level to ensure the board is even with the existing siding.
- Attach the siding with 8d galvanized ring shank siding nails into the studs. “You have to use galvanized nails that won’t rust and leave streaks coming down your siding,” Pollack says. The courses should overlap by at least 1 in. and the nails driven into the overlap at least 1/2 in. above the bottom edge.
- If you have insulated sheathing, predrill nail holes with a cordless drill to avoid crushing the insulation.
Pro-tip: Where siding meets a roof, it will rot if the siding touches the shingles. When you replace these boards, ensure you have good flashing along the joint. Install the new siding so there’s a 1 in. gap between the siding and shingles.
Make Your Repair Last
- Seal any gaps between joints with paintable acrylic caulk.
- Painting wood siding is optional but helps it last. “I definitely recommend painting wood siding,” Martinez says. Prime and paint all exposed edges of the new siding.
- Prevent water from splashing on the siding by installing new gutters or repairing leaky ones. Also, adjust lawn sprinklers so their water spray doesn’t hit the siding.
FAQ’s
What is the best wood for siding?
Cedar is the best choice for wood siding. It is pest and rot-resistant, lightweight and can be stained or painted. It is also readily available and can last 75 years if properly maintained.
What house siding lasts the longest?
Cypress wood can last 100 years or more if cared for properly.
About the Experts
Matthew Fabry is the owner of Roots Construction in Easthampton, Massachusetts. He is a licensed general contractor in the state.
Will Martinez owns W Remodeling and Handyman Services of Springfield, Massachusetts. He has more than seven years of home and bathroom remodeling experience.
Stan Pollack is the owner of Stan-the-Fixit-Man, offering a wide variety of handyman services since 1982. He has also been an instructor of Home Repair classes for adults in his community for 25 years.
Originally Published: May 06, 2019