
13 Tips for Building a Shed

Updated: Apr. 24, 2024
Need a shed for storing tools or just hanging out? Here are some tips from experienced builders to help you complete the project from the ground up.
A small tool shed is a fairly simple DIY construction project, but what if you want your shed to serve more of a purpose than just tool storage? That was my intention when I built my shed, “the Red Room,” on my property some years ago. It’s a ten-by-ten wooden structure with a loft and a distinct red wooden door that gives it its name.
Because I was working alone, I did things I wouldn’t recommend to a builder with helpers. For example, I built the roof rafter-by-rafter rather than constructing trusses and lifting them into place. I also supported the foundation on railroad ties rather than posts or a concrete slab, leaving the subfloor insulation exposed underneath. The roof hasn’t presented any major issues other than the extra time it took to build it, but the foundation started sinking after a few years, and rodents made short work of the insulation, much of which ended up inside the shed.
I’ve learned a lot from this shed-building experience and the others I’ve built or helped to build over the years. I’m about to start another shed project on the property — this time on an existing concrete slab — and I’ll work with an experienced builder, Victor Torres. The following tips are ones we recommend for anyone considering DIYing their own shed.

Build a raised foundation
Construct your shed on a solid foundation that’s a minimum of two inches off the ground. If any part of the floor is in ground contact, it will rot, provide easy access to rodents, and probably won’t stay straight because the earth has a habit of shifting and eroding after heavy rains.
Here are three options:
- Build on horizontal 6x6s: The shed doesn’t necessarily have to rest on deep footings. A pair of trenches filled with gravel and topped with treated 6x6s is often adequate in areas with well-drained soil. Level and square the 6x6s, and you’re ready to build and attach the joist system.
- Build on posts – If the ground is sloped, build your shed floor like a deck, with footings, posts and a wood frame covered by plywood. If you don’t like the opening under the shed, build a skirt to cover the space between the shed floor and the ground.

- Pour a slab: For a shed floor that’s strong, long-lasting and closer to the ground, it’s hard to beat concrete. Surprisingly, if you pour the slab yourself, the price is comparable to that of a wood platform. Just be sure to mix and pour it properly so it sets correctly.

- Pro Tip: Before digging, avoid an expensive mistake — or worse yet, a tragedy — by mapping out your underground utilities. Call 811 a few days before you plan to dig to have your buried utilities marked. It’s free in most places, so skipping this step doesn’t make sense.

Square the floor and walls
Don’t be tempted to get sloppy when you square up the floor and walls of your shed. An out-of-square start will haunt you through the rest of the project, from doors and windows to trim and roofing.
For a concrete slab, measure diagonally across the opposite corners of the form boards. Then adjust the forms until the diagonal measurements are equal. Do the same for a wood platform floor.
When constructing walls, measure each one diagonally from opposite diagonal corners and make sure the diagonals are the same length. Square the wall as needed before you stand it up and nail it in place.

Keep the framing straight
Double-check your framing often while building it to ensure it stays straight. Torres does this constantly, and all it takes is a little string.
Starting at the floor, stretch a string along the concrete forms or rim joist and make adjustments to straighten any deviations. Then do the same thing at the top of the walls, and finally when you set the roof trusses or ridge.
Here’s a trick: Attach small blocks of scrap 1/2-in. plywood to either end of a top plate and stretch a line between them, so there’s a space between the line and the plate. Then, use a third scrap of the same plywood as a gauge to check the distance between the line and the lumber. Use braces or something similar to adjust the top plate until the gauge just fits. Now your plates will be perfectly straight.

Use roof trusses
Don’t do what I did and build your gable roof rafter-by-rafter if you have a helper. Whether you order them from the lumberyard or make them yourself, trusses make building a shed roof much easier. Generally, you’ll need one truss every two feet. Connect the framing for site-built trusses with plywood gussets glued and screwed to the joints.
If you decide to build your own roof trusses, the best place to assemble them is right on the shed floor. But you have to do it before you build the walls. Here’s the best method: Snap chalk lines on the floor to outline the truss parts. Then, use the chalk lines to guide cutting the truss patterns and assembling the trusses.
Consider making the trusses long enough to add overhangs to the ends of your shed. They’re more work and require some extra material, but they’ll provide some protection from rain and snow, which translates to less painting and maintenance. Plus, overhangs just look better and give you a place to add decorative brackets. They’re well worth the extra effort.

Buy straight lumber
In a perfect world, all studs, joists and rafters would be straight. But since they aren’t, take the time to pick the best ones to use, especially the studs at corners and door and window openings.
Sight down the length of the studs and set aside the perfectly straight ones. While you’re at it, also set aside studs that are really crooked. If you have your lumber delivered rather than picking through the pile at the lumberyard yourself, you can cut these up to use as cripples or blocking. You may find other uses for short pieces later on.

Install siding before you raise the walls
Take advantage of your helper(s) in another way: If you’re using sheet siding, save time by installing it while the walls are still on the ground. Of course, they’ll be heavier to lift, but the siding helps keep the walls square, and you won’t have to worry about lifting siding panels into place and nailing them later.
Make sure to straighten the wall plates and square the wall by measuring diagonally before you nail on the siding. This is easier to do on a wood shed floor because you can tack the plates to the floor to hold the wall straight and square while you install the siding.
My go-to choice for shed siding is T1-11 plywood. You can also buy the same type of siding made from OSB, but the last time I looked, the cost was pretty much the same, and OSB siding is harder to find.

Dress things up with trim
Whether grooved or plain, sheet siding offers a fast and economical way to cover shed walls, but by itself, it can look pretty plain. Adding wide corner boards, wide window and door casing, and maybe a horizontal band at the base and top adds tons of class to a utilitarian-looking shed.
Use real wood as a last resort if you’re going to paint the trim. Other materials hold paint better and won’t rot. Here are some products to consider:
- PVC: You can paint it or leave it unpainted — but don’t use dark colors, or the plastic will melt. Torres cuts and shapes it with regular wood tools.
- Fiber cement: It’s less expensive than PVC, but you must paint it to protect it from moisture. Have more than one carbide-tipped blade on hand for cutting it — blades dull quickly because it contains concrete granules.
- Engineered wood-fiber trim: Similar to MDF, this product is designed for outdoor use. You can get it textured or untextured, and it handles pretty much like wood.

Install trim more efficiently
You don’t need to buy an expensive nailer for exterior trim. An inexpensive cordless 18-gauge brad nailer can do the job almost as fast.
Since those skinny brads don’t have enough holding power to keep large trim in place permanently, you must first lay on a couple of generous beads of construction adhesive. Then tack the trim into place, using just enough brads to hold it while the adhesive hardens. Unlike thicker nails, brads rarely split the trim, and you’ll have only a few tiny holes to fill.

Pre-cut metal roofing panels
Save time and energy by covering the roof with metal roofing panels. You can cut them with a circular saw and a carbide blade, but it’ll save you a lot of work if you order the panels the exact length you need. Plus, you’ll have a greater color selection if you order the roofing rather than buy off-the-shelf panels.
Remember to order in advance, since it usually takes several weeks for the roofing to arrive. Also, ensure the overhangs are the right size so the panels slightly overhang the fascia.

Build economical hanging doors
Get the same look as expensive frame-and-panel doors for a fraction of the cost by simply laminating two layers of inexpensive 3/4-in.-thick boards together to make a frame, covering the frame with panels or tongue-and-groove boards and hanging the resulting doors from an overhead track.
For strength, plan to build the front and back layers, so the corners overlap each other. Then, to accommodate inset panels, make the front pieces a little wider to create a lip for the panels to rest against. Hold the plywood or tongue-and-groove boards in place with stops nailed on the back. You can assemble the two frames with pocket screws before gluing and screwing them together, but it’s not necessary. After the glue dries, plane or sand the edges to hide the layers.
Don’t bother buying heavy galvanized hardware made for farm buildings to hang the doors. It’s overkill. Buy heavy-duty closet door hardware instead. It’s not meant for outdoor use, but holds up well when protected by an overhang. And if the roller bearings get corroded, replacing the entire hanger mechanism is simple.


Save money on windows
A shed is a great place to use recycled windows that you might have lying around, or you can find at building materials recycling centers like Habitat for Humanity’s Restore. I used repurposed materials for the Red Room, and they are perfect!
If you prefer to buy new, utilitarian barn sash windows are perfect. Basically, you order the sash — the movable part with glass — and build a simple frame to hold it. Add a few hinges and hold-open hardware, and you’ll have an inexpensive, nice-looking window. If you want a screen, you’ll have to build a separate frame and staple screening to it.
Consider skylights as an alternative or an addition to windows. They let in a flood of light and leave wall space free for hanging storage and shelving. Skylights made for houses are pricey, but there’s an inexpensive alternative.

Plastic dome skylights start at about $45 and are easy to install. Just cut a hole in the roof sheathing, nail the skylight into place and shingle around it. Plastic skylights aren’t exactly attractive, so place them on the side of the roof that’s the least visible.

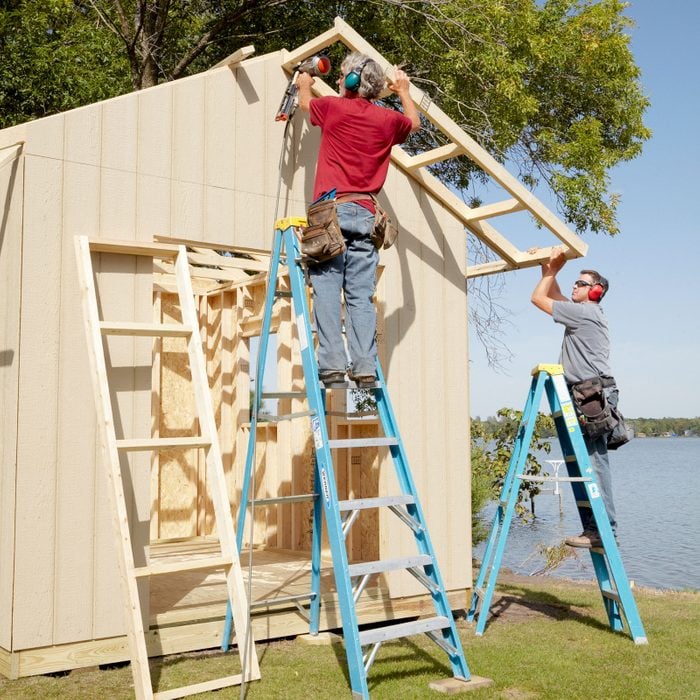
Rent scaffolding for shed roof construction
Working from ladders is more dangerous than working from scaffolding. Plus, constantly moving ladders around takes time.
When constructing the roof, consider renting a set of scaffolding with wheels. You’ll be amazed at how much easier it is to work from and set your tools and materials on a stable platform. You can rent a 5-ft.-tall section of scaffold with three planks and wheels for $100 to $200 per week.

Add a tool nook
If you aren’t building your shed primarily for tool storage, consider adding a shallow tool locker on the side or back of the shed. It offers quick, easy access to lawn and garden gear.
To build this tool locker, place an interior wall 12 inches from the back of the shed. Then cover the studs with pegboard and install a pair of steel pre-hung doors ($110 each) inside out (so they swing outward). Homemade or sliding doors would work well too.
About the Expert
- Victor Torres is the owner of VCT Construction, which operates in the city of Santa Cruz, CA and the surrounding areas, and he is the go-to shed expert in our neighborhood. He has been in the construction trades all his life, but began building wooden structures only when he emigrated from Guanajuato, Mexico nine years ago “because most Mexican buildings are made from concrete.”
Originally Published: September 24, 2018