
How to Build a Cupola
Updated: Feb. 20, 2023
Decoration, ventilation and a hangout for your rooster!

Multiple Days
Intermediate
$101–250
Introduction
Roof-top cupolas can be used for both decoration and ventilation. In the days before roof and ridge vents, a cupola was the most effective way to ventilate a stable, barn or even a house. And with new, rot-resistant materials they still work well.Tools Required
- Caulk gun
- Clamps
- Drill bit set
- Drill/driver - cordless
- Framing square
- Hammer
- Hearing protection
- Jigsaw
- Miter saw
- Safety glasses
- Table saw
- Tape measure
- Tin snips
- Utility knife
Materials Required
- 1-1/4-in. galvanized screws
- 1-in. galvanized nails
- 1/2-in. self-tapping sheet metal screws
- 2-in. galvanized screws
- 3-in. galvanized screws
- 3/4-in. roofing nails
- Acrylic caulk
- Construction adhesive
- Four 12 x 12-in. vinyl or aluminum gable vents. The dimensions refer to the louvered area not the vent's frame. Our 12 x 12-in. vents measured 14-1/2 x 14-3/4 in.
- Four 8-ft. pieces of brick mold
- One 10-ft. long roll of aluminum flashing
- One 4x8 sheet of 3/4-in. pressure-treated plywood
- One 4x8 sheet of 3/8-in. plywood
- One 8-ft. 2x2 (1-1/2 x 1-1/2 in.)
- One 8-ft. cedar 4x4 (actual size is 3-1/2 x 3-1/2 in.)
- One bundle of shingles
- Roof cement
- Three 10-ft. cedar 2x6s
Cupola Project Overview
When I decided to build a cupola to dress up my bland garage, I began by taking a walk. Most of the shed cupolas in my neighborhood are purely decorative. But the really old ones—those that sit atop garages that were once carriage houses—were built for both decoration and ventilation. In the days before roof and ridge vents, a cupola was the most effective way to ventilate a stable, barn or even a house.
Old or new, most of the cupolas I saw had some peeling paint or rotting wood. There were two typical trouble spots: the “saddle,” the part of the shed cupola that sits directly on the roof, and the “sill,” which rests on the saddle. To make my saddle maintenance-free, I wrapped it in aluminum flashing. To avoid problems at the sill, I beveled mine and left no flat areas where water could stand. I also used a vinyl brick mold, rather than wood, to frame the vents.
This article will show you how to build and install a shed cupola with these maintenance-saving features. The cupola’s structure is fairly simple, and all the dimensions, curves and angles are provided. The curved “witch’s hat” roof may look like the work of a master carpenter, but the entire cupola is an intermediate-level project. In fact, a novice with just a little carpentry experience can do a satisfactory job. After all, minor mistakes won’t be visible from the ground. But you will need several power tools (table saw, jigsaw, circular saw, drill and router) and at least three full days to build this shed cupola.
Note: A shed cupola mounted on a garage or shed will keep the building cooler in hot weather and drier during damp seasons. But for your home’s attic, a barn cupola alone doesn’t provide adequate ventilation: By itself, it doesn’t let enough air escape, nor does it provide a place for air to enter the attic. For effective ventilation, install soffit vents along with roof or ridge vents. Here’s how to install soffits that are maintenance-free.
Project step-by-step (20)
Cupola Details
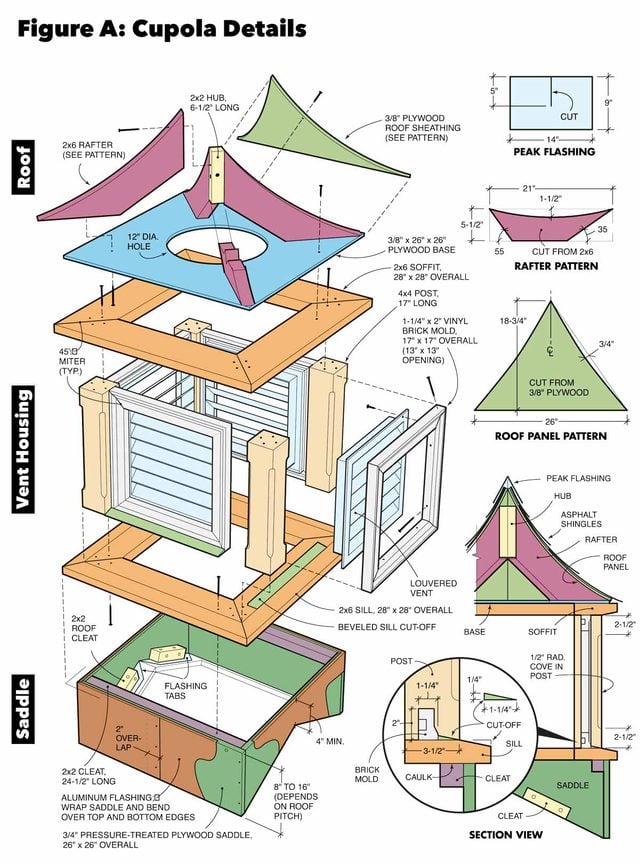
Most home centers and lumberyards carry everything you need to build this cupola. Here’s your shopping list:
- One 8-ft. cedar 4×4 (actual size is 3-1/2 x 3-1/2 in.)
- Three 10-ft. cedar 2x6s
- One 8-ft. 2×2 (1-1/2 x 1-1/2 in.)
- One 4×8 sheet of 3/8-in. plywood
- One 4×8 sheet of 3/4-in. pressure-treated plywood
- Four 8-ft. pieces of brick mold. Vinyl brick mold is maintenance-free, but it holds paint poorly and is usually available only in white. If you want a different color, you’ll have to use a wood brick mold.
- Four 12 x 12-in. vinyl or aluminum gable vents. The dimensions refer to the louvered area, not the vent’s frame. Our 12 x 12-in. vents measured 14-1/2 x 14-3/4 in. Metal vents, which are usually white, can be spray painted. For a lasting paint job, lightly sand the vents with 220-grit sandpaper first.
- One bundle of shingles. Home centers usually stock a few common colors and can special-order many others.
- One 10-ft. long roll of aluminum flashing. Painted flashing usually comes with one side white, the other dark brown. But you can lightly sand and spray paint it after it’s applied to the saddle. The width of the flashing you need depends on the pitch of your roof; the steeper your roof, the longer the sides of the saddle (Fig. A).
- Galvanized screws (1-1/4, 2 and 3 in.), 1/2-in. self-tapping sheet metal screws, 1-in. galvanized nails, 3/4-in. roofing nails, construction adhesive, acrylic caulk, roof cement (two tubes).
Note: Figure A can be downloaded and printed from Additional Information below.
Build the Vent Housing
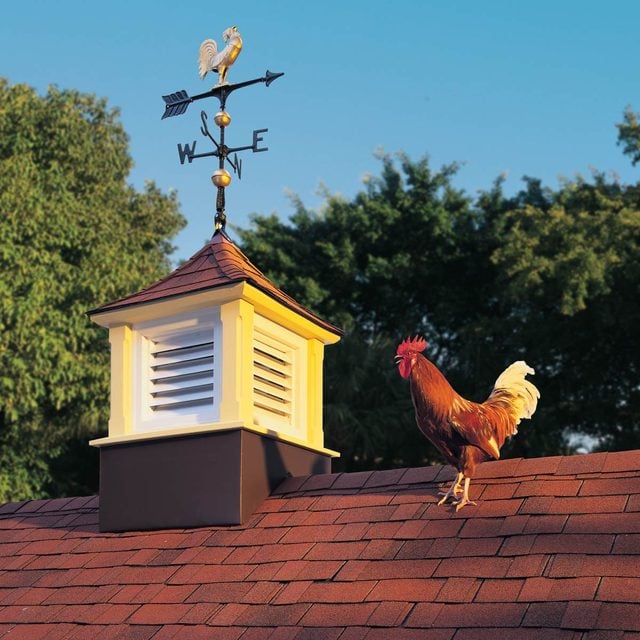
Fig. A gives all the dimensions you’ll need to cut the parts for the housing. The following 5 photos show how the vent housing all goes together. Here are some pointers to help you along:
- Unless you have a sliding miter saw, use a circular saw to miter the ends of the 2x6s that make up the sill and soffit. A circular saw isn’t the best tool for making perfect miters, but small imperfections won’t be visible from the ground.
- We cut coves into three corners of each 4×4 post using a 1/2-in. radius cove router bit.
- Use a couple of pieces of duct tape to hold each vent in place as you drive screws through the vent’s frame and into the brick mold. To save yourself the trouble of drilling pilot holes, use self-tapping screws
- Fill the cracks in the sill and soffit and seal around the vents, brick mold and posts with acrylic latex caulk. Water that gets into the vent housing may lead to peeling paint. You can also use caulk and a putty knife to cover the screwheads in the brick mold.
- Acrylic latex paint is the best finish for the wood parts. But always prime cedar with an oil-based primer designed to seal in “tannins,” natural chemicals that bleed through latex paint, leaving brownish stains.
Bevel the Sill and Soffit Pieces
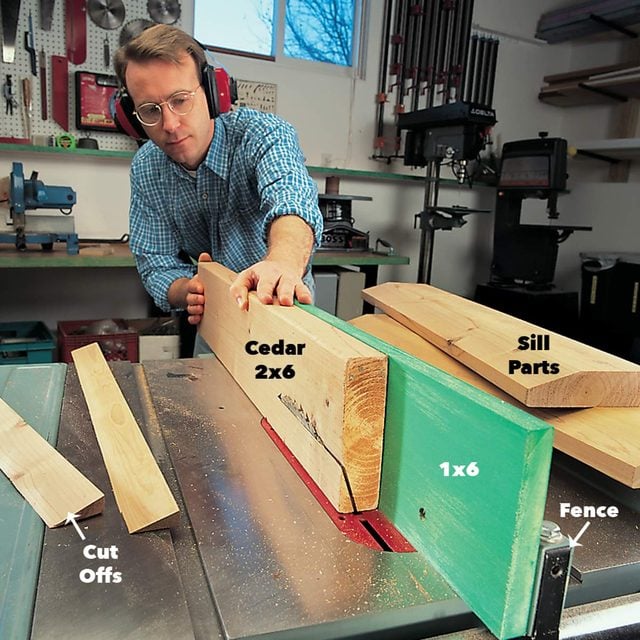
Bevel 2x6s on a table saw. To cut the pieces that will form the sill of the barn cupola, bolt a 1×6 to the saw’s fence (to keep the workpiece from tilting), set the blade at 19 degrees and position the fence 3/4 in. from the blade. In order to bevel the soffit parts, set the blade at 45 degrees and the fence 4-3/4 in. from the blade. To make bevel cutting easier, we first cut 2x6s into 30-in. sections. When all eight pieces are beveled, sand them and then miter the ends at 45 degrees. Save the beveled cut-offs from the sill and rip about 1/4 in. off them. You’ll use them later to complete the slope of the sill.
Assemble the Sill and Soffit Frames
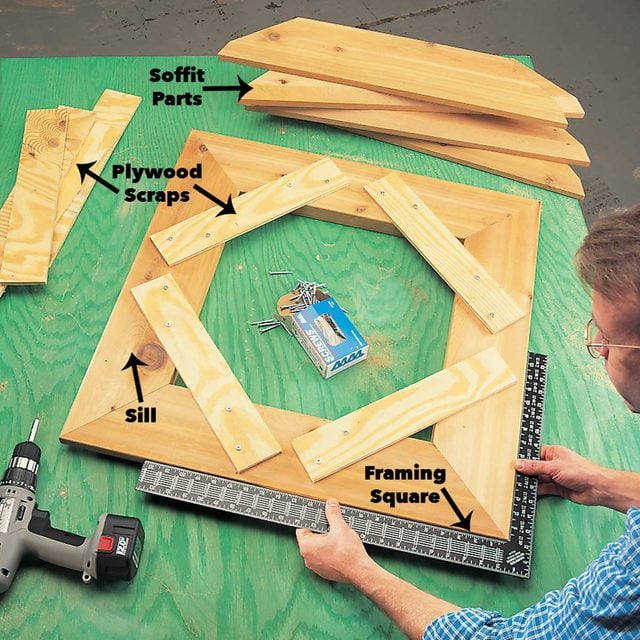
Assemble the sill and soffit frames by screwing temporary plywood scraps to the undersides of the 2x6s. Don’t cover up the corners—you’ll need to drive screws through them later. And make sure that the sill and soffit frames are perfectly square.
Add the Corner Posts
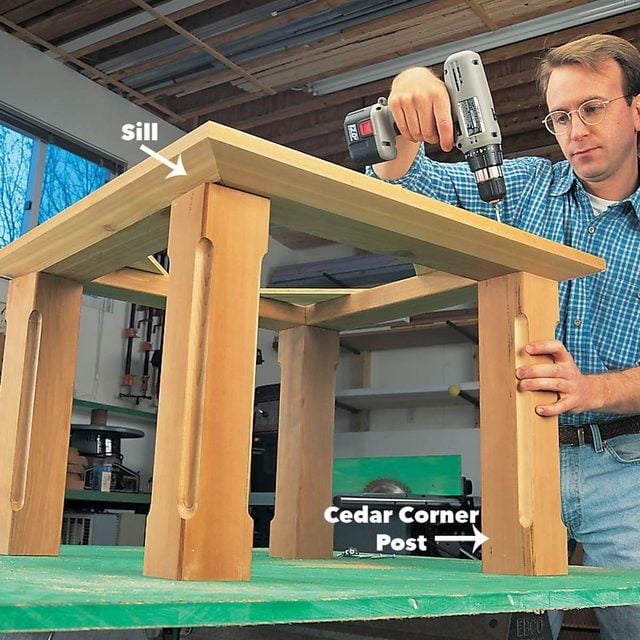
Screw the sill to the corner posts. Drill pilot holes and drive four 3-in. screws into each post, two on each side of the miter joint. The inner edge of each post should meet the inside corner of the sill.
Attach the Brick Mold Frames
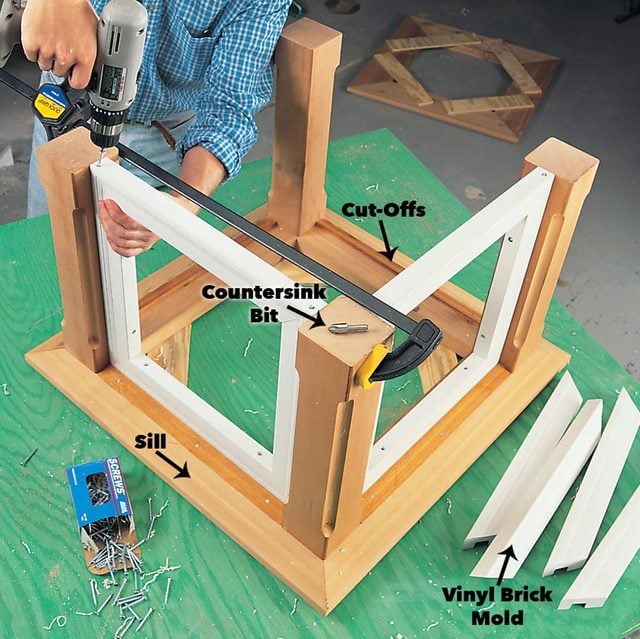
Assemble brick mold frames between the posts. Pre-drill and countersink the holes before driving screws. You may have to draw the posts together or spread them apart to make the top piece of brick mold fit. Screw the bottom and sides of the frames to the posts and screw the top piece to the sides. Remember to fasten the beveled cut-offs to the sill with nails and construction adhesive before you install the brick mold. Fig. A shows the details.
Add the Vents to the Frames
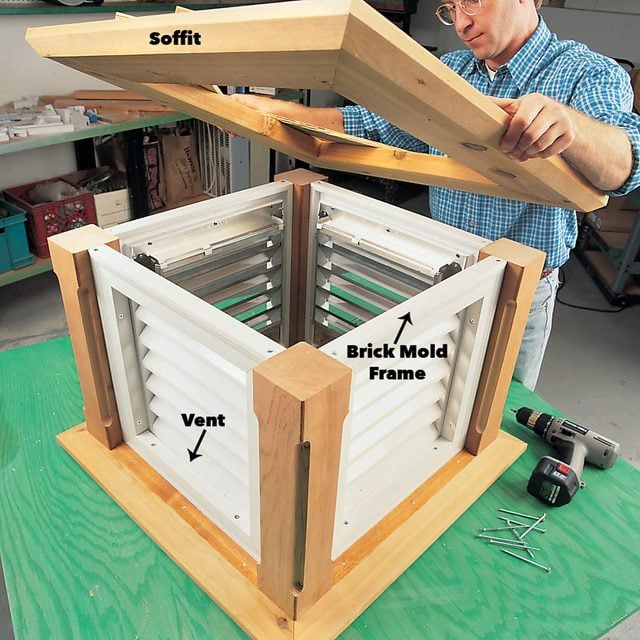
Screw the vents to the backsides of the brick mold frames with 1/2-in. self-tapping sheet metal screws. Then attach the soffit to the corner posts just as you attached the sill.
Build the ‘Witch’s Cap’ Roof for the Shed Cupola
The curved roof is the most time-consuming part of this project. Here are some tips to make the job go smoothly:
- Use a jigsaw to cut the curved rafters. Don’t worry about making the curves perfect. The roof sheathing will smooth over bumps and dips.
- Mark the curves for the roof sheathing using a piece of the door stop and a bar clamp like you did for the rafters. The curve is gradual enough to be cut with a circular saw set to a cutting depth of about 1/2 in.
- The gaps between the pieces of sheathing at the ridges will allow the ridge cap shingles to curve gently over the ridges. If you place the sheathing pieces tightly together, you’ll get a sharp ridge and the shingles will crack when you bend them.
- Cut full-size shingles into 4-in. wide strips with a utility knife, using a framing square as a guide. Each of the three tabs on a full shingle is about 12 in. wide., so you’ll get nine small shingles from each full shingle.
Cut the Curved Rafters
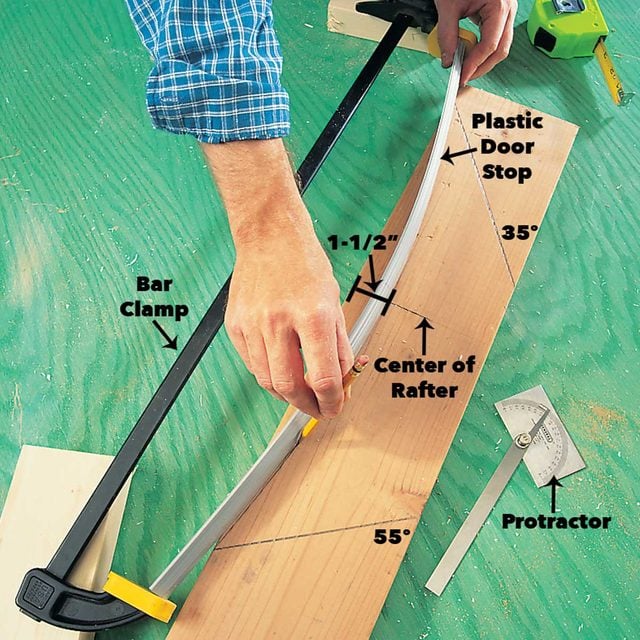
Mark and cut one rafter, then use it as a template to mark the other three. To mark the curve, we put a section of plastic door stop molding in a bar clamp and tightened the clamp until the curve was right. Any thin piece of wood will work, but we used plastic because it doesn’t have knots or any other imperfections that lead to an inconsistent arch. Use a protractor to mark the correct angles at the ends of the rafters.
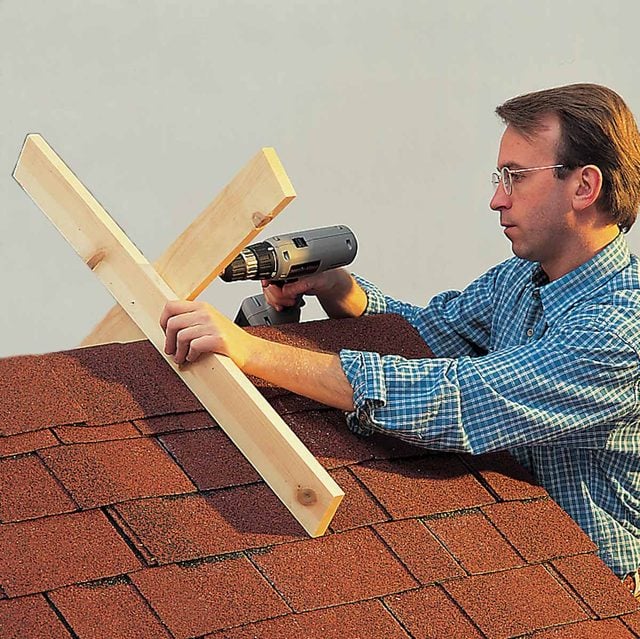
Fasten the Rafters Together
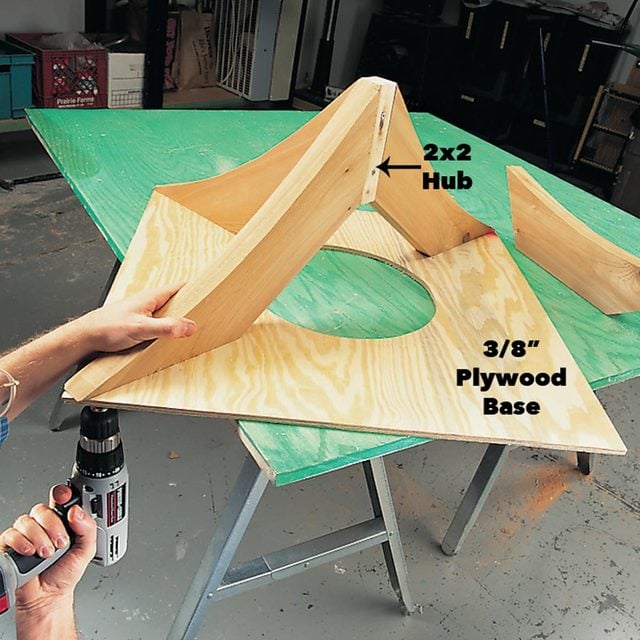
Join the rafters using a 6-1/2 in. piece of 2×2 as a hub. Screw the hub to two of the rafters, and fasten the other two by driving 3-in. screws through the rafters into the hub. Center the rafter assembly on a 26 x 26- in. piece of 3/8-in. plywood and drive 1-1/4 in. screws from below through the plywood and into the lower end of each rafter. Cut a hole in the plywood base so the roof can dry out if water gets in.
Screw the Sheathing to the Rafters
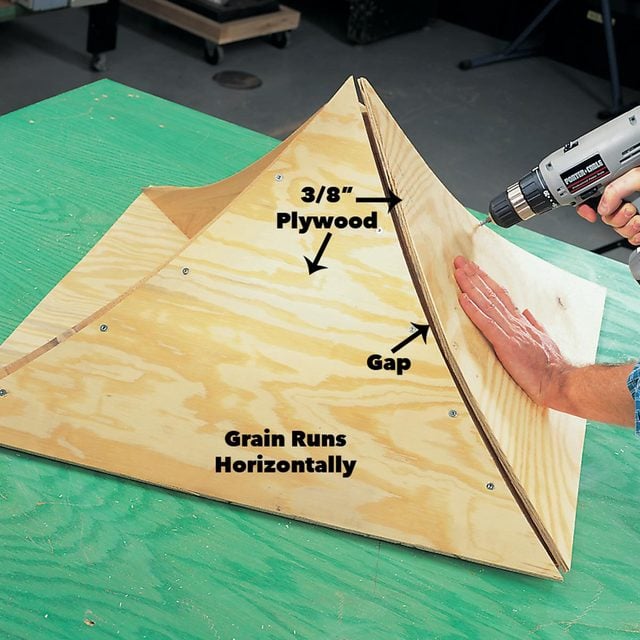
Fasten the 3/8-in. plywood to the rafters with 1-1/4 in. screws. Begin at the middle, driving the screws at an angle. There should be a gap (about 1/2 in. wide) between the pieces of sheathing. When the sheathing is done, center the roof on the vent housing and drive four screws up through the soffit into the roof’s base. You can remove the roof later to make it easier to carry. Important: Be sure to cut the roof sheathing so that the grain runs horizontally across each piece. Plywood bends more easily across the grain than with the grain.
Nail on the Roof Shingles
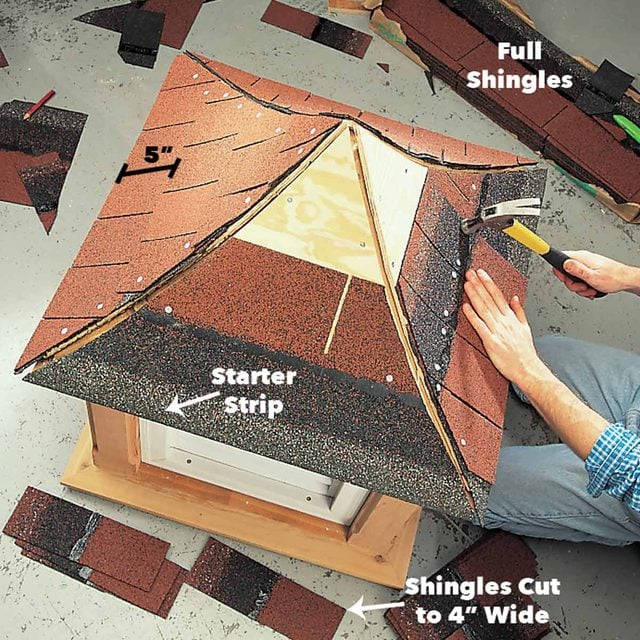
Shingle the roof beginning with a “starter strip,” a full shingle nailed to the roof upside down. The starter strip should overhang the plywood by about 3/4 in. With the starter strips in place, begin nailing on the 4-in. wide shingles. As with the plywood roof sheathing, leaving a gap between the shingles at the ridges. Glue the lower edge of each 4-in. tab down with a dab of roofing cement.
Add the Ridge Cap
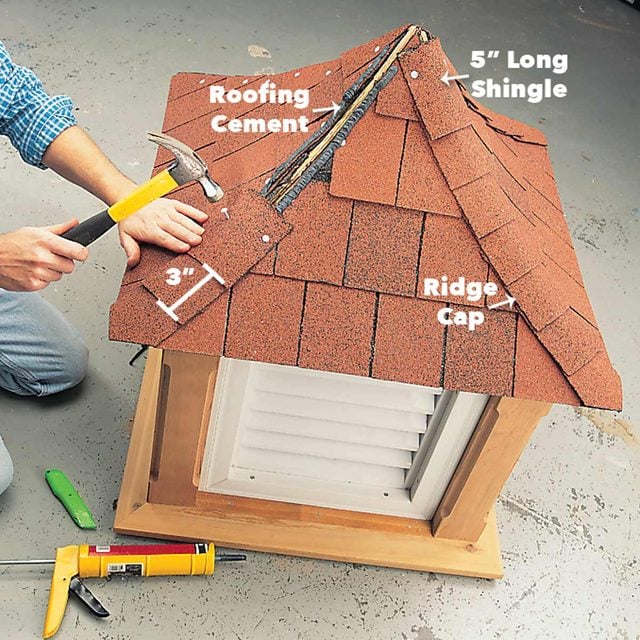
Nail the ridge cap shingles over the ridges. Lay heavy beads of roofing cement along both sides of the ridge. To make the shingles conform to the curve of the ridge, we cut them 5 in. long. The first shingle on each ridge must be cut to match the corner of the roof. The corners of the stiff shingles may stand up at first, but a few hours in the hot sun will make them lie flat.
Cap the Roof with Flashing

Cap the roof by folding a 9 x 14-in. piece of flashing around the peak (see Fig. A). Hold the flashing in place while you mark it for cutting. When the cap is cut, fold it back into its pyramid shape, squeeze a large blob of roofing cement into it, press it onto the peak and drive one roofing nail through the side of the cap that has the overlapping seam.
Custom-Fit the Saddle
Construct a roof pitch gauge by laying two boards over the ridge of your roof and screwing them together.
Trace the Cut on the Saddle
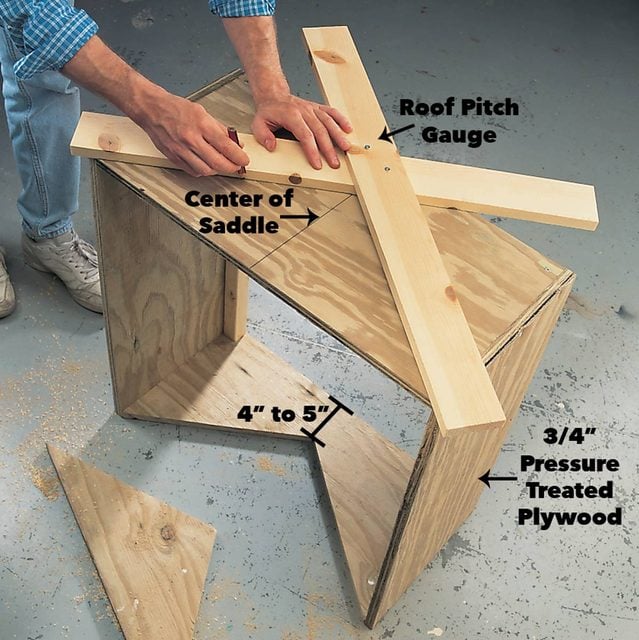
Build the saddle from pressure-treated plywood, then mark two sides of the saddle with the slope of the roof using your roof pitch gauge. Place the point of the gauge on the center line about 4 in. from the top of the saddle and align the legs of the gauge with the inside edges of the saddle. Then cut out the V-shaped notch that will straddle the ridge of the roof. For the saddle’s construction, see Fig. A.
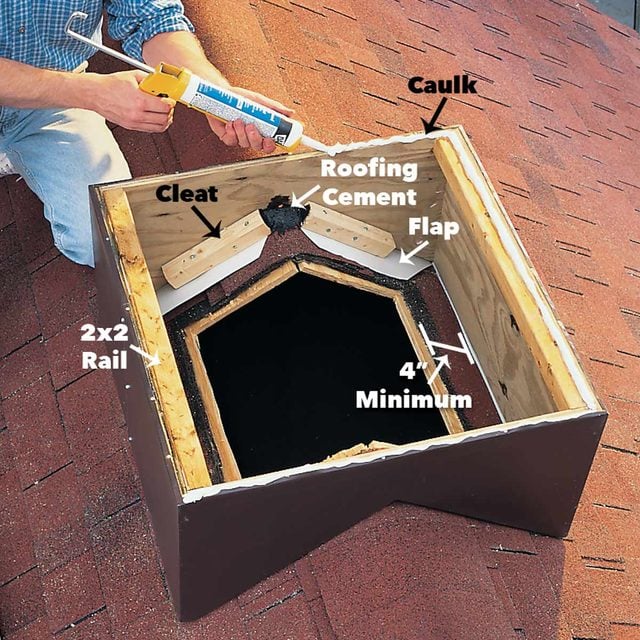
Flash the Saddle

After making the cutout, cover the exterior of the saddle with flashing. Wrap flashing tightly around the saddle and fasten down the seam with self-tapping screws. To crease flashing around corners, use a hammer and wood block. When the saddle is wrapped, fold down the overhanging flashing along the top and bottom edges. At the V-notch, cut the flashing, fold the flaps into the saddle and secure each flap temporarily with one screw. All of this is a lot easier if you have a helper. And be sure to wear gloves—or plan to visit the emergency room for stitches!
Screw the Saddle to the Roof
If your roof is too steep to comfortably walk and stand on, you’ll want to use roof bracket and/or a safety harness. And remember that rooftop safety also includes keeping away from power lines.
If you don’t want ventilation, simply mount the saddle, without doing anything to your roof. If your shed cupola will be used for ventilation, you’ll have to cut a hole in your roof. The hole should be about 16 in. wide at the ridge and extend 10 to 14 in. down from the ridge, depending on the pitch of your roof.
You can cut the hole with a circular saw or jigsaw, but be careful to cut only through your roof’s sheathing and not into any of the structural lumber underneath. Cutting through asphalt shingles will ruin a saw blade. So either use an old blade or first cut away the shingles with a utility knife.
Fasten the saddle to the roof with 2×2 cleats. First, lay a bead of roofing cement on the roof along each sloped side of the saddle. Then fold the four flaps down over the cement (cut them back if they extend over the roof hole). Drive 2-in. screws through the 2x2s into the saddle and 3-in. screws into the roof. Seal the gap at the ridge with roofing cement and caulk around the upper edge of the saddle. But leave the two low edges of the saddle unsealed so any water that gets in can drain out.
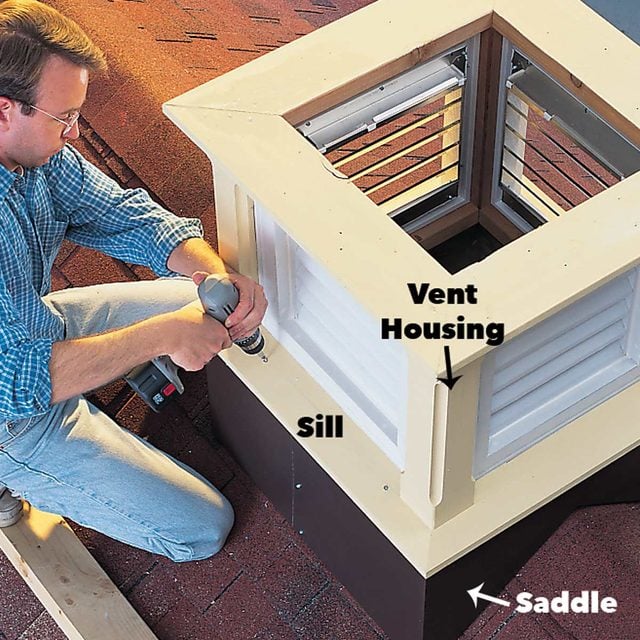
Attach the Vent Housing to the Saddle
The barn cupola isn’t terribly heavy: The three parts weigh about 80 lbs. altogether. But they are large and clumsy. If you’re not comfortable carrying them up a ladder, rent scaffolding. For a typical garage, you’ll need only one section of scaffolding. For a one-story house, you may need two sections.
Fasten the vent housing to the saddle by driving 3-in. screws through the sill into the 2×2 rails inside the saddle. Be sure the housing is centered on the saddle before you drive any screws.
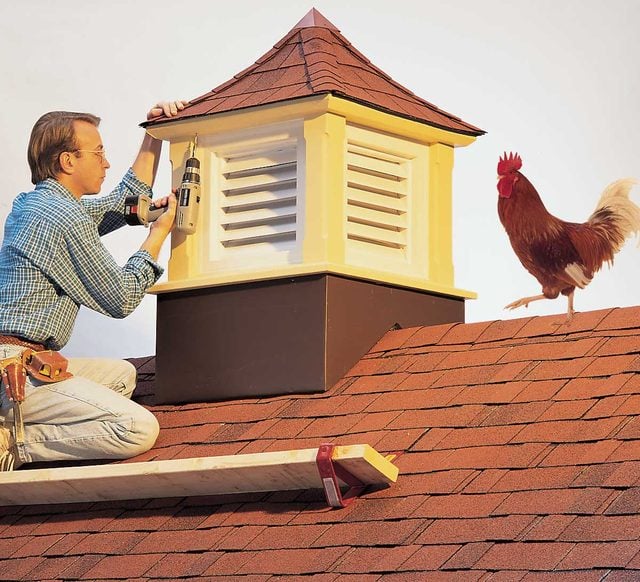
Finally, Add the Cupola Roof
Once the barn cupola is on the roof, all that’s left is screwing the three parts together, caulking and touching up the paint. Drive 2-in. screws through the soffit into the roof’s plywood base. Then caulk over the screwheads and touch them up with paint. Now there’s something to crow about!
If you’ve investigated rustic “barn” doors, you’ve probably gotten sticker shock. But we can help. We’ll show you how to build a simple barn door.
Additional Information: