
How To Prevent a Wet Basement by Fixing Your Home’s Drainage
Updated: Feb. 12, 2024
Worried that your wet basement will require an expensive fix? Here's how to assess and cure the most common cause.
Multiple Days
Beginner
Varies
Introduction
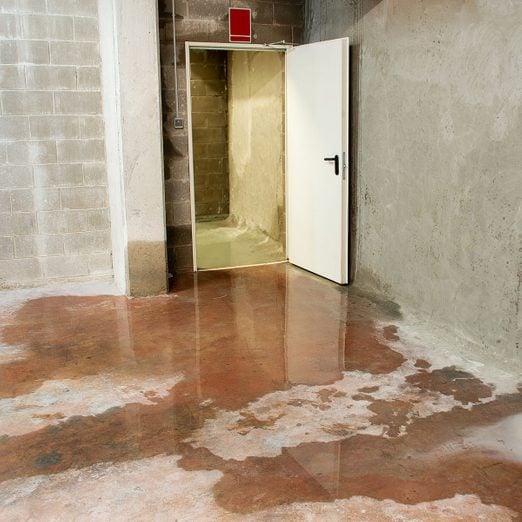
A wet basement can be a nightmare to live with. Water on the basement floor can damage your stored items, raise the overall humidity and create an environment ripe for mold and mildew.
Many homeowners see water infiltration and assume it's time to call in a contractor. But many wet basements aren't caused by a foundational issue. Instead, when we spoke with a professional basement waterproofer, we learned many basement leaks can be cured with a weekend of work and a few hundred dollars' worth of dirt and plastic.
We talked to Robert Vassallo, owner of Complete Building Solutions, an engineering firm that specializes in solving water-related building problems. He says many wet basements can be remedied by simply regrading the landscape, and adding or upgrading gutters and downspouts.
In my own experience, I've seen basement leaks caused by things as simple as a tenant who parked beside a driveway, crushing the downspout extension and leaving a tire track alongside the foundation. The resulting puddle turned into a rainwater reservoir. We replaced the downspout, refilled the grading and corrected the behavior. After that, the basement was perfectly dry again.
Here are some of the most pressing questions that come up when discussing wet basements.
How common are wet basements?
Shockingly common, especially after heavy rain or snow melt.
Is it OK to have a wet basement?
No. It's a problem, but typically manageable. Seeing water in the basement shouldn't make you hit the panic button, but it shouldn't be ignored, especially because the fix is often easy.
What are the risks of having a wet basement?
Plenty. It can damage your flooring, drywall and belongings. The moisture can encourage insect and vermin activity while creating a mold-friendly environment. It also can scare away potential buyers when it comes time to sell, effectively lowering your home value.
Is it normal to have some water in a basement after a heavy rain?
Generally, no. A properly designed home drainage system should prevent water from getting into the basement. But it's common for drainage systems to have issues over time, and to see some water seep in.
What are the main causes of a wet basement?
Improper drainage, like clogged gutters and downspouts or grading issues.
What's the best way to dry out a wet basement?
First, remove anything that can be damaged and open up as much airspace as possible. Get some fans and dehumidifiers going to evaporate the water. Then address the source of the leak. Typically that involves fixing the drainage, as described below.
About the Expert
- Robert Vassallo is the owner of Complete Building Solutions in Golden Valley, Minnesota. The company specializes in finding solutions to tough water problems in residential and commercial buildings.
Tools Required
- 4-foot level
- Compactor (hand tamper or electric/gas-powered compactor)
- Garden hose
- Measuring tape
- Screwdriver
- Shovel
Materials Required
- 6-mil poly
- Compactible fill
- Edging
- Gloves
- Mulch or gravel
Project step-by-step (5)
Assess the interior
Ideally, you’ll do this while there’s an ongoing leak, but you can also look for signs of dried water.
- Search for where the water collects. Be sure to examine each wall.
- Pay particular attention to the areas near any sump pump or visible cracks. (You’ll check these areas again when you look outside.)
- Track the timing of leaks. Does water appear in your basement shortly after a storm, or when the snow melts?
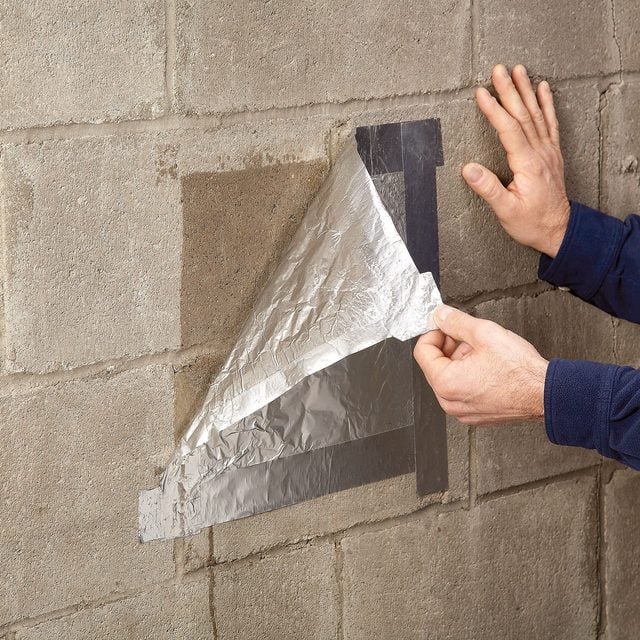
- Tape a piece of aluminum foil to an unfinished exterior basement wall. Tape all four sides. Leave it for a few days.
- If moisture collected between the foil and the wall, water is penetrating from outside the home. Follow the steps below.
- If moisture collected on the outside of the foil, that indicates condensation from high interior humidity. Set up a dehumidifier.
Suggested image: https://www.familyhandyman.com/wp-content/uploads/2017/05/FH09APR_WETBAS_03-9.jpg?fit=700,700
Assess the exterior
Once you’ve identified where the water is coming in, walk the perimeter of your home, paying close attention to areas that are wet on the interior. Look at the entire drainage system, from the roof down to the soil around the foundation, and any curb drains that run out to the street.
Check gutters and downspouts
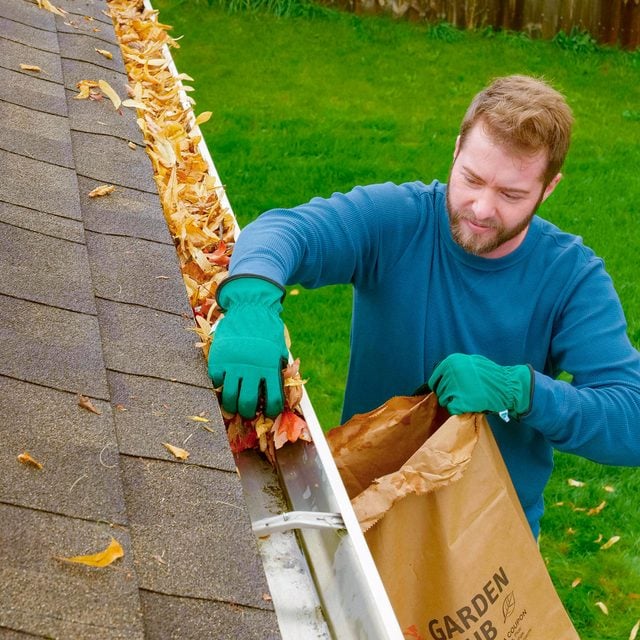
- If there are issues with the roof, gutters or downspouts, address those first. They’re often the easiest to deal with.
- Check the gutters and downspouts for clogs.
- You can do this by using a ladder or running water through the system.
- Use a garden hose (or bucket of water) to put water on the roof in the area where it seems to be entering your basement.
- Trace the water’s path through your drainage system, and note areas where it slows or backs up.
- You can do this by using a ladder or running water through the system.
- Address any gutter or downspout clogs immediately.
- Clear clogs by hand. You may need a screwdriver to disassemble downspouts to reach clogs in bends.
- Attach extensions to the downspouts as needed so the water discharges at least six feet away from the house.
- If your downspouts have curb drains (i.e. drain openings at the street), check them with a hose or observe them during the next significant rainfall.
- If no water emerges from the drain, then a clog or collapsed pipe may be to blame. Fixing them typically involves excavating the line or eliminating the underground run and attaching above-ground downspout extensions instead.
Getting water off your roof is one thing, but it’s equally important to get it away from your home’s foundation. Grading refers to the angle the ground slopes away from your home. Proper grading allows water to flow away from the foundation into the rest of your yard.
- Perform a thorough check of the ground around your foundation.
- Look for areas of sunken soil, garden beds with edging that protrudes to form a dam, and ground that slopes toward the house.
- Use a four-foot level to check the slope of the ground around your foundation.
- Place one end of the level at the highest part of the soil against your foundation, allowing the other end to extend away from the house.
- Adjust the height of the far end until the level’s air bubble is even.
- Measure from the bottom of the level to the ground, using a tape measure. That measurement tells you the slope over four feet. (Ideally, you’ll see about a four-inch slope.)
- Examine any shrubs or trees near the foundation.
- If their roots have formed a channel for water to reach the foundation, or if they penetrate cracks in the foundation, they’ll need to be removed or relocated.
Search for other causes
Every home and yard is unique. Sometimes the water comes from an unexpected source.
- Examine the area around any sump pump outlet. Is the outlet clogged? Does the ground slope back to the house?
- A sump pump that empties too close to the foundation can create a loop effect, where water pumped out of the basement simply funnels back into it.
- Look at the properties surrounding yours. I’ve seen homes at a lower elevation than surrounding properties struggle with water run-off from their neighbors’ gutter systems.
Suggested image: A great illustration would be a close up of using a four-foot level and a tape measure to check the slope. Another option would be a photo of repairing a downspout or cleaning gutters. https://www.familyhandyman.com/wp-content/uploads/2023/10/FHMVP23_PK_09_28_HowToCleanGutters_YVedit_FT.jpg?resize=568%2C568
Make a plan and order materials
Once you know what aspect of your drainage to target, make a plan and order materials.
Make the plan
- Draw a simple sketch of your house and yard, along with measurements.
- Use that sketch to identify areas to address.
- There are two ways to change the slope of the ground near your foundation.
- Add soil or some other compactable fill near the house;
- Move soil from the high area to the foundation.
- The goal is to create a six-foot-wide perimeter that slopes away from your home.
- Aim for a slope of about one inch per foot, for a six-inch drop from the house to the edge of the perimeter.
- This may not be practical for your home. Just get as close to it as you can.
- If your grading is already close to this ideal, simply use a garden rake to smooth and level the ground.
- If you need to bring in more soil, do some calculating. This can be intimidating, but take your time and double-check your arithmetic.
- A slope grade is essentially a right triangle, so you can simply multiply the length by width, then multiply that by the height. Divide that total number by two and you’ll have the volume you’re trying to fill.
- In reality, the existing grade isn’t perfectly level. There will be trees, patios and other obstacles that prevent this from being a perfectly abstract math problem.
- Do the best you can. Being off a little isn’t the end of the world.
- If you’re a little short, you can always run out and get an extra bag of soil.
- If you end up with more soil than you need, use the extra for filling any uneven patches of ground in the rest of your yard.
- Be sure you’re using the same measurements the fill material is sold in. If you’re measuring everything in inches to get a cubic inch total, you may need to convert that figure to cubic yards when you place an order.
- A slope grade is essentially a right triangle, so you can simply multiply the length by width, then multiply that by the height. Divide that total number by two and you’ll have the volume you’re trying to fill.
- Most people use soil as the fill, but you can use any compactable material that will create a run-off surface for water.
- Vassallo suggests ground-up recycled concrete and asphalt for fill. It’s cheap and compacts easily to form a hard, dense surface.
- If you want to have in-ground plants in that six-foot perimeter around your house, you probably should stick with soil.
Order materials
- For most DIY grading projects, you can buy bags of soil at a landscape supply store or home center.
- If you need a lot of fill, it may be cheaper to let a dump truck deliver a load.
- If your local landscaping or gravel company offers a “slinger” service, see if they’ll shoot it directly to the work area. I love this option because it saves a ton of time hauling material by wheelbarrow.
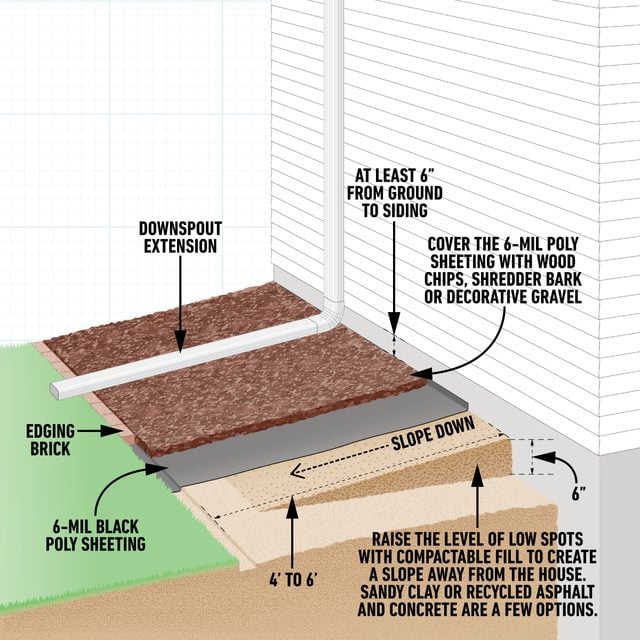
- (Optional) Order enough 6-mil black poly sheeting to cover the area between the sloped perimeter.
- This places a barrier over the soil, shedding water away from the home.
- Vassallo suggests substituting rubber roofing (aka EPDM) for the 6-mil poly. Contact local roofers to see if they’re tearing off an old EPDM roof and you might get the material for free.
Correct the grading around your foundation
- Remove shrubs and trees you don’t need. Work around any that are a valued part of your landscape.
- Spread the new fill, using a level and a tape measure to check the slope.
- Aim for the one inch per foot target slope.
- Maintain six inches between the soil surface and the siding to prevent rot and discourage insects.
- Again, you’ll work with the limitations of your home and your lot.
- If you can’t regrade the entire perimeter, do as much of it as you can.
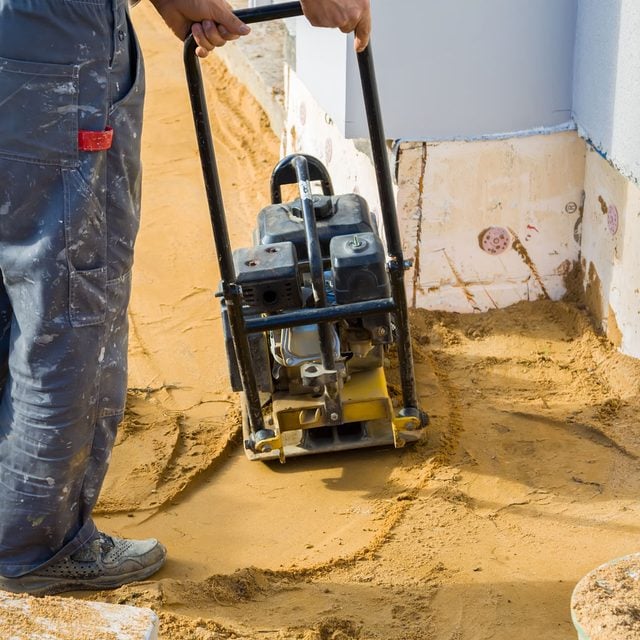
- When you’re happy with the slope, tamp the soil to compact it.
- If you’re doing the entire perimeter, it may be worth renting a gas-powered compactor for this. Otherwise, a hand tamper will work.
- Power compactors typically rent for about $60 for a half day, or $80 for a full day. Check your local rental center for exact pricing.
- A power compactor only requires a single operator. But these are really heavy (typically well over 100 lbs.) so you may need a helper to load and unload it from a rental site.
- If your plan includes adding bricks along the edge, dig a trench deep enough so that the top edge of the brick is level with the ground.
- (Optional) Lay 6-mil poly over the compacted fill.
- For extra insurance against any water infiltration, Vassallo suggest sealing the 6-mil plastic or EPDM to the foundation wall with acoustical sealant caulk and installing flashing over the joint.
- Cover the fill or poly with mulch, wood chips or some type of decorative stone or gravel.
FAQs
What other steps can I take to prevent a wet basement?
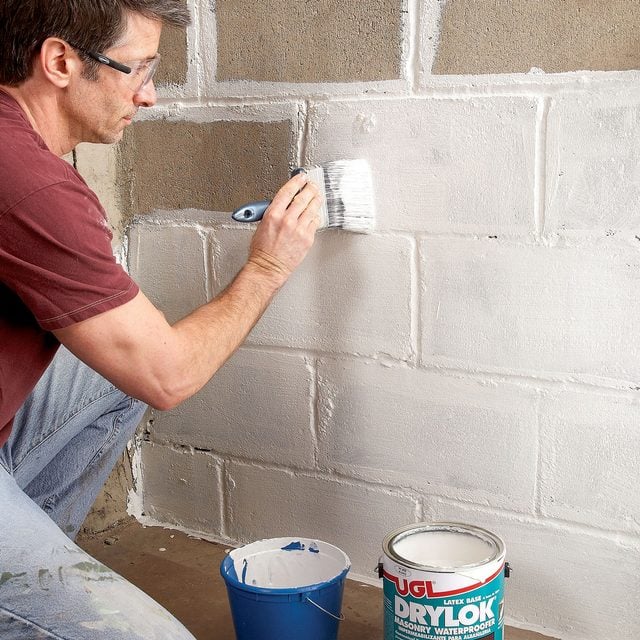
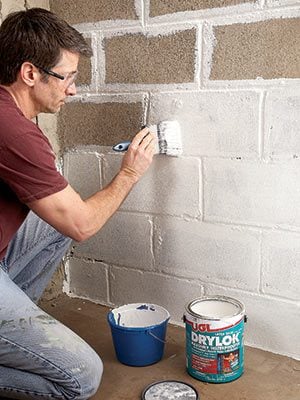
- Coating basement walls with a water blocking paint like DryLok won’t stop the source of the leaks. But it can prevent water infiltration and divert water to a more appropriate drainage system.
- Changing the lot grade isn’t always feasible. Another option Vassallo suggests: Building a rain garden to act as a water reservoir and a beautiful lawn feature.
Will a dehumidifier help a wet basement?
- Yes. Dehumidifiers are great for drying out basements. (See the aluminum foil tip mentioned in Step 1 above.) If rain or snow melt are the causes of your basement water, however, a dehumidifier only reduces the symptom, rather than addressing the source.
When should I call a pro?
Checking your gutters and adjusting your grading are the easiest and most direct ways to take care of many wet basements. If your basement still leaks after you’ve made these corrections, consider hiring an engineering firm experienced in solving water leakage problems to propose other remedies.
Suggested image: https://images.tmbi.com/wp-content/uploads/wwwroot/tfh/blog_images/drylok_waterproofer.jpg