
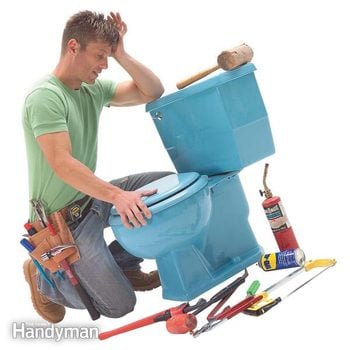
Toilet Seat Replacement
Updated: May 04, 2023What to do if the hold-down bolts won't loosen
How to remove plastic seat bolts
Installing a new toilet seat is an easy two-minute job: Just set the seat in place and tighten the nuts. Removing the old seat, on the other hand, can be a frustrating ordeal. Often, the bolts that fasten the seat are so corroded that you simply can’t unscrew the nuts. But there’s no need to explode—we have the solution.
First, take a look at the bolts that secure the seat. If the bolts or nuts are plastic, they can’t corrode and will come off easily. Simply pry open the cover behind the seat to expose the bolt’s head. Unscrew the bolt with a pliers or a screwdriver while you hold the nut underneath with the pliers.
Metal seat bolts: The drill option
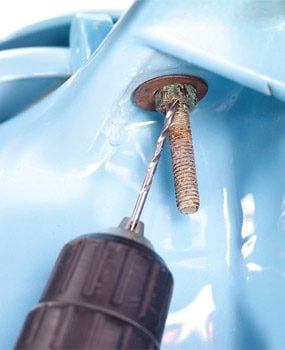
If lubricant won’t free the nut, grab your drill, drill bit collection and safety glasses. Using a 1/16-in. bit, drill into the bolt where it meets the nut (Photo 2). Drill 1/4 in. into the bolt. Next, enlarge the hole with a 1/8-in. bit, followed by a 3/16-in. bit. Then try the socket wrench again. Your goal now isn’t to unscrew the nut but to break off the bolt as you turn the nut. If the boltwon’t break, keep enlarging the hole. Eventually you’ll weaken the bolt enough to break it.
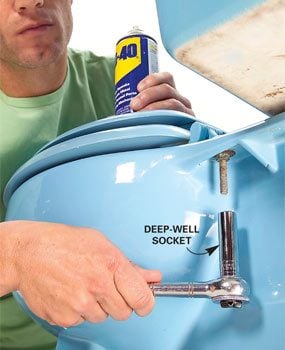
Metal seat bolts: The deep-well socket option
If the bolts are metal, you might be able to unscrew the nuts with a pliers, but the best tool for this job is a socket wrench equipped with a deep-well socket (Photo 1). Most toilet seats require a 1/2-in. socket. The deep socket fits over the long bolt and grips the nut tightly. Most metal bolts aren’t covered by a flip-open cover; all you have to do is turn the nut counterclockwise. Go ahead and twist as hard as you can. If the bolt is brass or badly corroded steel, you might break it off, which is just fine.
If the nut won’t budge, douse it with a penetrating spray lubricant such as WD-40. Hold a rag behind the nut to catch the overspray. Give the lubricant 15 minutes to penetrate, then try again. If the bolt spins as you turn the nut and doesn’t loosen, or the bolt just spins, go to the next option.
Shopping Tips
Because they’re slightly elastic, plastic bolts sometimes allow the toilet seat to slide from side to side. To prevent this, some manufacturers add a plastic sleeve to the seat hinge. Others include a piece of adhesive foam that you can place under the hinge. If your new toilet seat has plastic bolts but doesn’t include these improvements, buy a roll of two-sided carpet tape and stick a small piece to the underside of each hinge.
Looking for an unusual color? Several online retailers offer sample books containing 94 toilet seat colors. For about $50, you get the book and a new seat. Just type “ ‘Bemis color direct toilet seat’” into a search engine and you’ll find several sources.
Required Tools for this replacement toilet seat project
Have the necessary tools for this DIY project lined up before you start—you’ll save time and frustration.
- 4-in-1 screwdriver
- Deep-well socket.usually 1/2 in.
- Drill/driver - cordless
- Safety glasses
- Socket/ratchet set
Required Materials for this replacement toilet seat project
Avoid last-minute shopping trips by having all your materials ready ahead of time. Here’s a list.
- Penetrating Lubricant
