
Tips for Soldering Copper Pipe
Updated: Feb. 14, 2024
Intimidated by the thought of soldering copper pipe? We've got a collection of pro tips to help out at every step of the process.
The Basics of Soldering Pipes
Soldering copper pipe is a tremendously useful DIY skill. It can help you remodel a kitchen, save the day with a quick water line repair, or even let you build metal accents for the yard.
Unfortunately, it’s also one of the more intimidating DIY skills for novices. Even those of us accustomed to working with plumbing don’t pick up the tips and tricks that let the pros work so fast and efficiently.
My own introduction to soldering copper was a trial of fire and ice. I was working in a home left unheated over the winter, and every single copper pipe run burst in one or more locations. I made a lot of mistakes in the process, but I managed to re-plumb every supply line.
This kind of learning on the fly is a common DIY learning curve. The trouble is, it can bake in bad habits. By contrast, professional plumbers like Beau Means have a longer and more structured education that lets them do things safer, smarter and faster.
“I come from a long line of plumbers,” says Means. “I learned to solder from my father when I was quite young. I used to tag along with him on jobs and clean his copper pipe and fittings for him.”
About the Expert
Beau Means is a master plumber with nearly 35 years of experience. Formerly the chief plumbing inspector for Wichita/Sedgwick County, Means is general manager of Benjamin Franklin Plumbing in Wichita, Kansas and chairman of the local plumbing board.

Choosing Your Tools: Propane vs. MAP Gas
There are two main fuel options when selecting a torch for soldering pipes: propane (in blue tanks) and MAP (in yellow tanks). MAP stands for methylacetylene-propadiene propane. You may see MAP gas labeled as MAPP or MAP-PRO. There are some distinctions between those acronyms, but for DIY purposes, we can treat them as synonyms.
Propane is less expensive but generates less heat. The higher heat of MAP typically makes things go faster, but both work just fine.
“We used propane when I was plumbing in new construction,” says Means. “But in the service and repair side, we use MAP gas.” The reason? Modern code requires lead-free solder and brass fittings on supply lines. Lead-free materials typically require a higher heat level.
“Lead-free brass fittings take much more heat than the older style brass fittings,” adds Means. “So MAP gas is a better option when soldering copper to brass. It burns hotter and makes soldering a bit quicker when you get into larger sizes of pipe.”

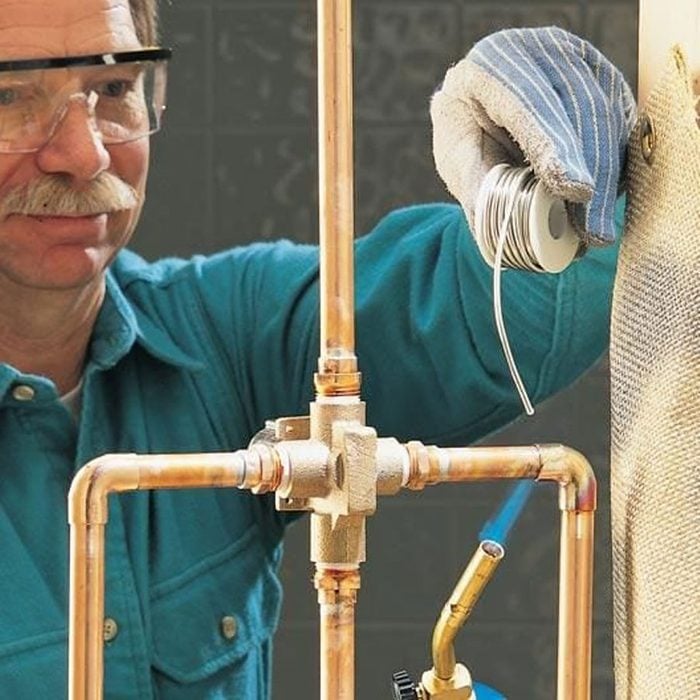
Soldering Safely
Soldering pipe can be done safely. But if you get into bad habits, you can set up yourself or your property for a serious burn. Beau Means’s first tip: Take the time to protect yourself.
“Wear long sleeves, gloves, and eye protection to protect yourself from falling molten solder and flux,” he says. “Never solder directly above you.”
I can personally attest that Means’s advice is spot-on. For about a decade, I had a nickel-sized scar on my forearm that came from dripping solder. I was working in short sleeves and stood directly under the joint I was soldering.
And it’s not just your arm that can be burned by falling solder. You need to take care of your surroundings as well.
“When soldering in a wall or confined space be aware of your solder droppings,” Means says. “They can fall out of sight and smolder for hours. And cover any flooring or furniture that may be below the area you are working in.”

How to Use a Flame Protector
You need to protect your home as well as yourself! Don’t solder close to wood or other flammable material without protecting it from the flame.
“For flame protection, I recommend using a small fire blanket or flame barrier,” says Means. “We also use Cool Gel, which is a spray-on heat barrier that you can [use to] coat the surrounding area. Additionally, we keep small fire extinguishers in our tool bags, just in case.”
Flame blankets are fire-resistant fabric that can be hung behind the joint you’re working on. This insulates flammable material like wood or drywall from the heat of your torch. If you don’t have one, a piece of sheet metal or wet rag will reduce the risk of fire.
Exercise caution even when not directly working on the pipes.
“Pay special attention to where you are pointing your flame,” says Means. “When you pull it away to apply the solder, it is easy to lose focus on the flame and burn something.”

Keep Soldered Pipes from Melting
Sometimes you’ll need to solder a joint close to an existing fitting. If you’re not careful, the heat from your torch can re-melt the solder at the older joint. Then you’ll creating a leak in a joint that was perfectly good before this.
Avoid this mistake by wetting and wringing out a two-inch-wide strip of cloth. Then wrap it around the fitting you want to protect. The wet rag absorbs the heat and prevents the solder in the existing joint from melting.

Don’t Reuse Old Fittings
DIYers often look for ways to save on project costs by reusing materials. But while you may reuse copper pipe that’s in good shape, reusing old fittings and connectors can be more trouble than it’s worth.
It’s time-consuming and difficult to take apart and clean old fittings. And even after all that, there’s a good chance they’ll leak. You’ll get better results in less time by simply buying new fittings.
Remember that copper also carries a high salvage value. If you keep a bucket or can of leftover copper, you can trade them in at a scrap metal recycler.

Use the Proper Amount of Solder
A challenge for many beginners is figuring out how to use enough solder to seal a joint, but not too much.
It’s tempting to melt a few inches of solder into a joint as extra insurance against leaking. But excess solder can puddle inside pipes, restricting water flow. It can even break loose and damage faucet valves.
“Once you get good at soldering, the length of the solder will be pretty close to the diameter of the pipe,” Means says. “So for 1/2-in. pipe, you’ll use about a 1/2-in. of solder.”
Finding it tricky to track how much solder you’ve used? Means has a tip for that, too.
“Bend the solder at the expected length,” he says. “This will help you control or aim the solder and will help indicate when you have used enough.”
When you use the right amount of solder at the right temperature, it all flows like magic, sliding around the pipe and filling the gap between the pipe and the fitting. Just be sure to visually inspect the whole joint, including the back side. Means recommends using an inspection mirror for joints in tight spots.

Keep Threads Solder Free
When soldering threaded fittings, it’s easy for solder drips to run into the threads, making it difficult to get a good seal when you screw on the matching part. This is particularly common when the threaded fitting is below the joint you’re soldering.
There are two main ways to avoid this problem.
- If you can, pre-assemble the threaded joint at a workbench. Keep the threaded fitting pointed up, so that the solder will run away from the threads.
- If you have to solder a threaded fitting in place, be sure to wipe excess flux from around the joint after you assemble the pipe and fitting. Extra flux can run down onto the threads, causing the solder to follow it.

Assemble Pipe in Sections
Soldering one joint at a time is inefficient. Instead, cut, flux and assemble sections of pipe at a time. Start soldering at one end of the assembly and move methodically from one joint to the next.
Use pipe straps to allow you to solder sections in place. It’s possible to pre-assemble them at a workstation, but you risk ending up with an assembly that doesn’t quite fit when you’re ready to install it.

Using Flux
It’s easy to forget about flux, but it’s essential to a proper solder. Flux cleans the surfaces to be soldered, helps the solder flow, and creates a stronger bond.
Tinning flux is a step up from basic soldering flux. It contains a bit of silver solder powder that melts when heat is applied. The resulting thin layer of solder helps ensure a leakproof joint. Tinning flux is available at most hardware stores and home centers and only costs a little more than standard flux.
Means suggests taking time to examine your flux to ensure it hasn’t picked up any grit from the workspace. Flux with dirt or debris in it can cause poor distribution of the solder.
“Don’t let fluxed fittings or pipe set around for too long,” he says. “The resulting oxidation can cause issues. Always wipe excess flux and solder off with a damp rag. If you end up with an unsightly ball of solder on the joint, you can hit it quickly with the flame to soften and wipe it away. Don’t burn yourself here!”

Keep Pipes Dry When Soldering
One of the most essential parts of repairing copper pipe is draining the system.
Soldering a joint in pipes that contain even tiny amounts of water is nearly impossible. Most of the heat from the torch goes into turning the water to steam, so the copper won’t get hot enough to melt the solder.
Unfortunately, it’s common to find a small amount of water in a pipe system even after you drain the pipes. Back when I learned how to solder, I was taught to jam white bread into the pipe.
“White bread is an old trick that does come in handy in a pinch,” Means says. “A small amount of white, not wheat, bread inserted into the pipe will help to stop a trickle of water. Just be sure to clean your aerators afterward if working near a fixture.”
While Means is familiar with these older techniques, there are better options these days.
“There are devices known as Jet Swets, which are rubber stoppers that are inserted into the pipe with a cord or stem,” he says. “They expand to seal off the flow of water and can then be pulled out once the sweat joint is made.”
Frequently Asked Questions
What tools do you need to solder copper pipe?
A cleaning brush, torch, flux and solder. Optional materials include a heat shield and water blocker.
Why does my solder keep turning into a ball?
“If your solder is turning into a ball, the pipe or fitting may not be hot enough,” Means says.
“Always start by heating the pipe near the joint first, then move the heat to the fitting. Test for the right amount of heat by touching the solder to the side of the joint opposite of the heat. The solder should melt and flow around the fitting. Then, remove the heat and touch the solder to the side of the joint that you were heating. Do not try to apply the flame directly to the solder.”
Can you overheat copper pipe when soldering?
Yes. “If the fitting begins to turn black and sooty, you have probably gone too far and cooked all of the flux out of the fitting,” Means says. “You will want to re-clean and flux the fitting and pipe again (once cooled).”