
Hardwood Floor Repair: How to Patch a Hardwood Floor
Updated: Jun. 23, 2023How to replace a damaged oak or other hardwood floorboard.

- Time
- Complexity
- Cost
- A full day
- Beginner
- Less than $20
Replacing Hardwood Floors: Mark the floor board plank and drill holes

Photo 1: Determine what needs to be removed
With hardwood floor repair, you need to first determine what should be removed. Look at the damaged flooring plank and decide how much length to remove. You want the new butt joint to be staggered about 10 in. from the butt joints of any adjacent flooring courses. Draw a line for the cut, then use a sharp chisel (1 in. or wider) to carefully cut the line through the top 1/8 in. of the flooring to create a crisp edge that defines the new butt joint.
With a spade bit, drill three relief holes next to the layout line to remove the bulk of the wood. Complete the cut by using the chisel to trim the full edge of the butt joint completely square and clean.
Replacing damaged or hole-filled hardwood tongue-and-groove floorboards takes a couple of hours, sharp tools and an understanding of how to break the interlocking tongue-and-groove board edges. When removing old flooring, create a new butt joint on just the side of the plank that’s closest to the hole or where the damage ends.
Using the technique shown in Photos 1 – 4 and a carbide-tipped flooring blade that can cut through nails, remove the old hardwood flooring and install a perfect replacement piece. New flooring usually stands “proud” next to older, worn flooring.
Also, matching the color of aged flooring is difficult. For these reasons, the best time to repair flooring planks is when the entire floor needs to be sanded and refinished. Otherwise, using belt and orbital sanders, you’ll have to level and then finish the new plank so it blends into the existing flooring—a tough job.
Saw relief cuts into the flooring plank

Photo 2: Cut into the damaged floorboard
Make relief cuts in the flooring plank using a circular saw.
Saw two parallel relief cuts an inch apart down the center of the flooring plank to be removed. Set the saw blade depth 1/16 in. deeper than the thickness of the flooring. Position the circular saw in front of the newly created butt joint with the saw guard retracted, the blade clear of the flooring and the weight of the saw balanced on the front of the saw shoe. For safety, don’t position any part of your body behind the blade.
Grip the saw firmly, turn it on, carefully lower the blade into the flooring, and make the first saw pass down the flooring to just before the other end of the board. Repeat the procedure with a second plunge cut.
Using the chisel and a pry bar, remove the strip of flooring between the relief cuts and pull the tongue-and-groove edges of the old flooring where they interlock with the adjacent flooring courses. Completely clean out the opened section of flooring.
Replacing Hardwood Floors: Remove the bottom of the groove from the new floor plank
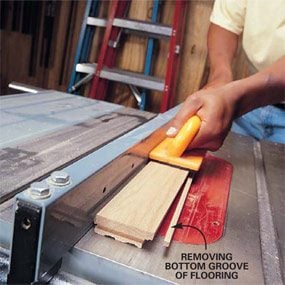
Rip cut and remove the bottom groove from the replacement flooring piece using a table saw, circular saw, or sharp chisel and utility knife. Set the saw fence to cut 5/16 in. off the width of the plank and the saw blade depth to cut into it 1/4 in. deep. Once the bottom groove has been removed, measure the length required for the replacement piece and cut it. Pencil the location of floor joists on the new board.
CAUTION:
Our blade guard is removed for the photo—use yours!
Fit and nail the new floor plank

Install the replacement flooring board by inserting the tongue side into the groove of the adjacent flooring plank and dropping the board into position. If necessary, tap the new board flush into position using a rubber mallet. Drill pairs of 1/8-in. nail holes near the ends of the new board and at each joist and fasten the flooring with 8d finish nails. Set the nailheads.
Required Tools for this Project
Have the necessary tools for this DIY project lined up before you start—you’ll save time and frustration.
- Circular saw
- Cordless drill
- Drill bit set
- Hammer
- Knee pads
- Nail set
- Safety glasses
- Square
- Tape measure
- Wood chisel
Required Materials for this Project
Avoid last-minute shopping trips by having all your materials ready ahead of time. Here’s a list.
- #8 finish nails
- Floor plank
