
Make a Plastic Laminate Table Top
Updated: Apr. 13, 2023Make a super-solid top for a desk in one day
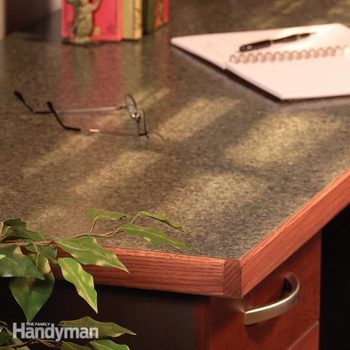
This desktop design is as durable as it is good looking and best of all it is easy to make. The size, shape and color of the top is infinitely variable. You can adopt this design to almost any situation that calls for a strong, durable top such as kitchen islands, laundry room counters, tables for the kids’ play area, you name it. Choose from a huge palette of colors and designs for the laminate top. The hardwood edging gives the top a handsome appearance that can tie in with existing wood in the room decor.
We'll show you everything you need to work with plastic-laminate. All it takes is some basic shop tools, a few stock lumberyard items and this article.
- Time
- Complexity
- Cost
- A full day
- Beginner
- $101–250
Things to consider before you start
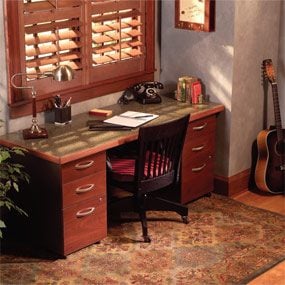
Hunting around for a desk to fit the odd corner in your bedroom or family room? Why not make it yourself? The big advantage of building your own desktop is that you can make it any size you like and choose from hundreds of colors, then pick a wood edge to match your room trim. Our desktop is made from plastic laminate with hardwood edging and is a solid 1-1/2 in. thick. The laminate surface is perfect for writing on and is as durable as any kitchen countertop. We checked out the laminate samples at a local home center and placed our order. The material was ready for pick-up about one week later. The plastic table top worktop rests on nifty file drawers that you can find online or at a local office supply store.
If you’ve never worked with plastic laminate before, don’t worry. While some woodworking experience would be valuable, this project isn’t complicated. In this article, we’ll show you how to cut it, use the right adhesive and trim it to achieve knockout results.
Figure on spending about $2 per square foot for your laminate sheets for your laminate table. We purchased one 4 x 8-ft. sheet, which was large enough to laminate the bottom and the top of the worktop. You’ll need to laminate both sides to make sure the top doesn’t warp over time. Plan on spending a bit over $125 for all the desktop materials. We found our cherry file cabinets on the Internet for about $200 each. But you can spend much less if you choose simple metal file cabinets. Just be sure the cabinets are about 28 to 29 in. high for a comfortable working height.
Video: How to Install Laminate Work Surfaces in Your Workshop
Plastic laminate is the perfect, nearly indestructible surface for workshop tops or any other surface that will get abuse. We’ll show you how to work with plastic laminate to create your own laminated countertops or work surfaces for your workshop.
Two slabs of 3/4-in. particleboard and a hardwood edge make up the foundation
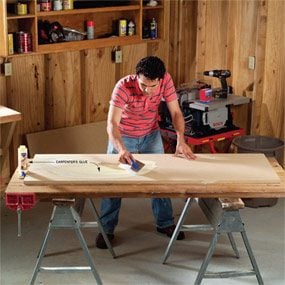
Photo 1: Two slabs of 3/4-in. particleboard make up the foundation.
Cut two pieces of 3/4-in. particleboard a bit longer and wider than your actual desk size. Spread carpenter’s glue onto the top side of the lower piece using a 1/8-in. notched trowel. Make sure the entire top is covered with glue, especially the edges.
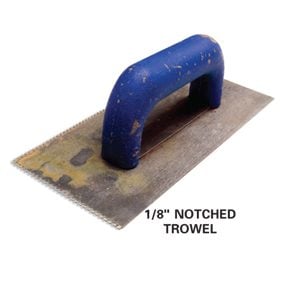
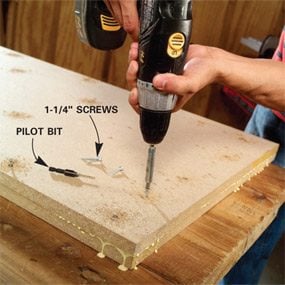
Photo 2: Glue and screw the two pieces together
Predrill, glue and screw the top piece onto the lower using 1-1/4-in. wood screws. Keep your screws about 2 in. in from the edge and drive them every 6 in. across the entire surface.
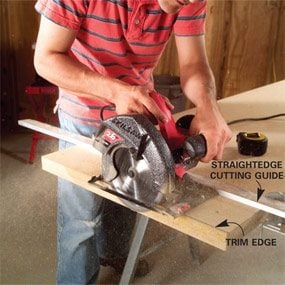
Photo 3: Trim the top
Trim the top to size once the glue has set. Clamp a straightedge to the top to get a perfectly square and straight cut on each edge.
We chose particleboard for the worktop substrate because it’s flat and relatively stable. You could choose plywood instead, but make sure you have very flat pieces to start with. Cut the particleboard pieces about 1 in. longer and wider than the finished size so you can trim them square after gluing them together. You’ll trim to the finished size minus the width of the hardwood trim. We made our finished top 25 in. wide and 63 in. long, including the 3/4-in.-thick hardwood nosing strips.
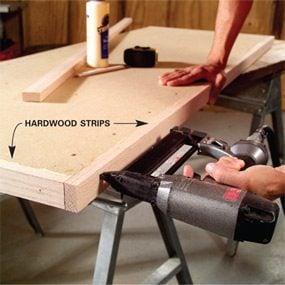
Set the bottom piece of particleboard onto your workbench and spread carpenter’s glue over the entire surface (Photo 1) using a notched trowel to ensure even coverage. Then set the top piece of particleboard over the lower piece and screw them together (Photo 2). Be sure to countersink the screwheads slightly below the surface. Next trim the worktop to size using a straightedge guide (Photo 3). This will give you a nice, square edge for gluing the hardwood trim pieces. Then rip the hardwood pieces 1/16 in. wider than the thickness of your top. Once it’s installed (Photo 4), you can sand (Photo 5) both the top and the bottom flush with the top.
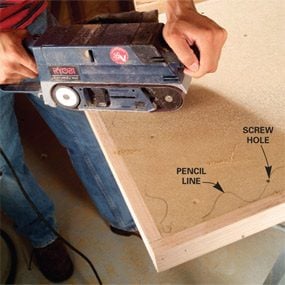
Take care when sanding so you don’t bevel the sides of the worktop. Any slight bevel will telegraph through the laminate. Then fill the screw holes with wood putty and sand the putty flush with the top.
Figure A: Laminate Desktop Components
Laminate the top and bottom of the desk for stability
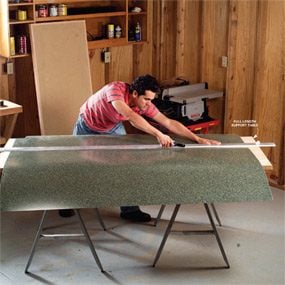
Photo 6: Cut the plastic laminate
Cut your plastic laminate about an inch larger than the top with a carbide cutting tool. Use light pressure for the first score and then score it several more times to cut it. Cut both the top and the bottom piece about 1 in. longer and wider than the finished workpiece.
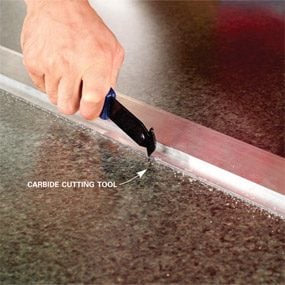
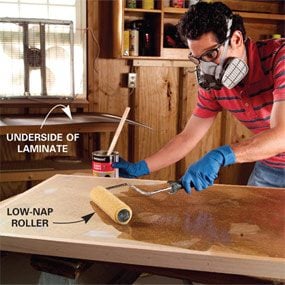
Photo 7: Spread the contact cement
Vacuum the top until it’s free of dust. Roll on contact cement with a low-nap roller, making sure to cover the whole area. Wear a respirator and have plenty of ventilation. Roll the contact cement onto the backside of the plastic laminate as well. Let the adhesive dry for 30 minutes, until it’s no longer tacky.
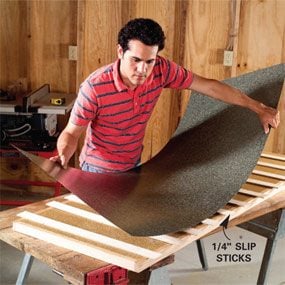
Photo 8: Position the laminate
Set dust-free strips of wood onto the dried glue surface, then position the plastic laminate over the worktop.
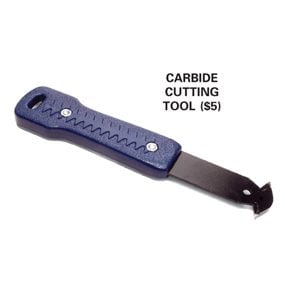
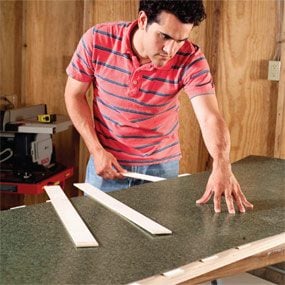
Photo 9: Pull the strips
Pull the strips out one by one, beginning at the center and working your way out to the edges. Press the laminate into place as you go. Work carefully to get the laminate flat onto the worktop without air pockets.
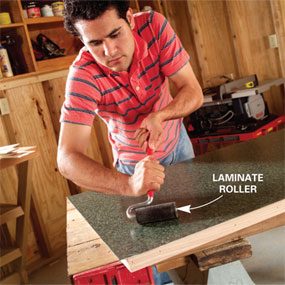
Photo 10: Roll the laminate
Roll the laminate from the center out to the edges with firm pressure on a roller. If you don’t have a roller, wrap a cotton towel around a 10-in. piece of 2×4 and press the laminate down. Go over the entire surface several times and be careful not to break the edges of the laminate as you roll.
You have to keep two things in mind when you’re working with plastic laminate. First, this stuff is brittle, so you’ve got to keep it supported when you cut it or move it from place to place. A twist or tight bend will crack it. Second, the edges can be sharp, especially after cutting, so handle the piece carefully. The pros have all types of special tools for cutting this stuff, but you’ll find that the carbide tool shown will work just fine. You can find it at your home center, usually in the tile department. It’s got two sharp tips for cutting. Any straightedge will work to guide the cutter. I like to use the aluminum guide for my circular saw.
Measure and mark your plastic laminate to size (at least 1 in. larger in each direction), clamp a straightedge over the mark and draw the cutting edge lightly from one end to the other (Photo 6). This initial score is critical, so keep a steady hand. Score it again along the same line, adding more pressure. After scoring it a few more times, the laminate will be cut through. With more experience, you can snap it after a couple of scores. But until then, just score it until you cut all the way through. Now cut it to length and you’re ready to glue.
The best adhesive to use is a solvent-based contact cement. It’s volatile, so provide lots of ventilation and wear an organic vapor mask to avoid breathing the fumes. You also have to keep it away from flames and pilot lights. If you can glue the laminate outside in temperatures above 55 degrees F, do it. Water-based contact cement has less fumes, but it’s fussier to use and requires two and sometimes three coats to get a good bond. Apply the contact cement to the bottom side of the worktop and to the backside of the plastic laminate with a 1/4-in. nap roller (Photo 7).
It’s best to start with the bottom side of the worktop so you can become familiar with the gluing and routing processes. That way, any goof will be on the bottom and no one will notice! Buy a good-quality roller (one that doesn’t shed fibers) for rolling on the contact cement. Roll it on the backside of the laminate first so you can use the workpiece as a table. Lift the laminate carefully and set it aside to dry. Then apply the cement to the worktop. Let both dry for 30 minutes.
Contact cement bonds when the two dry-to-the-touch coated surfaces meet. The bond is immediate, leaving no possibility of readjusting. That’s why it’s necessary to use slip sticks to separate the two surfaces while you position them accurately. Have your slip sticks ready to go. I made mine from scrap 2×4 that I ripped down to 1/4-in.-thick strips. You can also use dowels or even molding strips as long as they’re the same thickness. Just be sure they’re not dusty. Set the slip sticks every 3 in. along the top so the laminate and worktop surfaces won’t touch. Position the laminate on the sticks and make sure the laminate overhangs each side equally. Now pull out one of the center strips, then the next. The top will start to fall onto the other surface. Press the top of the laminate lightly as you pull out adjacent sticks (Photo 9) one at a time. Work your way from the center out to the edges. Next, press the laminate firmly to the desktop with a laminate roller (Photo 10) to improve the bond and get rid of any trapped air between the surfaces.
Trim the laminate flush with the hardwood edge
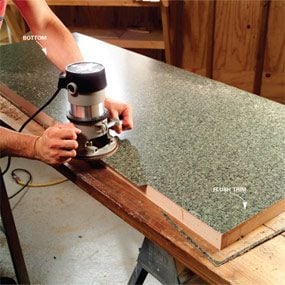
Photo 11: Trim the laminate
Trim the bottom laminate flush with a special flush-trim bit. Go around twice to make sure the edge is crisp. If the bit clogs with glue, unplug the router and clean the bit with WD- 40. Wipe any excess glue off the sides with mineral spirits.
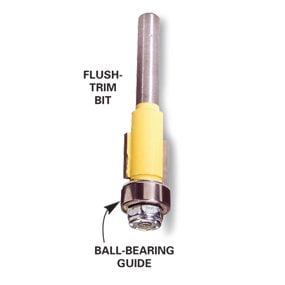

Install the flush-trim bit in your router so the ball-bearing guide rides on the center of the hardwood edge. Set your router onto the surface with the bit free of the laminate. Turn on the router and gently guide it into the laminate, making a counterclockwise trip around the worktop. Let the bit do the work, pushing the router along at a rate of about 1 in. every second or so. Don’t go too slowly or the router bit will burn the edge. When you get close to the corner, ease the router into the corner and follow the next edge. If you miss a spot, don’t worry because you’ll be making a second trip around. After completing one pass, check the edge for glue drips, which might ruin your straight edge. Scrape any glue off with a sharp chisel. Unplug the router, examine the bit and clean it with WD- 40. Wipe it completely dry and make another pass with the router.
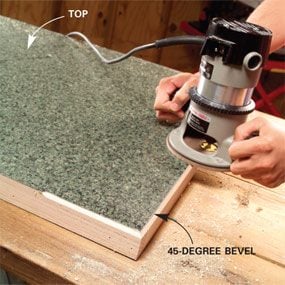
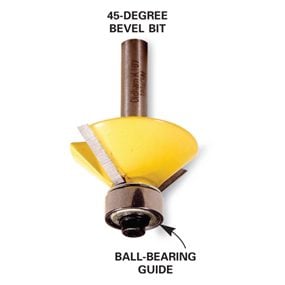
Now that you’ve completed the bottom side, repeat the process for the top. The only thing to do differently is to trim the top the second time using a 45-degree bevel bit to cut a comfortable, eased edge along the top (Photo 12). Try this setup on pieces of scrap wood first. Set the bit to remove about 1/4 in. of material. Again, go counterclockwise and make two passes. Once you’ve completed the routing, further ease the edge with a fine mill file with light strokes. The idea here is just to soften the sharp edge made by the trimmer.
Finish the hardwood edge
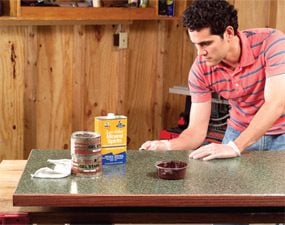
Hand-sand the wood edges with 150-grit sandpaper wrapped around a firm sanding block, then apply the stain. We mixed equal parts of two stains to get a close match with our purchased file cabinets. One was a mahogany, the other a cherry gel stain. Wipe the stain into the wood and then clean the excess off the laminate with a rag moistened with mineral spirits. Let the stain dry and then use an oil or varnish such as Watco or Minwax Antique Oil Finish over the stain. Let the finish dry and then fill the small nail holes with a matching putty stick. Wipe the putty flush with the surface using a clean rag moistened with mineral spirits.
Setting up your desk
Leave a comfortable seating distance between your file cabinets and let the top overhang the outer sides of the cabinets. Cut several pieces of soft anti-skid rubber rug mats to fit on top of the file cabinets and set the desktop onto the mats. The mats will cushion the top and keep it from sliding if you bump the file cabinets.
Required Tools for this Project
Have the necessary tools for this DIY project lined up before you start—you’ll save time and frustration.
- Air compressor
- Air hose
- Belt sander
- Brad nail gun
- Circular saw
- Cordless drill
- Countersink drill bit
- File
- Hearing protection
- Roller sleeve
- Router
- Shop vacuum
- Straightedge
- Trowel
Required Materials for this Project
Avoid last-minute shopping trips by having all your materials ready ahead of time. Here’s a list.
- 3/4" x 1-1/2" hardwood edging
- 4 x 8 sheet of 3/4" particleboard
- 4 x 8 sheet of plastic laminate
- Contact cement
- Wood glue
