
How to Increase Storage Space In Your Bathroom

Updated: Jan. 05, 2023
Turn unused bathroom space into a hidden yet functional cabinet.

Multiple Days
Intermediate
$101–250
Introduction
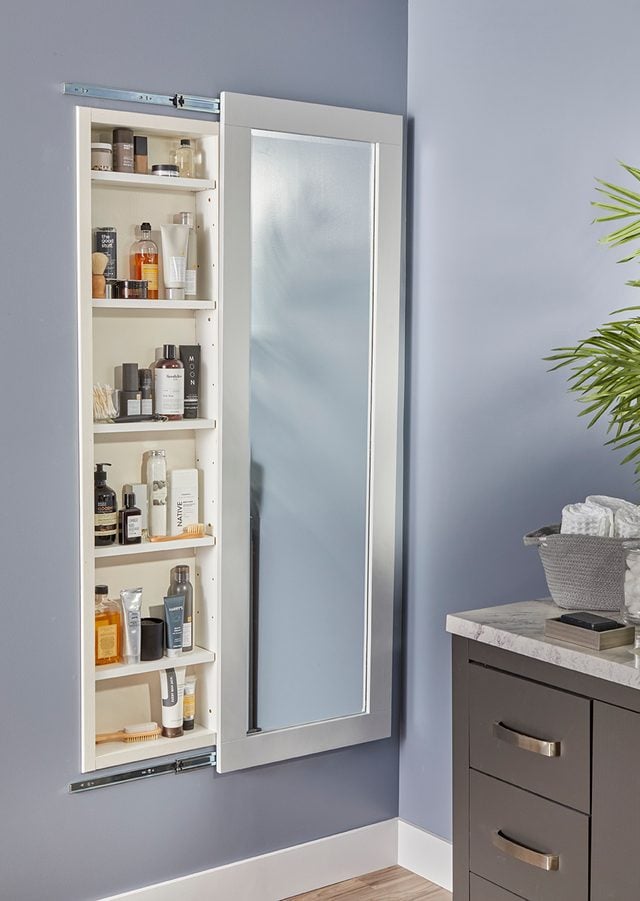
Got plans to hang a mirror or a large painting? Consider using the stud cavity behind it for handy, secret storage. I installed this mirror cabinet in the bathroom — like a giant medicine cabinet. The mirror glides on ball-bearing drawer slides to open and close the cabinet. When the mirror is in place, nobody knows the cabinet is even there!Tools Required
- dado set
- Drill/driver
- Finish nailer
- Miter saw
- rabbeting bit
- Router
- Table saw
Materials Required
- 1 qt. paint
- 1" finish nails
- 1/4" x 48" x 96" plywood
- 15' of 1/4" x 1-1/2" mullion
- 16" x 60" mirror
- 28 shelf supports
- 3/4" x 12" x 96" melamine shelf
- Clear silicone
- Eight #6 x 2" panhead screws
- Eight #8 x 1-1/2" wood screws
- Eight 3/4" panhead screws
- Glass safety film
- Two 18" full extension drawer slides
- Two 1x4x8' poplar boards
- Wood glue


Getting Started
Including the frame, my mirror was 21-1/4-in. wide, so I needed about 23 inches of open wall space to the left of the mirror for it to slide left. You can mount the drawer slides to go either direction.
I bought a frameless beveled mirror for $125. I could have purchased a framed mirror to save some work, but I decided to build my own frame. The mirror is heavy, so I wanted the frame to be solid lumber for strength. I also needed it to be thick enough for 3/4-in. screws to attach the drawer slides.
I chose 1×4 poplar boards. Poplar is easy to find, inexpensive and lightweight. It also has good screw-holding capability and takes paint well. For the cabinet, I used precut melamine shelving from the home center. Its front edge is already banded, so if you plan your cuts, you won’t need to edge-band your shelves.
Project step-by-step (15)
Peek Inside the Wall
- Check for obstructions in the wall cavity. Cut a slot big enough for your phone, and take one photo up and one down.
- If there are pipes or electrical cables in your way, you can choose a different stud cavity, size the cabinet so it doesn’t interfere, or reroute the pipes or wires.
- Note: If you pick a different location, you can easily patch the small slot.

Cut the Opening
- Starting from the slot, cut a hole large enough to reveal the exact stud locations.
- Draw the opening using a level and a framing square, and then cut on the line.

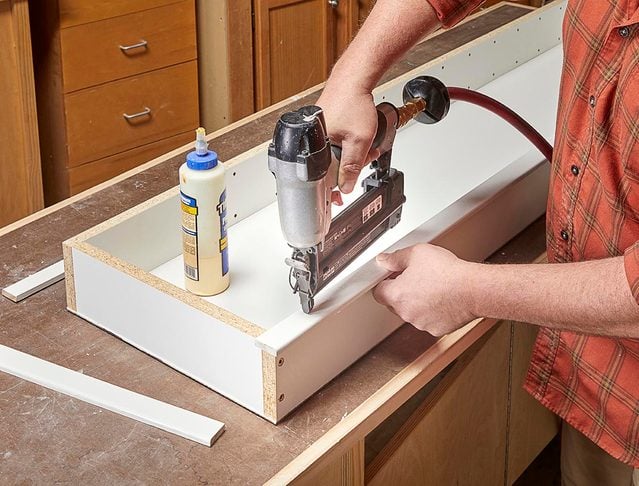
Build the Shelves
- Cut a strip for the shelves (D) from the front edge of the melamine.
- Next, cut the sides (A), top and bottom (B) from the remaining piece (see Figure D).
- Assemble the parts using 1-1/2-in. wood screws.
- Cut the back (C) and paint it white.
- Note: You may need to resize the cabinet slightly to fit your stud cavity.

Drill for Shelf Supports
- Make a jig to drill the holes by drilling evenly spaced holes in a length of hardwood.
- Hold the jig in place on the cabinet side and drill the first hole.
- Slip a drill bit of the same size into the hole you just drilled to keep the jig in place. When you get to the end of the jig, slip the drill bit into the last hole and continue.
- Pro Tip: Use a depth stop on the bit to ensure you won’t drill through the side.
- Nail on the back with one-inch finish nails.

Add the Trim
- Glue and nail on the trim (E and F) to cover the edges of the cabinet as well as any gap between the cabinet and the wall opening.
- Choose trim that’s 3/8-in. thick or less.
- Pro Tip: Because standard drawer slides are 1/2-in. thick and the wall may not be dead flat, thicker trim could keep the mirror from sliding.
Cut Half-Lap Joints
- Cut the frame parts (G and H) to length, then make half-lap joints at their ends.
- Pro Tip: I cut half-laps using a dado set on my table saw. I attach a long fence to the miter gauge, and then add a stop block to set the joint’s shoulder. Start with two scrap pieces, making passes in both until you get the right depth.

Chamfer the Joints
- Add a very slight chamfer to the shoulders of the joints on the side pieces, and on the entire inner edge of the top and bottom.
- Note: This creates a shallow “V” where the joints come together. The groove is optional but adds some visual interest. I like to use a block plane for this, but a sanding block works fine.

Assemble the Frame
- Glue the half-lap joints, then clamp them until the glue dries.
- Set the frame on blocks or sawhorses to provide room for the clamp heads.
- Note: Because of their ample gluing surface, these half-lap joints are super strong.

Rout the Mirror Recess
- Rout a 7/16-in.-wide recess the depth of your mirror’s thickness, using a rabbeting bit in your router.
- Pro Tip: Make the cut in two or three passes to avoid router tear-out.
- Sand the mirror frame up to 150 grit and then apply paint.

Attach the Slides
- Separate the two components of the drawer slides. Fasten the wide tracks to the frame.
- Pro Tip: If you mount the narrow tracks to the frame, the slides’ release levers won’t be accessible.
- Note: Placement of the slides isn’t critical; just center them side to side and be sure they’re above and below the cabinet’s trim.
- Pro Tip: If you mount the narrow tracks to the frame, the slides’ release levers won’t be accessible.

Install Blocking
- The drawer slides don’t carry weight the usual way, so they must be firmly attached to the wall. Instead of relying on drywall anchors, I installed blocking.
- Using the drawer slide placement on the frame to determine where the slides would attach to the wall, I cut 2x4s to fit between the studs and screwed them into place.
- Mark centerlines on the wall for the drawer slide locations.

Install the Cabinet
- Set the cabinet in the opening, plumb and level. Fasten it into place with three-inch wood screws through the sides, into the studs.

Hang the Frame
- Fasten the top narrow track on its centerline above the cabinet, centered side to side.
- Slip the other narrow track into its wide track at the bottom of the frame, making sure the narrow track is fully extended.
- Slide the frame onto the top narrow track.
- Plumb the frame, and then fasten the bottom narrow track to the wall.


Apply Safety Backer
- This mirror will be in motion regularly, so I applied transparent window safety film ($15 for an 18-in. x 8-ft. roll online) on the back.
- Pro Tip: In case of breakage, the glass shards won’t crash to the floor. Just peel the backing and press the film onto the back of the mirror.

Install the Mirror
- It’s easier to hang the frame by itself without the added weight, so I installed the mirror last.
- Apply a bead of silicone in the rabbet, and then carefully place the mirror in the silicone.
- Let the silicone set for a day and then trim off any excess with a razor blade before hanging the mirror.

Originally Published: September 01, 2020