
6 Tips for Painting Interior Woodwork
Updated: Apr. 18, 2024
Get a silky smooth finish on your woodwork.

Having trouble getting your paint to look smooth? Welcome to the club. Painting woodwork so it has a flawless, glossy sheen is challenging. In this article, we’ll show you some techniques and tricks that will produce top-notch results.
For great painted woodwork, good surface preparation and brushing technique are essential. We’ll show you how to accomplish both, plus what to add to the paint so it goes on smoother.
Many pros still rely solely on oil-based paints because they dry slowly and allow brush marks to flatten out. But you can achieve similar results with high quality latex paint.
Today’s formulations cover and brush out well. You won’t have the strong odor of oil that will drive you out of the house for days. And latex also offers the advantage of fast drying and easy soap and water cleanup.
Latex paint is available in a range of sheens from flat to high gloss. Because you want your wood trim to wear well, we recommend eggshell or semi-gloss. The downside to these shiny finishes? Every bump and scratch shows through. Remember: good prep is critical.
How To Prep Wood for Painting
A coat of paint won’t fill or hide cracks, chips and other surface defects in the wood, and it won’t smooth an existing rough surface. You have to fill and smooth the woodwork first.
Wash the woodwork with a TSP solution (or TSP substitute) to remove grease and grime. Mix according to the directions on the package and scrub with a sponge or rag. Be sure to rinse well with clear water to remove residues.
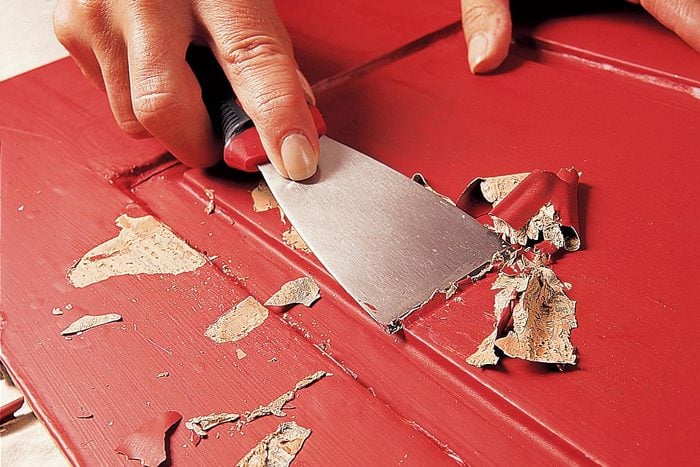
Scrape loose and cracked paint off the wood
Next, examine the surface for loose and cracked paint that needs scraping. Many scraper types are available, but a 2-in. stiff putty knife works well for small areas.
When you’re done scraping, you’re left with a rougher surface and a few more scratches and gouges than when you started. Don’t worry — you’ll fix these areas next.
Mix wood filler
For dents and chips deeper than about 1/8-in., we like to use a two-part polyester resin. One example is Minwax wood filler. It sticks well, doesn’t shrink and sands easily. It’s also the best material for rebuilding chipped corners. Auto body fillers also work well.
Scoop out a golf ball-sized amount onto a scrap piece of wood or cardboard. Add the correct amount of hardener (follow the directions) and mix thoroughly but quickly. The resin only has a five- to 10-minute working time.
Keep in mind stiff putty knives work better for scraping; flexible putty knives work better for filling.
CAUTION: Paint dust and chips from lead paint are hazardous. If your home was built before 1977, the year lead paint was banned, call your local public health department and ask about paint testing details and safe scraping, sanding and cleaning techniques.
Fill Scratches With Spackling Compound
Prep work requires patience, especially when you have to go back to an earlier step. What you decide is acceptable here is what you’ll get in the finish coat. But keep in mind the most critical eye will probably be yours.
For finer scratches and chips, use a spackling compound. Don’t use a lightweight compound; it doesn’t stick to painted wood as well. Brush marks in the old paint are particularly annoying and must be sanded out, not filled.
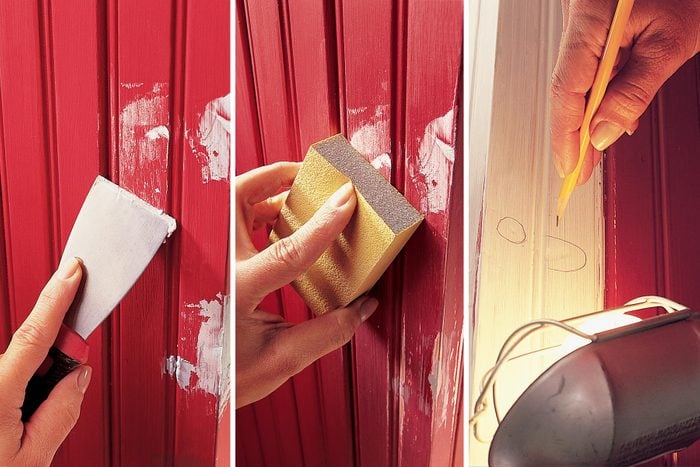
Work putty into scraps
Pick up a dab of putty with the knife and apply it to the gouges. Hold the putty knife at an angle and press and smooth the filler into the scraped area. Leave the filler slightly higher than the surrounding surface.
Use a sanding sponge to sand the filler
Sand the painted surface with 100- or 120-grit sandpaper or a medium sanding sponge. Make sure to eliminate all ridges. Then, finish-sand with 180-grit sandpaper or a fine sanding sponge. Spot-prime the filler and any bare wood with a latex primer. This step is worth the effort because it helps you see imperfections.
Mark imperfections in the wall
Check your work by holding a bright light (trouble light or flashlight) close to the woodwork. Every small bump and scratch will jump out. Circle the defects with a pencil, then go back to the filler and sanding steps. Spot-prime and finish-sand these reworked areas.
Finish up the prep work by lightly sanding all areas that haven’t been scraped and spot-primed. Use 180-grit paper or the fine sanding sponge. This will smooth out previous brush marks and scuff the surface to help the new coat of paint stick. Then wipe down the whole surface with a damp cloth to remove all the dust. This way, your wood surface is ready for a smooth paint job.
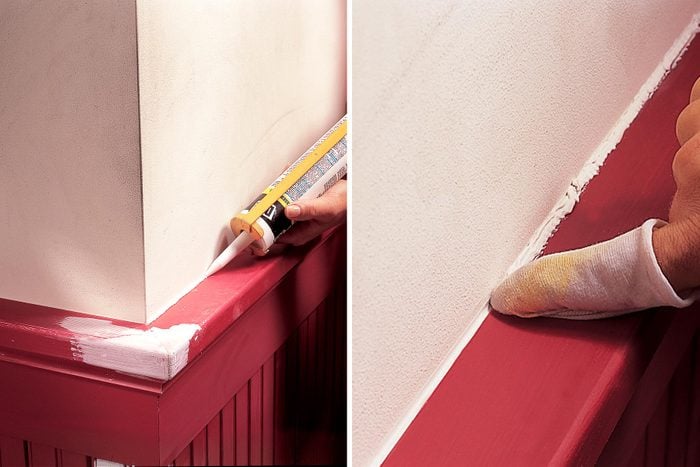
Caulk the Gaps
Now that the filling, sanding and priming are done, caulk any long cracks and gaps. Use an acrylic latex caulk; it adheres well, remains flexible and cleans up with water. Cut the caulk tube at the very tip to leave a tiny hole. You’ll have better control of the caulk.
Apply a bead of acrylic caulk that protrudes slightly, then wipe it with a damp cloth wrapped around your finger. Wipe excess caulk off the cloth so you don’t smear it on either side of the joint. You may have to wipe several times to produce a smooth, clean caulk line.
The Paint and the Brush
Don’t undermine all the time and effort you’ve put into the prep work by using cheap brushes and paint. Buy the best. With proper cleaning, a quality brush will last for years. In most cases, you’ll find the highest quality paint and tools (and good advice) at specialty paint stores.
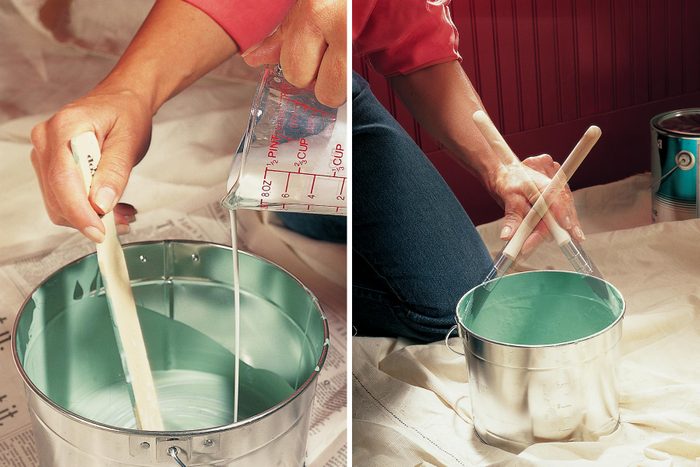
While we recommend latex, it does have one weakness: It dries quickly. The longer the paint remains wet, the better it flows and flattens, leaving a smooth surface. We recommend you use an additive that slows the drying process and helps the paint lie smooth. (Floetrol is one common choice.) Read the directions for the amount to add.
Mix in an additive
For best results from brushing, don’t dip directly from the can. Pour a quart of the paint into a four- or five-quart pail. This is your working paint that will move around with you. Add the measured amount of additive and mix well.
Tap the brush; don’t wipe it
From this pail, you can dip and tap your brush without splattering. Dip the brush bristles one to two inches into the paint to load the brush. Lightly tap the tip of the brush against the sides of the pail to shake off excess paint.
Choosing a brush
As with paint, buy quality when you shop for brushes. Our favorites for trim are a 2-1/2-in. straight brush and a 1-1/2-in. angle brush for detail work and cutting in. Whether to use a straight or an angled brush is an individual choice. For latex, buy a synthetic bristle brush with “exploded” tips.
A good brush draws a decent “load” of paint into the bristles and applies it smoothly onto the work surface.
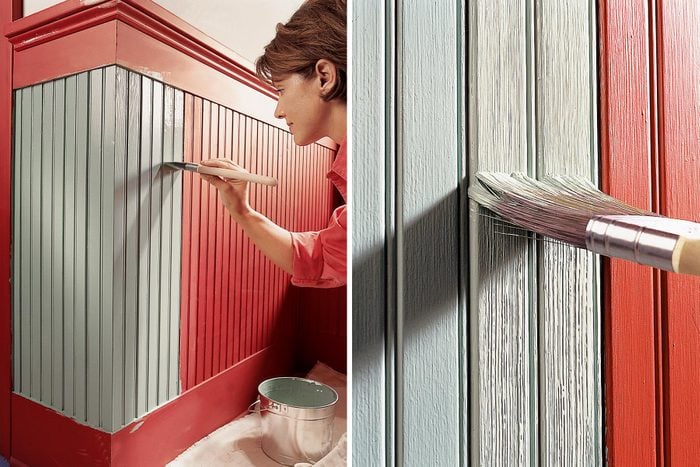
Painting Wood Brushing Technique
The sequence: Quickly coat an area with several brush loads of paint, and then blend and smooth it out by lightly running the unloaded brush tip over it (called “tipping”). Try to coat a whole board or section, but don’t let the paint sit more than a minute before tipping.
Painting wood from the top down
The more paint the brush carries, the faster you’ll coat the woodwork. But you want to avoid dripping. So after dipping, tap the tip of the brush against the pail, like the clapper of a bell. For a drier brush, try dragging one side over the edge of the pail.
Hold the brush at about a 45-degree angle, set the tip down where you want to start and pull it gently over the surface with a little downward pressure. Start at the top of the board with the loaded brush and stroke down toward the middle. When the brush begins to drag, stop and reload.
Hold the paint brush perpendicular to the wood boards
Tip the wet paint by lightly setting the tip of the brush against the wet paint at the top of the board and lightly stroking down the whole length of the board. Hold the brush almost perpendicular to the surface for this stroke.
Here’s where the good brush pays off. The paint will flow smoothly onto the wood surface with little effort on your part. A common mistake is forcing paint out of the brush after it becomes too dry. The goal is a uniform thickness, but not so thick as to run or sag. With practice, you’ll quickly find the ideal thickness.
If the new color doesn’t hide the old, it’s better to apply a second coat than to apply one thicker layer. Continue the next brush load from where the last stroke left off, or work backward, say from an inside corner back into the wet paint.
Don’t worry about the fine brush strokes
When “tipping,” avoid dabbing small areas; this leaves marks in the paint. Make long strokes. The brush will leave a slight track of parallel ridges, but they’ll lie down before the paint begins to skin over.
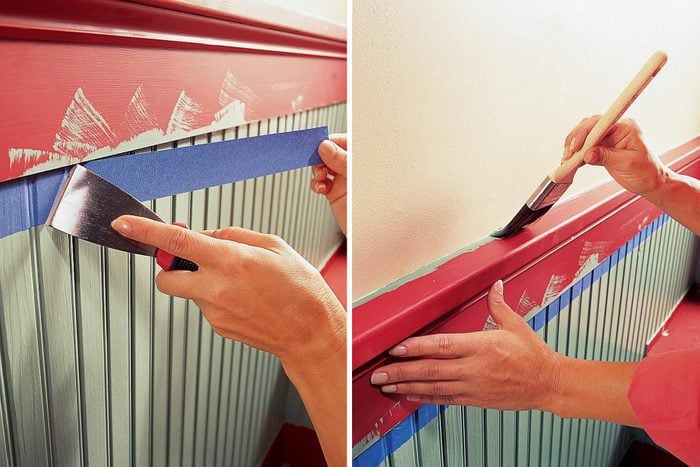
Masking Off and Cutting In
Often the wood boards you’re painting butt against a different paint color or a wall. There are a couple of techniques you can use to leave a sharp, crisp line.
Tape off finished areas
Masking off with tape is one method. Lay painter’s tape tight to the line where your new coat of paint will end. Push the tape tight against the surface with a stiff putty knife to prevent the wet paint from bleeding (running) underneath the tape. Brush the woodwork, letting the paint go partially onto the tape, then tip. Remove the tape when the paint is dry.
Cut in along the wall
The pros usually skip the masking tape and just cut in with a brush; it’s faster. With some practice and a steady hand, even an amateur can get really sharp lines. Learn with a smaller brush (1-1/2-in.) and go to a wider brush as you gain control. Dip the brush and scrape one side on the pail.
Hold the dry side of the brush toward the line and slowly draw the brush along. Support your arm to steady it, and keep the stroke moving. Use gentle downward pressure; you want the bristles to splay out slightly as you stroke. You’ll find you can control the paint line by varying the pressure you apply to the brush.
When the brush dries, reload and start where the previous stroke ended. Sometimes you’ll have to go back over a section where the paint is shy of the line. Complete cutting in and then coat the rest of the piece.
Whether one coat will suffice depends on the paint used and the color. If the first coat looks streaky or transparent, a second coat is necessary. Let the previous coat dry overnight, then lightly sand with 180- or 220-grit paper or a fine sanding sponge. Wash the dust off the surface with a damp cloth, let dry and brush on another coat.