How to Install an Egress Window

Updated: May 04, 2023
Adding a code compliant egress window makes a brighter, safer basement.
Multiple Days
Advanced
$5000
Introduction
One of the best investments you can make in your home is to add finished square footage, and for many homes, the basement is the best place to do that. But many people don’t know the new habitable space in your basement requires an egress window to provide an exit in case of an emergency. Installing one is a big job, but the larger window will flood your basement with natural light and make it code compliant.Tools Required
- 8-lb. maul
- Basic carpentry tools
- circular saw/miter saw
- Concrete saw
- Drill
- Hammer drill
- Hand Seamer
- Hand tamper
- Impact driver
- Mini excavator (rental)
- Oscillating multi-tool
- rakes
- shovels
- Table saw
Materials Required
- 1-1/4" roofing nails
- 1-1/4” concrete anchors
- 1" x 8' Z-flashing
- 12' 6" x 27' 6" geotextile fabric roll
- 2-1/2” concrete anchors
- 2-1/4" x 11/2" x 72" steel angle
- 2" x 4' x 8' 25-psi rigid insulation
- 2x10 x 8' lumber
- 2x12 x 8' lumber
- 2x4 x 8' pressure-treated lumber
- 2x6 x 8' cedar lumber
- 3” sidewall flashing
- 4" x 10' perforated drainpipe
- 48" x 25' fiberglass screen
- 5/4x6 x 8' cedar decking
- 6” timber/lag screws
- 6x6 Critical structure treated timbers
- 8” timber screws
- Clean 3/4" rock
- Composite deck screws
- Flexible flashing tape
- Seam tape
- Silicone

Before You Start
Adding an egress window is a big job, and it’s important to plan your project to meet the building requirements in your location. Here are the steps I took before starting to excavate:
Apply for a permit
This process could take a few weeks. My city required detailed plans of the well, the dimensions of the window and rough opening, the size of the header and a drawing of the property, including the house.
Engineered drawing
The retaining walls that made up our well were tall enough to require an engineer’s approval. I sent my plans to a local engineer who gave me a new drawing with a stamp of approval to include with my permit application. If you buy a manufactured well, this step is likely unnecessary, but your city’s building department makes the final call.
Call the digging hotline
When you’re digging, even just a few inches, call to have underground utilities located and marked.
Digging is dangerous if you don’t know where the utilities are. If you skip this step and hit a gas, water, or power line underground, you’ll risk the lives of yourself and others, and you’ll be on the hook for the costly repairs. So be sure to call 811 before your project. The process varies by state, so call a few days ahead of your project.
Requirements for Egress Windows
Here are the minimum requirements identified by the building code:
- The opening needs to be 5.7 square feet.
- The minimum width is 20 inches.
- The minimum height is 24 inches.
- The well needs to provide a clear space of 3-ft. x 3-ft. when the window is open.
- From the inside, the sill height cannot exceed 44 inches
Project step-by-step (26)
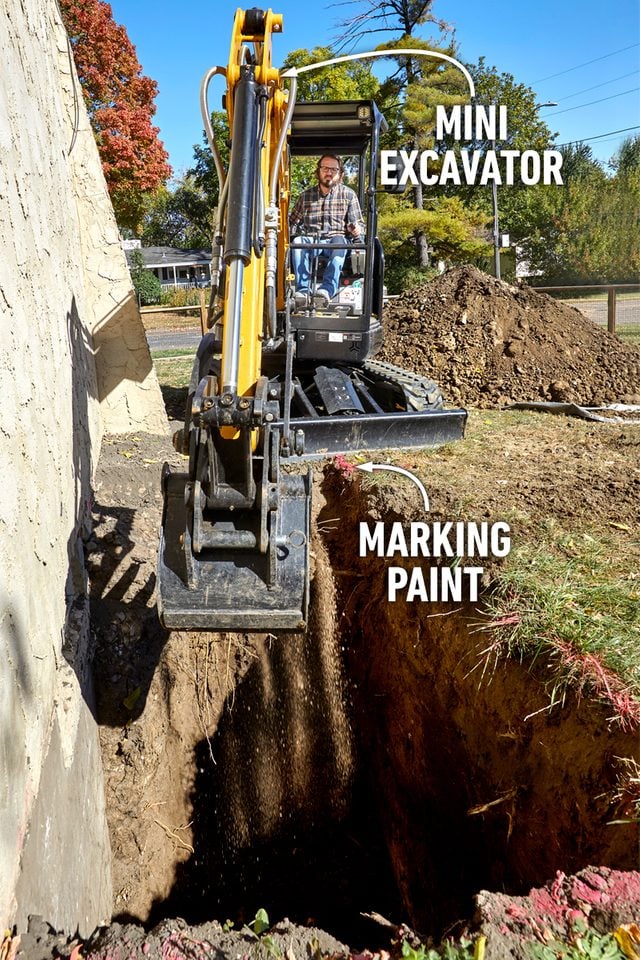
Dig the Window Well
Following my plans, I drew the window well location with marking paint. I rented a mini excavator to make the digging much easier. It was well worth the $450 to avoid hand digging.
Have a plan for the dirt you’re removing; it will be more than you anticipate. We took the nearly 10 cubic yards of dirt to a nearby compost site.
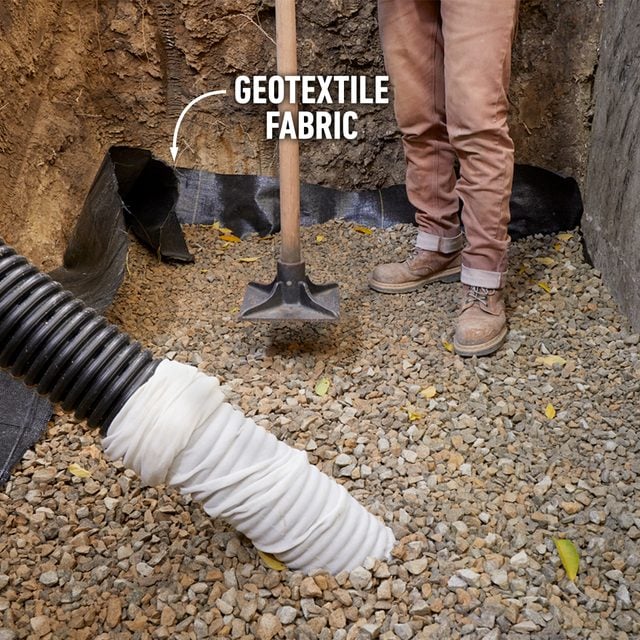
Add a Drain
Once the well was dug and free of loose dirt, I dug a trench underneath the house and fed a drainpipe to meet the drain tile system. The city required this to prevent water from pooling and then freezing against the house, potentially damaging the foundation.
The drain provides a path for water that collects in the window well to reach the sump pump. Once the drainpipe is in place, fill the well with clean rock.

Level the Base
Use any remaining loose dirt to create a slope toward the drain. Then cover the bottom surface with geotextile fabric and a two-inch layer of clean rock, leveled and tamped. The fabric keeps the rock from settling into the dirt and causing the entire base to shift.
Pro tip: The rock isn’t “gravel” or “class V.” When I call to order it, I ask for “3/4-in. clean rock.” It’s an angular rock free of silt that could clog the drain. It compacts well, creating a solid base for the retaining wall and a drainage field.
Insulate the Footing
My window is 55 inches tall. To make room for the installation, we dug down closer to the footing than I’d normally like to.
Because we live in an area with freeze/thaw cycles, the footing needed frost protection. My solution: Add two layers of two-inch rigid insulation rated to 25 pounds per square inch (psi). That rating ensures the rock won’t crush the insulation. I cut out a hole to feed the drain through, and positioned the insulation in the bottom of the well.

Add Rock for the Timber Wall Base
I covered the insulation with another layer of fabric, then added eight inches of clean rock on top. The extra layer of fabric will keep the sharp rock from puncturing the insulation. Make sure the rock is level and compact it with a hand tamper.

Line the Well
Before laying the timbers, I lined the well with geotextile fabric. I unrolled the fabric along the dirt walls and folded it over the edges of the hole. The fabric will keep dirt from entering and clogging the drainage space behind the timbers.

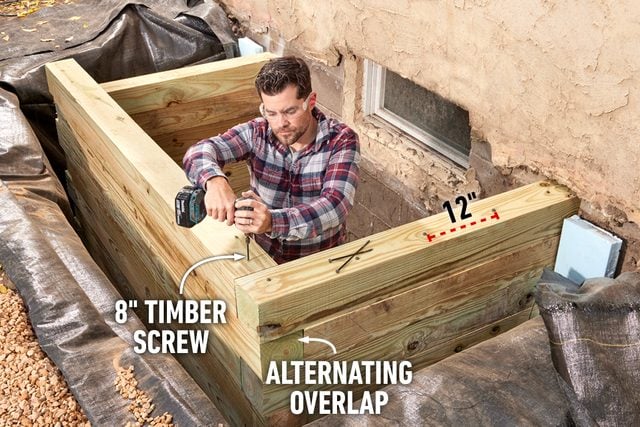
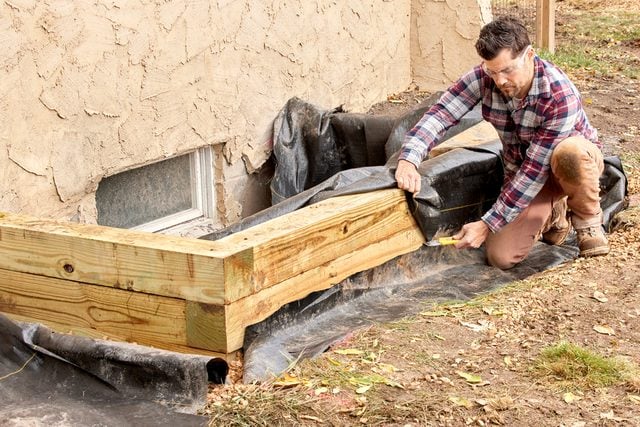
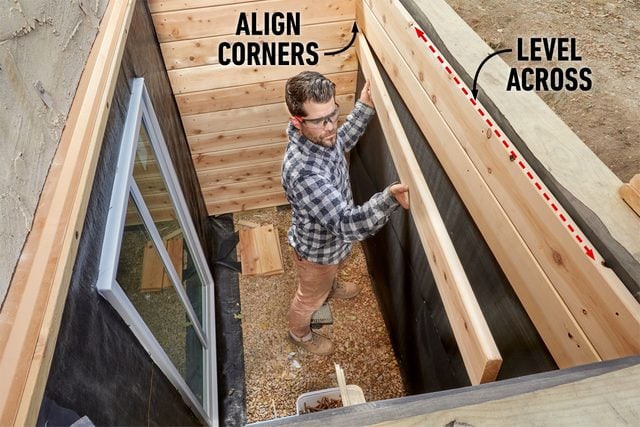
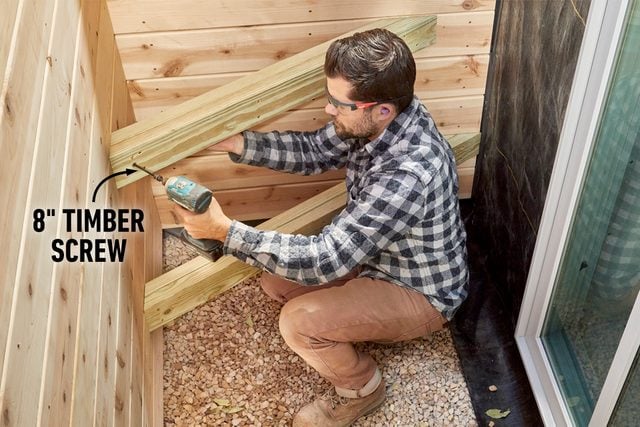
Build the Retaining Wall
After you’ve established a level base of clean rock, start building the retaining wall. The first course of timbers must be level along the length and width of the well. You might have to tamp and move rocks to position this first course. Each consecutive course will be placed by alternating the overlapped corners.
As the timbers are stacked, check to be sure they’re plumb or leaning out slightly. Fasten each course to the previous one with an eight-inch coated timber screw every foot.
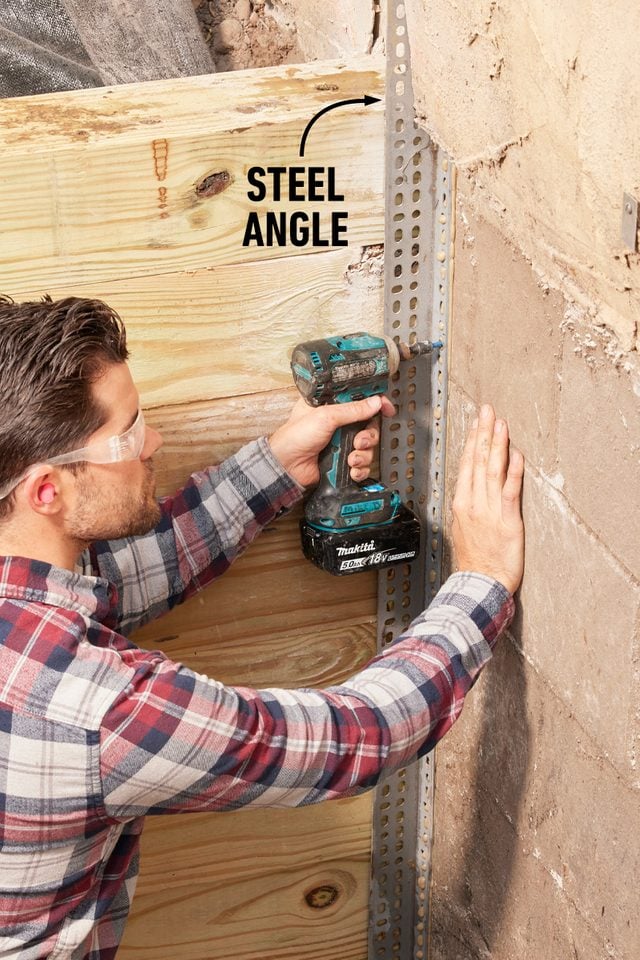
Brace the End Walls
To keep the ends of the retaining wall from falling in during backfilling, I added a length of steel angle against the foundation, on the inside of the well. I drilled pilot holes with a hammer drill and fastened the angle to the block wall with construction adhesive and 1-1/4-inch concrete screws. The retaining wall needs to shift a bit, so don’t fasten it to the steel angle.
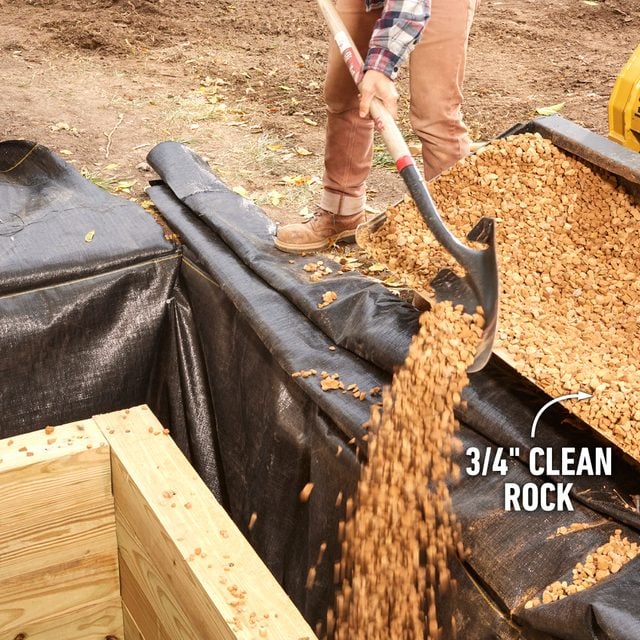
Backfill the Well
Fill the space outside the well with clean rock. The rock lets water drain away from the wall and gives it space to dry, adding longevity to the treated lumber. Leave about four inches of grade at the top to be filled with topsoil.
Cover the Backfill
Fold the rest of the fabric over the rock and tack it to the retaining wall. Then cover the fabric with topsoil, maintaining a slight slope away from the well. The fabric prevents dirt and silt from clogging the drainage space.
Install a Header
Before cutting the hole in the wall, I needed to reinforce the rim joist with a header to span the new opening. I used the header span tables in the International Residential Building Code to determine how many 2x10s I needed to add to support the larger opening.
Using construction adhesive and lag bolts, I fastened two 2x10s, one at a time, to the existing rim joist. Each ply of the new header is eight inches longer than the opening to ensure there’s enough bearing on each side of the opening.

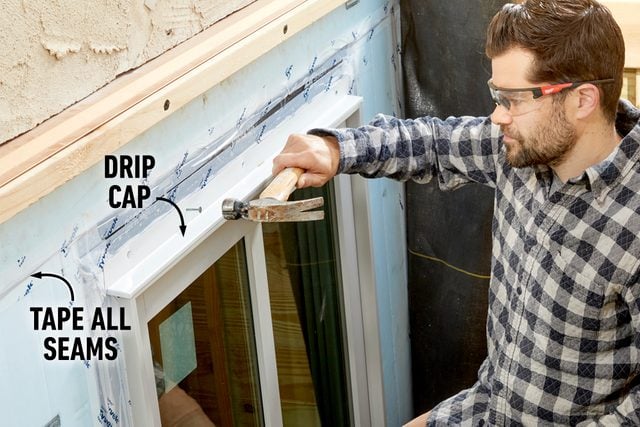
Remodeling Challenges and Solutions: Adding a Drip Ledge
I ran into a challenge where our new well transitions to the stucco siding. My solution was to add a drip ledge above the well. This creates an eave over the window, allowing the water to shed in front of the window instead of onto it. It also makes a smooth transition from the existing stucco to the thicker insulation and cladding I’ll add in the following steps.
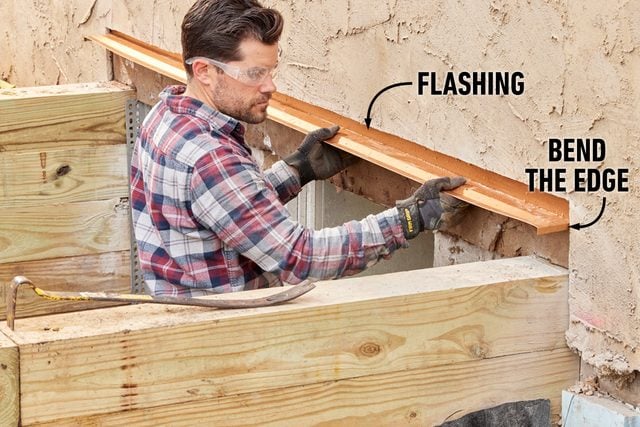
Add Flashing
The flashing behind the existing siding and water-resistant barrier is vital. To fit the flashing behind the stucco and felt paper, I lightly pried the layers from the house and cut any nails in the way with an oscillating multi-tool. Once I tucked the flashing behind the stucco, I pressed down on it to slope it away from the house.
Fasten the Ledge
I ripped a cedar 2×6 to about four inches wide and gave it an eight-degree bevel. Then I drilled evenly spaced pilot holes on its edge. I fastened the ledge to the rim joist with six-inch timber screws.

Cut the Window Opening
With the well structure built and the drip ledge and header installed, we were ready to cut the new opening.
I measured my window and added 4-1/4-in. to the total height and width to determine the rough opening size. I transferred those measurements to the block wall. Then, donning a rain poncho, ear and eye protection and a respirator, we carefully cut the block. To keep the chain or blade from binding, we cut the bottom first, then the sides.

Concrete Saw Choices
Circular concrete saw
Typically, you cut a window opening with a circular concrete saw, a large gas-powered tool with a diamond blade and a hose connection. These saws need a constant flow of water to keep the blade cool, and require you to make cuts on both sides of the wall. But making the cut on the inside fills the house with gas fumes and floods the floor.
Concrete chainsaw
We used a concrete chainsaw instead. The chainsaw made a clean cut all the way through the 12-inch block from the outside, keeping fumes and puddles out of the house.

Install the Window Bucks
Once I removed the cut blocks, I filled the hollow cores of the remaining wall with concrete and fit window bucks around the opening.
I cut 2×12 pressure-treated wood bucks to fit the width of the opening and fastened the top buck to the bottom of the sill plate with screws. Then I leveled the bottom buck with shims, gave it a slight pitch outside and fastened it to the core-filled blocks with concrete anchors.
Note: As you’ll see, I set the bucks proud of the block wall by two inches to line up with a layer of rigid insulation that will be added to the outside of the wall.

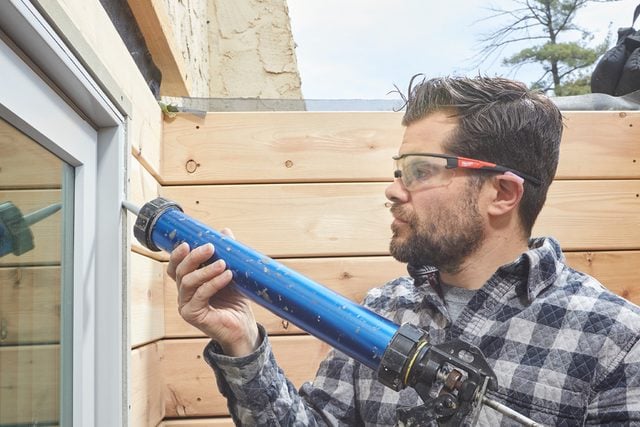
Flash the Opening
I used six-inch wide flexible flashing tape to create a window pan. I started by covering the front of the sill, wrapping the tape up the sides about six inches. Then I carefully stretched the tape around the corners and the front of the bucks.
Next, I applied the tape to each side, overlapping the tape on the sill. Finally, I covered the top of the bucks. I made sure to adhere the tape up the block wall, sealing any entry points where water could get inside the framing.
Note: On a normal window, the flashing tape folds around the buck and adheres flat to the block. That seals the gap between the block and the buck. In this application, you seal the gap with caulk and protect the wood with flashing tape.

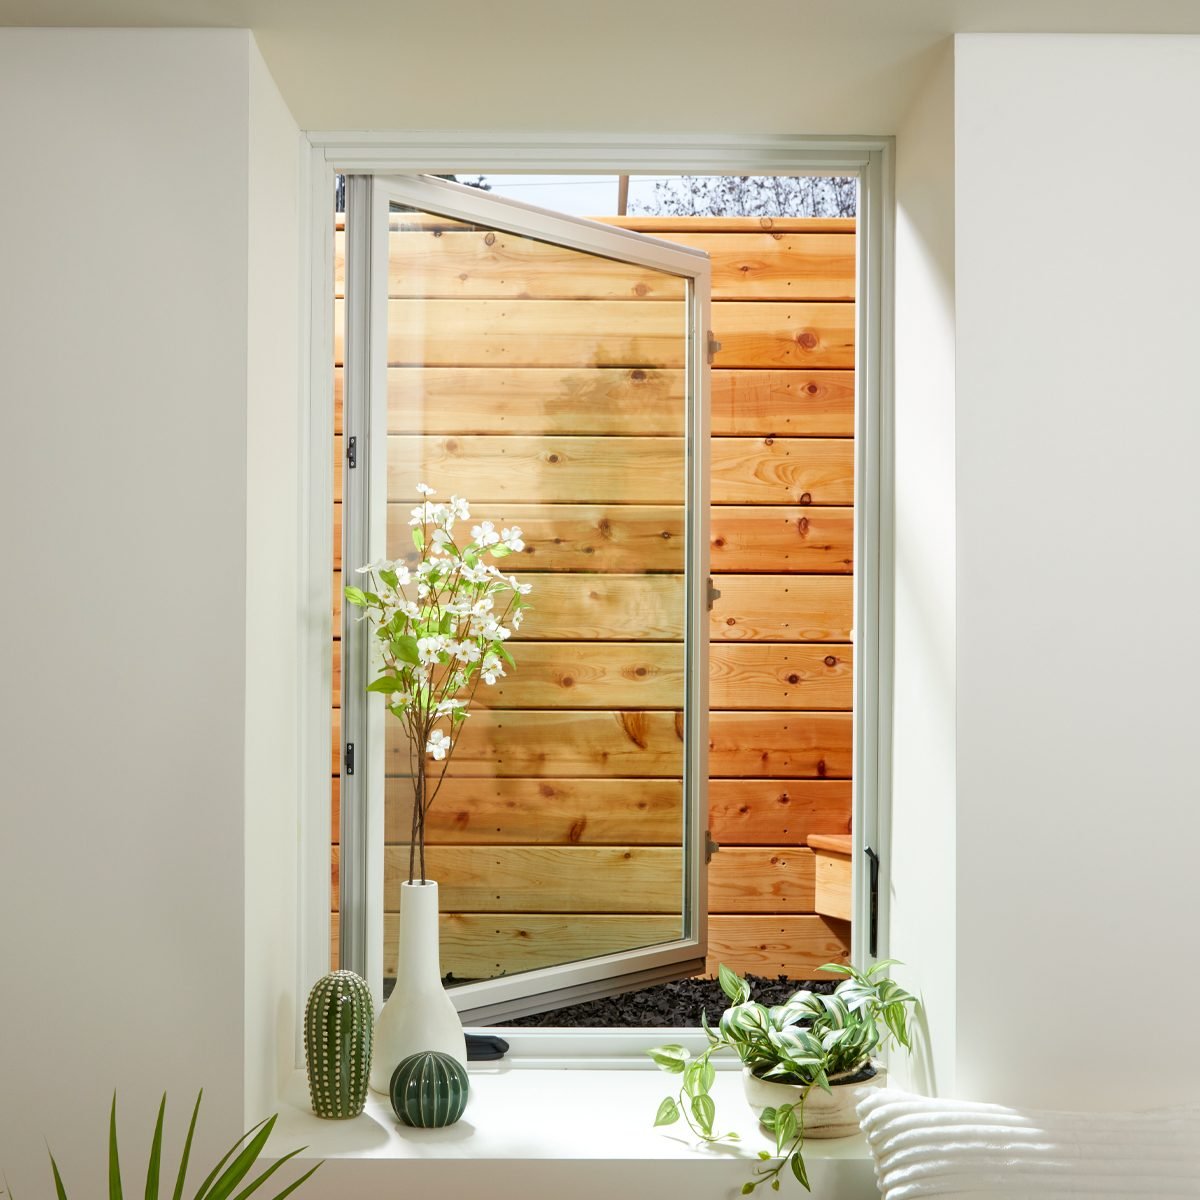
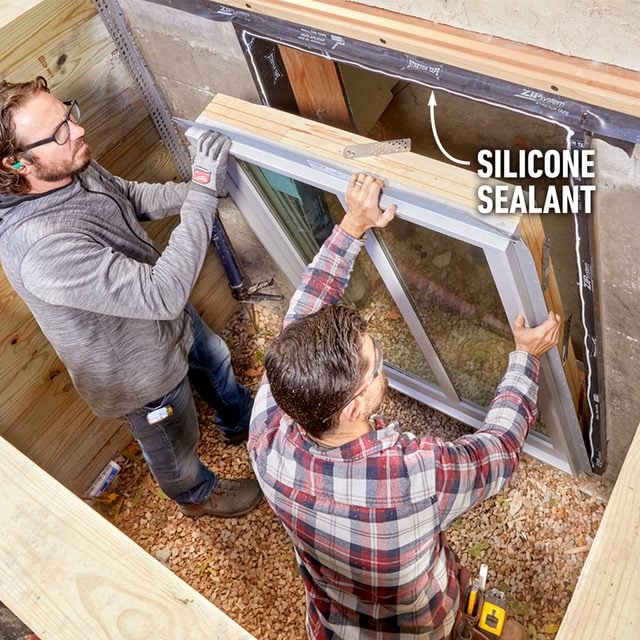
Egress Window Installation
Installing an egress window is no different than any other window. Before placing the window in the opening, apply a continuous bead of silicone along the sides and top of the window bucks as close to the inside edges as you can get. Don’t seal the bottom.
Then, with a helper, set the bottom of the window in the opening and carefully tip the window in until the nailing flange meets the window bucks.
Pro tip: I purchased this window at a builders’ reuse center for a little more than $200. I didn’t mind that it didn’t match the rest of the windows, but I didn’t like the center piece of trim. I removed the trim after the window was installed.
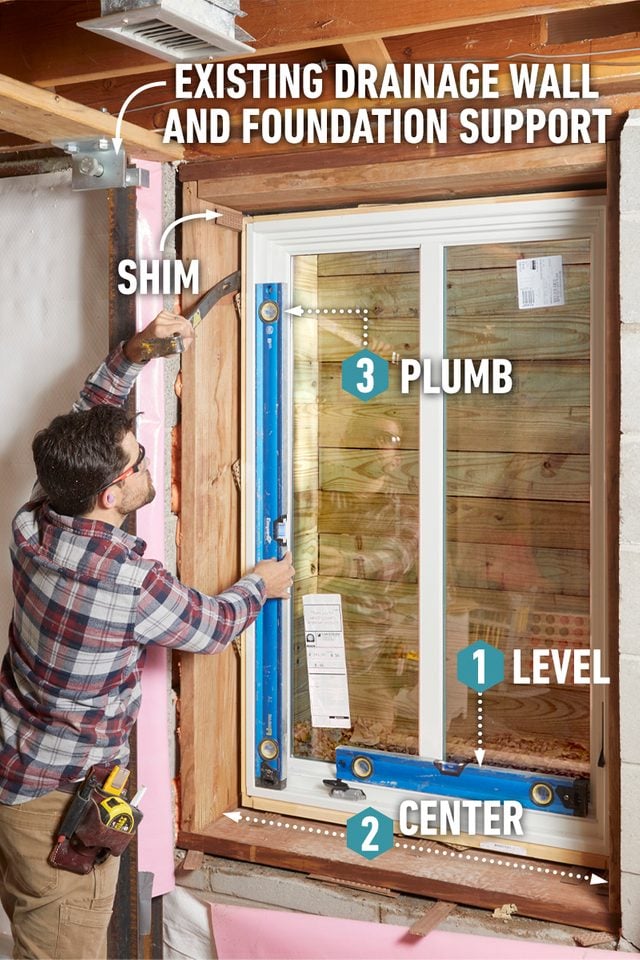
Level and Plumb the Window
With your helper outside holding the window, head inside to position it.
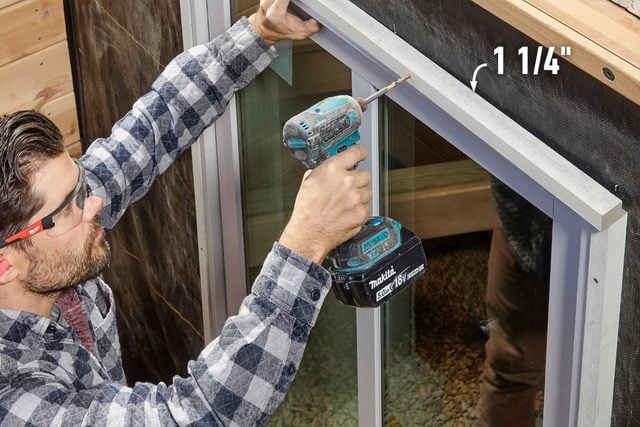
First, raise the window a 1/2-inch off the sill and level it with a few shims. Then center the window and have your helper drive one roofing nail in each bottom corner of the window’s nailing flange. Next, place a level against the hinge side and adjust it plumb. Use a few shims to keep it in place and check the other side.
Check the window to make sure it’s level and plumb, and also check that the measurements from opposite corners are equidistant. Then drive a nail in each top corner of the nailing flange. Before nailing the rest of the window, place the level back on the sides. If there are gaps between the frame and the level, use shims to straighten the frame, then have your helper nail the sides and the top of the window’s flange.
Insulate the Wall
Believe it or not, the soil we removed from against the house insulated the basement, so we need to replace it with a two-inch layer of rigid insulation.
I ripped a pressure-treated cleat to match the depth of the insulation and fastened it with concrete screws a few inches from the retaining wall. Then I pressed the insulation between the cleat and the wood bucks. I pressure-fit insulation all the way around the window and sealed all the seams with sheathing tape.
Pro tip: I covered the blue rigid insulation with leftover landscape fabric to keep it from showing through the cladding.

Add a Drip Cap
I cut a piece of one-inch Z-flashing to 1/2-inch wider than the window. Then I used a hand seamer to fold the ends down to cover the sides of the window. After nailing on the drip cap, I covered the flange with flashing tape to keep out water.
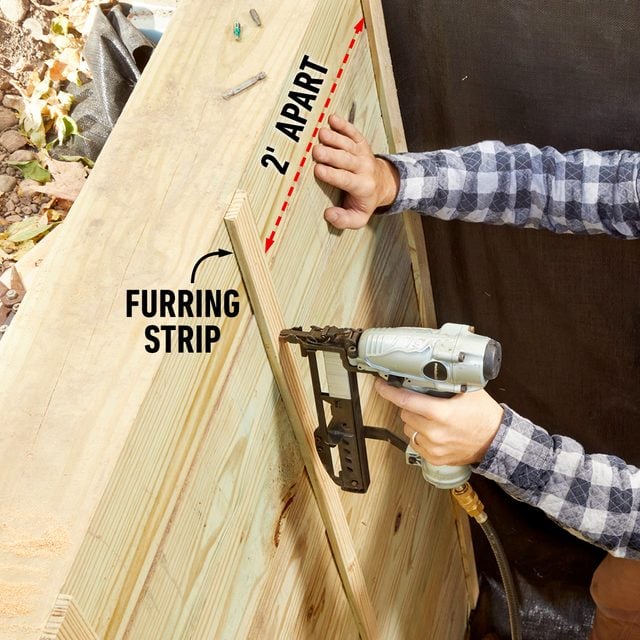
Add Furring Strips
Before dressing up the inside of the well with cedar, I ripped a pressure- treated 2×4 into 1/4-inch thick strips and fastened them inside the well every two feet. This will allow water to drain away to keep the cedar cladding and the timbers free of rot.
Install Pest Screen
To prevent pests from finding a home behind the cedar cladding, I lined the inside of the well with a roll of fiberglass screen mesh. I made sure the mesh was taut and stapled it to each furring strip.

Clad the Well Walls
I used cedar deck boards to clad the inside of the well.
After cutting each piece to length, I fastened the boards to the timber wall with composite deck screws through each furring strip. I made sure each board was level so each course would line up at the corners.
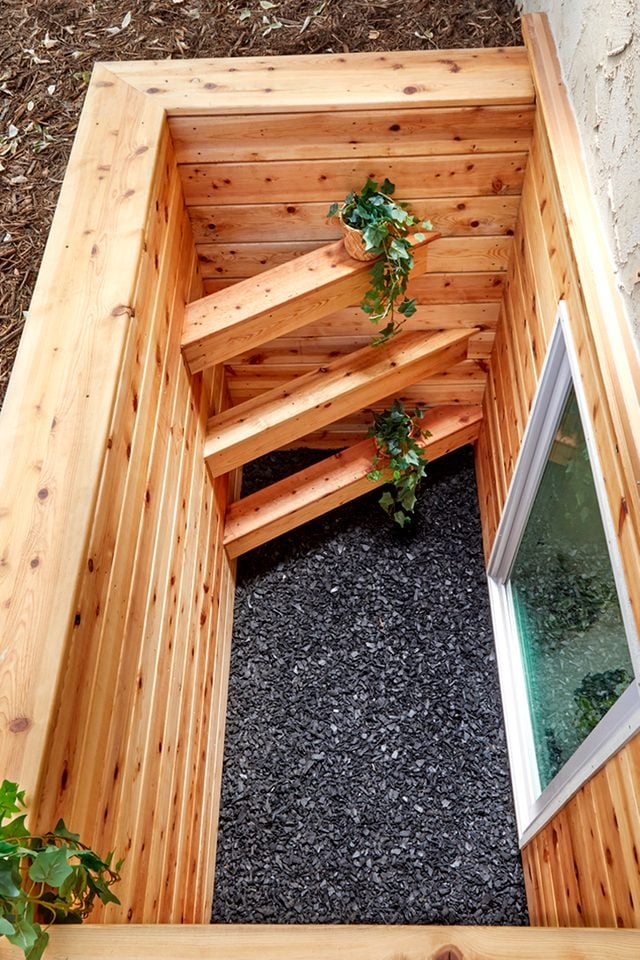
Build the Stairs to Code
I glued and screwed two 2x4s together, then cut one end at 60 degrees and the other at 30 degrees. Starting with the bottom stair, I fitted each one into the corner, shortening each step as I worked my way up the wall.
This city requires each step to be at least 12 inches wide and three inches away from the wall, with no more than 18 inches of rise between them. I added deck boards to the top and face of the stairs to match the rest of the well.
Trim the Window
I used Boral TruExterior boards to trim the window. I ripped them to 1-1/4-inch wide and fastened them on edge with composite decking screws.
Seal the Window
Caulk the trim to the window at the sides and bottom. I used a door-and- window sealant that remains flexible after curing. The caulk prevents water from being trapped between the window and the trim.
I capped the top of the retaining wall with cedar decking and finished the well with a few coats of tung oil.