
How to Build a Water Garden With Waterfall
Updated: Sep. 03, 2023Put a little piece of paradise right in your own backyard. We'll show you how to build a pond waterfall with rocks here.
- Time
- Complexity
- Cost
- Multiple Days
- Beginner
- $501-1000
Overview
There’s something soothing about the scent, sound and sight of water, something that washes away stress and strain. While you can’t stop by the French Riviera or Walden Pond after a hectic day of work, you can have a private oasis waiting for you at home, complete with gurgling water and colorful fish.
In this story, we’ll walk you through the basic steps for building one of our favorite water garden ideas, a backyard pond. Roll up your sleeves—it’s mostly muscle work. There’s no need for precise measurements, no unforgiving blueprint to follow, and no deadlines. Working like beavers, you and anyone else with a strong back could probably finish a large pond in a couple of weekends. But that would take the fun out of it. Give yourself plenty of time and creating a pond will be almost as relaxing as sitting beside it.
The basic pond consists of a good-quality liner, a high-efficiency pump, and lots of stone and gravel. For a little bit more money you can add the convenience of a filtration system, which will reduce your weekly maintenance chores. Larger ponds won’t cost a whole lot more; you’ve already made most of your investment in pumps and filters. We’ll show you how to build a pond waterfall with rocks here:
With water garden ideas, careful planning prevents trouble later on
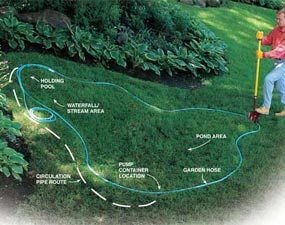
Photo 1: Lay out the pond with a hose
Use a garden hose to establish approximate pond borders, adjusting and readjusting until you’re satisfied with the shape of the pond. Then dig out the pond bed, terracing both shallow and deeper areas for plants. Exposed rocks, tree roots and anything else that might puncture the liner must be removed from the hole.

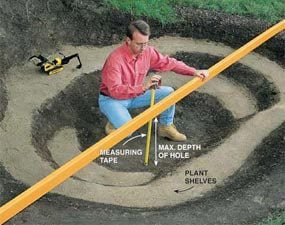
Digging out a pond hole is grunt work, not an intellectual endeavor. Still, it requires some planning. Before you grab your shovel, roughly map out the shape, desired plant shelves (Photo 2), and the pump and waterfall locations. Here are some more key considerations:
- Select a location where you can readily enjoy your pond, close to a patio or visible from a window. Don’t stick your pond in the back corner of your yard where only the squirrels will enjoy it.
- You can locate your pond in most any area of your yard as long as it doesn’t receive runoff from rainfall. You don’t want lawn and garden chemicals washing into your pond. As a rule, the more sun the better, but don’t discount a shadier spot. Just stay away from the area inside the canopy of your trees, the “drip line. ” If you locate your pond near trees, be prepared to clean leaves from the pond more often. Most water plants prefer sun, but some can survive in shade. Choose hardier plants and fertilize more often if you select a shaded site.
- A toddler can drown in the smallest pond, so some building codes require fences around ponds 18 in. deep and deeper. Call your local Department of Inspections, explain that you’re building a water garden (not a swimming pool) and ask what rules apply. But if you have young kids, consider installing a fence around it anyway. Be sure to choose a fence that cannot be climbed.
- Caution: Before you dig, call your utility company or 811 and ask to have someone come out and mark your property for buried utilities. Utility companies usually won’t mark “private” lines, that is, lines added for convenience, such as a power line from a house to the garage or a gas line to an outdoor grill. Turn off the power or gas to these areas if you suspect a line is in the vicinity of your digging.
- Oversize your pond if possible. Once you stock it with fish and plants, you’ll be surprised how much smaller it’ll look. Besides, a large pond is often easier to take care of than a small one. (Controlling algae is often easier with a large pond.) The additional expense is minimal. A 10 x 16-ft. size is a good starting point.
- Water circulation is important, so position the pump as far as possible from the water inlet (waterfall, stream or fountain).
- Digging even a small pond is a big job. Plan plenty of breaks or enlist the neighborhood teenagers to help you out for a day.
- To power the pump, you’ll need an outdoor electrical outlet (Fig. A). Have a licensed electrician install a GFCI-protected outlet if you’re not comfortable with wiring.
How to build a pond waterfall with rocks: Pond-building tips
- Use the excavated dirt to berm up around your pond or build up your waterfall area. It will save you the hassle of having it hauled away or running it around your yard in a wheelbarrow.
- Before you start digging, lay on the ground the water circulation pipe that goes from the pump to the waterfall. Throw the excavated soil on top of it. This will save you the work of digging a trench to bury the pipe.
- Use a tablet-style fertilizer pressed into the soil around your nearby landscape plantings so the nutrients don’t leach into the water.
Choose a flexible liner
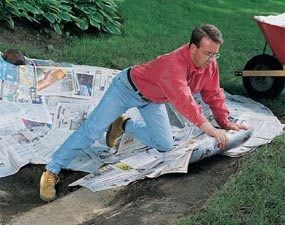
Photo 4: Line the hole
Line the pond bed with a 1/2-in. layer of newspapers. The newspaper helps prevent liner punctures and will eventually decompose and form a clay-like layer. You can also use the special pond underlayment that’s available at your pond supply dealer.
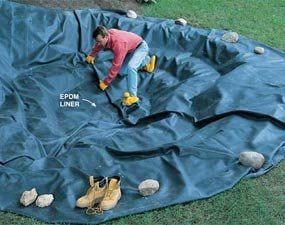
Photo 5: Spread the rubber liner
Lay in the liner so it loosely conforms to the contours of the hole. Don’t worry about folds and ripples; they’ll flatten out when you add water. Put rocks on one side to hold the liner in place while you adjust the other. Any excess material can be trimmed off with scissors or a utility knife after the pond is full of water and encircled with rocks.
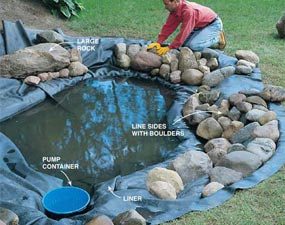
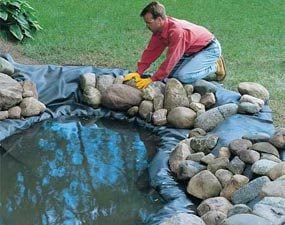
Photo 6: Place the rocks and the pump
Line the pond sides with boulders and set in the pump container. Wash down the rocks after they’re in place and then empty the pond with your pump. For large rocks, lay a scrap piece of liner slightly smaller than the rock on top of the pond liner before positioning the rock. This helps prevent punctures.
We’re using a flexible liner made of a synthetic rubber called EPDM (ethylene propylene diene monomer). The liner is economical, durable and easy to install. You can create almost any shape and it adapts well to most site conditions.
Flexible plastic liners are also available. They’re made of PVC (polyvinyl chloride) and HDPE (high-density polyethylenes). These liners aren’t as flexible as rubber liners. Plastic liners are often used on large holding ponds when economy is a concern and flexibility is not. The preformed liners found at many home and garden centers are less desirable. These are essentially large plastic or fiberglass tubs. At first glance, these seem easier to install, but this usually isn’t the case. Preformed liners can be difficult to handle and level and, when lined with rocks and boulders, aren’t as forgiving as flexible ones.
Guidelines for purchasing a liner
- Most professionals use a 45-mil EPDM liner. (A mil is a thousandth of an inch.) It’s strong, yet flexible enough to handle easily (Photo 5).
- If you plan to have fish, make sure your liner is stamped “fish-safe. ” Roofers often use a type of EPDM that’s been treated with chemicals that can harm fish.
- Purchase your liner in one single sheet, large enough to cover the entire pond bottom and sides. Liners are commonly cut and sold from 100-ft. rolls with 10- to 20-ft. widths; you can custom-order liners up to 45 ft. wide. Liners can be spliced if necessary, but it involves more work and provides an opportunity for a leak. If your waterfall or stream requires extra length, use a separate piece of liner. You don’t need to glue the two liners together as long as the stream or waterfall liner is higher than the water level of the pond.
- Calculate the dimensions of the liner by measuring the maximum length and the maximum width of your pond, then add three times the depth measurement to each dimension. Better a bit big than a bit small.
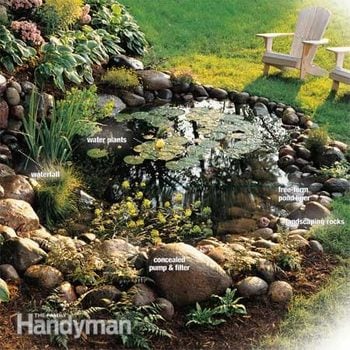
Figure A: Pond Features
This basic pond layout, with sloping, stair-stepped sides and a pump and waterfall at opposite ends, can be adapted to larger or smaller ponds.
Make your pond hospitable to plants and fish
A pond is just a hole filled with water. Add plants and it becomes a water garden. Add fish and your pond comes alive. You’ve got an entire aquatic ecosystem right in your back yard. Here are a few things to keep in mind when planning for plants and fish.
- Before adding plants or fish to your newly filled pond, wait a week for the chemicals in the tap water to neutralize. To accelerate the process, you can add a dechlorinator to the water. Consult your water garden supplier for more info on this chemical.
- Anchor plants in pots or baskets designed for aquatic plants. A third option is to place the roots of each plant in “root balls, ” a mix of gravel and soil in nylon stockings tied with soldering wire (Fig. A). Root balls are cheaper than pots or baskets and are easier to move. They also keep fish from disturbing the soil. Mistake: Don’t use standard potting soil in your pond. The high nutrient content encourages algae growth. Ordinary garden soil is just fine.
- If you plan to stock your pond with fish, part of it must be at least 18 in. deep.
- If you plan to leave your fish in year-round, keep a spot open in the pond by running an aerator or fountain all winter. If your climate is so cold that the pond still freezes, purchase a floating heater. Keeping your pond open provides needed oxygen for the fish and allows gases to escape.
- For convenience, leave hardy water plants in all winter. Bring tropicals or water plants from warmer plant zones inside for the winter.
- Fish, like teenagers, need their space. One inch of fish for every square foot of pond surface is a good rule of thumb. For example, a 4-in. fish needs 4 sq. ft. of pond surface.
- Hardy fish—goldfish for example— don’t require much attention. You don’t even need to feed them once they’re established, as long as your pond isn’t overstocked. Hardy ones can survive by eating insects and the plant life in your pond. They actually help keep your pond clean. If you plan to stock your pond with more exotic species, you’ll have to do more to ensure their survival. Look in a library or bookstore for books about tropical fish, home aquariums and fish ponds.
Keep your pond healthy—make water fall
It’s important for water to circulate and aerate throughout the pond. Buying an inexpensive fountain head and connecting it to the end of the water circulation pipe is the easiest way to accomplish this.
The most dramatic way to circulate and aerate water in your pond is to construct a waterfall and stream. Install a stream bed liner the same way as for your pond. Begin by digging a holding pool. The pool keeps water from spraying out of the circulation pipe and allows it to spill lazily into the pond. Next, dig the course for the water to flow in. Two feet wide is a good dimension. Lay the liner in place, overlapping the pond liner by at least 6 in.
Creating an attractive water flow will take some trial-and- error adjustments of the rocks. But this is the fun part. Don’t mortar your rocks in place. The mortar looks unnatural and makes it difficult to move rocks around to get the desired effect.
To control water’s frustrating tendency to flow invisibly under or between rocks instead of pleasantly over them, fill hidden passages with expanding foam sealant. It’s available at hardware stores. Pond suppliers also sell a special black-colored expanding foam that becomes almost invisible.
Choosing a 24-hour-per-day pump
Buy a pump that’ll turn over the pond’s entire volume once per hour. To size your pump, calculate the approximate volume in your pond: Multiply the length (ft.) x the width (ft.) x the average depth (ft.) and multiply by the conversion factor of 7.48. Also note the height and distance the pump needs to move the water between the pump and the water inlet. With these figures in hand, consult your pump supplier for the pump size and circulation pipe diameter for your pond.
Once you’ve determined the pump size, decide whether to buy a high- or low-efficiency pump. High-efficiency pumps cost more but last longer and are less expensive to run. Since your pond pump will run 24 hours a day, seven days a week, the lower utility bills will soon make up for the higher price tag.
Place your pump in a pump container to keep it from clogging with leaves or debris. Either buy one from your pond dealer, install the pump in a skimmer container, or make one from a sturdy garbage can peppered with 1/4-in. holes (Photo 6). Don’t be shy about drilling holes. The more water you allow through the can, the better.
Simplify Maintenance with a Skimmer and Filter
Keeping your pond clean isn’t difficult; once you get it down it’ll be as routine as taking a bath. Your pond has two sources of pollution: debris that falls or blows into the water and algae. Pick up leaves and other windblown debris with a fine-mesh net. The type used for skimming swimming pools works great. Skim daily to prevent the material from sinking to the bottom, decomposing and creating sludge.
An easier but more expensive way to clean out this debris is with an automatic skimmer system, kind of a dishwasher for your pond. Once you have one, you can’t imagine pond life without it. A skimmer system works off the inflow of your pump. Water is drawn through a tub containing a mesh bag that collects leaves, paper and other debris. The system bags it for you—all you have to do is empty the bag about once a week. The frequency will depend on the time of year, the amount of wind and the number of trees in your area. It’s easiest to install a skimmer system w h e n y o u build your pond. If you decide to add it later, you’ll have to drain your pond, dig a hole and readjust the liner.
The second threat to a clean pond is algae, microscopic plants that’ll turn your pond green. A small amount of algae is beneficial, but large amounts can have your pond looking like the swamp monster scene from Scooby-Doo.
Keep algae at bay by limiting nutrients and sunlight. Here are some tips to do this:
- Shade the surface of the pond with water plants such as lilies. A good rule of thumb is to cover one-third of the surface with plants.
- Install a variety of plants. Plants consume nutrients from fish waste and decomposing matter in your pond, stealing the food algae need to live.
- Keep debris out of the water. As debris decomposes, it releases nutrients into the water.
- Don’t overstock your pond with fish. Too many fish will release more nutrients than the plants and bacteria can consume, leaving food for algae.
- Don’t overfeed your fish. Food not consumed by the fish provides nutrients for algae.
- As a further measure, biological and mechanical filters are available from your pond supplier. They take a lot of guesswork out of keeping a balanced, clean and clear pond.
Once you establish a biological balance in your pond, maintenance is minimal. A thorough annual cleaning (draining and rinsing out the pond) and periodic maintenance (keeping debris out) are all that’s required. While you’re at it, learn how to build a container water garden.
Required Tools for this Project
Have the necessary tools for this DIY project lined up before you start—you’ll save time and frustration.
- 4-in-1 screwdriver
- Cordless drill
- Drill bit set
- Level
- Spade
- Tape measure
- Utility knife
- Wheelbarrow
- Wire stripper/cutter
Required Materials for this Project
Avoid last-minute shopping trips by having all your materials ready ahead of time. Here’s a list.
- Biological/mechanical filter (optional)
- Boulders
- EPDM pond liner
- Expanding foam
- Flexible black plastic pipe
- Gravel
- Pond underlayment
- Pump container
- Rocks
- Skimmer and filter system (optional)
- Submersible pump
