
How to Build a Space-Saving Flip-Top Workbench
Updated: Jun. 16, 2023A space-saving workshop on wheels!
- Time
- Complexity
- Cost
- A full day
- Intermediate
- $251-500
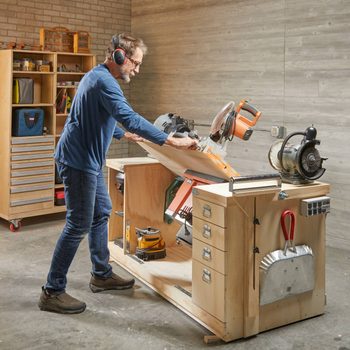
Flip-Top Bench Loaded with Features
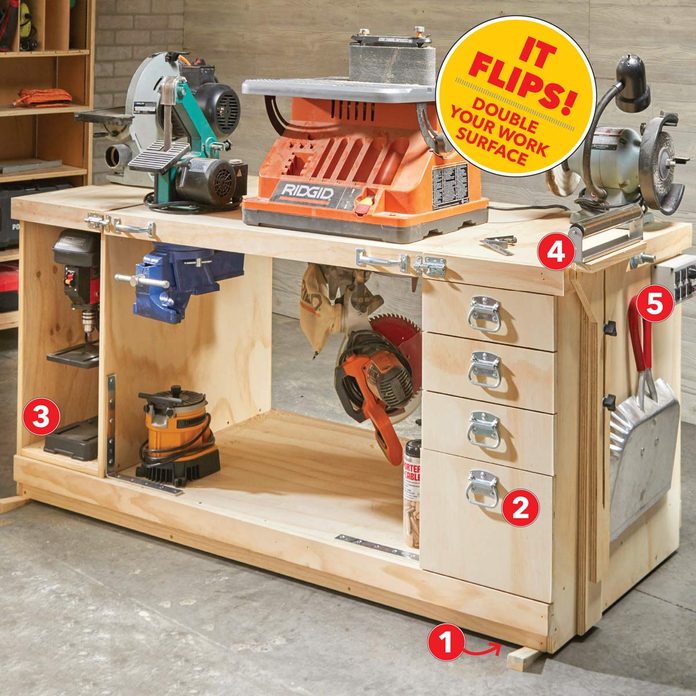
- The wheels make it mobile (and the simple lock wedges make it immobile).
- The drawers and recessed pegboard cabinet backs give you convenient places to stash tools, supplies and accessories.
- The open side cabinet gives you space to store a small drill press or other slim bench top tool.
- The out feed roller lends a helping hand for handling long materials.
- The power strip allows you to plug in multiple tools.
Of course, you could configure the workbench so one side holds bench top tools while the other serves as a wide-open work surface. Plus, once you are done with this project check out these 12 Super-Simple Workbenches You Can Build.
Project Directions:

For the flip-top workbench to “flip,” the base, side cabinets and revolving work surface must be flat and square. This means starting with flat plywood, making square cuts, installing components square to one another and checking your accuracy along the way. Check out Project PDF’s below to see this flip-top benches project drawings, cutting lists and the materials list. Start by ripping three sheets of 3/4-in. plywood into 28-1/2-in.- wide panels using either a table saw or a circular saw and guide. Set the long cutoffs aside; you’ll put them to good use later. Cut parts C, D, E, F, G and N to length.
Build the Base

1. Assemble the base frame from 1x4s, check for square, then install the 3/4-in. plywood sheathing and secure it with 2-in. screws.
Build the Side Cabinets

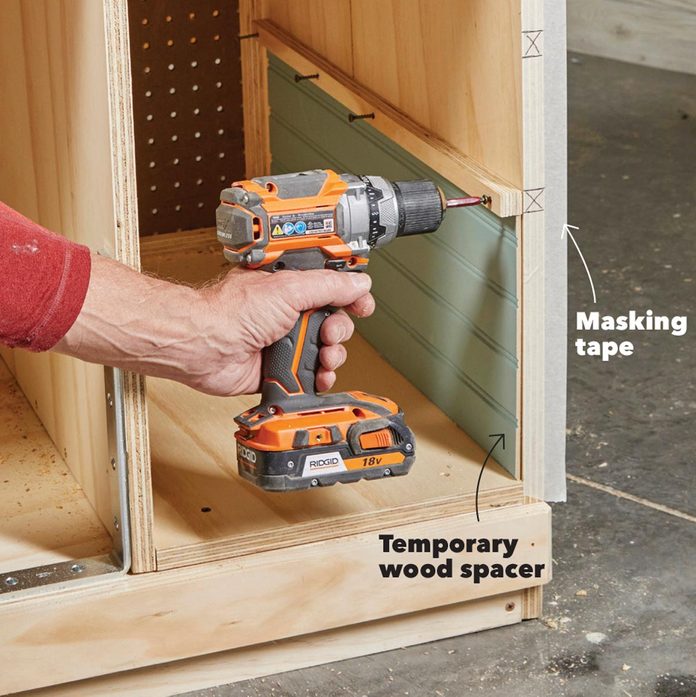
2. Build the two side support cabinets as shown in the photo above. Note that one of the vertical supports is longer than the other so it can extend down alongside the base to add rigidity to the cabinet. Make certain each cabinet box is square. Secure the 3/4-in. x 3/4-in. cleats (H, J), insetting them 3 in. from the back of the box. Cut the pegboard panels (K) to size and glue and nail them into place. These panels help keep the cabinet boxes square and rigid.
Install the Cabinets
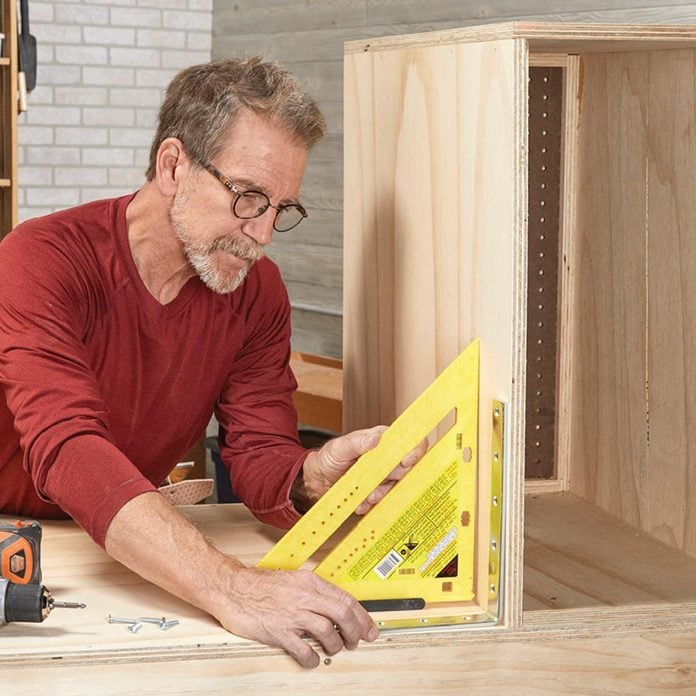
3. Position the cabinets and secure them to the base with a couple of temporary drywall screws. Measure to make sure the cabinets are equidistant from each other at the top, bottom, front and back. If you need to adjust the cabinets, remove the screws, adjust them, then rescuer them with a couple more screws. Use a square to ensure the front of the cabinet is square to the platform, then secure the 10-in. L-brackets (L) with a few screws.
Note: You’ll firmly fasten the cabinets and L-brackets in place once the revolving platform is in place.
Drill the Pivot Holes
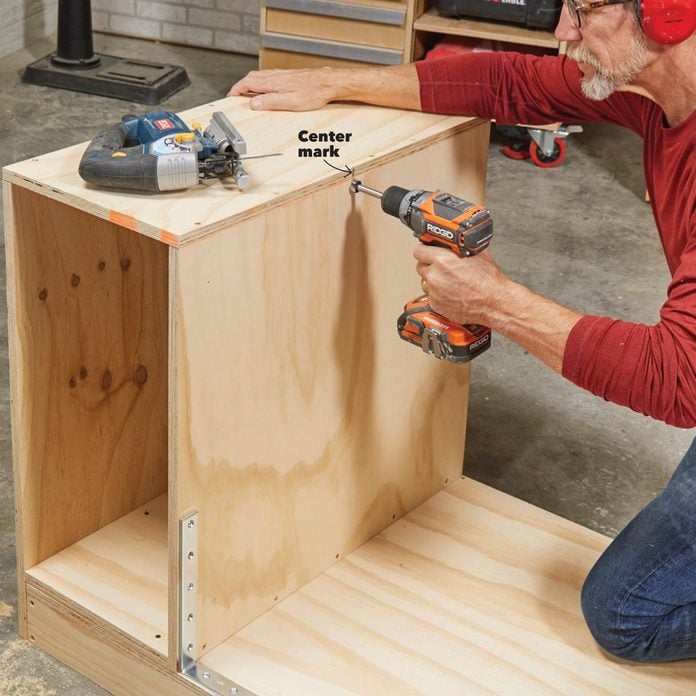
4. Measure and mark the exact centers of the cabinets on both sides. Measure down 3/8 in. from the bottom of the top piece of plywood (G) to establish crosshairs. Drill a 3/4-in. hole (Photo 4); the top should just kiss the bottom of the cabinet top. Use a jigsaw to square off the top edges of the holes so the hole is U-shaped.
Insert the Threaded Rod
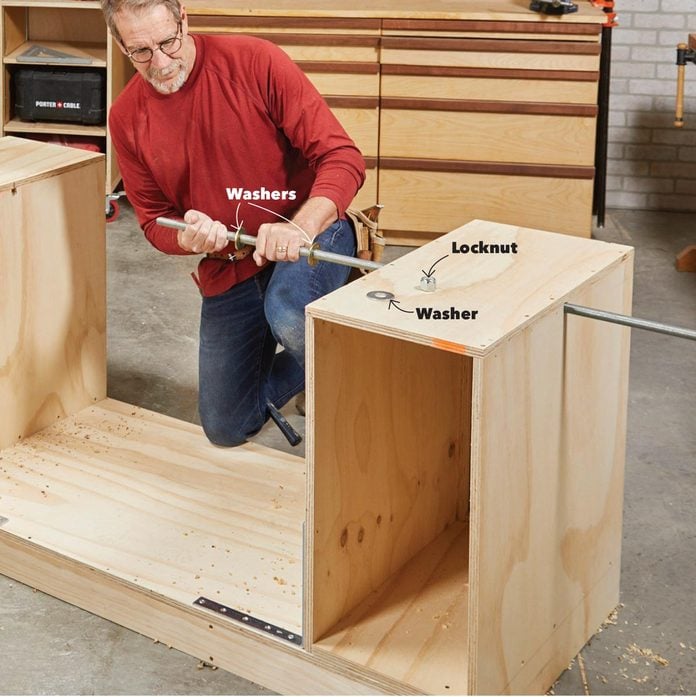
5. Feed the 6-ft. threaded rod through the holes in the first cabinet, slide two 3/4-in. washers over the rod as shown in Photo 5, then finish sliding the rod through the holes in the second cabinet. Let the end protrude about 2 in. past the cabinet on one side, slide a temporary spacer block over the end, then install a 3/4-in. washer and locknut. Add a spacer block, washer and locknut to the other “long” end too. Leave the nuts a little loose for now.
Slide in the First Layer of the Platform
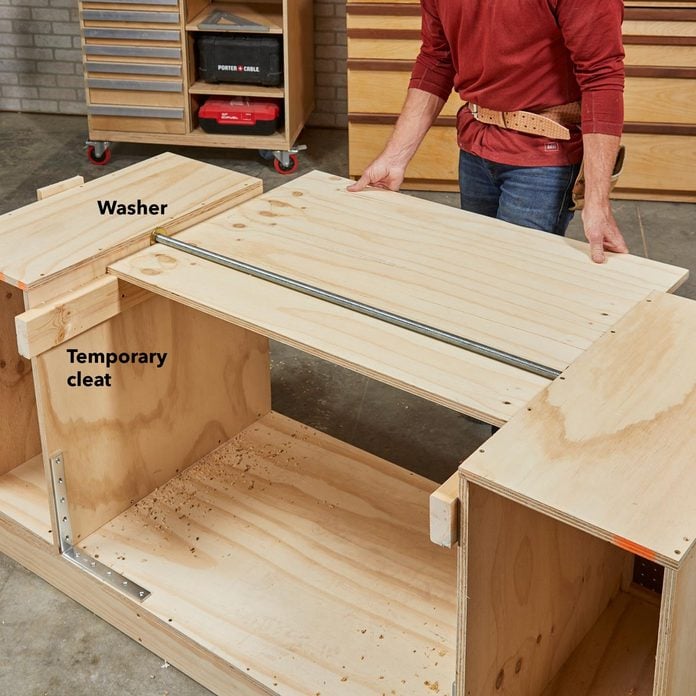
6. Install a pair of temporary horizontal cleats 3/4 in. below the threaded rod. Slide one of the platform panels (N) into place so the front and back edges are exactly even with the front and back edges of the cabinets. Check to make sure the gaps between the panel and cabinets are equal. If not, adjust the cabinets and L-brackets until the gaps are equal. Now permanently install the L-bracket and cabinet screws.
Install the Middle Layer of the Platform
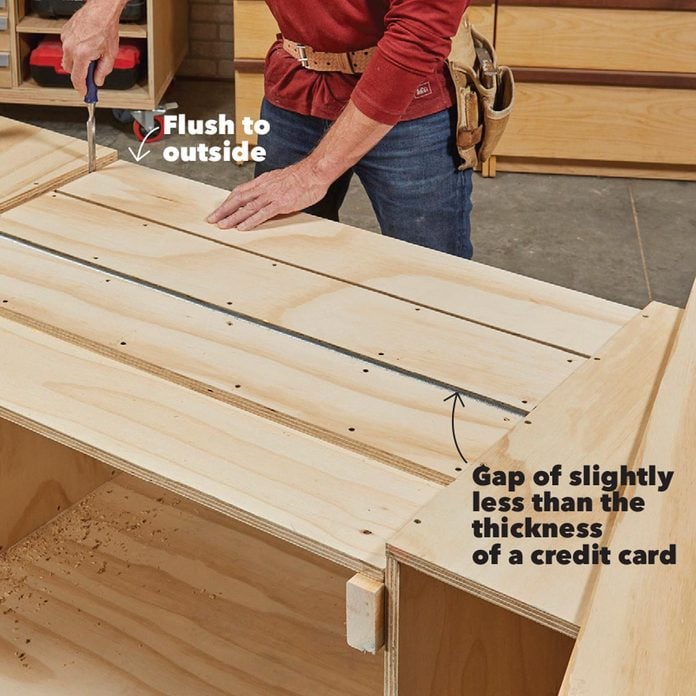
7. The center layer of the platform consists of four strips (P). Apply glue to the backs of two of these strips. Position them on each side of the threaded rod, leaving a gap slightly less than the thickness of a credit card, then secure them with 1-1/4-in. drywall screws. Install the two outer strips even with the outside edges of the platforms.
Secure the Third Layer

8. Apply glue to the center strips, position the final full platform panel (N) and secure that in place with 2-in. drywall screws. This top panel should be flush with the tops of the side cabinets. Give your top a 180-degree test spin to ensure it aligns with the edges of the cabinets in both positions.
Install the Barrel Bolts

9. Add the trim using Figure A (in project PDFs below) as a guide. Then install the four barrel bolts—one on each corner of the revolving platform and predrill holes for the barrel bolts and catches and secure with screws. Positioning the catch farther away from the bolt will provide more “play” when latching. If the bolts don’t slide freely, use a pair of locking pliers to open up the U-shaped part of the catch.
Install the Drawer Runners
10. Use a scrap piece of plywood as a spacer for installing the lowest drawer runners, then rip the scrap to width and use it as a spacer for installing the other runners as you move upward.
Install the Drawer Bottoms
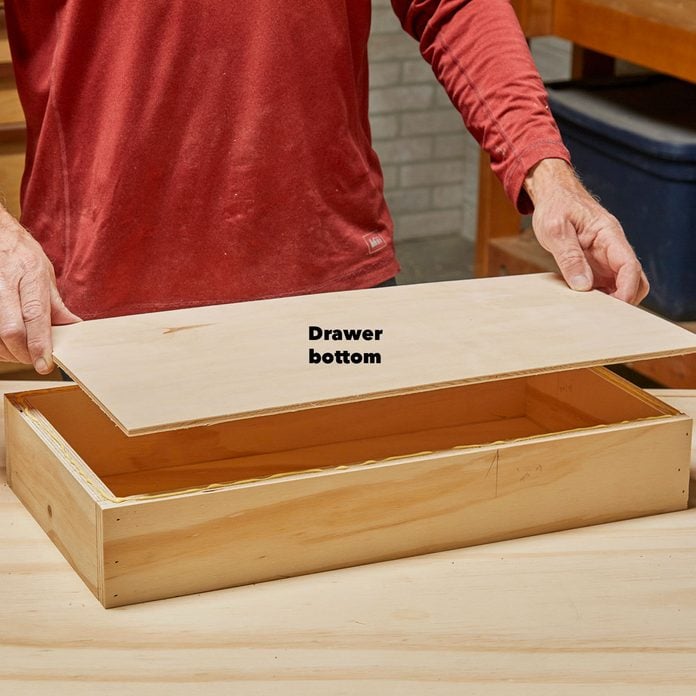
11. Build the drawer boxes from leftover 3/4-in. plywood, then glue and screw the 1/4-in. plywood bottoms into place. Determine the heights of the drawer fronts and cut them from leftover plywood.
Install the Drawer Fronts
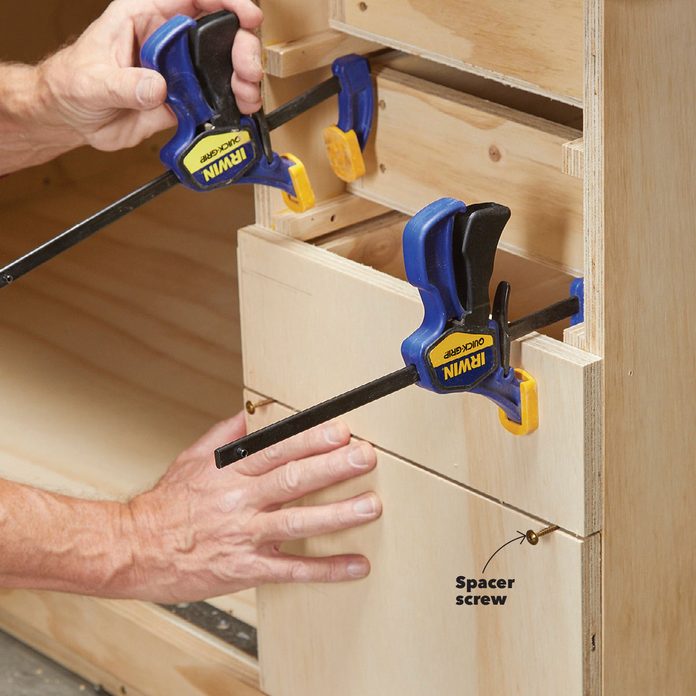
12. Use a couple of screws as spacers, clamp the front to the drawer box, then secure the front in place with four screws driven in from the back.
Mount the Movable Arm

13. You can build up to to four roller stands to help support material as you work. Drill holes and 1-in. counterbores into the back of the fixed leg (HH), then tap the tee nuts in place. Add a 1/4-in. spacer strip (GG) and secure the fixed arm to the cabinet side. Use a jigsaw to cut the movable arm (JJ) to shape and to cut the slot down the center. Secure the movable arm to the tee nuts with wing nuts.
Mount the Roller

14. Glue and nail a 1×2 to the top of the arm, then screw the roller carrier into place. A retractable pin in the roller allows you to remove and remount the roller.
Secure the Tools
15. Drive heavy-duty, large head, coarse-threaded screws through the tool mounting holes into the flip top. Be sure they penetrate 2 in. Keep balance in mind as you select the tools and determine their positions.
Using the Flip-Top Bench

Your barrel bolts will fit snugly into the U-shaped catches—you want them snug for stability. Take note:
- It may be difficult to latch all four barrel bolts at one time; just make sure to always latch at least three of them for stability.
- If you find the barrel bolts difficult to slide in and out by hand, use a couple taps of the hammer to slide the bolt in and out.
- If the bolts fit really tight, use pliers to slightly open up the U-shaped catch of the barrel bolt.
Project PDF Files
Click the links below to download the materials list as well as the drawings for this project.
Project Drawings Figure A and Cutting Lists
