
How to Build a Drill Press Table
Updated: Jul. 02, 2019Build your own custom drill press table with all the bells and whistles.
Drill press table benefits
Drill presses are designed for working with metal, not wood. That’s why, 10 years ago, I screwed an old scrap of 3/4-in. treated plywood to the metal table so I could screw down or clamp stops and fences. Frankly, I was embarrassed by it and finally built this dedicated woodworking drill press table. Mine is a bit over the top, with dadoes, plastic laminate and T-Tracks. Tackle it if you wish. The truth is, you could make a quick and easy top by bolting two glued layers of particleboard to the cast-iron table from the underside. You can screw or clamp temporary stops and fences to that and have a serviceable table. But your table won’t be as fetching or as easy to use as mine.
Table Features
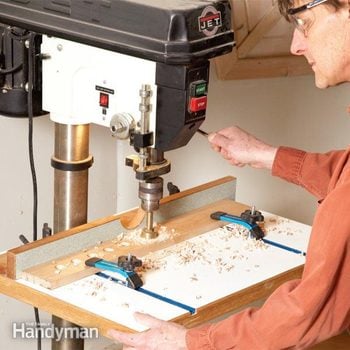
Fence: A semicircular clearance hole for the chuck allows for drilling holes that are close to the fence.
Throat plate: An inset 1/2-in. replaceable throat plate takes the abuse so the top won’t have to.
T-Tracks: T-Tracks are universally useful gizmos that allow you to endlessly adjust jigs, fences and hold-downs. On this table, they’re used for a sliding fence and hold-downs.
Laminate: Plastic laminate on both the top and bottom will keep the top from warping with humidity changes.
Edging: A hardwood edge-banding protects the rather delicate core from getting dinged up—plus, it’s pretty.
Construction guidelines
Here’s an overview of the construction process for this homemade drill press table. Glue 1-in. oversized particleboard panels together then cut them to size on the table saw. Edge-band both sides of the table, then belt-sand the top so the hardwood is flush with the surfaces. Cut the laminate squares 1 in. oversize and apply them with contact cement. Then rout the laminate squares flush with a flush-trim bit and chamfer them with a 45-degree bit. Rout out the 1/2-in.-deep recess for the throat plate.
Cut the 3/4-in.-wide dadoes on the table saw. Cut the clearance hole on the fence with a 2-1/2-in. hole saw on the drill press. Screw the fence together before applying the laminate, then rout that as you did with the tabletop.
Lag screws (1-1/2 x 5/16 in.) and washers work great for securing your new top to the existing drill press table. The instructions with the T-Track will tell you the rest.
Figure A: DIY Drill Press Table Details
This DIY drill press table features sliding clamps, a sliding fence and a durable laminate top.
You can download and enlarge Figure A in “Additional Information” below.
You’ll also find a complete Materials List in “Additional Information” below.
Additional Information
Required Tools for this DIY drill press table Project
Have the necessary tools for this DIY drill press table project lined up before you start—you’ll save time and frustration.
- Belt sander
- Clamps
- Drill bit set
- Drill/driver - cordless
- Hole saw kit
- Miter saw
- Router
- Table saw
Required Materials for this DIY drill press table Project
Avoid last-minute shopping trips by having all your materials ready ahead of time. Here’s a list.
- Contact cement
- See Materials List in "Additional Information"
- Wood glue
