
Frameless Kitchen Cabinets
Updated: Apr. 09, 2024A pro shows you the special installation techniques for these 'Euro-style' cabinets.

Here’s a home improvement job that’ll give you instant home equity along with great visual impact. Installing your own kitchen cabinets isn’t as difficult as you might think, but it does require some basic carpentry skills. We’ll show you wall and floor prep tips to make the job go faster and easier.
- Time
- Complexity
- Cost
- Multiple Days
- Intermediate
- $501-1000
Planning and prep work
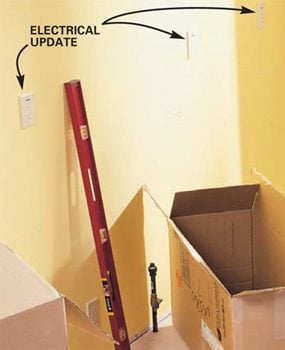
Photo 1: Prep before the cabinets arrive
Complete as much prep work as possible before installing the cabinets. Take care of any electrical and plumbing changes as well as wall smoothing, patching or painting. When your cabinets arrive, check them for damage and make sure you’ve received everything you ordered.
Here’s a home improvement job that’ll give you instant home equity along with great visual impact. Installing your own kitchen cabinets isn’t as difficult as you might think, but it does require some basic carpentry skills.
Kitchen cabinets today are a modern wonder with all kinds of cool space-saving features, smooth-gliding drawers and pull-out shelves. The contemporary price tag can be $5,000 to $15,000 per kitchen.
Making kitchen cabinets look good requires some carpentry experience, a steady hand and a willingness to be fussy enough to make things fit, despite the obstacles. It’s more involved than screwing boxes together. You need to know how to use a circular saw, read a level and follow a plan with precision. If you don’t have the necessary temperament or skill level, you can still enjoy all the benefits of new cabinets by having them installed by a pro. (Figure on at least $1,200 labor for a modest-size kitchen.) If you do decide to tackle the job yourself, just follow the step-by-step photos. Read the text for wall and floor prep and special tips to make the job go faster and easier.
The cabinet supplier will help design your kitchen—for free!
These days, you pretty much get what you pay for in the competitive cabinet market. The more you spend, the better the hardware, finish and built-in features you’ll get. Buy the best cabinets you can afford—you’ll probably be living with them for a very long time. Even with all the cabinets I’ve installed over the years, I still wouldn’t dream of ordering my cabinets without consulting a professional cabinet representative at a full-service lumberyard or a home center. A professional will walk you through all the cabinet styles and finishes, latest features and sizing options.
Doing the research on your own would take hours of digging and phoning. Just bring accurate measurements of your kitchen showing door and window locations along with plumbing and electrical placement. Many consultants will put your design into a computer program that’ll let you view your design from any angle for a complete preview of your new dream kitchen. Don’t settle for one designer’s input before making a decision. As with a medical diagnosis, it’s always best to get a second opinion.
Once you make your selection and place an order, expect to wait four to six weeks for your new cabinets to arrive—most manufacturers fill orders to your specifications.
What to do with all those boxes
When your cabinets finally arrive, you’ll have more cardboard to deal with than an average-sized grocery store (Photo 1). Find a large open area, get some help and carefully open each box (don’t cut through them or you may slice the front of a drawer or door) and lift out each cabinet. Plan ahead how to get rid of the cardboard boxes. Most cities that recycle will pick them up, but you might have to make other arrangements.
Inspect the cabinets for any damage and call the supplier if you notice any problems. Store the cabinets in a dry area where they’re easily accessible. Excess moisture will ruin your cabinets. We cleared out the adjacent dining room and kept ours there during the two days it took us to install them.
You can do the whole job with simple portable tools
Some tools worth having for this job are a good 4-ft. level (6-ft. if you’ve got the budget) and a pair of Quick- Grip clamps as shown in Photo 12. These tools will help make the difference between a good job and a great job. You’ll of course need a drill, power screwdriver, circular saw, belt sander and jigsaw.
Be sure you’ve also got access to a solid 6-ft. stepladder. Rent a finish nailer ($45 a day with compressor) for the final day of installation to attach trim, especially if you’re installing crown molding.
Do all prep work before the cabinets arrive
Before your new cabinets arrive, remove your old ones and make any changes in the plumbing and electrical layout as well as fix any nasty spots in the walls. Most kitchen remodeling means redoing the floor as well. If you have a wood floor, you may find that the planking doesn’t run under your old cabinets, or you could even discover three layers of vinyl. We removed our old vinyl and laid new underlayment as a base for our vinyl tile. You can lay your floor first and risk scuffing it, or install it later and fit the flooring around the cabinets.
It’s a lot simpler and faster to paint the room first and resign yourself to a touch-up once the job is done. When the paint is dry, locate all the wall studs and mark them (in most homes, studs are 16 in. from center to center).
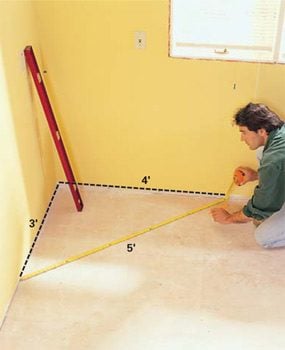
Check all the walls for plumb (straight up and down) and check the corner for square (Photo 2). Most walls are not perfect and a 1/8-in. variance in vertical is common. If you find more than 3/8-in. variance from plumb from the top to the bottom of a wall, however, you may want to hire a professional installer.
If your walls aren’t plumb, you may need to slide the corner cabinet away from the wall a bit to make up for the leaning wall. For example, if one wall tips in 1/4 in., you’ll need to hold the top of the base cabinet about 1/8 in. away from the wall so that the upper wall cabinet can be tight against the wall. This will all make sense once you start drawing the exact cabinet dimensions on the wall (see Photo 3). Keep in mind that whatever adjustment you make will affect the countertop installation later on. Most standard countertops allow a 1-in. overhang in front of the cabinet, so holding a cabinet out from the wall will affect the fit. A small variation of 1/4 in. here and there is common.
Figure A: Frameless or face frame?
As you can see in Fig. A, there are slight differences between frameless (Euro-style) cabinets and traditional face frame cabinets. Frameless cabinets are essentially a box with visible front edges. The face frame cabinets have a hardwood frame that is attached to the sides, top and bottom and overhangs each side 1/4 in.
The frameless cabinets we show in our installation are a bit tougher to install because there is no margin for hiding errors—the side edge of the cabinet doesn’t overhang like on the face frame cabinet. They also tend to be considerably heavier than face frame cabinets. In addition, frameless cabinets have very tight door and drawer clearances that make the panels look continuous, giving them a clean look. However, these tight clearances can make frameless cabinets difficult to adjust precisely, and the doors may need readjustment every now and then. Face frame cabinets have larger spaces between adjoining cabinet door and drawers, making small
deviations less noticeable.
Because face frame cabinets have a hardwood frame that overhangs each side (see Fig. A), you need
to really pay attention to the dimensions of the actual cabinet vs. the size of the face frame when you’re aligning your cabinets to marks on the walls. Frameless cabinets have exact dimensions from the front to the back, so there’s no extra figuring when you align them to the wall locations you’ve drawn (Photo 3).
Here are some other, less obvious differences:
- Frameless cabinets are joined to one another through their side panels.
- Face frame cabinets are joined through their hardwood face frames.
- Frameless cabinets can cost 15 percent more, something to consider if you’re on a tight budget.
- Frameless cabinets will require a higher skill level to install.
- Looks can make a big difference. Frameless cabinets tend to have a modern, clean-line appearance, while face frame cabinets tend to look more traditional. Go to a showroom and examine the differences firsthand.
Layout the plan in the room
The right spacing for appliances
If you have a slide-in range, allow an extra 1/8 to 1/4 in. of room to slide the unit into place. I usually allow an extra 3/16 in. of space for a 30-in. range or a 24-in. dishwasher. Check your appliance specs for the right size. There’s nothing worse than trying to shoehorn them in once the cabinets and countertops are installed.
Also think through your range hood venting possibilities. Range hoods can be ventless with a filter that cleans and recirculates the air, or they can vent outside. Our range hood traveled up and exhausted through the wall behind. Other options are venting through the ceiling and out the roof, or if you have a two-story house, venting through the ceiling into a joist space and out the exterior wall. Some ranges even have a downdraft vent that you can vent under the floor and run in the joist space with a vent to the outside.
Keep in mind that you can also have a cabinet above your hood if you need extra storage or don’t want the hood as a design focal point. Most codes require a 30-in. space between the range top and the hood.
Dishwasher fronts can also be customized with panels that match your cabinets—keep that in mind when ordering your cabinets.
Refrigerators come in a wide variety of shapes and sizes. When you order a new one, be concerned with its depth so that it doesn’t protrude too far into the room. This can interrupt traffic patterns and appear clumsy. Some contractors even recess the refrigerator into the wall behind it to solve this problem, but the easier solution is to get a model that’s the right depth. As with the dishwasher, certain models of refrigerators accept front insert panels.
Figure B: Cabinet Layout
Carefully plan the best layout for your kitchen
Key:
A – 39′ corner cabinet
B – 36′ base cabinet
C – 9′ base cabinet
D – 18′ base cabinet
E – 18′ base cabinet
F – 15′ base cabinet
G – 39′ x 36′ wall cabinet
H – 18′ x 36′ wall cabinet
J – 33′ x 36′ wall cabinet
K1 – Refrigerator side panel
K2 – Refrigerator side panel
L – 36′ x 21′ wall cabinet
M – 18′ x 36′ wall cabinet
N – Crown molding support
P – Crown molding
Q1 – Peninsula base cabinet
Q2 – Peninsula base cabinet
R1 – 12′ peninsula shelf end
R2 – 12′ peninsula shelf end
Start the installation with the corner base cabinet
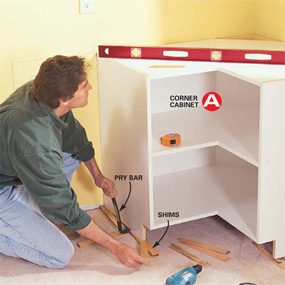
Photo 4: Get an accurate start
Set and level the corner cabinet first. Shim the cabinet to the horizontal level lines you marked on the wall. Be fussy, since all the other cabinets attach to this cabinet. Make any adjustments to out-of-plumb walls at this point (see text).
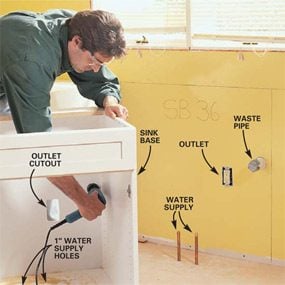
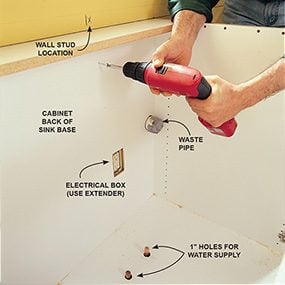
Photo 5: Measure carefully for cuts
Cut the holes for the electrical fixtures and plumbing into the back of the cabinet. Your electrical box should be installed so it sticks out from the wall the thickness of the cabinet. If the electrical box is flush with the wall, you must use a box extender. Cut the holes for the water supply and waste with hole saws and a drill. Our water supply was plumbed up through the floor.
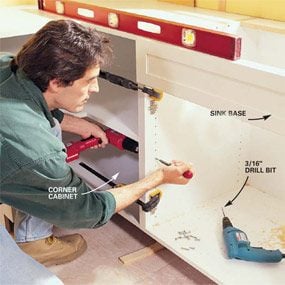
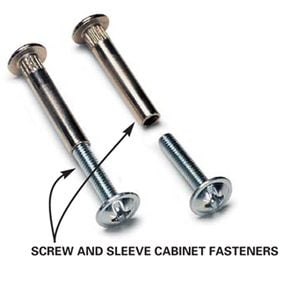
Photo 6: Fasten the cabinets together
Fasten the cabinets together after you’ve aligned and clamped the cabinet fronts. Use the screw and sleeve fastener provided or 1-1/4 in. wood screws. You may need to loosen the adjacent cabinet from the wall to get the fronts precisely aligned. Screw the cabinets together near the top and bottom front as well as at the center front.
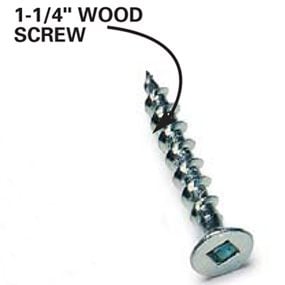
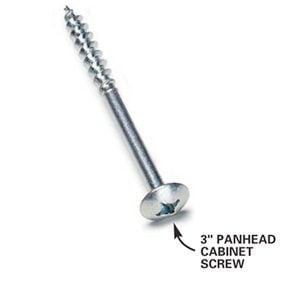
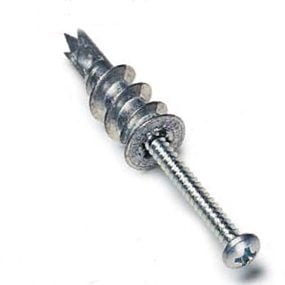
Close-up: 1-1/4-in. wood screw
Use screws in locations where extra reinforcement is needed or if you don’t have access to screw and sleeve fasteners.
All installers have a preferred routine for setting cabinets. Some installers swear by setting the upper wall cabinets first. This is fine if you’ve got lots of experience and well-developed forearms.
If you set the bases first, you’ll save a few bumps on the head. And if you make a simple helper box like the one shown in Fig. B and Photo 8 that rests on the lower cabinets, the uppers will be easy to shim and align with your marks on the wall. Your hands will be free to work.
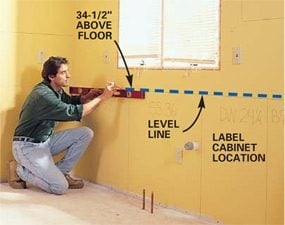
After you’ve marked the location of every cabinet and removed all the doors and shelves from each cabinet (they’ll be much lighter), lift the corner cabinet into position. Have your packet of shims ready, and level the cabinet exactly to the height mark as shown in Photo 3. Transfer the stud locations to the inside of the cabinet and screw it to the wall. Don’t rack the cabinet as you screw it. You may need a shim against the wall if the cabinet is pulled out of shape. Once it’s screwed to the wall, check the cabinet for level in each direction as shown in Photo 4.
Next tackle the adjacent base cabinet. Our second cabinet was the sink base, so we carefully measured the plumbing and electrical locations from the corner cabinet and transferred these to the sink base (Photo 5). Once you’ve cut the holes for these, align the front faces of the cabinets. You may find you need to loosen the corner cabinet from the wall a slight amount and shim the sink base level to get the faces to align. Once they align perfectly, clamp them together (Quick-Grip clamps work great). Then drill and screw a 3/16-in. (or a 5mm) hole through the cabinets and push the sleeve (Photo 6) through one side and screw the machine screw into the sleeve. If your cabinets don’t come with these nifty sleeve and screw connectors, drill pilot and countersink holes for 1-1/4 in. wood screws and connect the cabinets with these. Now check the cabinet for level once again and screw it to the wall.
Use a helper box to simplify hanging the wall cabinets
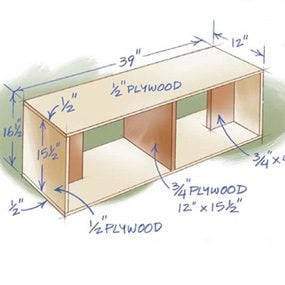
Figure C: Helper Box
The helper box can hold the heavy cabinet in position while you screw it in place. You can add a cleat on the top to make the box higher or change the dimensions to fit your needs.
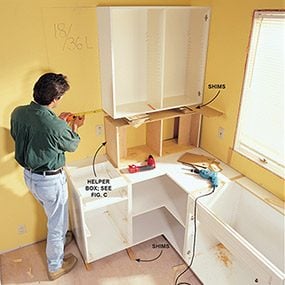
Photo 8: Fasten the upper cabinet to the wall
Position the upper cabinet onto the ‘helper box’ and shim under the box with chunks of wood and cardboard until the cabinet aligns with your marks. Measure the stud locations and transfer them to the inside of the cabinet to drill holes for the screw. Screw each upper cabinet to the wall studs with at least three screws at the top and bottom. (Narrow cabinets that land over one stud will need wall anchors for extra support; see close-up.)
Close-up: Wall E-z Ancor and screw
Use wall anchors to secure cabinets when a stud isn’t where you need it.
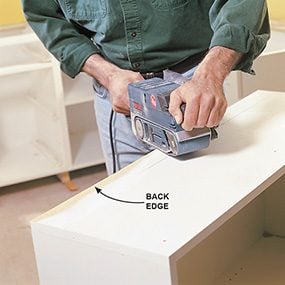
Photo 9: Adapt the corner, if necessary
Sand the back edge of the corner cabinet if the drywall mud is thick and holds the cabinet out from the corner. Sand back a couple of inches from the back and fit it again.
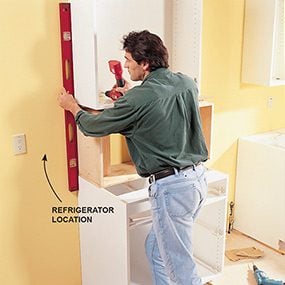
Photo 10: Use a level for alignment
Align the wall cabinets exactly with the base cabinets where critical appliance placements are necessary. Here the refrigerator end panel (K1) must be fastened to the wall and base cabinets. On the right side, the range and hood tuck in between the wall and the base cabinets.
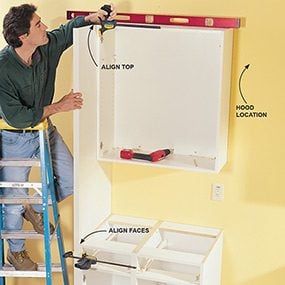
Photo 11: Use clamps to draw cabinets together
Scribe the refrigerator end panel to the floor if necessary, then precisely align and clamp the panel to the wall and base cabinets. Drill pilot holes and then screw the panel to the cabinets using the screw and sleeve fasteners or 1-1/4-in. screws. Fasten the bottom of the panels to the floor with steel angle brackets a few inches back from the front face (they’ll be concealed once the fridge is in place).
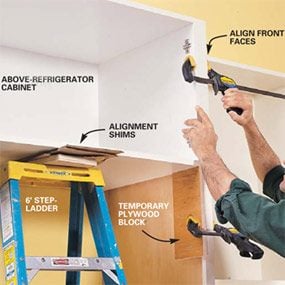
A friend of mine introduced me to the helper box shown in Photo 8 and Fig. C. He has become so attached to his helper box that he’s even named it Igor. He adds that Igor is the cheapest employee he has and has never complained no matter how heavy the cabinet. Simply rest the helper box on the cabinet, set the wall cabinet on the box and add shims as necessary.
The most important rule in hanging wall cabinets is to make sure they align perfectly with the base cabinets when they abut a range hood, refrigerator cabinet or pantry cabinet (Photo 10). This means planning ahead and starting with the first cabinet exactly on layout. You can’t always make up the difference if wall space is limited.
Euro-style (frameless) cabinets can be particularly tough to make fit and stay on layout. They don’t have overlaps you can shave to get precise fits. For example, the first wall cabinet we hung (Photo 8) wouldn’t fit tight to the wall because of the drywall and tape buildup in the corner. As a result, the front edge adjoining the wall had a 3/16-in. gap all the way from the top to the bottom. (Because its frame is wider than the box, a face frame cabinet would have fit here perfectly.) So we belt-sanded the backside of the cabinet (Photo 9) to fit into the corner. If you have a gap wider than 3/16 in., you may have to use a narrow filler strip (painted to match the cabinets) glued or screwed to the side of the cabinet to hide the gap.
Remember to screw the wall cabinet faces together the same way you did the bases. You may need to loosen the adjoining cabinet to align the front faces of the cabinets. Then screw the faces flush and retighten the cabinet to the wall. Hang all large panel cabinets (such as the refrigerator cabinet in Photo 12) the same way you hang the wall cabinets.
Adding the finishing touches
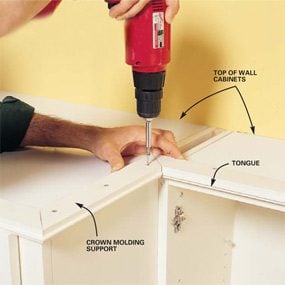
Photo 13: Add crown molding support
Fasten the crown molding support to the top of the cabinets with 1-1/4-in. wood screws. If you have soffits, you’ll need to fasten the supports from inside the cabinets or glue and shim them in place with construction adhesive or silicone adhesive. I like to position the supports so that the seam of the support and crown molding is hidden by the cabinet doors.
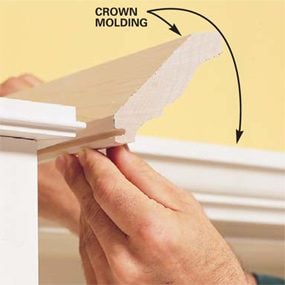
Photo 14: install crown molding
Cut and fit the crown molding and push it into the tongue of the support strip. Once the fit looks good, use a brad nailer to nail the molding to the support.
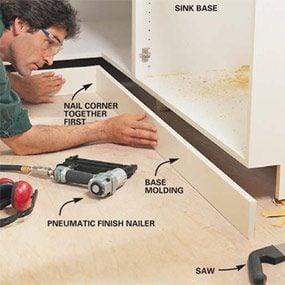
Photo 15: Install the base kick panels
Fit the base molding to the base cabinets. You may wish to install your new flooring before you nail the molding in place. A pneumatic finish nailer really helps in this awkward position.
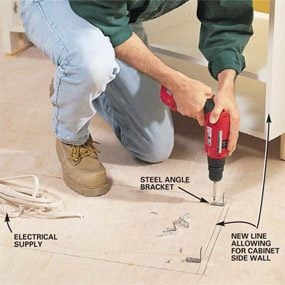
Photo 16: Fasten the island cabinets to the floor
Set the island cabinets in place and trace around the outside of the cabinets with a pencil. Draw a second set of lines inside to indicate the thickness of the cabinet side walls. Screw angle brackets to the floor along these lines. Drill a hole for your electrical supply through the base of the cabinet, align and shim the cabinets level, and screw the cabinet side walls to the bracket from below.
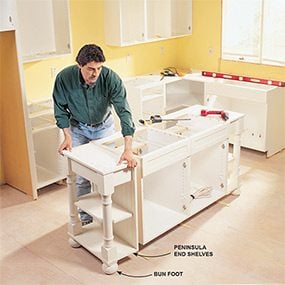
Photo 17: Finish setting the island
Position the peninsula (or island, in this case) shelves against the island cabinets. If you plan to install vinyl tile, as we did, don’t fasten the shelf ends yet. Install the flooring and then screw them to the island base cabinets. You may need to belt-sand the bun feet to fit.
You may decide to install crown molding, as we did (Photo 14), or a simpler piece of trim at the top of the wall cabinets. Buy trim that’s designed to go with the cabinets, not off-the-shelf stuff. The tall ceiling in our kitchen provided us with easy access to the top of the cabinets. You may have a soffit (enclosed area above the cabinets) or a lower ceiling. You’ll need to get creative about fastening these moldings if the space is tight. Oftentimes you can glue them in place with silicone adhesive or adhesive caulk. You’ll be able to shim them in place while the adhesive dries or fasten the moldings from inside the cabinets.
Before you nail the base molding (Photo 15), cut the shims flush at the toe-kick area. A small hobby saw or a hacksaw blade clamped in a locking pliers works great to trim them flush with the front edge. You may want to squirt a bit of construction adhesive on the edge of the shims and on the floor beneath to make sure the shims stay put.
Once you’ve completed the installation, you’ll need to hang and adjust the doors as well as drill and set your knobs or pulls. To correctly place your knobs and cabinet pulls, make a thin plywood jig. You can also find helpful jigs specially designed for this task at home centers.
Required Tools for this Project
Have the necessary tools for this DIY project lined up before you start—you’ll save time and frustration.
- Belt sander
- Circular saw
- Clamps
- Cordless drill
- Drill bit set
- Framing square
- Handsaw
- Hearing protection
- Hole saw kit
- Jigsaw
- Knee pads
- Level
- Miter saw
- One-handed bar clamps
- Pry bar
- Safety glasses
- Scribing tool
- Stepladder
- Tape measure
- Utility knife
Required Materials for this Project
Avoid last-minute shopping trips by having all your materials ready ahead of time. Here’s a list.
- 1-1/2-in. brad nails
- 1/2 plywood (1/2 sheet)
- Shims
