
How to Form and Pour a Concrete Slab
Updated: May 02, 2023
A pro shows you how to build strong concrete forms, place a solid slab and trowel a smooth finish
Multiple Days
Advanced
$501-1000
Introduction
Pouring a concrete slab yourself can be a big money-saver or big mistake. We'll show you the best tips and tricks for working with concrete so you get it right the first time.Tools Required
- Circular saw
- Hammer
- Level
- Pry bar
- Safety glasses
- Tape measure
Materials Required
- ½” dia. rebar
- 6-mil plastic
- Anchor bolts
- Concrete
- Duplex nails
- Forming lumber
- Packable fill
- Tie wire
Project step-by-step (16)
Wet concrete on skin can cause everything from mild redness to third-degree, permanently disfiguring chemical burns. You and your helpers should take these steps:
- Wear eye protection. Sandy concrete splashes can wreak havoc with your eyes.
- Wear long pants and long sleeves to protect your skin.
- Wear tall rubber boots if you have to wade in wet concrete.
- Wear gloves (rubber gloves are the safest bet).
- If your clothes get saturated with wet cement, remove them, thoroughly rinse your skin and change into clean clothes before going back to work.
Prepare the Site
Contact your local building department to see whether a building permit is required and how close to the lot lines you can build. In most cases, you’ll measure from the lot line to position the slab parallel to it.
Start to prepare the site for concrete by driving four stakes to roughly indicate the corners of the new slab and use a line level and string or builder’s level to see how much the ground slopes. Flattening a sloped site means moving tons of soil. You can build up the low side or dig the high side into the slope and add a low retaining wall to hold back the soil.
- Pro tip: Your concrete slab will last longer, with less cracking and movement, if it’s built on solid, well-drained soil. If you have sandy soil, you’re in luck. Just scrape off the sod and topsoil and add gravel fill if needed. If you have clay or loam soil, you should remove enough to allow a 6- to 8-in. layer of compacted gravel under the new concrete.
If you have to remove more than a few inches of dirt, consider renting a skid steer or hiring an excavator. An excavator can also help you get rid of excess soil.
- Note: Before you do any digging, call 811 or visit call811.com to arrange to have your local utilities locate and mark buried pipes and wires.
Set and Level One Side
- Cut a 2×12 to length (or splice it with a cleat) for one side of the concrete forms and nail it to a corner stake.
- Level the 2×12 and nail it to the second corner stake.
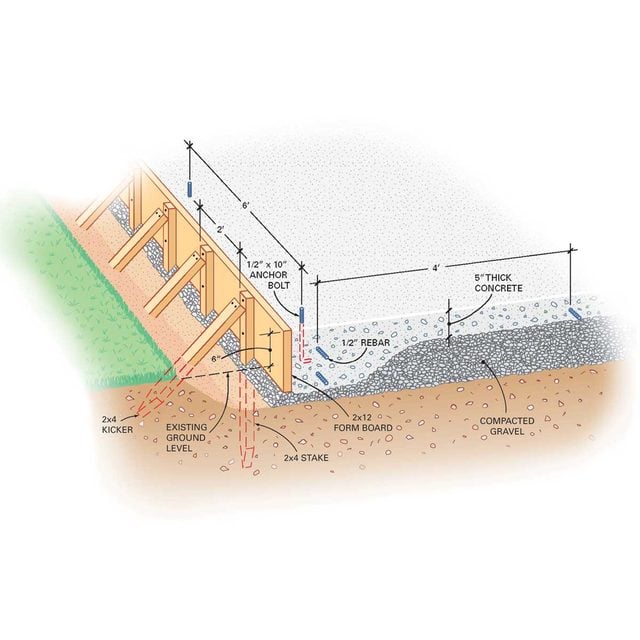
- Start by choosing straight form boards. For a five-inch-thick slab with thickened edges, which is perfect for most garages and sheds, 2×12 boards work best. For a driveway or other slab without thickened edges, use 2x6s.
- If you can’t get long enough boards, splice them together by nailing a four-foot 2×12 cleat over the joint. Sight down the boards to make sure they’re aligned and straight before nailing on the cleat.
- Cut the two side form boards three inches longer than the length of the slab. Then cut the end boards to the exact width of the slab. You’ll nail the end boards between the side boards to create the correct size form.
- Use 16d duplex (double-headed) nails to connect the form boards and attach the bracing. Nail through the stakes into the forms.

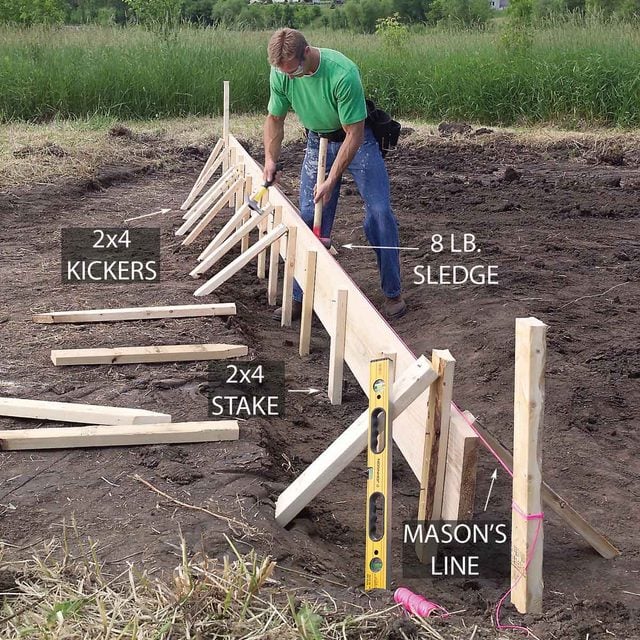
Stake and Brace the Side Form
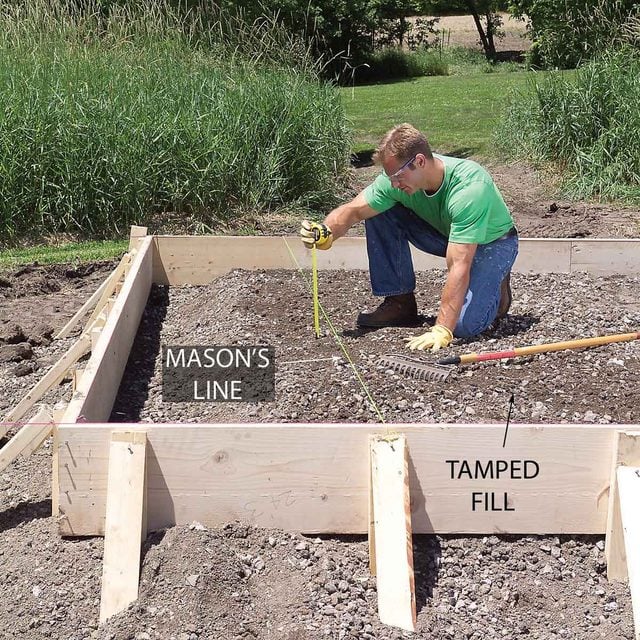
- Stretch a mason’s line just above the top edge of the 2×12.
- Align the 2×12 with the string and brace it with pairs of 2x4s spaced every two feet.
- To absorb the shock and make nailing easier, hold a sledgehammer behind stakes and form boards as you nail.
- Brace the forms to ensure straight sides. A freshly poured concrete slab can push form boards outward, leaving your slab with a curved edge that’s almost impossible to fix. The best way to avoid this is with extra strong bracing. Place 2×4 stakes and 2×4 kickers every two feet along the form boards for support. Kickers slant down into the ground and keep the top of the stakes from bending outward.
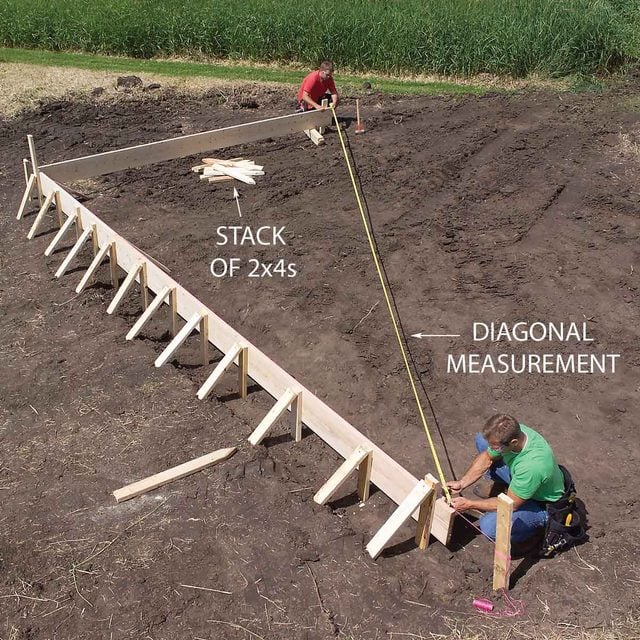
Square, Level and Stake the Other Sides
- Cut a second 2×12 to the width of the slab.
- Nail one end to the braced form and use the calculated length of the diagonal to set the form at 90 degrees.
- Drive a stake at the end.
- Level, straighten and brace the second form board.
- Add the third side.
- Pro tip: Leveling the forms is easier if you leave one end of the form board slightly high when you nail it to the stake. Then adjust the height by tapping the stake on the high end with a maul until the board is perfectly level.
Fill and Level
- Spread and tamp three-inch layers of granular fill to within five inches of the top of the forms. This will help concrete forming.
- Stretch a string across the top of the forms and measure down to the ground. Do this in three or four spots and average the results.
- Subtract the thickness of your slab. Then use this depth to calculate the cubic yards of fill needed.
- Slope the fill down along the edges to create a thickened edge of concrete.
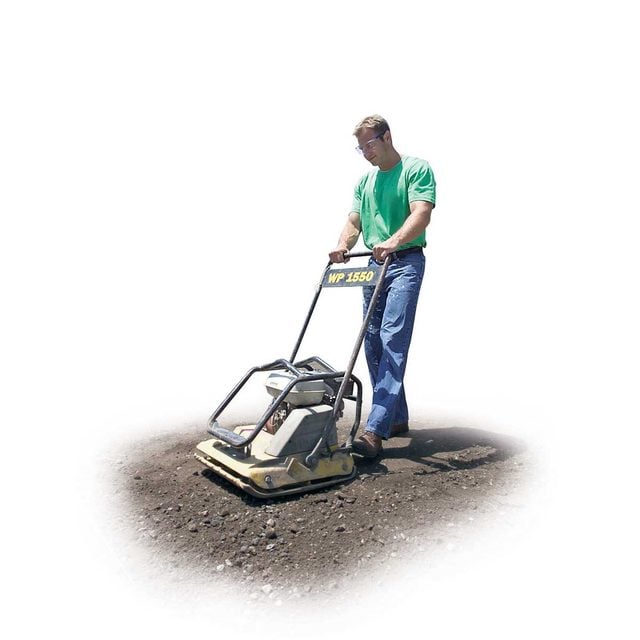
Pack the Fill
- Pack the fill solidly with a plate compactor.
- Leave a 12-inch-deep by 12-inch-wide trench around the perimeter for the thickened edge.
- If you’re building a heated structure on the slab, cover the ground inside the concrete forms with 6-mm polyethylene sheeting. Otherwise you can leave it uncovered.
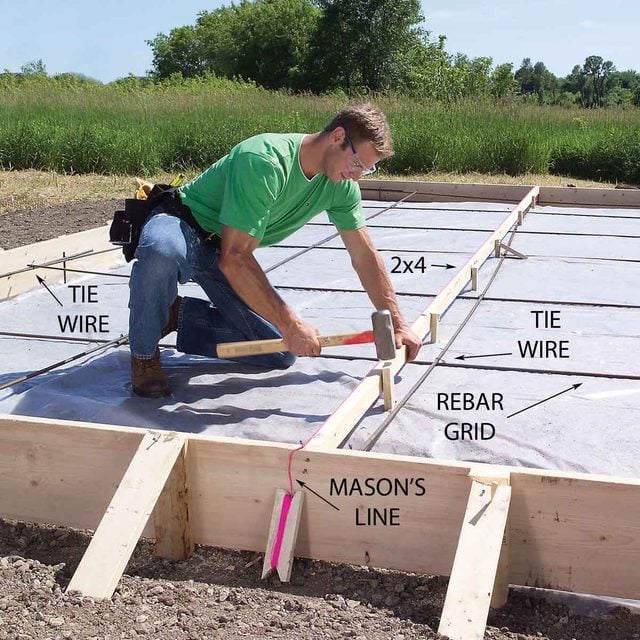
Tie in the Rebar to Strengthen the Slab
- Cover the fill with a layer of 6-mm plastic sheeting.
- Tie two bands of 1/2-inch steel reinforcing rods (rebar) to stakes set about four inches from the perimeter of the forms.
- Use a metal-cutting blade or disc in a reciprocating saw, circular saw or grinder to cut the rebar. Cut and bend pieces of rebar to form the perimeter reinforcing.
- Splice the pieces together by overlapping them at least six inches and wrapping tie wire around the overlap.
- Wire the perimeter rebar to rebar stakes for support.

Partition the Slab
- Lay a grid of rebar spaced four feet apart over the plastic and connect the intersections with tie wire.
- Divide the concrete slab down the middle with a 2×4 nailed to 1×3 stakes.
- Align the top edge with a taut string.
- If you’ve never poured a large slab or if the weather is hot and dry, which makes concrete harden quickly, divide this slab down the middle and fill the halves on different days to reduce the amount of concrete you’ll have to finish at one time. Remove the divider before pouring the second half.
- Mark the position of the door openings on the concrete forms. Then mark the location of the 1/2-inch anchor bolts on the forms. Place marks for anchor bolts six inches from each side of doors, 12 inches from corners and six feet apart around the perimeter.
Prepare for the Concrete Truck
- To estimate the concrete order, multiply the length by the width by the depth (in feet) to arrive at the number of cubic feet. Don’t forget to account for the trenched perimeter.
- Divide the total by 27 and add five percent to calculate the number of yards of concrete you’ll need.
- Our slab required seven yards.
- Call the ready mix company at least a day in advance and explain your project.
- Most dispatchers are quite helpful and can recommend the best mix. For a large slab like ours that may have occasional vehicle traffic, we ordered a 3,500-lb. mix with five percent air entrainment. The air entrainment traps microscopic bubbles that help concrete withstand freezing temperatures.
- Triple-check your concrete forms to make sure they’re square, level, straight and well braced.
- Have at least two contractor-grade wheelbarrows on hand and three or four strong helpers.
- Plan the route the truck will take.
- For large slabs, it’s best if the truck can back up to the concrete forms.
- Avoid hot, windy days if possible. This kind of weather accelerates the hardening process — a slab can turn hard before you have time to trowel a nice smooth finish.
- If the forecast calls for rain, reschedule the concrete delivery to a dry day. Rain will ruin the surface.
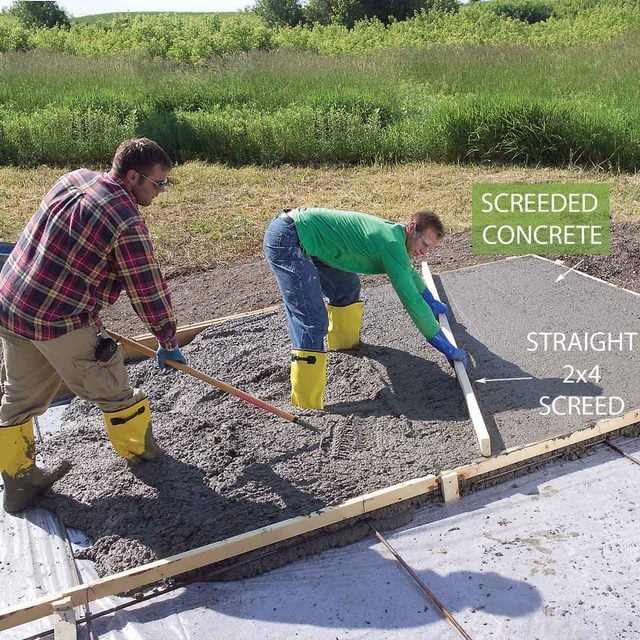
Pour and Level the Concrete
- Drag a straight 2×4 (screed board) across the top of the concrete forms to level and begin to finish the concrete surface.
- Make multiple passes if needed to create a flat, evenly filled area.
- Have a helper add or remove concrete in front of the screed as you pull it.
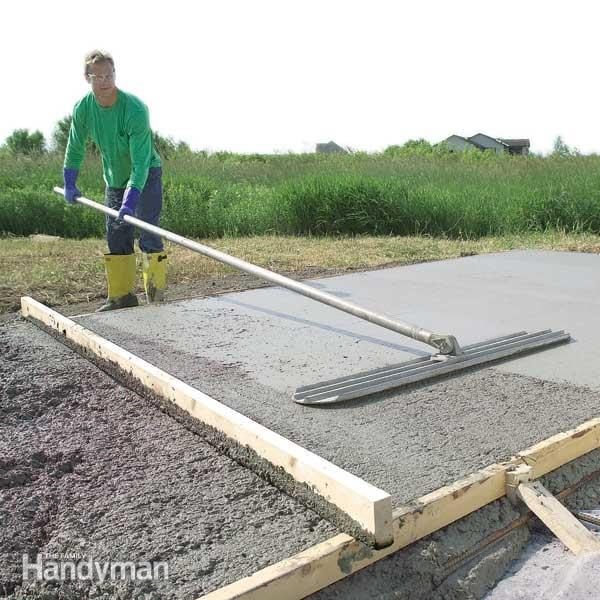
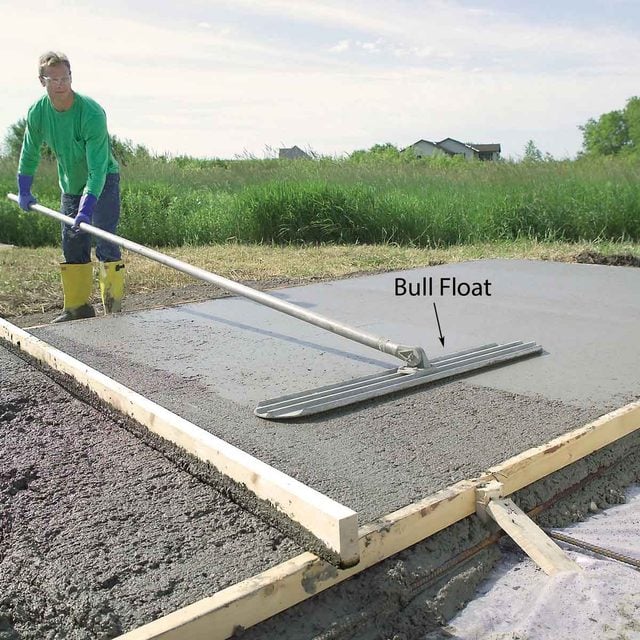
Flatten with a Bull Float
- Push a bull float across the screeded concrete, keeping the leading edge slightly elevated.
- When you reach the far side, lift the handle enough to slightly elevate the edge closest to you and pull back to the starting point.
- Move over and repeat, overlapping the previously floated surface by about one-third.
- Pro tip: Three or four passes with the bull float is usually sufficient. Too much floating is a common concrete pouring mistake that can weaken the surface by drawing up too much water and cement.
- After you smooth the slab with the bull float, water will “bleed” out of the concrete and sit on the surface. Wait for the water to disappear and for the slab to harden slightly before you resume finishing.
- Pro tip: Three or four passes with the bull float is usually sufficient. Too much floating is a common concrete pouring mistake that can weaken the surface by drawing up too much water and cement.
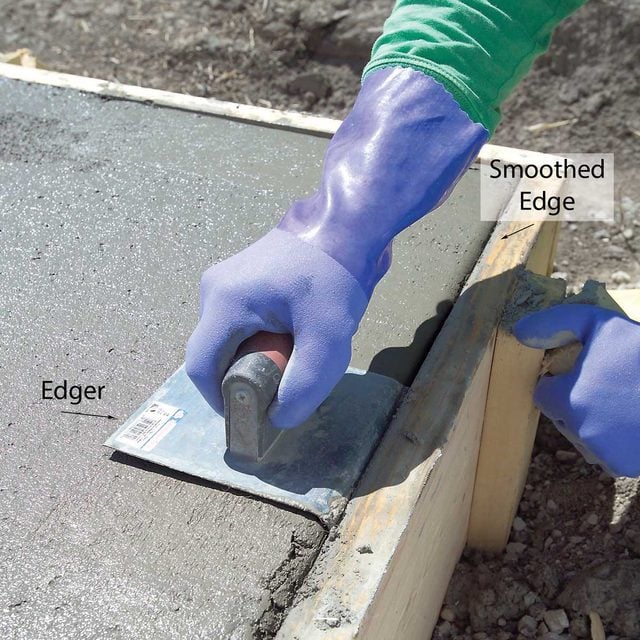
Round Off Slab Edges
- Round the edges of the slab with an edging tool after any surface water disappears.
- Work the edger until the edge is solid and smooth.
- If the edger sinks in and leaves a track that’s more than 1/8-inch deep, wait for the slab to harden slightly before proceeding.
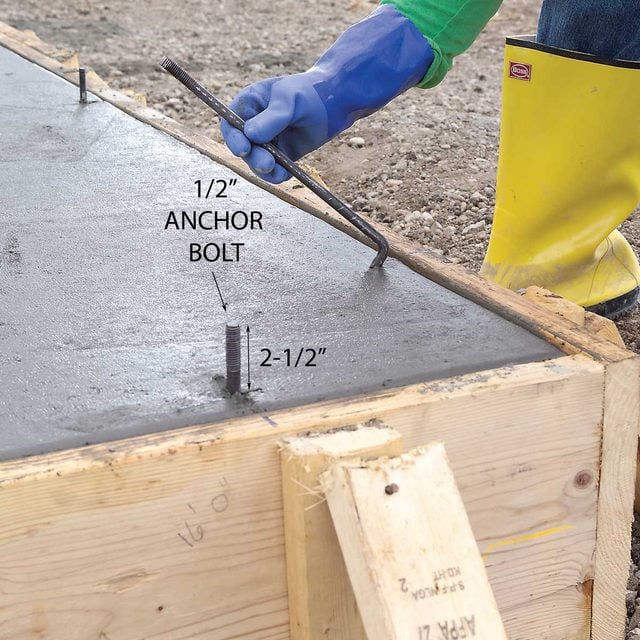
Set the Anchor Bolts
- Press 1/2-inch anchor bolts into the concrete before it hardens.
- Place bolts one foot from corners and every six feet.
- Place bolts six inches from the sides of door openings.
- Leave about 2-1/2 inch of the bolts exposed.
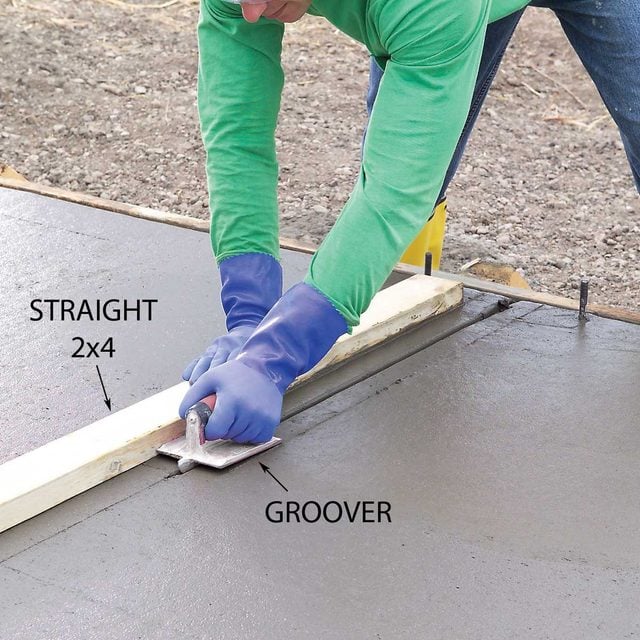
Cut Control Joints
- Form control joints to minimize random concrete cracks by running a groover along the edge of a straight 2×4.
- Work the groover forward and back while making a progressively deeper cut.
Smooth with Trowels
- You’ll have to wait until the concrete can support your weight to start grooving the slab.
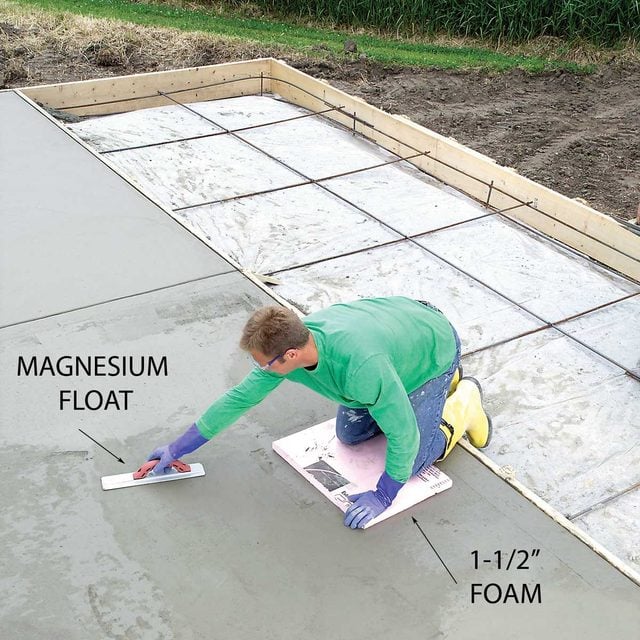
- Cut two-foot squares of 1-1/2-in.-thick foam insulation for use as kneeling boards.
- The kneeling board distributes your weight, allowing you to get an earlier start.
- Grooving creates a weakened spot in the concrete that allows the inevitable shrinkage cracking to take place at the groove rather than at some random spot.
- Cut grooves about every 10 feet in large slabs.
- When you’re done grooving, smooth the concrete with a magnesium float.
- Hand floating removes imperfections and pushes pebbles below the surface.
- Use the float to remove the marks left by edging and smooth out humps and dips left by the bull float.
- You may have to bear down on the float if the concrete is starting to harden.
- The goal is to bring a slurry of cement to the surface to aid in troweling.
- Then further smooth the surface with a steel trowel.
- Pro tip: For a really smooth finish, repeat the troweling step two or three times, letting the concrete harden a bit between each pass.
- If you want a rougher, nonslip surface, you can skip the steel trowel altogether. Instead, drag a push broom over the surface to create a “broom finish.”
- Pro tip: For a really smooth finish, repeat the troweling step two or three times, letting the concrete harden a bit between each pass.
Let it Harden and Remove Forms
- Keep concrete moist after its poured so it cures slowly and develops maximum strength.
- The easiest way to ensure proper curing is to spray the finished concrete with curing compound. Curing compound is available at home centers. Follow the instructions on the label. Use a regular garden sprayer to apply the compound.
- You can lay plastic over the concrete instead, although this can lead to discoloration of the surface.
- Let the successfully poured concrete slab harden overnight before you carefully remove the form boards.
- Pull the duplex nails from the corners and kickers and pry up on the stakes with a shovel to loosen and remove the forms.
- Since the concrete surface will be soft and easy to chip or scratch, wait for a day or two before building on the slab.
- Since the concrete surface will be soft and easy to chip or scratch, wait for a day or two before building on the slab.