
How To Build a DIY Danish Modern Chair

Updated: Feb. 23, 2024
You don't need a bunch of fancy, expensive tools to build this chair. Read on to learn how.

Multiple Days
Advanced
$600-700
Introduction
Build an iconic chair for a fraction of the price.Tools Required
- Angle grinder
- Band saw
- Belt sander
- Circular saw
- Dowel jig
- Drill/driver
- flap disc
- hand tools
- Jig Saw
- random orbital sander
- Rasp
- Router
- Router table
- Table saw
Materials Required
- 1/4-in. dowels
- 2-in. seat webbing
- 3/8-in. dowels
- 4/4 cherry
- 6/4 cherry
- Gel Polyurethane
- Hide glue
- Sandpaper
- seat webbing clips
- Wood glue
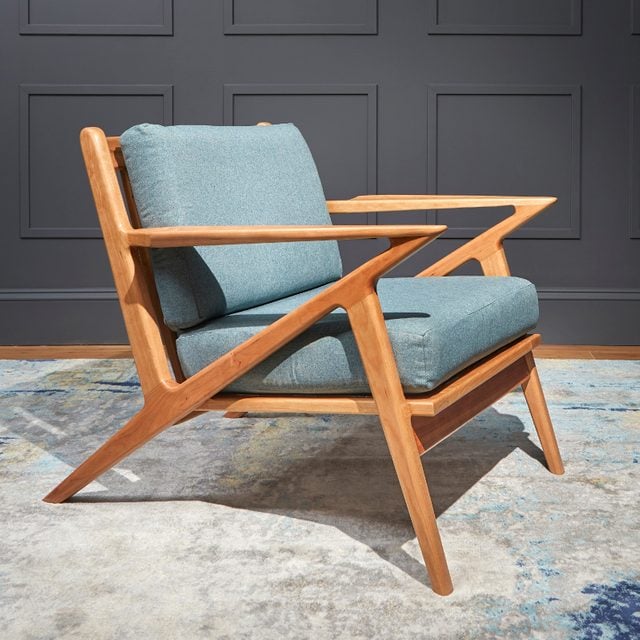
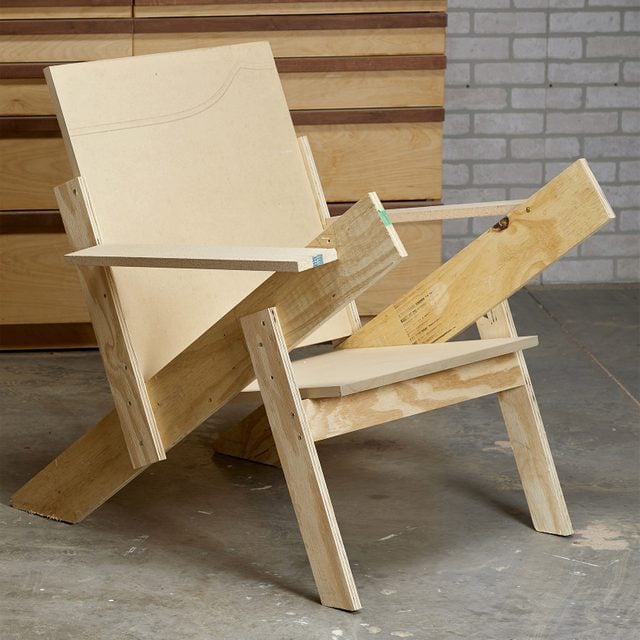
Building a chair can be daunting because it needs to look good and feel good. That’s why I based my chair on a time-tested 1960s design — and a stunning one at that.
Of course, you can build this Selig chair with a shop full of nice power tools. But you can also tackle it with tools you already own, or make a minimal investment in a few new ones.
I ordered ready-made cushions from Joybird, a company that makes reproductions of this chair. The size of its stock cushions determined some of my chair’s dimensions. You can buy your cushions there and know they will fit.
Print full-sized patterns here.
Old school or Modern
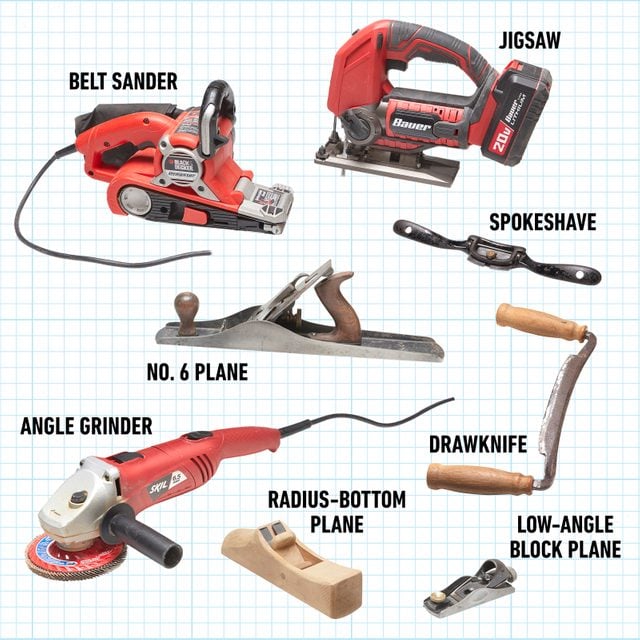
I fell in love with traditional hand tools many years ago. I love restoring them and working with them, so I used them a lot for this project. But you don’t need to be a hand tool snob to make this chair. A few common, modern power tools will let you do all the necessary shaping and joinery.
Figure A: Exploded View
Overall Dimensions: 29-1/2-in. H x 29-1/2-in. W x 35-3/4-in. D
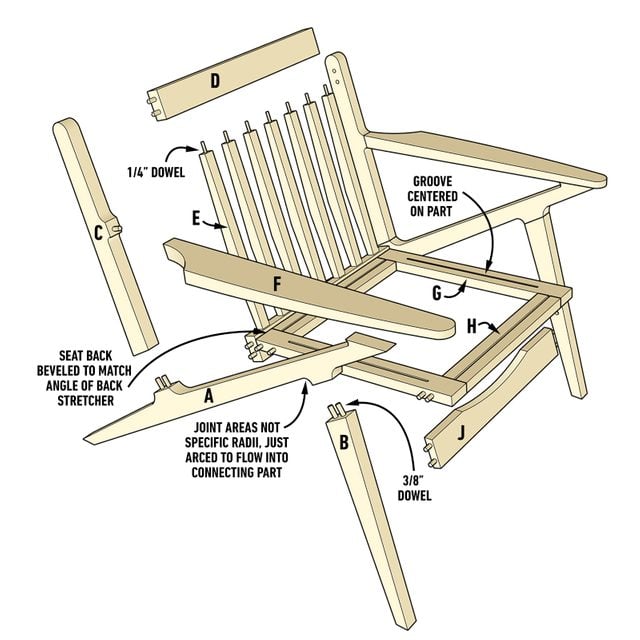
Figure B: Armrest Patterns
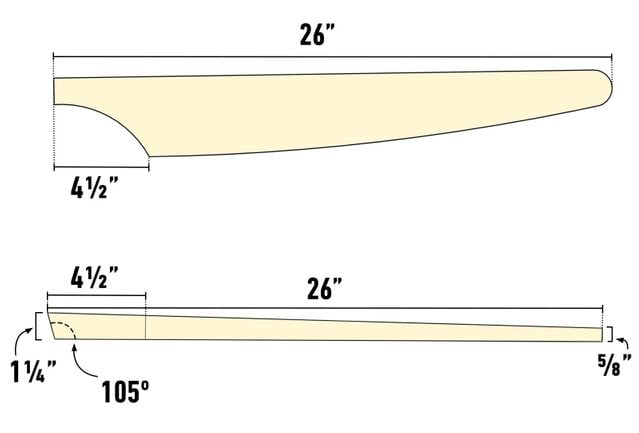
Figure C: Front Leg Pattern
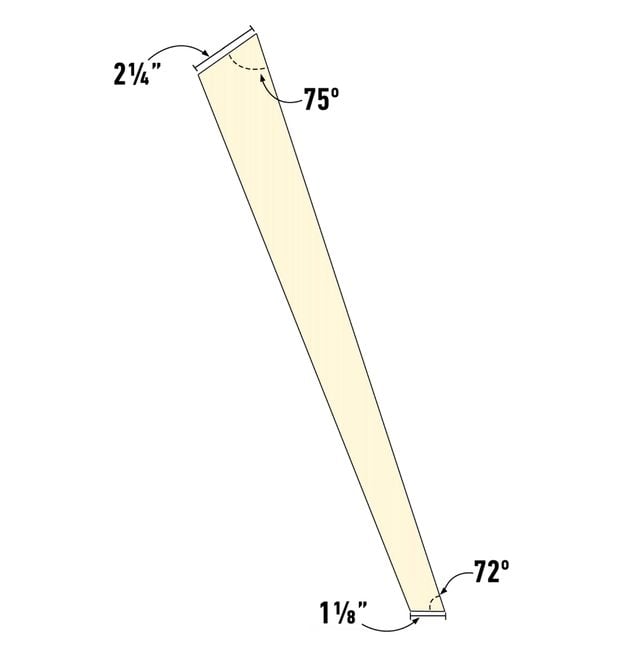
Figure D: Back Spindle Pattern
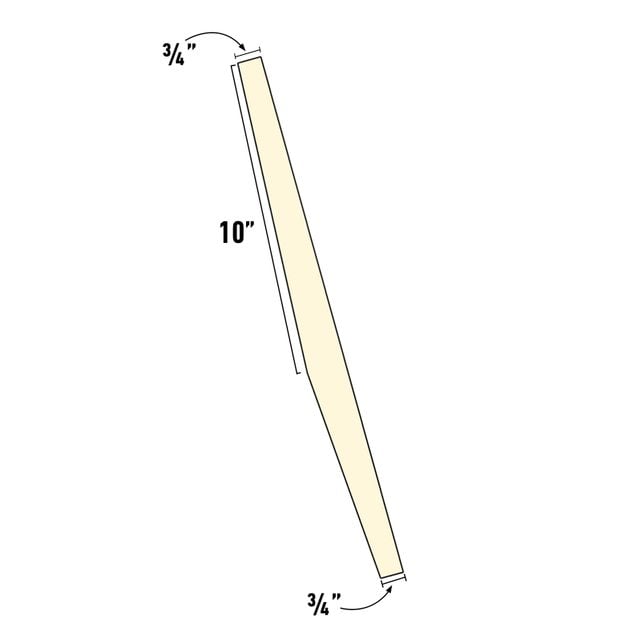
Figure E: Backrest Pattern

Figure F: Front Stretcher Patterns
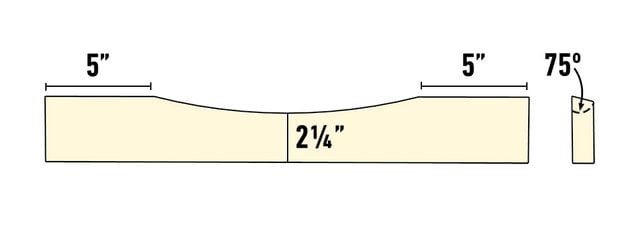
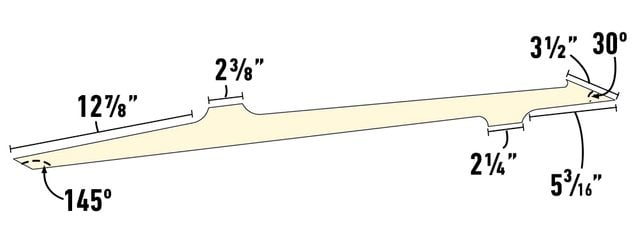
Figure G: Back Leg Pattern
Cutting List
| KEY | QTY. | DIMENSIONS | PART |
| A | 2 | 1-1/4″ x 3-1/2″ x 41-1/4″ | Back leg |
| B | 2 | 1-1/4″ x 2-1/4″ x 19-3/8″ | Front leg |
| C | 2 | 1-1/4″ x 3″ x 21-5/8″ | Backrest |
| D | 2 | 1-1/4″ x 2-5/8″ x 22″ | Back stretcher |
| E | 7 | 1″ x 1-1/4″ x 17″ | Back spindle |
| F | 2 | 1-1/4″ x 3-3/4″ x 26″ | Armrest |
| G | 2 | 1” x 2-3/8” x 21” | Seat frame side |
| H | 2 | 1” x 2-3/8” x 17-1/4” | Seat frame stretcher |
| J | 1 | 1” x 3” x 22” | Front stretcher |
Project step-by-step (19)
Make a Mock-up
To customize your chair for a particular shape, start with a rough mock-up using scraps. You’ll get all your angles and dimensions perfect. If you do change the dimensions, you may need to have custom cushions made.
Once you have it just right, make a full-scale drawing. I do this on white melamine. It’s easy to make changes by just wiping off pencil marks with mineral spirits.
Make Part Patterns
Print full-size patterns, then cut them out of 1/2-in. medium density fiberboard (MDF) with a jigsaw or band saw, staying just outside of the line. Carefully sand your patterns, taking all the time you need to get them perfect. Your router’s pattern bit will follow them exactly.
If you don’t own a router or router table, don’t worry. I’ll tell you about other options as we go.
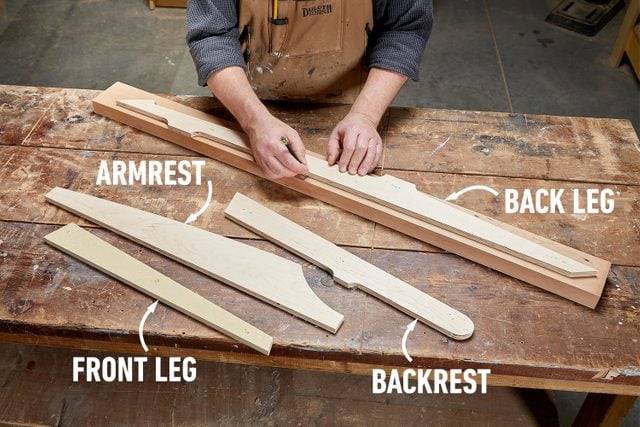
Trim the Parts
Trace your patterns on your lumber, then cut them out, staying no more than 1/8-in. outside of the line. That leaves little to rout off, making Step 3 much easier. If you’re not going to use a router with a pattern bit, you’ll still make the patterns. Trace them onto your lumber and rough-cut them with a band saw or jigsaw.
Rout the Parts
Tack the patterns to your rough-cut parts with one-inch brad nails or finish nails. Using a pattern bit in your router or router table, trim off the excess. Pry off the pattern, attach it to the next rough-cut piece and continue.
If you’re not using a router, sand your parts to the line instead. For this, go with a belt sander, edge sander, spindle sander or all of the above. For tight radii, if you don’t have a spindle sander, you’ll need a round file or sandpaper wrapped around a dowel.

Make Dowel Joints
Test the fit where the front legs and back supports meet the joint areas on the back legs. Those joint areas terminate at the outer edges of the back leg boards, so they should be perfect. If you need to make any adjustments, touch up the pieces with a sanding block, disc sander or edge sander.
Once you’re satisfied with the fit, mark each joint where the dowels will go. Clamp your dowel jig to the joint surfaces, lining up its registration mark with the marks you made. Then drill your holes. I used two 3/8-in. dowel holes in each joint. Use a brad point bit for this.

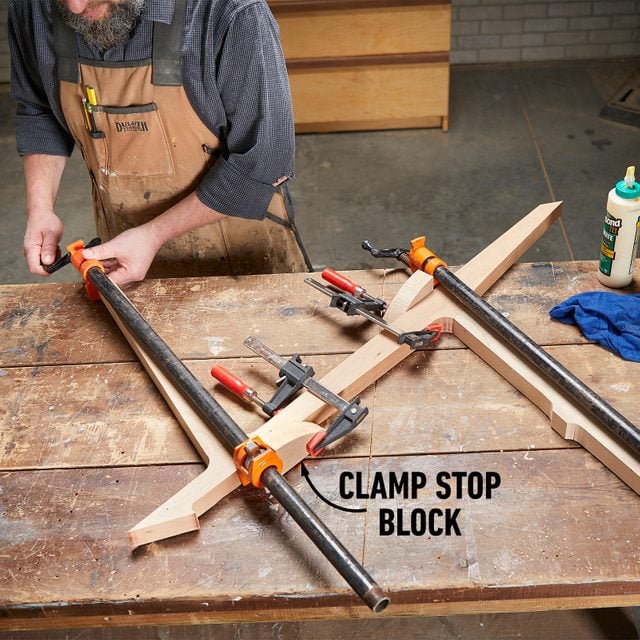
Assemble the Sides
Dry-fit the dowel joints to make sure everything lines up properly. Be sure you’re using dowels made for joinery, not smooth dowel stock from the hardware store. Joinery dowels are fluted, allowing glue to escape the dowel holes as the joints are pressed together. A tight-fitting smooth dowel doesn’t allow the glue to escape and can prevent a joint from closing.
Once you’re satisfied with the fit, apply glue to the dowels and joint surfaces, insert the dowels and press the joints together. Use pipe clamps to coax them fully home. Stop blocks clamped to the parts keep the pipe clamps from sliding. Glue only one joint at a time so you’re never in a rush.
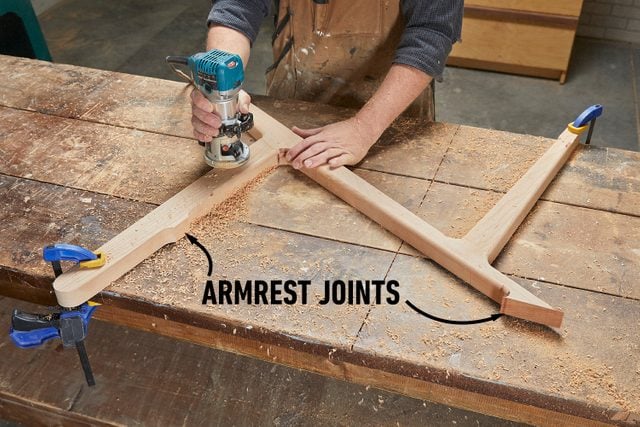
Rout the Side Assemblies
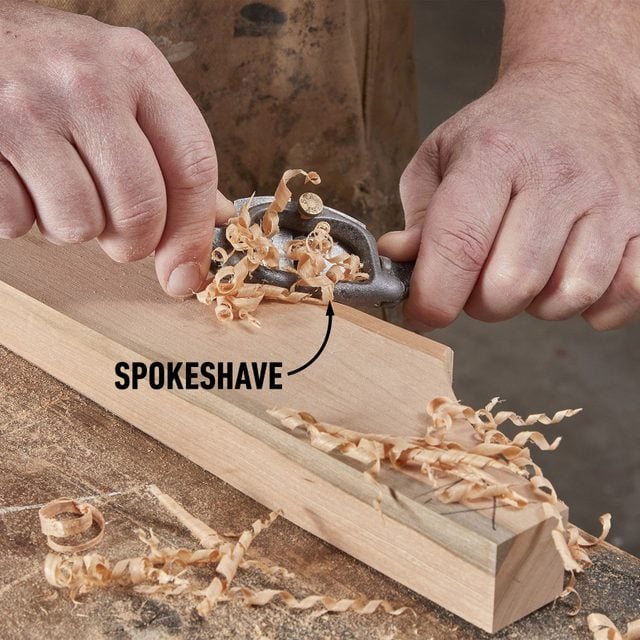
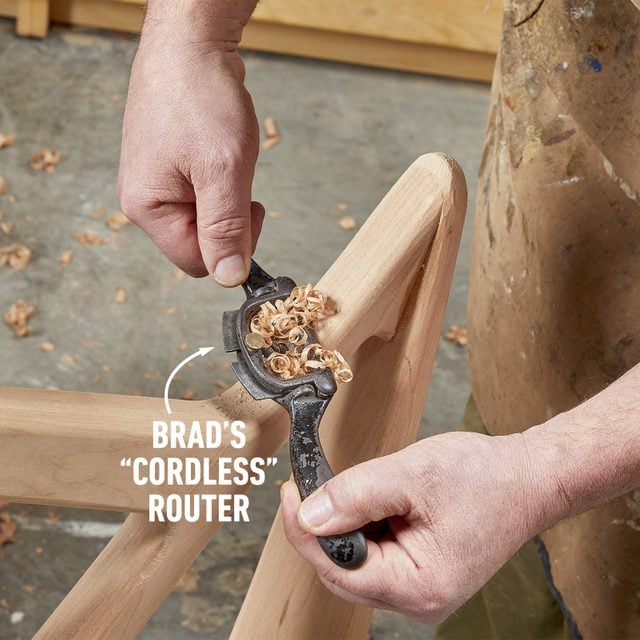
Once the glue is dry, radius all the sharp edges with a 3/8-in. round-over bit. If you don’t have a router, you can accomplish this easily with hand tools. A rasp, belt sander, orbital sander, hand planes, spokeshaves or any combination of these tools is fair game. Avoid the armrest joints at this point.
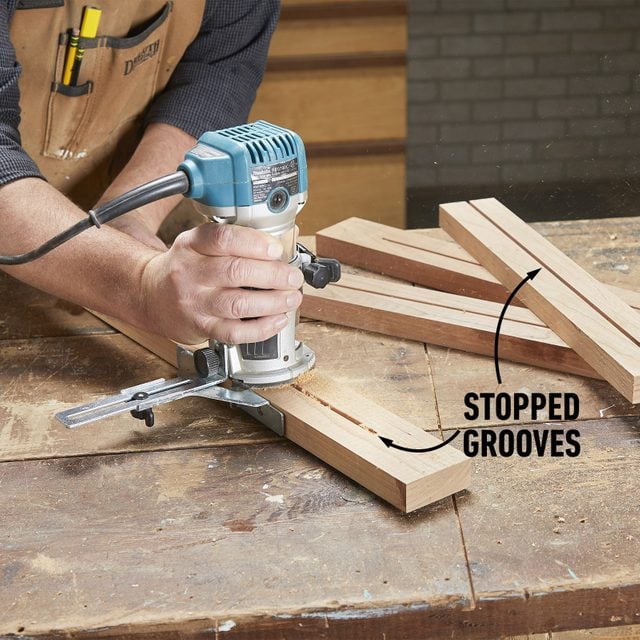
Groove Seat Frame Parts
Create 5/32-in. x 1/2-in. grooves down the center of each seat frame part. The best way is to make two passes using a 1/8-in. bit in a compact router with an edge guide. That way you can make stopped grooves in the side frames. Otherwise, you can make these grooves on the table saw and fill the resulting gap afterward.
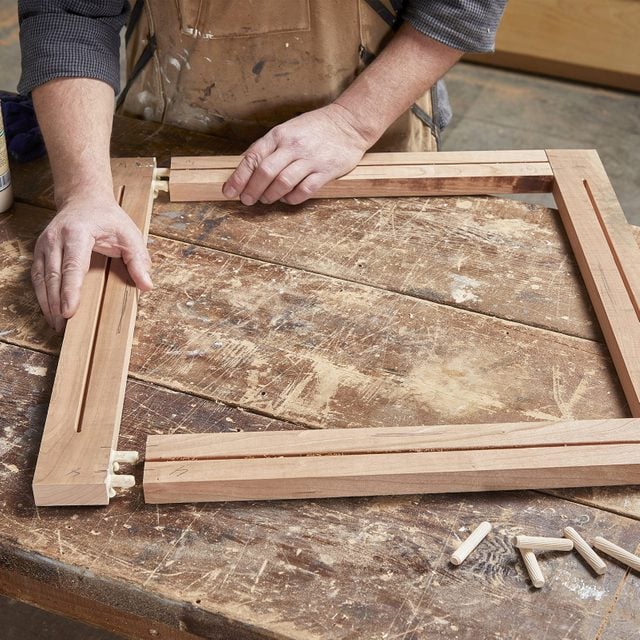
Assemble the Seat Frame
Using your dowel jig, drill dowel holes in all the seat frame parts. Test the fit, then add the glue and dowels. When the glue is dry, bevel the back edge at 75 degrees.
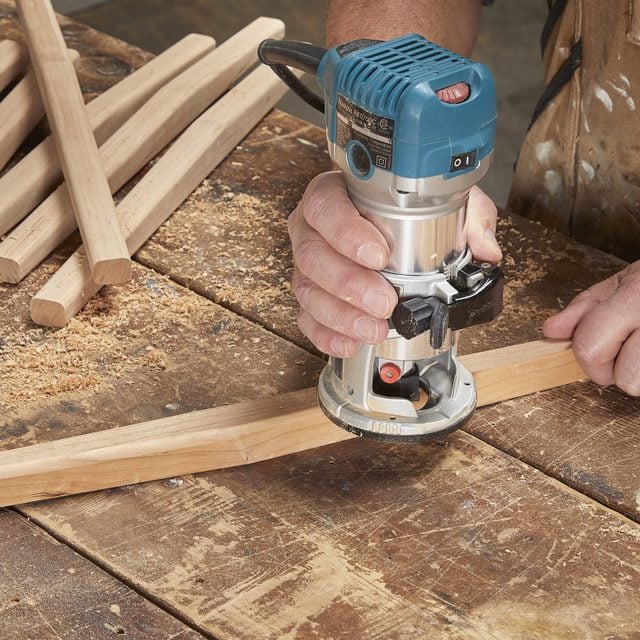
Make the Back Spindles
Cut the seat’s back spindles to their finished shape, staying just outside the line. Then sand them to the line and round over the edges with a 1/4-in. round-over bit, sanding block or block plane.
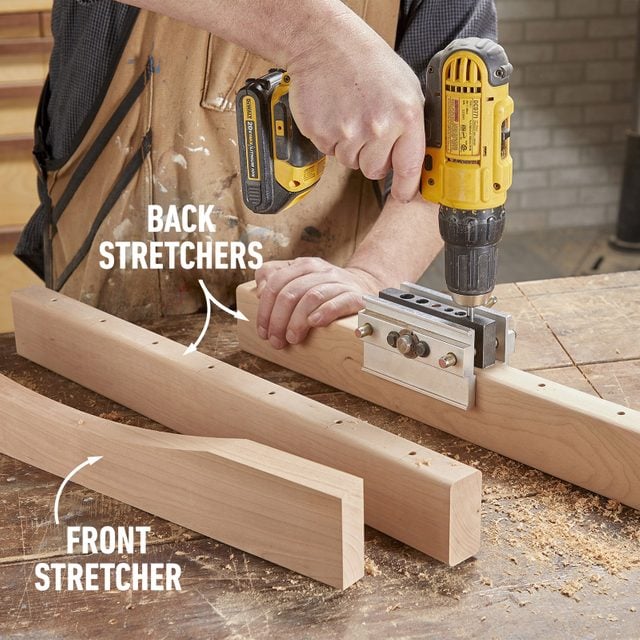
Make the Stretchers
Cut the back and front stretchers, shaping the front stretcher as shown on the pattern. Round over only the bottom edge of the front stretcher and bevel its top edge at 75 degrees. After rounding over the back stretchers, drill seven evenly spaced 1/4-in. dowel holes in one edge of each back stretcher, centered on its thickness.
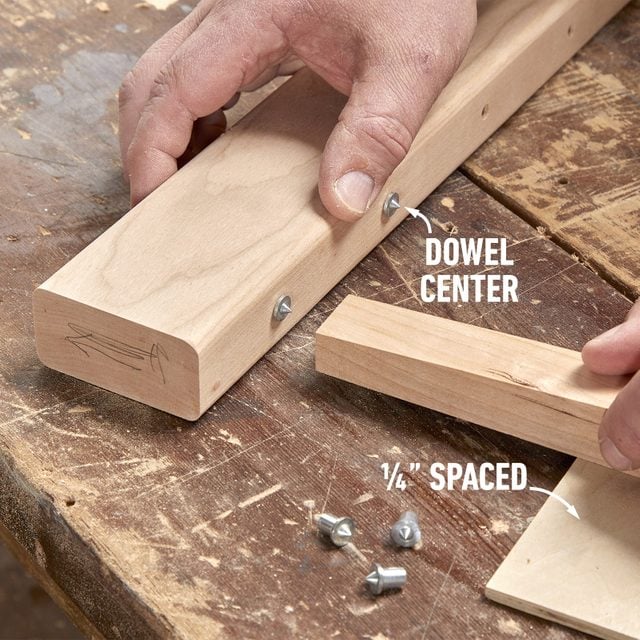
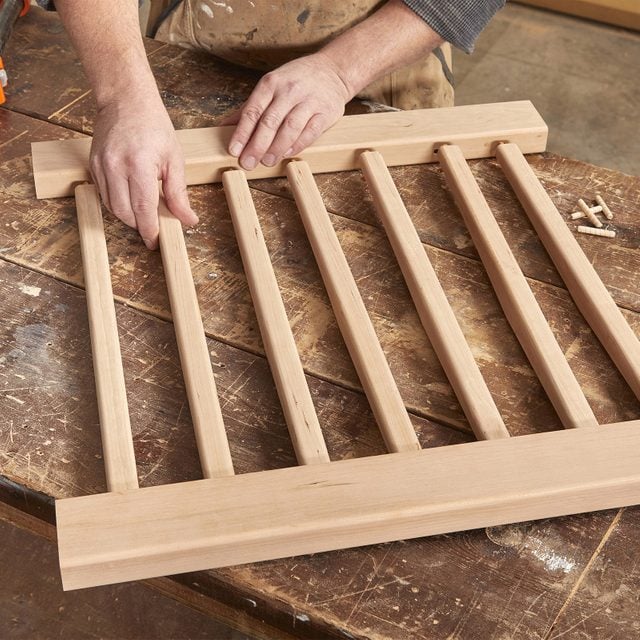
Assemble the Back
Use dowel centers and a 1/4-in. spacer to locate the dowel holes in the spindles (Photo 11A), then drill 1/4-in. dowel holes in the ends of the spindles. You can set up a vertical drilling jig on your drill press or just drill them freehand.
Glue all the spindles into the bottom stretcher, then add the top stretcher (Photo 11B). For a complex assembly like this with lots of joints, I use hide glue because it has a long open time.
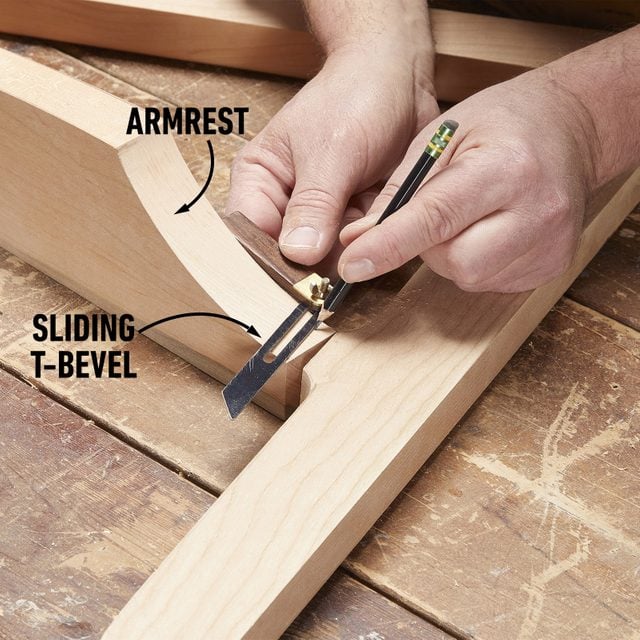
Cut the Armrest Joint
Lay the assembled side on your workbench and set the armrest in place. Copy the angle from the backrest joint area onto the end of the armrest using a sliding T-bevel. Cut the angle with a miter saw.
Shape the Armrests
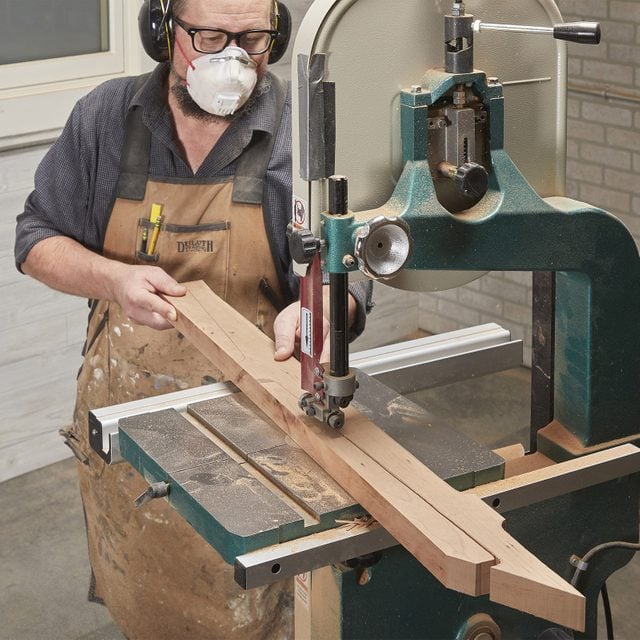
You’ve already cut their basic shape. Now the fun sculpting begins.
The armrests taper in thickness from back to front, as shown on the pattern. I used a band saw to cut this taper. If you don’t have one, you can cut the taper with a handsaw or just belt-sand it down. Don’t shape the backrest-armrest joint area.
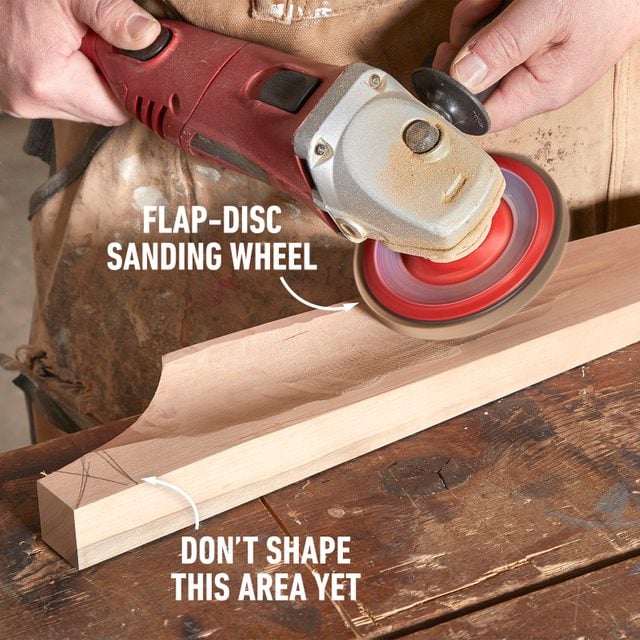
With the armrest set in place, trace the front armrest support on the underside of the armrest, so you know to stay away from that area, too. Now you can smooth the tapered armrest, round over the edges and call it good. Or you can “scoop” the top, as I did (Photo 13A), and give the underside a more gradual round-over (Photo 13B). Scoop the top with a flap-disc sanding wheel on a grinder.
Assemble the Danish Modern Chair
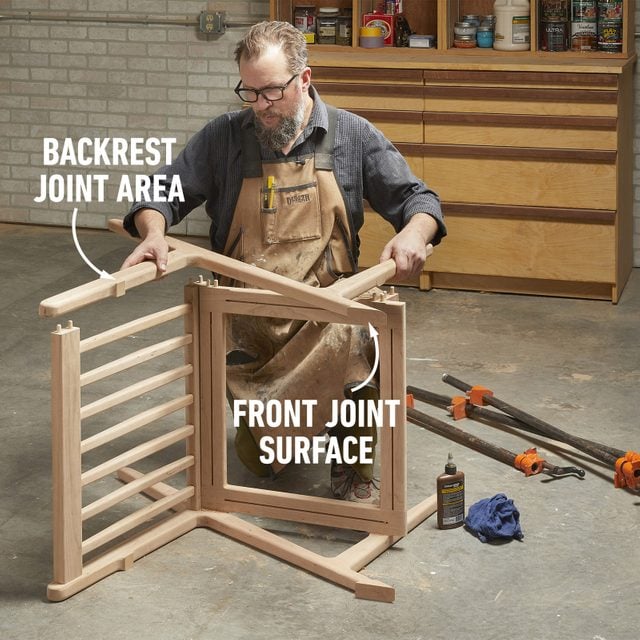
Dry-assemble the chair without dowels, using pipe clamps, and then mark each part’s location on its mating part. Mark and drill dowel holes in the seat frame and stretchers.
With the chair disassembled, set the drilled parts in place on the chair sides and mark the dowel locations with dowel centers. Drill the dowel holes in the chair frame. Apply glue to the dowels and the joint surface, and attach the back and seat frame to one side. Glue the dowels into the other ends of the seat frame and stretchers, and press the second side onto the dowels.
Again, use hide glue to give yourself extra time. Use pipe clamps to press the joints fully home.
Attach the Armrests
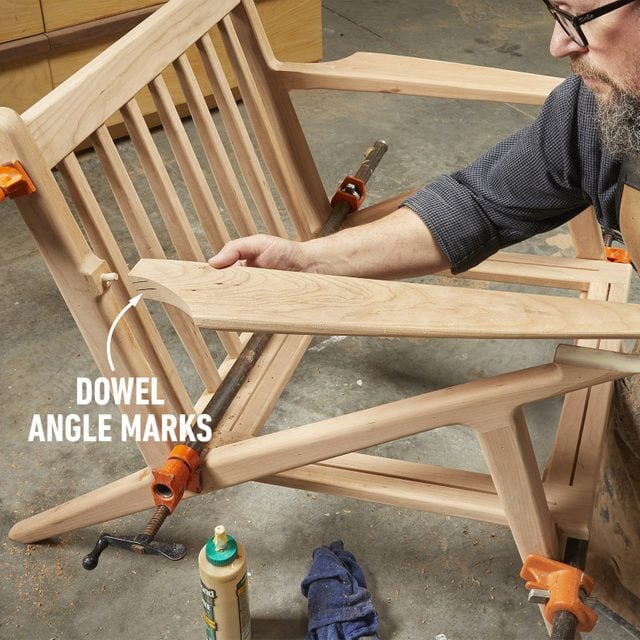
The back joint is a standard dowel joint. Drill the backrest first with a doweling jig, then mark the armrest with a dowel center. Next, put a dowel in the backrest hole, hold the armrest in position and trace the dowel’s angle on the edge of the armrest. That will give you a reference for drilling that hole freehand. I used one 3/8-in. dowel at these joints.
Glue the dowel and joint surface, as well as the front joint surface. Press the joints together. Use packing tape to hold the front of the armrest in place and let the glue dry.
Finish Shaping the Danish Modern Chair
Shape and refine all the joint transition areas. Use everything at your disposal: flap-disc sander, belt sander, rasps, files and/or sanding blocks.
Once the shaping passes the eye test, sand the whole chair and apply a finish of your choice. I sanded up to 800 grit and applied five coats of General Finishes Gel Topcoat. It’s easy to apply and you don’t have to worry about drips or sags. But it doesn’t build up as quickly, so you need to apply more coats than a brushed-on finish.
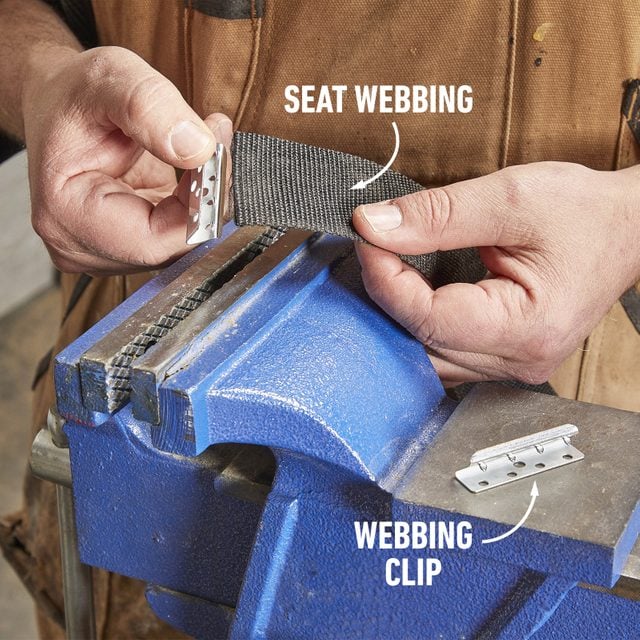
Prep Your Seat Webbing
Cut three pieces of webbing to go across the seat and three to go front to back. To find the right lengths, measure the distance between slots and add 13/16-in. Squeeze the webbing clips on the ends of all the webbing strips. You can do this in a vise, or with a Vise-Grips or similar pliers.
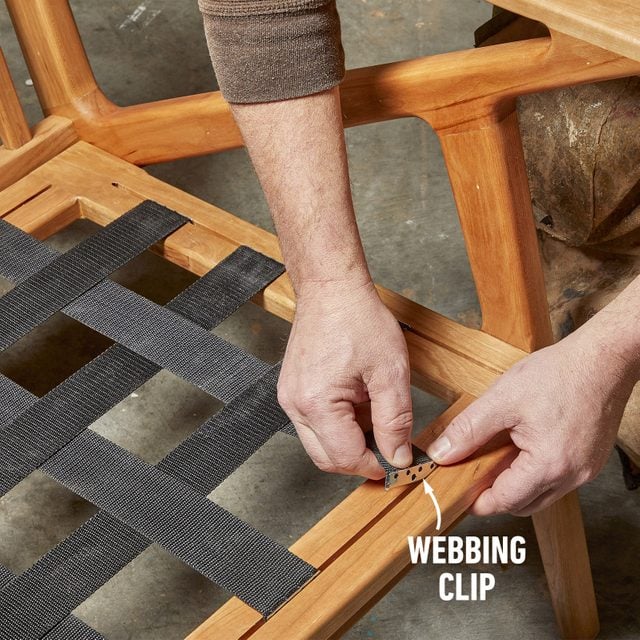
Install Danish Modern Chair Seat Webbing
Starting about two inches from the side frame, insert one clip for the first strip into the back frame member’s groove and the other clip into the front frame groove. Continue across the whole seat, evenly spacing the three strips. Next, add webbing across the seat by weaving the strips in between front-to-back webbing.
Want to restore an old wobbly chair? Here is how you can fix it.
Originally Published: February 02, 2022