
6 Deck Building Tips to Help You Perfect the Details

Updated: Oct. 17, 2023
When you're building a deck, the details matter.
Building a deck is one of the most popular DIY projects for everyone from seasoned pros to weekend warriors. Who doesn’t want the perfect spot to relax outside when the weather’s warm?
But there’s a lot of work that goes into it, from planning your deck to putting on the finishing touches. With decks, the devil’s in the details, as the old saying goes. You’ve got to be precise to make sure the joists are positioned correctly, the railings are spaced evenly and more.
Depending on what kind you’re building, you may or may not need deck stairs. We won’t get into the stairs here, but if you do need to add them, the same attention to detail will apply.
These six deck building tips will help you get everything dialed in just right when you’re building your deck.
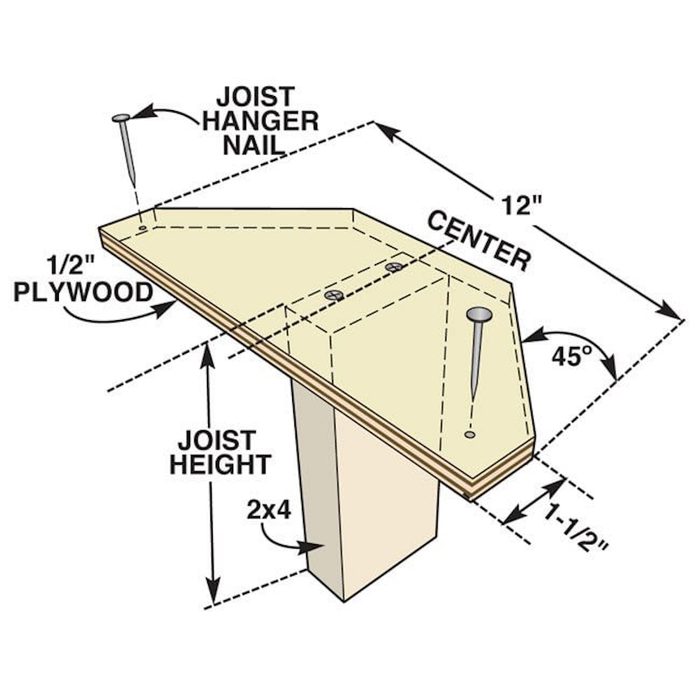
Simplify Deck Joist Hanging
The easiest method for running deck joists, especially when you’re working alone, is to attach joist hangers to the ledger board before installing your joists. The trick is to set them at the right height. Take a few minutes to tack together the jig shown here.
You can build the jig with a 5 x 12-in. piece of plywood and a scrap 2×4 cut to the width of your joists. Align the 2×4 to your layout line. Tack the plywood to the top of the ledger, making sure it’s tight. Place the joist hanger around the 2×4 and nail 16d galvanized nails through all the holes into the ledger board.
Cut the 2×4 to the average width of the joists (sometimes the joists will vary in width as much as 1/4 in.). Nail both sides of the hanger flanges to the ledger, leaving one side with about a 1/16-in. gap so a wet joist can slide into place. As you set your joists, chisel out a notch on the bottom if the joist sits too high or shim it if it’s too low.
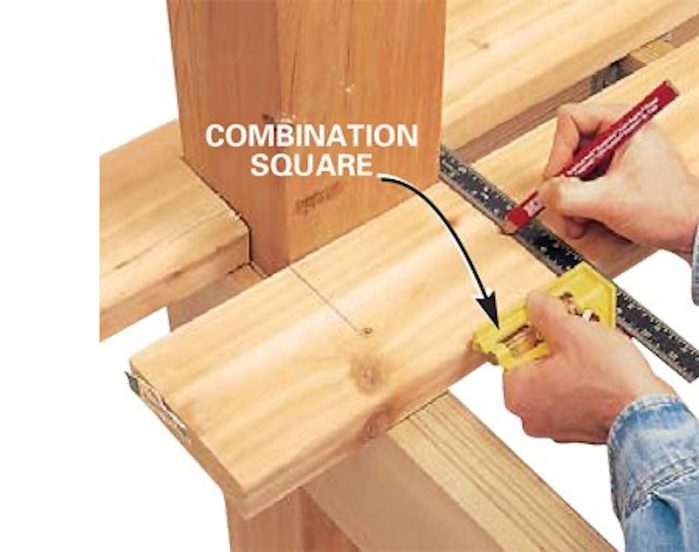
Cut Accurate Notches
The most accurate way to cut a board around a deck post is to hold the deck board tight against the post. Transfer the post location to the board with a combination square. Measure and mark the depth of the notch.
When measuring for the depth of the notch, check both sides of the post. Oftentimes there’s a twist in the post and the measurements aren’t equal. Cut out the notch with a jigsaw.
Space Deck Balusters with a Jig
Carpenters love to use jigs because they make work easier and faster. Here’s a simple jig that comes in handy for building sections of deck railing. It centers the baluster on 3-1/2 in. wide rails and sets the space between them typically 4 in. or less.
When you attach the balusters, always start in the center so the leftover space on each end is equal. Measure the total length in advance and either start with a baluster in the exact center or with an opening centered —whichever makes the space between the last baluster and the post come closest to your 4-in. maximum baluster opening.

Straighten Bowed Deck Boards
No matter how good your lumber supplier, a good share of your decking is sure to be bowed. Straightening bowed deck boards is a routine part of deck construction. Set the board, bow in, and nail one end. As you work your way down, drive a chisel into the joist and lever the board toward you. When the board is tight to your spacer, nail the board to the joist.
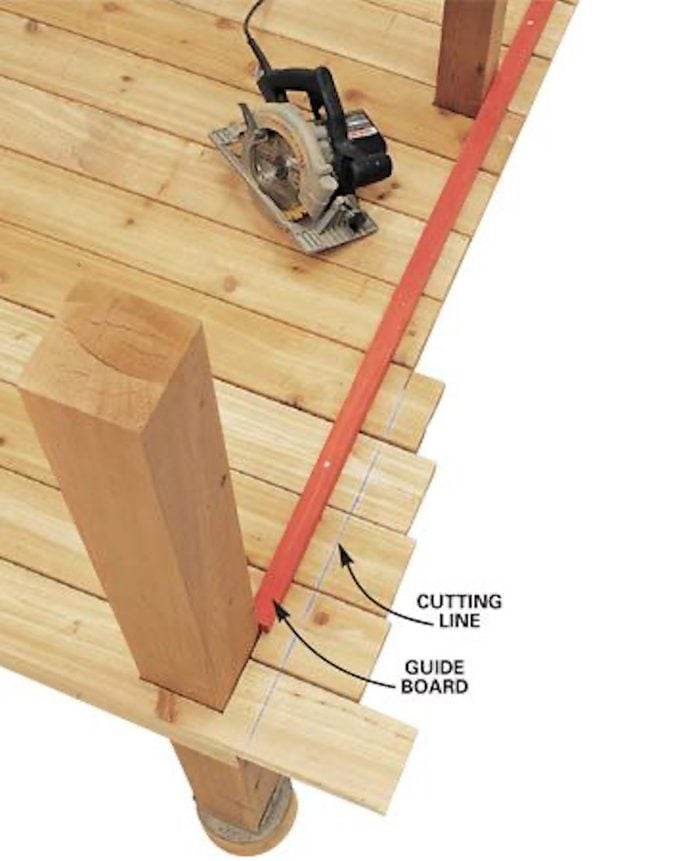
Trim Deck Boards Perfectly Straight
Beauty is in the details. Using a board to guide your saw as you trim your decking leaves an edge crisper than the steadiest hand can make.
Screw a straight board to the decking as a guide for your circular saw. Measure the distance from the edge of the saw blade to the base plate and position the board to allow about a 1-in. overhang for the decking. Run your saw along the edge, keeping the saw plate parallel to the decking and tight to the guide.
If you use a 2×2 like we did, sight down it from one end to make sure you get it perfectly straight. You’ll have to cut the last two boards off freehand. Mark the entire cut with a chalk line and keep your saw going in a straight, steady motion.
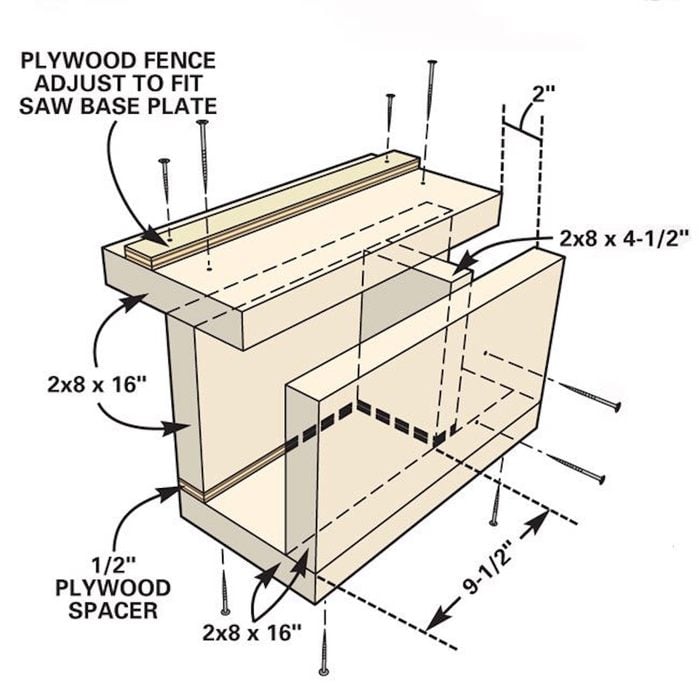
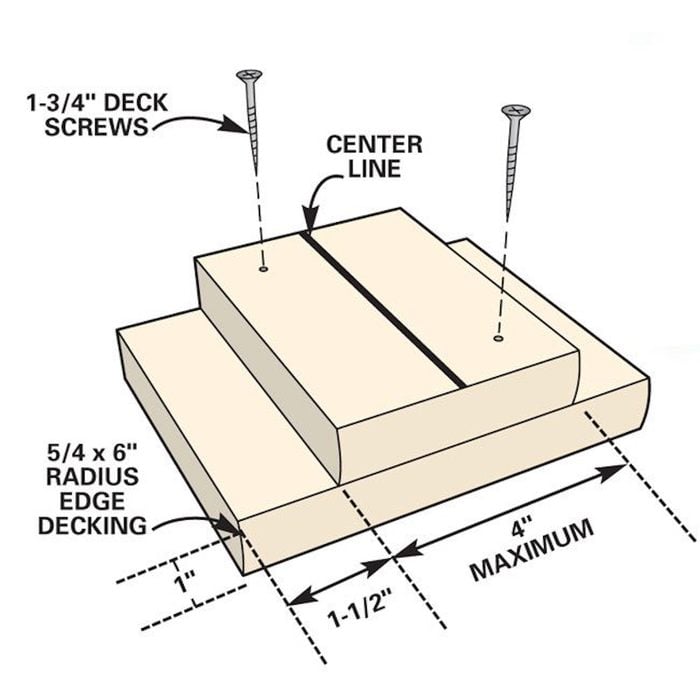
Craft a Beveled Post Cap
Placing a cap over your rail posts not only looks good as a decorative add-on for your deck, but it also protects the vulnerable end grain of the post from the weather. Caps for 6x6s usually must be special-ordered, but you can make your own from 2×10 material and save the wait and money.
This jig is made from 16-in. pieces of 2×8 framing and 1/2-in. plywood (see illustration). Setting the plywood guide on the jig to your circular saw requires some trial and error. Adjust it so the blade leaves a slight reveal on the top of the cap. Secure the cap to the posts with construction adhesive and 3-in. galvanized finish nails.
Originally Published: July 06, 2023