
Water Heater Installation
Updated: Mar. 11, 2022Replace it yourself and save hundreds of dollars!
- Time
- Complexity
- Cost
- A full day
- Intermediate
- $101–250
Overview
If you have some basic plumbing experience, you can replace a water heater yourself and save $200 to $400 in plumber’s fees. We’ll show you how to replace a conventional natural gas water heater. The procedure is the same for a propane heater. If you choose a “power vented” gas model, all the water and gas connections are the same as we show, but the venting steps are different. For more, search for “power-vented water heater” above. Replacing an electric water heater is a little easier. All the water connections are the same and you don’t have to deal with gas piping or venting. For details on situations different from the one we show here (such as electric models, plastic water lines or copper gas lines) search for “replace water heater” above.
Time, materials and money
If you have lots of plumbing experience, you might be able to complete this project in half a day. But we recommend you start in the morning so you have plenty of time to get the job done and not leave your family without hot water overnight. You’ll need a helper to carry the old unit out and the new one in. Check with your trash hauler or recycling center to find out how to dispose of the old heater.
Water Heater Cost
A new water heater will cost from $250 to $500, depending on the size, efficiency and warranty. The materials you’ll need for the installation depend on your situation and local codes.
Water Heater Installation Codes
Even if you’ve worked with plumbing and gas lines in the past, play it safe and contact your local department of inspections. Get a permit (if required), and go over your installation plans with an inspector.
Turn off the gas and water

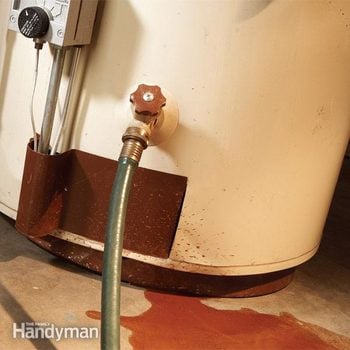
Photo 1: Shut off the gas
Shut off the gas by turning the handle a quarter turn. In the “off” position, the handle is perpendicular to the pipe.
To get started, turn off the gas at the valve near the water heater (Photo 1).
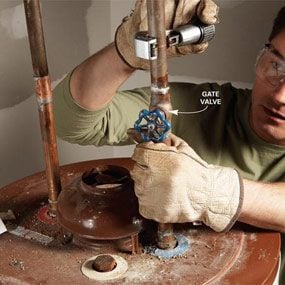
If the “isolation” valve above your water heater is a gate valve (Photo 3), we recommend that you replace it with a ball valve (Photo 4). Be sure to choose a “fullport valve.” Gate valves often leak or won’t close tightly. To replace the valve, you’ll have to shut off the water at the main valve (usually near the meter). That means your whole house will be without water until you install the new valve. If you already have a ball valve or if you choose to leave the old gate valve in place, you can simply shut it off. That way the rest of the house will have cold water while you work (toilets will still work!).
With the water and gas off, drain the water heater. Attach a garden hose to the drain valve at the bottom of the tank, route it to a floor drain and open the drain valve. To allow air into the hot water lines and speed up the draining process, go to the highest faucet in the house and turn on the hot side only (on single-handle faucets, push the lever all the way to the left).
Update Your Gas Valves
If your valve doesn’t look like this one, see “Old gas valves can leak.”
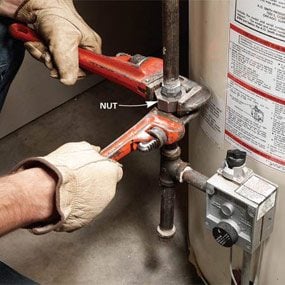
Disconnect the gas, vent and water lines
Disconnect the gas line at the union (Photo 2). Then disassemble the threaded “tee” and “drip leg” and remove the nipple from the water heater gas control valve. Don’t throw them away—you’ll need them for the new water heater. If your gas line is copper or a flexible supply line, just unscrew the nut.
To disassemble the vent piping, remove the sheet metal screws. Wear gloves; the ends of the metal piping are sharp. You can reuse the vent pipes if they’re in good shape. But if you find even slight holes, cracks or corrosion, toss them into the trash. New pipe is inexpensive and leaks can allow deadly carbon monoxide to build up in your home.
Next, cut the copper water lines with a tubing cutter (Photo 3). If you have copper corrugated water lines, simply disconnect the nuts at the water heater. If you have galvanized steel pipes, disconnect unions just as we did with the gas union shown in Photo 2. Also unscrew the blow tube from the temperature and pressure (T&P) valve. You may be able to reuse it on the new water heater.
At this point, the old heater should have drained enough so it can be moved off to the side (with a helper). If the heater isn’t draining fast enough, sediment may be clogging the valve. Allow it to drain as long as possible and then move the heater outside so you can remove the drain valve from the tank.
Reconnect the water
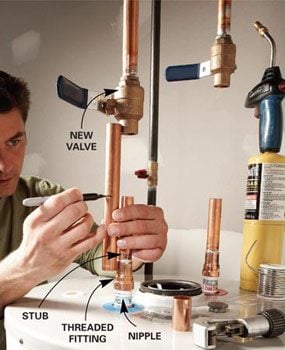
Set the drain pan into place with the opening facing the floor drain. Get someone to help you lift and set the heater in the pan. If you’re replacing the isolation valve, solder on the new ball valve next.
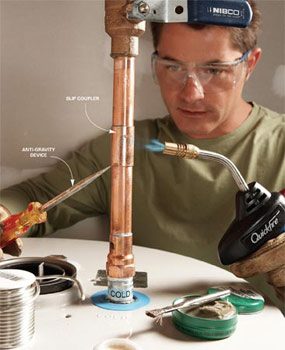
Screw dielectric nipples into the new water heater. These plastic-lined nipples reduce corrosion and increase water heater life. Some water heaters come with dielectric nipples already installed (buy a set if yours doesn’t have them). Be sure to coat the threads with pipe thread sealant or wrap with Teflon tape. Next, solder female threaded copper pipe fittings to short lengths of copper tubing and set them aside to cool. Tighten the cooled fittings onto the nipples. Then add short sections of pipe below the valves (Photo 4) and make the final connections with “slip” couplers (Photo 5). You must use slip couplers—standard “stopped” couplers won’t work. For tips on soldering copper pipe, search for “solder” above.
Thread a “blow tube” onto the T&P valve. If the old blow tube is too short, you can use 3/4-in. galvanized steel pipe or copper pipe (along with a male threaded fitting). If you use galvanized pipe, cut off the threads on the bottom to prevent someone from capping off the blow tube if the T&P valve leaks.
Install the new vent
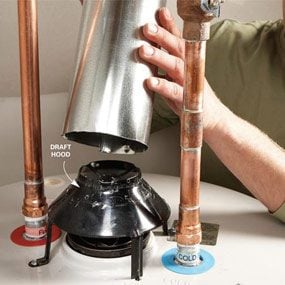
Snap the new draft hood onto the water heater and secure it with sheet metal screws. Check the installation manual for the recommended diameter vent pipe for your new heater. If the recommended vent pipe diameter is larger than the vent hood opening, don’t install a reducer. Measure a straight section of new galvanized vent pipe to rise as high as possible before you install the adjustable elbow (the higher the rise, the better the draft). On any horizontal sections of vent, make sure the pipe slopes down toward the water heater 1/4 in. per foot of pipe. Bend out small sections of the pipe and attach it directly to the vent hood with screws (Photo 6). Then continue installing new vent pipe sections and connect to the flue. Most plumbing codes require a minimum of three screws for each vent pipe joint. For tips on cutting metal venting, search “sheet metal” above.
Hook up the gas
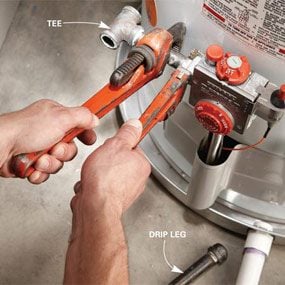
Photo 7: Reconnect the gas
Reconnect the gas. Hold back the control valve to avoid damaging it. Then screw the drip leg into the tee.
Apply gas-rated pipe thread sealant or tape (don’t use standard white Teflon tape) to the gas nipple and thread it into the new gas control valve. Tighten the nipple using two pipe wrenches (Photo 7). Assemble the tee and drip leg using the same two-wrench technique.
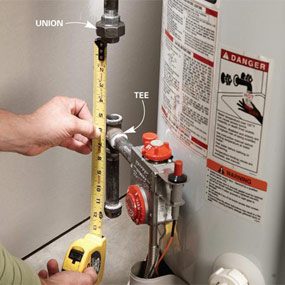
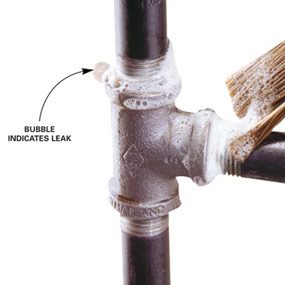
If the old section of pipe below the union no longer fits, you’ll need to measure for a new nipple (Photo 8). Make sure you assemble and tighten the gas union before you measure the length for the intermediate nipple. Add 3/4 in. to 1 in. to this measurement and buy a new nipple. When the gas connections are complete, turn on the gas and check for leaks (Photo 9). You can buy leak detector in a convenient spray bottle ($3) or mix your own solution (one part dish detergent, two parts water).
Open the water valves and an upstairs faucet and fill the tank. Leave the faucet open until water flows out. Then shut it off and check the new water connections for leaks. Open the gas valve and light the pilot light following the manufacturer’s instructions. You’re in for a pleasant surprise with your new water heater—manufacturers have done away with the old “match-lit” pilot system. Instead of igniting the pilot with a match or lighter, you just push a button.
When the burner fires up, test for “backdrafting,” which can allow deadly carbon monoxide into your home. Close all doors and windows and turn on kitchen and bath exhaust fans. When the burner has been running for at least one minute, move an incense stick around the draft hood. The smoke should be drawn up into the vent. If not, the exhaust may be entering your home. Turn off the gas and call in a professional plumber.
Finally, set the thermostat to a safe temperature. (For help, search for “water heater temperature” above.) In about two hours, you’ll have enough hot water for a well-deserved long shower.
Old Gas Valves Can Leak
The “grease-pack” valves found in older homes tend to leak as they age. Even if your local code doesn’t require replacement, we recommend you install a ball-type gas valve instead ($10). Replacement isn’t difficult; you just unscrew the old valve and screw on the new one. But you will have to turn off the main gas valve and later relight pilot lights. If you don’t know how to handle these tasks, call in a professional plumber and expect to pay $80 to $150.
Local Code Requirements
You’ll find lots of accessories for your new water heater at the home center. Some are required by local codes; others are just good ideas. Plumbing codes vary, so check with your local inspector.
1. Gas shutoff valve
All codes require a gas valve near the water heater. If you have a “grease-pack” valve, see ‘Old Gas Valves Can Leak’ section above.
2. Earthquake straps
These straps prevent a water heater from tipping over and are required in earthquake-prone areas. $12 per pair.
3. Flexible gas line
A flexible gas line can withstand movement and is usually required in earthquake-prone areas. They’re easier to connect than steel pipe, but they’re not allowed everywhere, so check with your inspector. $15.
4. Drip leg
Any dust or grit in the gas line falls into this short section of pipe before it can reach the water heater’s control valve. The required length of the drip leg varies.
5. Isolation valve
All codes require a valve on the cold water line. Though not required by codes, a second valve on the hot line makes future water heater replacement easier. $10 each.
6. Flexible water lines
These flexible lines withstand movement and are required in earthquake zones. But you may want to use them just because they’re easy to install. $20 per pair.
7. Overflow pan
Most plumbing codes require a pan and drain pipe in locations where a leak can cause damage. But installing a drain pan is a good idea for any location. $18.
8. Expansion tank
Some codes require an expansion tank to absorb the pressure created when heated water expands. $35.
9. Blow tube
The T&P valve releases pressure, and a “blow tube” directs the scalding hot water toward the floor. The required distance between the blow tube and floor is usually 18 in. or less.
Water Heater Bonding
New Jersey building codes require a bonding wire be installed between the cold/hot pipes and the gas line. The majority of local codes don’t require the bonding wires but they do serve a purpose. According to the experts we spoke with, bonding wires may actually extend the life of the water heater by diverting electrolysis from the anode rod and tank—even on electric models. So whether or not your local code calls for the bonding wire, you may want to install one to get more life out of your water heater. This little project is brain-dead simple. It only costs about $10 and takes about 10 minutes.
Required Tools for this Project
Have the necessary tools for this DIY project lined up before you start—you’ll save time and frustration.
- 4-in-1 screwdriver
- Adjustable wrench
- Nippers
- Pipe wrench
- Pliers
- Plumbers tape
- Safety glasses
- Slip joint pliers
- Soldering torch
- Tape measure
- Tube cutter
Required Materials for this Project
Avoid last-minute shopping trips by having all your materials ready ahead of time. Here’s a list.
- Gas-rated pipe thread sealant or tape
- Solder and flux
