How to Connect Gas Pipe Lines
Updated: Apr. 26, 2023
Use the correct fittings for a safe gas hook-up
Introduction
Make gas line connections from steel or copper pipes to ranges and clothes dryers safe and secure by using the proper fittings and connections.Tools Required
- Adjustable wrench
- Pipe wrench
Materials Required
- Fittings
- Pipe joint compound
Gas connections for your oven or dryer are really pretty simple — it’s mostly a matter of screwing stuff together. But knowing which fittings to use where can be tricky, and using the wrong ones can lead to a dangerous leak. This article will show you how to safely connect a gas dryer hookup or gas range.
Kits containing a flexible stainless steel gas line and fittings are available at home centers and hardware stores. The kits usually have everything you’ll need, but in some cases, you may have to buy a few more fittings. But before you start, check with your local building inspections department to see if you’re allowed to do your own gas dryer hookup.
We’ll show you three common gas piping scenarios. We’ll show you one way to make each connection, but there are other equally legitimate ways using common plumbing parts. Don’t be confused by the labels FIP and MIP; they simply stand for female pipe threads and male pipe threads, respectively. And when you buy the parts, don’t hesitate to ask for help. Then screw all the gas line parts together to make sure they fit.
Project step-by-step (3)
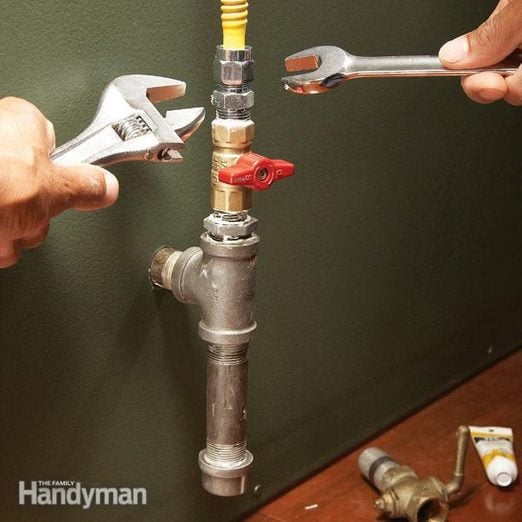
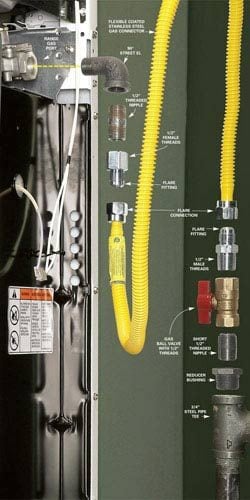
Situation 1: Make Connections to Steel Gas Pipe
- If your old appliance is connected with a steel gas pipe and you’re installing a new appliance, buy a gas appliance connecting kit.
- Replace the steel gas pipe with the flexible gas supply lines stainless steel tube.
- Pro tip: You can’t connect the flare fitting on the flexible gas line supply directly to a steel pipe thread. You have to install the flare fitting that’s included with the kit.
- Coat all threaded pipe connections with pipe thread compound before assembly.
- If necessary, use a bushing to reduce the existing 3/4-inch female pipe thread to 1/2 inch.
- Use a 90-degree elbow at the stove to avoid kinking the gas tubing when you push the stove against the wall.
- Before you replace an old valve, find and turn off the main gas valve to the house.
- Note: The main gas valve is usually located near where the gas line enters the house.
- Replace old-style gas valves (second photo below) with modern ball valves that are labeled for use with gas.
- Turn the gas back on when you’re done.
- Remember to check all your gas appliances to see if they have pilot lights that need relighting.

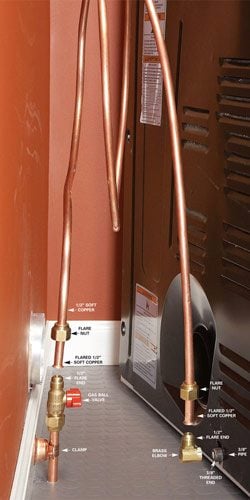
Situation 2: Connections to Soft Copper
Connections for flexible “soft” copper are made by flaring the end of the soft copper tubing with a special flaring tool and installing flare fittings that have a matching cone-shaped meeting surface. Common sizes of flare fittings are 3/8 inch, 1/2 inch, and 5/8 inch.
- Match flare fittings to the outside diameter of the soft copper you’re connecting to.
- Note: The photo below shows a soft copper line that’s kinked and should be replaced. There are two options:
- Cut a new length of coiled soft copper, flare the ends and connect it with flare fitting.
- Or replace the damaged tubing with a flexible stainless connector as shown here.
- If the flare fitting on the flexible stainless gas line matches the size of the flare fitting on the existing gas valve, you can simply screw it on.
- If the fittings don’t match, one solution is to replace the valve with one that has a flare fitting on one side and a 1/2-inch female pipe thread on the other side.
- Use the adapter included with your hookup kit to connect the flexible gas line.
- On the stove end, use another flare-to-pipe-thread fitting.
- Pro tip: Remember to apply pipe thread compound or gas-rated Teflon tape to the threads on threaded connections before assembling them. Flare joints rely on a tight fit to seal and don’t require additional sealant.


Reuse a Soft Copper Coil
It’s common for appliances to be connected with a coil of soft copper like the one shown here. The ends of the copper tubing will be flared like the end of a trumpet. A leak-proof joint is formed by the perfect fit between the flared end of the tube and the cone-shaped fitting. If the soft copper tubing isn’t kinked or damaged, you can reuse it to connect your new appliance.
- For this dryer connection, we purchased a brass elbow with a 1/2-inch flare fitting on one side to match the 1/2-inch flare on the copper tubing, and a 3/8-inch female iron thread fitting on the other to match the 3/8-inch pipe exiting the back of the dryer.
- Note: Your tubing may be a different size and your appliance may have different threads. Buy fittings to match.
- Coat threads with pipe thread compound or gas-rated Teflon tape before assembling.
- Align the copper tubing so the flare fits perfectly before threading on the flare nut.
- Tighten the nut with an adjustable or open-end wrench.
- Turn the gas back on and swab each joint with a solution of 2 tsp. dishwashing liquid to 1 cup water or with a commercially prepared leak testing solution.
- Coat each connection and watch for bubbles to form.
- If you see a bubble, turn off the gas and try tightening the leaky connection.
- If this doesn’t work, take it apart. Inspect flare connections for debris or damage.
- Fix leaky threaded connections by reapplying pipe joint compound or gas-rated Teflon tape and reassembling the fitting.