How to Install a Paver Patio Base
Updated: May 31, 2023
Let plastic paver patio base panels take the place of the gravel base to eliminate tons of labor.
Introduction
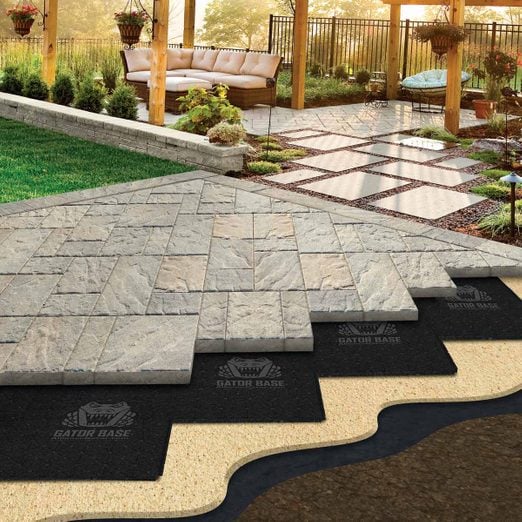
A traditional base for a paver or stone patio is a 6-inch-deep layer of compacted gravel. For a typical 10 x 12-foot patio, that means carting away about 2-1/2 tons of soil, and hauling in the same amount of gravel. But there’s an easier way. Let plastic panels take the place of the gravel base. For that same patio, you would need only 24 paver base panels weighing a total of about 30 pounds to replace the 2-1/2 tons of gravel.Paver patio base panels are made from lightweight high-density polypropylene. The panels typically have tongue-and-groove or shiplap edges to keep the panel edges flush with one another. You may wonder how a thin plastic mat can effectively replace a 6-in.-deep layer of compacted gravel. The answer is that the panels spread out the load, so the weight of a person walking on the patio is distributed more widely. Distributing the load puts less pressure on the soil and prevents the paver bricks from becoming uneven.
The panels have the added advantage of providing an insulating layer that reduces problems caused by soil that thaws and refreezes. And finally, paver patio base panels have built-in channels and holes to drain water to the sand layer below. Studies from independent engineers have concluded that the panels are equivalent to a compacted gravel base for load distribution and superior for thermal resistance.
Benefits of a Paver Patio Base:
- Requires less digging
- Eliminates heavy gravel fill
- Saves time
- Reduces the cost of digging and hauling
- Prevents damage to the landscaping caused by excavating equipment
- Allows patio installations in fenced areas or areas with limited access
- Protects the screeded sand while you’re installing pavers
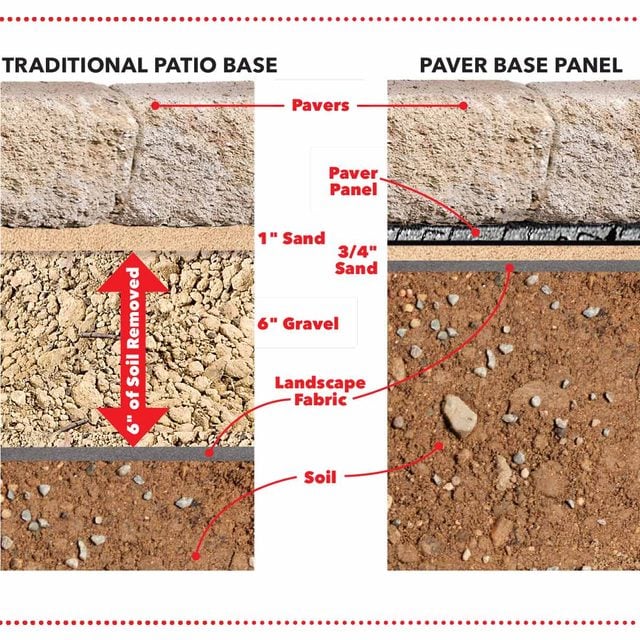
Traditional Patio Base vs. Paver Base Panels:
Project step-by-step (7)
Plan the Paver Area
- Plan the size and mark out the area with paint, a garden hose or string.
- Measure the width and length and figure out how much material you’ll need.
- Divide the square footage of your patio by the square-foot coverage of each panel to determine the number of panels you’ll need. Add about 20 percent if your patio is an irregular shape.
- Pro tip: Plan to build the patio base 1 foot wider and longer than the size of the finished patio so that it will extend 6 inches beyond the paving on all sides.
Excavate the Patio Paver Area
- Remove grass or other vegetation and skim off 2 to 4 inches of soil.
- Pro tip: You can speed up sod removal by renting a sod cutter.
- Pro tip: You also must remove soil evenly and leave a flat surface, as there’s no thick layer of gravel to make up for uneven ground. After digging and grading, there shouldn’t be more than about 1/2-inch variation in flatness over the area.
- Use a plate compactor to tamp down the soil.

Roll Out Landscape Fabric
- Add a layer of landscape fabric over the tamped soil.
- Note: The purpose of the landscape fabric is to prevent the sand from mixing in with the soil. But it’s important to use a non-woven fabric, as woven landscape fabric isn’t very permeable and can trap water under your patio. Look for fabric with at least a 20-year life span.

Add the Sand Bed
- Spread out a layer of sand that’s an average depth of 3/4 inches.
- Screed the sand layer to provide a flat, properly sloped surface for the paver patio base panels.
- Pro tip: Buy all-purpose or fill sand, not sandbox sand. It’s too fine. If you’re buying bags of sand, figure about one 50-lb. bag for every 8 square feet of patio.

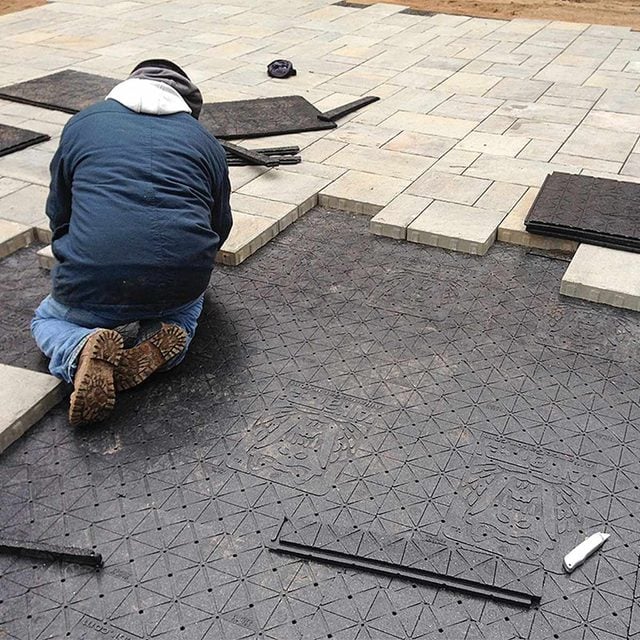
Lay Paver Mat Panels on Leveled Sand
- Lay the paver base panels over the sand bed, staggering them to avoid continuous seams.
- Pro tip: If you’re planning to lay stones that vary in thickness, you’ll have to put a layer of sand over the panels to allow leveling of the stones.

Install Paver Edging
- Attach paver edging to the paver mats.

Install the Pavers
- Install the pavers as you would over a conventional gravel base.
- Note: An advantage of this system is that the screeded sand is protected by the panels, so you’re unlikely to mess it up as you work.