
Patio Tiles: How to Build a Patio With Ceramic Tile
Updated: Jul. 03, 2023Make patio tiles stand up to Mother Nature with these installation and care tips.

Thanks to modern materials, tile is now a durable and long-lasting option for exterior concrete patios–even in cold climates. Here's what you need to know.
- Time
- Complexity
- Cost
- Multiple Days
- Intermediate
- Varies
Tiling outdoors
For about 6,000 years, builders have been using ceramic tile outdoors—on buildings, walkways, even streets. Not only does tile offer a range of colors and designs unmatched by any other material, it’s also amazingly tough. In places like Italy and Mexico, you can find exterior tile in good condition, despite centuries of wear and tear.
You won’t find much ancient tile outdoors in cooler climates, though. Tile can take generations of foot traffic, but water that freezes or expands in or under tiles can turn a gorgeous patio into a crumbling mess.
That’s why tile hasn’t been used widely outdoors in cold climates: It was just too risky. Over the last several decades, however—as tile setting and materials have improved—that risk has diminished.
This article will explain how to choose and use the latest materials to lay patio tiles outside in regions that experience subfreezing temperatures. Because we’ll focus specifically on what you need to know for a successful exterior project, we won’t cover all the basic techniques of tile setting. So unless you’ve already done some tile setting, we strongly recommend some more reading before you tackle this job. Tips for Installing Tile and Modern Tile Installation Tips are good places to start.
Six keys to successful outdoor tile setting
- Use high-quality materials only. Expensive patio tiles won’t necessarily outlast moderately priced tile, but with thin-set, grout, sealer and caulk, you get what you pay for.
- Follow the manufacturer’s instructions. Even the best setting materials won’t perform as promised unless you mix and use them as instructed.
- Apply tile only to a stable, well-drained slab. A slab with places for puddles or ever-growing cracks is no place for tile.
- Allow the tile to expand and contract without cracking by placing expansion joints no more than 16 ft. apart and anywhere the tile meets a vertical surface like steps or the house’s foundation.
- Don’t give water places to enter or hide. That means densely packed and sealed grout joints, caulked expansion joints and no empty pockets in the thin-set.
- Don’t delay maintenance. If grout cracks or a tile comes loose, replace it before a small problem becomes a big one.
Only the best materials: Outdoor tile ideas

Photo 1: Level the slab
Screed floor leveler over low areas using a 2×4. Check the entire slab for low spots by laying a straight 10-ft. 2×4 on edge; any areas where the gap between the slab and the 2×4 is wider than 1/8 in. must be filled.
Important: Nothing should cover isolation joints or fill expansion joints except caulk. If you get floor leveler or isolation membrane in the joint, scrape it off with a putty knife after it hardens. Here are the best patio flooring ideas.
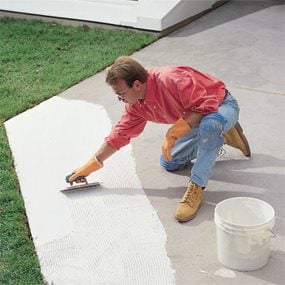
Photo 2: Apply crack isolation membrane
Comb the isolation membrane material over the slab with the notched edge of the trowel and then flatten it out with the trowel’s straight edge. When combing, hold the trowel consistently at about a 45-degree angle. That way, the notches will evenly distribute the pasty material, giving you a flat, consistent membrane.

Photo 3: Set the patio tiles in thin-set mortar
Squish patio tiles into thin-set mortar adhesive applied with a 3/4-in. U-notch (rounded-notch) trowel. Twist the tiles back and forth slightly as you force them down. Your goal is complete coverage—that is, the space between the tiles and the membrane below should be completely filled with thin-set (no cavities to hold water and cause trouble). To allow enough space for grout, remove thin-set that wells up between the tiles or into expansion joints with a pencil or screwdriver. Clean thin-set off the surface of tiles with a damp sponge.

Photo 4: Grout the tiles
Push the grout diagonally across the tiles, holding the grout float at a 45-degree angle. Use a hard rubber float, not one with soft foam backing. To pack the joints densely, work the grout back and forth in all four directions. Then hold the float at nearly 90 degrees to the tile surface and scrape excess grout off the tile. Remove grout residue with a damp (not dripping-wet) sponge, rinsing it frequently.
Some home centers carry everything you’ll need for this project. But for the best materials and advice, visit a few tile specialty stores, preferably pro-level suppliers.
The tile you choose must be made from dense material—porous tiles will absorb water and crumble as that water freezes. The tile you buy may be called “frost-free,” “vitreous,” “impervious” or “freeze-thaw stable,” but whatever the label, make sure it’s warranted by the manufacturer to withstand freezing.
Chances are, you’ll need floor leveler, a powder that you mix with water and spread over low spots in the slab (Photo 1). Sometimes called SLC (self-leveling compound), floor leveler is sold under a variety of brand names; just be sure the one you buy is recommended for outdoor use.
An isolation membrane is an elastic barrier that separates the tile from the slab. That way, when the slab cracks—as all slabs eventually do—the tiles can “float” above the cracks without cracking themselves. This protection is limited, of course: Cracks that widen 1/8 in. or so will likely “telegraph” into the tiles above. Isolation membranes are available as sheets of rubbery fabric that get sandwiched between two layers of thin-set, or as pasty trowel-on mixtures, which are easier to apply (Photo 2).
Latex additives are what make today’s thin–set mortar adhesives (Photo 3) so much better than their predecessors. “Modified” materials—as in “latex modified” or “polymer modified”are less likely to absorb water and more elastic, so they can better withstand movement caused by temperature change or by pockets of ice under the tile. Still, all modified thin-sets are not the same; use one that meets all specifications for outdoor use (the label includes this information).
The same goes for sanded grout (Photo 4); look for an exterior-grade grout. Ask the tile store for recommendations if you’re not sure. (The grout may require mixing with a latex liquid instead of water.)
Silicone grout sealer penetrates the grout, making it more resistant to both staining and water absorption.
Choosing the best caulk, for filling expansion joints, is sometimes a compromise between durability and appearance. Urethane caulk, which holds up to foot traffic best, may not be available in a color that matches your grout. Siliconized latex and acrylic latex are often available in more colors and in sanded versions to match the texture of the grout.
A sound old slab
An existing concrete patio or walkway can be tiled as long as water drains off it and any cracks in it are stable and level (one side of the crack shouldn’t be higher than the other). Cracks normally widen and narrow slightly with the seasons, but if they’re getting wider year by year, don’t tile over them.
If the concrete has sunk to the level of the surrounding soil, you’ll have to do some grading. Water must not pool on the tiles. So the slab’s surface has to be made flat (Photo 1).
To prepare an existing slab, scrub it clean with a stiff broom and water. Remove any oil or grease stains with a degreaser. If the concrete has a smooth-troweled surface, rent a pressure washer with at least 4,000 psi to clean the slab and roughen its surface. Muriatic acid will also clean and roughen concrete. Finally, fill cracks with caulk (one that’s intended for use on masonry) and holes with vinyl or latex patching compound (available at home centers).
A perfect new slab
Pouring a concrete slab is a major project in itself and we won’t explain how to do it here. Whether you do it yourself or hire a contractor, here are the requirements for a lasting, tile-ready slab:
- Patio slabs are typically 3-1/2 in. thick and reinforced with steel mesh (if anything). But because strength and crack resistance are so important for this project, we recommend a slab 5 to 6 in. thick, reinforced with a 2-ft. x 2-ft. grid of 1/2-in. rebar.
- For good surface drainage, the slab should slope 1/4 in. per running foot. A 16-ft. long slab, for example, would be 4 in. lower on one end than the other.
- Place isolation or control joints in the slab where they’ll coincide with expansion joints in the tile (more on that below).
- If you hire a contractor to pour the slab, make sure curing compounds aren’t used. Curing compounds increase the strength of concrete by slowing the curing process, but they also prevent tile-setting materials from bonding well to the slab.
- The slab should have a broomed finish, not a smooth-troweled surface.
- Concrete shrinks and gains strength for weeks after it’s poured. So wait at least four weeks before setting tile on a new slab. And any concrete, new or old, should stay dry for at least three days before you begin tile work.
Figure A: Exterior ceramic tile details
A new slab should have at least 6-in. of compacted fill and a minimum 5-in. of concrete with rebar, with expansion joints.
Expansion joints

Photo 5: Seal expansion joints
Seal expansion joints with caulk after cleaning them out well (vacuuming them is a quick, thorough method). To make a neat joint, mask the tile along both sides and smooth the caulk with a rounded putty knife. You can round the blade of a plastic putty knife using a utility knife and sandpaper.
Whether you’re setting tile on an old or new slab, you must include expansion joints (Fig. A and Photo 5). An expansion joint is a strip of flexible material—in this case, caulk—that lets tile expand and contract with changes in temperature. Here’s where to put expansion joints:
- Anywhere tile meets a vertical surface like steps or the foundation of your house.
- Over any isolation or control joints in the concrete. Isolation joints are strips of compressible material (isolation strip) in the slab. Control joints are shallow grooves in the concrete.
- Your patio must have expansion joints at least every 16 ft. (measuring in both directions). For example: A 16 x 16-ft. patio would need expansion joints only along steps or a foundation. A 16 x 20-ft. patio would need one dividing the 20-ft. length. The patio shown here (about 20 x 20 ft.) needed two intersecting joints.
Typically, expansion joints placed 12 ft. apart or less must be at least 3/8 in. wide; joints 12 to 16 ft. apart, 1/2 in. wide. But if you live, say, on the Canadian Prairie, where summer highs and winter lows can differ by more than 100 degrees, add 1/8 in. of width to your expansion joints. NOTE: Also widen expansion joints (or space them closer together) if you plan to use dark-colored tile, which becomes hotter when exposed to sunlight.
Layout and design pointers

Layout planning—determining in detail how to position the tiles—is one of the most important (and neglected) parts of any tile project. It’s a good idea to use graph paper to design and redesign the layout. Here are a few things that make planning for exterior tile different from most interior jobs:
- Even if the caulk you use to cover the expansion joints closely matches the grout, the expansion joints will be noticeable—in part, because they’re usually wider than grout joints. This isn’t a problem unless the joint interferes with a symmetrical pattern. Often, the solution to this problem is to create a “dummy” expansion joint to restore symmetry. Just leave a space as wide as a true expansion joint between the tiles and fill it with caulk.
- If you’re pouring a new slab, choose the tiles and layout first. That way, you can size the slab to eliminate (or at least minimize) cutting tiles and place expansion joints where they’ll work with, rather than against, your design.
- If glass doors or large windows will overlook the patio, it will be more like an extension of your home’s interior than an entirely separate space. So as you design your patio, be sure to keep adjacent rooms and colors in mind.
- Try to choose tiles that are available in a ”bullnosed“ version. The rounded edges will nicely finish off the edges of your patio.
Required Tools for this how to build a patio with ceramic tile Project
Have the necessary tools for this DIY how to build a patio with ceramic tile project lined up before you start—you’ll save time and frustration.
- Bucket
- Caulk gun
- Chalk line
- Framing square
- Grout float
- Knee pads
- Level
- Notched trowel
- Notched trowel - U-notched trowel
- Shop vacuum
- Tape measure
Required Materials for this how to build a patio with ceramic tileProject
Avoid last-minute shopping trips by having all your materials ready ahead of time. Here’s a list.
- Ceramic tile
- Crack isolation membrane
- Exterior caulk
- Exterior-grade grout
- Exterior-grade thinset mortar
- Floor leveler
- Gloves
- Tile Sealer
- Tile spacers
- Tiling sponge
